
SQL Server Management Studio (SSMS) is a powerful and widely-used tool for interacting with SQL Server, Azure SQL Database, and related Microsoft data platforms. For database administrators and developers, SSMS is often an indispensable part of their workflow, offering a comprehensive suite of features for database management, querying, and administration. However, SSMS is natively a Windows application, which presents a challenge for those working within the macOS ecosystem.
If you’re a Mac user needing to manage SQL Server databases, you might be wondering, “Can I use SQL Server Management Studio on my Mac?”. The direct answer is no, SSMS doesn’t have a macOS version. But don’t worry, there are effective solutions! This guide will walk you through how to leverage readily available tools to access and manage your SQL Server instances directly from your macOS machine, focusing on a robust and efficient method using Docker and Azure Data Studio.
Understanding SQL Server Management Studio (SSMS)
SQL Server Management Studio is more than just a query editor. It’s a complete integrated environment designed to manage every aspect of your SQL infrastructure.
What is SSMS?
SSMS provides a graphical interface to:
- Administer SQL Server: Manage server settings, security, replication, and more.
- Design Databases: Create and modify database schemas, tables, views, stored procedures, and other database objects.
- Query and Analyze Data: Write and execute T-SQL queries, analyze query performance, and visualize data.
- Configure Azure SQL Services: Manage Azure SQL Database, Azure SQL Managed Instance, and Azure Synapse Analytics.
Why is SSMS Important?
SSMS streamlines database management tasks, offering a centralized platform for developers and administrators to interact with SQL Server. Its rich feature set and user-friendly interface significantly enhance productivity when working with SQL Server environments.
The Challenge: SSMS and macOS
The primary challenge is SSMS’s exclusive compatibility with Windows. There isn’t a native macOS installation package for SSMS, meaning direct installation on macOS is not possible.
The Solution: Docker and Azure Data Studio
Fortunately, technology provides excellent workarounds. We can successfully use SQL Server on a Mac by combining two powerful tools:
- Docker: Docker allows us to run applications in containers, essentially virtualized environments. We can run a SQL Server instance within a Docker container on macOS.
- Azure Data Studio: Microsoft provides Azure Data Studio, a cross-platform database tool compatible with macOS, Windows, and Linux. While not a direct replacement for all SSMS features, Azure Data Studio offers robust query editing, data visualization, and database management capabilities, and integrates seamlessly with SQL Server running in Docker.
This guide will focus on using Docker to run SQL Server and Azure Data Studio as your macOS-compatible interface, effectively bringing SQL Server management capabilities to your Mac.
Prerequisites: Getting Ready to Install SQL Server Tools on Mac
Before we dive into the installation steps, let’s ensure you have the necessary components in place.
System Requirements
- macOS: Ensure your macOS is up to date for optimal Docker compatibility.
- Sufficient System Resources: Running Docker and SQL Server requires adequate system resources. Ensure you have enough RAM and disk space available.
Docker Desktop Installation
-
Download Docker Desktop for Mac: Navigate to the official Docker website to download Docker Desktop. Docker provides options for both Intel chip and Apple chip Macs. Choose the correct installer for your Mac’s processor.
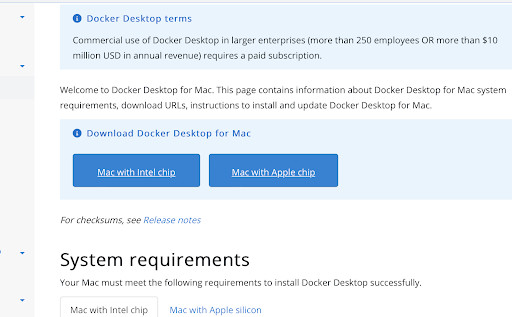 Download Docker options for Intel or Apple chip Macs
 -
Install Docker Desktop: Once the
.dmgfile is downloaded, open it and drag the Docker icon to your “Applications” folder. This will install Docker Desktop on your Mac.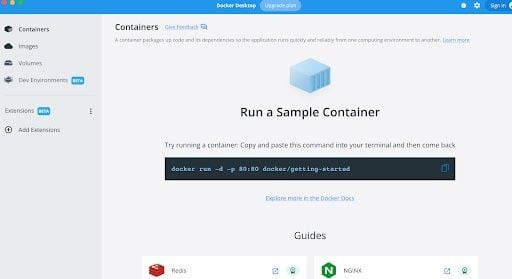 Drag Docker icon to Applications folder for installation
 -
Open Docker Desktop: Launch the Docker application from your Applications folder. Docker Desktop will start in the background.
Initial Docker Configuration
By default, Docker might allocate a limited amount of memory, which might be insufficient for SQL Server to run smoothly. We need to increase the memory allocation for Docker.
-
Access Docker Preferences: Open Docker Desktop and navigate to “Settings” (usually accessible from the Docker menu in the menu bar), then select “Preferences.”
-
Adjust Resources: In the Preferences window, go to the “Resources” tab. Here, you’ll find a “Memory” slider. SQL Server requires at least 3.25 GB of RAM, and it’s recommended to allocate at least 4 GB to Docker for optimal performance. Slide the memory slider to 4 GB or more.
-
Apply and Restart: Click “Apply & Restart” to save the changes and restart Docker Desktop with the new memory settings.
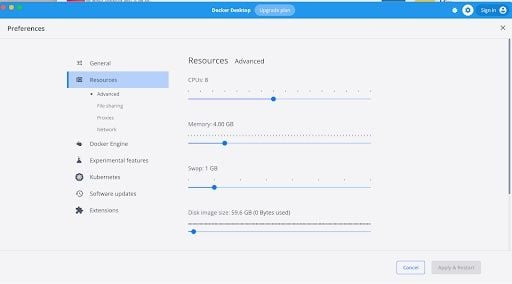 Docker Desktop Resources settings to increase memory allocation
With Docker Desktop installed and configured, we are ready to proceed with installing SQL Server components.
Step-by-Step Guide: Installing SQL Server Tools on macOS
Now, let’s walk through the steps to get SQL Server running on your Mac using Docker, and connect to it using Azure Data Studio.
Step 1: Install Docker Desktop
(This step is already covered in Prerequisites)
Step 2: Pull the MS SQL Server Docker Image
-
Open Terminal: Open the Terminal application on your Mac (found in Applications > Utilities).
-
Pull the SQL Server Image: Run the following command in the Terminal. This command instructs Docker to download the official Microsoft SQL Server 2022 image from the Microsoft Container Registry (mcr.microsoft.com).
sudo docker pull mcr.microsoft.com/mssql/server:2022-latestYou’ll be prompted for your administrator password because of
sudo. Enter your password and press Enter.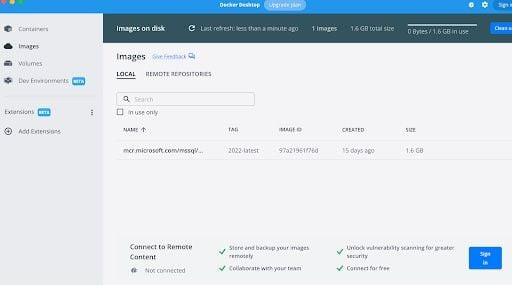 Terminal command to pull MS SQL Server Docker image
Docker will download the SQL Server image, which might take some time depending on your internet connection. Once the download is complete, the SQL Server image will be available in your local Docker environment. You can verify this in Docker Desktop under the “Images” tab.
Step 3: Launch the SQL Server Container
-
Run the Docker Container: In the Terminal, execute the following
docker runcommand to start a SQL Server container based on the image we just downloaded.docker run -d --name sql_server_test -e 'ACCEPT_EULA=Y' -e 'SA_PASSWORD=yourStrongPassword123' -p 1433:1433 mcr.microsoft.com/mssql/server:2022-latestImportant: Replace
yourStrongPassword123with a strong, secure password of your choice for the SQL Serversa(system administrator) account.Let’s break down this command:
-d: Runs the container in detached mode (in the background).--name sql_server_test: Assigns the name “sql_server_test” to your container for easy management.-e 'ACCEPT_EULA=Y': Automatically accepts the SQL Server End-User License Agreement, which is required to run the container.-e 'SA_PASSWORD=yourStrongPassword123': Sets the password for the SQL Server system administrator (sa) account. Crucially, use a strong password here!-p 1433:1433: Maps port 1433 on your Mac to port 1433 in the Docker container. 1433 is the default port for SQL Server, allowing applications on your Mac to connect to SQL Server running inside the container.mcr.microsoft.com/mssql/server:2022-latest: Specifies the Docker image to use for creating the container (the SQL Server 2022 image we pulled earlier).
-
Verify Container is Running: Open Docker Desktop and go to the “Containers” tab. You should see a container named “sql_server_test” running.
Alt Text: Docker Desktop interface displaying the “sql_server_test” container in a running state.
Step 4: Install SQL Command-Line Interface (sql-cli)
To test the SQL Server connection and interact with it from the command line, we’ll install sql-cli, a command-line tool for SQL Server. sql-cli is installed using npm (Node Package Manager), which is often included with Node.js.
-
Install
sql-cliusing npm: In the Terminal, run the following command:npm install -g sql-cliIf you encounter permission errors, try using
sudo:sudo npm install -g sql-clinpmwill download and installsql-cliglobally on your system.
Step 5: Verify SQL Server Installation
Now, let’s test the connection to your running SQL Server instance using sql-cli.
-
Connect to SQL Server using
sql-cli: In the Terminal, use the following command to connect to your SQL Server instance.mssql -u sa -p yourStrongPassword123Replace
yourStrongPassword123with the same password you set for theSA_PASSWORDenvironment variable in thedocker runcommand. -
Run a Test Query: Once connected, you’ll see an
mssql>prompt. Type the following query and press Enter to verify the SQL Server version:SELECT @@VERSION GOIf the connection is successful, you will see output displaying the SQL Server version information.
 Terminal showing successful SQL Server connection and version query result
Congratulations! SQL Server is now running on your Mac and you’ve successfully connected to it via the command line.
Step 6: Install Azure Data Studio – The GUI for macOS
While sql-cli is useful for command-line interaction, for a graphical interface similar to SSMS, we will use Azure Data Studio.
- Download Azure Data Studio: Go to the Azure Data Studio download page. Download the macOS version (ZIP archive).
- Install Azure Data Studio: Once downloaded, unzip the archive. Drag the “Azure Data Studio.app” to your Applications folder.
- Open Azure Data Studio: Launch Azure Data Studio from your Applications folder.
Step 7: Connecting and Managing Databases with Azure Data Studio
-
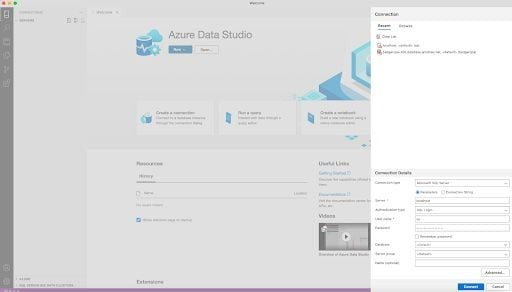
Create a New Connection: In Azure Data Studio, click on the “Connections” icon (usually the leftmost icon in the Activity Bar). Click the “New Connection” button (the plus sign +).
-
Enter Connection Details: In the “Connection” dialog, enter the following details:
- Server:
localhost - Authentication Type: SQL Login
- Username:
sa - Password:
yourStrongPassword123(the same password you used earlier)
- Server:
-
Connect: Click the “Connect” button.
Azure Data Studio will connect to your SQL Server instance running in Docker. You can now explore databases, write and execute queries, manage database objects, and perform other database management tasks using Azure Data Studio’s graphical interface.
Terminal showing successful SQL Server connection and version query result
Managing Your SQL Server Instance on Mac
Stopping and Restarting the Docker Container
When you are finished working with SQL Server, you can stop the Docker container to free up system resources.
-
Stop the Container: Open Terminal and run:
docker stop sql_server_test -
Restart the Container: To start the SQL Server container again later, use:
docker start sql_server_testAfter restarting, you can reconnect with Azure Data Studio using the same connection details.
Best Practices for Running SQL Server on Mac via Docker
- Resource Management: Monitor Docker’s resource usage and adjust memory allocation as needed for optimal performance.
- Password Security: Always use strong passwords for the
saaccount and any other SQL Server logins. For production environments, consider more robust security measures. - Data Persistence: By default, data within Docker containers is not persistent when the container is removed. For persistent data, you would need to configure Docker volumes. For development and testing, the default setup is often sufficient.
- Updates: Regularly check for updates to Docker Desktop, SQL Server Docker images, and Azure Data Studio to benefit from the latest features and security patches.
Troubleshooting Common Issues
- Docker not starting: Ensure Docker Desktop is properly installed and that your system meets the requirements. Check Docker Desktop logs for error messages.
- Connection problems: Verify that the Docker container is running, the SQL Server service within the container is started, and that you are using the correct connection details (server name, username, password). Check firewall settings if you encounter connection issues.
- Performance: Running SQL Server in Docker can have performance implications compared to native installations. Optimize Docker resource allocation and SQL Server configuration if performance is critical.
Conclusion
While SQL Server Management Studio itself is not available for macOS, by using Docker and Azure Data Studio, you can effectively run and manage SQL Server databases on your Mac. This approach provides a robust and cross-platform compatible solution for macOS users who need to work with SQL Server. Azure Data Studio offers a capable graphical interface for most common SQL Server tasks, making the transition from SSMS to a Mac environment seamless. Embrace these tools and continue your SQL Server development and administration work comfortably on your macOS machine.