
Yes, you read that right! Oracle Cloud offers a surprisingly generous free tier, including enough resources to run a robust Minecraft server – we’re talking 4 cores, 24GB of RAM, and SSD storage, all without spending a dime. This completely overshadows free Minecraft server hosting options like Aternos and even rivals some paid services. The catch? You need to roll up your sleeves and handle the server configuration yourself.
Think of this guide as your enhanced roadmap to getting your free Oracle Minecraft Server up and running. We’ll build upon the official Oracle documentation (https://blogs.oracle.com/developers/post/how-to-set-up-and-run-a-really-powerful-free-minecraft-server-in-the-cloud), filling in the gaps and optimizing for peak performance, especially if you’re planning a modded or heavily populated Minecraft world. Let’s dive in and create your powerful, free oracle minecraft server!
Optimizing Your Virtual Machine Instance for Minecraft
When you reach the stage of selecting your Virtual Machine instance within the Oracle Cloud setup, resist the default recommendations if you’re serious about performance, especially for a modded or bustling vanilla minecraft server. Here’s how to maximize your free resources:
-
Cores and RAM are Key: Instead of the base suggestion, explicitly choose 4 cores and allocate a generous 12GB to 24GB of RAM. Minecraft servers, particularly modded ones, thrive on ample RAM. Utilizing the full 24GB within the free tier is highly recommended for a smoother experience.
-
Operating System – Choose Oracle Linux: Ensure you select the latest version of Oracle Linux as your operating system image. While it might not always be the default, Oracle Linux is optimized for their cloud infrastructure and provides excellent stability and performance.
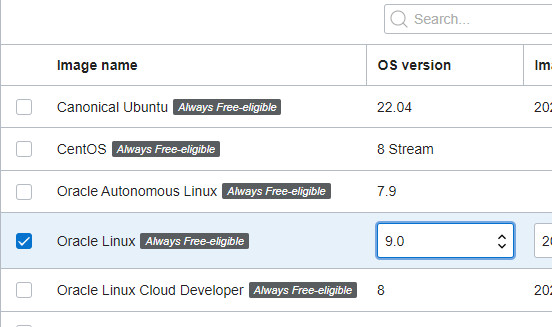 Selecting Oracle Linux 9 for your free minecraft server instance
 -
Boost Boot Volume Performance: Navigate to the “boot volume” tab during instance configuration. Allocate between 75GB and 200GB of storage – remember, this is also within the free tier limits. Crucially, locate the “VPU” (Volume Performance Units) slider and drag it all the way to the right. This maximizes the I/O performance of your server’s storage, which is vital for chunk loading and overall responsiveness in your oracle minecraft server.
 Maximizing VPU slider for optimal storage performance on your minecraft server
Streamlining SSH Access with VSCode for Minecraft Server Management
The official Oracle guide directs you towards general SSH clients. However, for managing a minecraft server, especially when dealing with configurations and mods, VSCode (Visual Studio Code) provides a superior experience. Its integrated terminal and file explorer significantly simplify server administration.
-
Download and Install VSCode: If you haven’t already, download VSCode from the official website: https://code.visualstudio.com/
-
Install the Remote SSH Extension: Open VSCode and navigate to the “Extensions” tab on the left sidebar (it looks like four squares). Search for and install the “Remote – SSH” extension by Microsoft. This powerful extension allows you to seamlessly connect to your oracle minecraft server.
-
Set up an SSH Client: VSCode relies on an SSH client on your local machine. Follow the instructions provided by VSCode to ensure you have a compatible client installed: https://code.visualstudio.com/docs/remote/troubleshooting#_installing-a-supported-ssh-client. For Windows, OpenSSH is often pre-installed or easily enabled. For macOS and Linux, it’s usually already available.
-
Configure SSH for Your Server:
- Press
F1in VSCode to open the command palette. - Type “SSH Open” and select “Remote-SSH: Open SSH Configuration File”.
- Choose the configuration file in your user folder if prompted (usually the first option).
- Press
-
Add Your Server Details: In the configuration file, add a new host entry with the following format, replacing the placeholders with your actual server details:
Host oracle-minecraft-server HostName <Your Oracle Server Public IP> User opc IdentityFile "<Path to your SSH private key file downloaded from Oracle>"- Host: A friendly name for your server connection (e.g.,
oracle-minecraft-server). - HostName: The public IP address of your Oracle Cloud instance. You can find this in your Oracle Cloud console.
- User: The default username for Oracle Linux instances is
opc. - IdentityFile: The full path to the private SSH key file (
.keyor.pem) you downloaded when creating your Oracle Cloud instance.
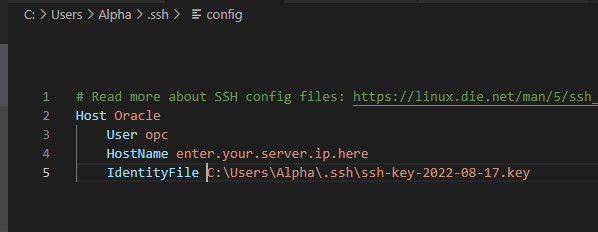 Configuring SSH host in VSCode with server IP and SSH key path for minecraft server access
 - Host: A friendly name for your server connection (e.g.,
-
Connect to Your Server:
-
Click the green “Remote Explorer” button in the bottom left corner of VSCode.
-
Select “Connect to Host…” from the dropdown.
-
Choose “oracle-minecraft-server” (or the Host name you defined) from the list.
-
Confirm any prompts and enter the passphrase for your SSH key if required.
-
-
Open Your Server Folder: Once connected, go to “File” > “Open Folder…” and click “Continue”. This will open the remote file system of your oracle minecraft server within VSCode’s explorer.
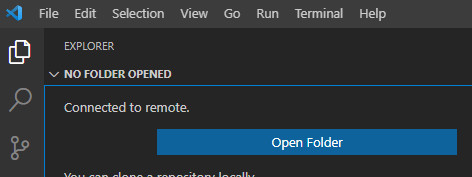 Opening remote folder in VSCode to manage minecraft server files
Now you have a powerful, graphical interface to manage your oracle minecraft server files directly within VSCode. You can easily edit server.properties, configure mods, upload world saves, and monitor your server – all with the convenience of VSCode.
Setting Up Your Minecraft Server Environment on Oracle Linux
Before launching your minecraft server, a little Linux command-line familiarity goes a long way. VSCode provides an integrated terminal (Ctrl+`) which gives you direct access to your server’s command line.
-
Linux Command Line Basics: Consider a quick introduction to the Linux command line. Resources like https://scicomp.aalto.fi/scicomp/shell/ or countless YouTube tutorials can provide a foundational understanding of essential commands. You’ll use commands to navigate directories, manage files, and execute server operations. Open multiple terminals within VSCode using the “+” button in the terminal panel for efficient multitasking.
-
Keep Your Server Updated: Start by updating the server’s software packages to ensure you have the latest security patches and software versions. Use the command:
sudo yum upgrade -
Install Java – The Heart of Minecraft: Minecraft servers run on Java. Install Java 17, which is recommended for modern Minecraft versions, using:
sudo yum install java-17-openjdk.aarch64. To explore other available Java versions, use:sudo yum search JDK.
Installing and Launching Your Minecraft Server Software
Now for the exciting part – getting your minecraft server software onto your Oracle instance!
-
Modded Server Packs or Vanilla Jar: For modded servers, platforms like Modrinth and CurseForge offer pre-packaged server zips. You have two primary methods to get these (or the vanilla Minecraft server jar) onto your server:
- VSCode Upload (Slower for large modpacks): Download and extract the server zip locally. Then, using VSCode’s file explorer, drag and drop the extracted folder to your desired location on the server. This can be slow for large modpacks.
- Direct Download with
wget(Faster): Obtain the direct download URL of the server zip file. In your VSCode terminal, navigate to the directory where you want to install the server using thecdcommand (e.g.,cd /home/opc). Then, usewget <URL of zip file>to download the zip directly to your server. Extract the zip file usingunzip <name of zip file>.
-
Make Scripts Executable: Modded server packs often include shell scripts (
.shfiles) for starting the server. Make these scripts executable using:sudo chmod +x <script_file_name.sh>. -
Auto-Restart on Crash (Optional but Recommended): To ensure your minecraft server automatically restarts if it crashes, you can wrap the server startup command within a
while true...doneloop in your startup script. -
Run in the Background with
nohup: To keep your oracle minecraft server running even after you close your SSH session, use thenohupcommand. Prefix your server startup command withnohup, for example:nohup ./start.sh. -
Prioritize Server Processes with
niceandsudo: To give your minecraft server priority over other system processes, usesudo nice -n -18before your startup command. This requiressudofor process priority adjustment. Combine withnohupand background execution if needed:nohup sudo -b nohup nice -n -18 ./start.sh. While seemingly redundant, this combination can improve background process reliability withsudo.
Performance Tuning for Your Oracle Minecraft Server
Maximize the performance of your free oracle minecraft server with these crucial tuning tips:
-
Optimize System Performance Profile: Apply a Minecraft-optimized performance profile using:
sudo tuned-adm profile latency-performance oci-rps-xps oci-busy-polling oci-cpu-power oci-nic -
Prioritize Server Process (Already Covered): Use
sudo nice -n -18when starting your server. -
Disable Chunk Writing Sync: In your
server.propertiesfile, setsync-chunk-writes=false. This can significantly improve performance but increases the risk of data loss in crashes. Crucially, implement regular backups using a mod like FTB Backups or similar backup solutions regardless of this setting. -
Advanced Java Arguments (Example): Fine-tune Java’s garbage collection and performance settings. The following is an example set of Java arguments. Note that some arguments (like ZGC) are still under evaluation and might be further optimized:
-server -XX:+UnlockExperimentalVMOptions -XX:+UnlockDiagnosticVMOptions -XX:+UseG1GC -XX:+ParallelRefProcEnabled -XX:MaxGCPauseMillis=100 -XX:+UnlockExperimentalVMOptions -XX:+DisableExplicitGC -XX:+AlwaysPreTouch -XX:G1NewSizePercent=30 -XX:G1MaxNewSizePercent=40 -XX:G1HeapRegionSize=16M -XX:G1ReservePercent=20 -XX:G1HeapWastePercent=5 -XX:G1MixedGCCountTarget=4 -XX:InitiatingHeapOccupancyPercent=15 -XX:G1MixedGCLiveThresholdPercent=90 -XX:G1RSetUpdatingPauseTimePercent=5 -XX:SurvivorRatio=32 -XX:MaxTenuringThreshold=1 -XX:ConcGCThreads=3 -XX:+ExplicitGCInvokesConcurrent -XX:G1RSetUpdatingPauseTimePercent=12 -XX:+PerfDisableSharedMem -XX:+UseStringDeduplication -XX:+UseFastUnorderedTimeStamps -XX:AllocatePrefetchStyle=1 -XX:+OmitStackTraceInFastThrow -XX:ThreadPriorityPolicy=1 -XX:+UseNUMA -XX:-DontCompileHugeMethodsExperiment with these and other Java arguments to find the optimal configuration for your specific minecraft server setup.
-
GraalVM Enterprise Edition (Potential Speed Boost): Consider using GraalVM Enterprise Edition instead of OpenJDK for a potential performance increase of around 15%. However, at the time of writing, it’s not directly available in Oracle Linux 9 repositories and requires manual installation (GraalVM 22.1.0 is recommended over the latest release): https://docs.oracle.com/en/graalvm/enterprise/22/docs/getting-started/index.html. Refer to Oracle’s guide on installing Java for more context: https://blogs.oracle.com/developers/post/how-to-install-oracle-java-in-oracle-cloud-infrastructure
-
Huge Pages (Advanced Tuning – Potential for Further Gains): Enabling Huge Pages can provide further performance improvements, but Oracle’s default security configurations might interfere.
-XX:+UseTransparentHugePagesmay silently fail. Further investigation and custom configuration might be needed to leverage Huge Pages effectively on your oracle minecraft server. -
Kernel and I/O Tuning (Expert Level): For advanced users, deeper kernel and I/O tuning can yield additional performance gains. This is a complex area and requires in-depth Linux system administration knowledge.
By following this comprehensive guide, you’ll be well-equipped to set up and optimize a powerful, free oracle minecraft server using the Oracle Cloud Free Tier. Enjoy building and exploring your Minecraft world without the hosting costs!