
Securing your Windows Server is paramount to protect your data and infrastructure from unauthorized access and cyber threats. This article, originating from a Chinese source focused on system security, has been adapted and expanded for an English-speaking audience to provide a comprehensive guide to hardening your Windows Server environment. We will delve into critical security configurations, with a particular emphasis on Windows Server rename administrator account, alongside other essential security measures.
I. Essential Security Policies
1.1. Implementing Strong Password Complexity
Enforcing robust password policies is the first line of defense. Complexity prevents easy guessing or cracking of passwords.
Configuration Path: Open the Group Policy Editor by typing gpedit.msc in the Run dialog. Navigate to Computer Configuration > Windows Settings > Security Settings > Account Policies > Password Policy.
Recommended Settings:
- “Password must meet complexity requirements”: Enabled. This enforces a combination of uppercase and lowercase letters, numbers, and symbols.
- “Minimum password length”: Set to 8 or 12 characters for enhanced security.
- “Enforce password history”: Configure to 5. This prevents users from reusing their recent 5 passwords.
- “Minimum password age”: Set to 1 day to prevent immediate password changes to bypass history.
- “Maximum password age”: Set to 90 days. Regular password changes mitigate the risk of compromised credentials.
- “Store passwords using reversible encryption”: Disabled. This is crucial for security; never store passwords in a reversible format.
Note: If you are using a bastion host for Windows login, be cautious when modifying “Minimum password age” and “Maximum password age.” Changes might impact bastion host functionality and IT management processes. Consult your security team before making alterations in such environments.
1.2. Account Lockout Policies
Account lockout policies automatically disable user accounts after a certain number of failed login attempts, preventing brute-force attacks.
Configuration Path: In the Group Policy Editor (gpedit.msc), navigate to Computer Configuration > Windows Settings > Security Settings > Account Policies > Account Lockout Policy.
Recommended Settings:
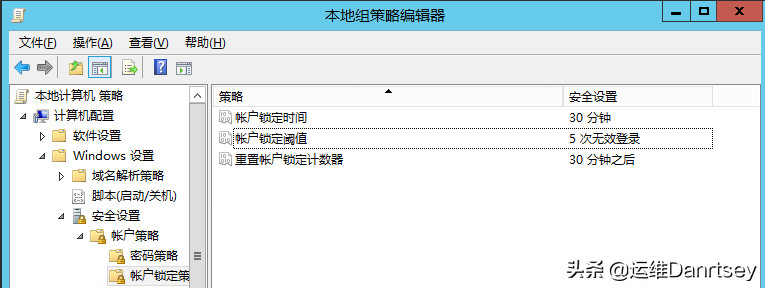
- “Account lockout duration”: 30 minutes is a reasonable duration.
- “Account lockout threshold”: Set to 5 invalid logon attempts.
- “Reset account lockout counter after”: 30 minutes.
 Account Lockout Policy Group Policy Settings
These settings mean that if an account has 5 failed login attempts within 30 minutes, it will be locked for 30 minutes.
1.3. Automatic Disconnection of Idle Remote Sessions
To enhance security and resource management, configure automatic disconnection of idle Remote Desktop sessions.
Configuration Path: In the Group Policy Editor (gpedit.msc), navigate to Computer Configuration > Administrative Templates > Windows Components > Remote Desktop Services > Remote Desktop Session Host > Session Time Limits.
Recommended Settings:
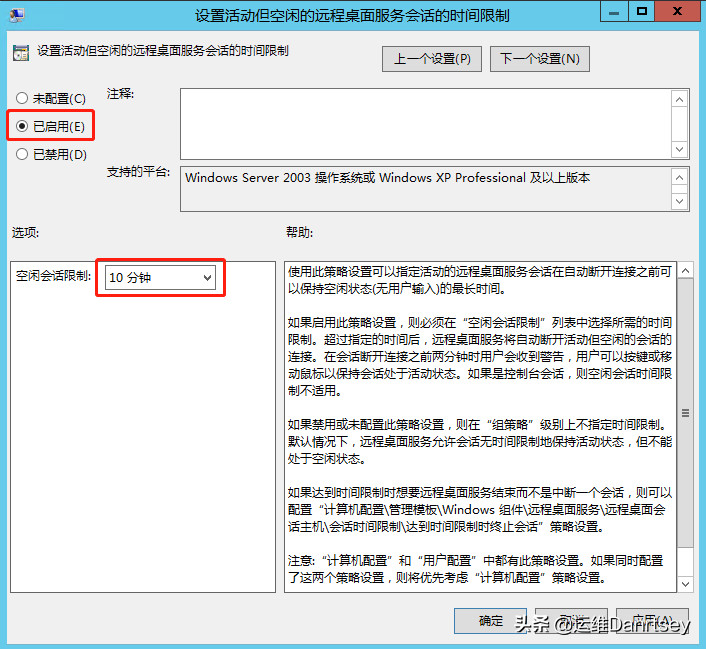
- “Set time limit for active but idle Remote Desktop Services sessions”: Enabled, set the idle time limit to 10 minutes.
 Remote Desktop Session Time Limits Group Policy Setting
This setting automatically disconnects remote sessions that are active but idle for 10 minutes.
1.4. Removing Unnecessary Accounts and Renaming Administrator
Regularly audit and remove any unused user accounts. Additionally, disabling the Guest account and renaming the Administrator account are crucial security steps.
- Disable Guest Account: By default, the Guest account should be disabled. Verify this setting in User Management.
- Rename Administrator Account: The default “Administrator” account is a well-known target for attackers. Renaming it reduces the risk of targeted attacks.
II. Security Options for Enhanced Protection
Access security options to fine-tune various security behaviors within Windows Server.
Configuration Path: Open the Group Policy Editor (gpedit.msc) and navigate to Computer Configuration > Windows Settings > Security Settings > Local Policies > Security Options.
2.1. Password Expiration Warning
Proactively remind users to change their passwords before they expire, promoting timely password updates.
Setting: Locate “Interactive logon: Prompt user to change password before expiration” and change the default value of 5 days to 30 days.
2.2. Restricting Anonymous Access
Prevent anonymous users from accessing sensitive resources by restricting anonymous access to named pipes and shares.
Settings:
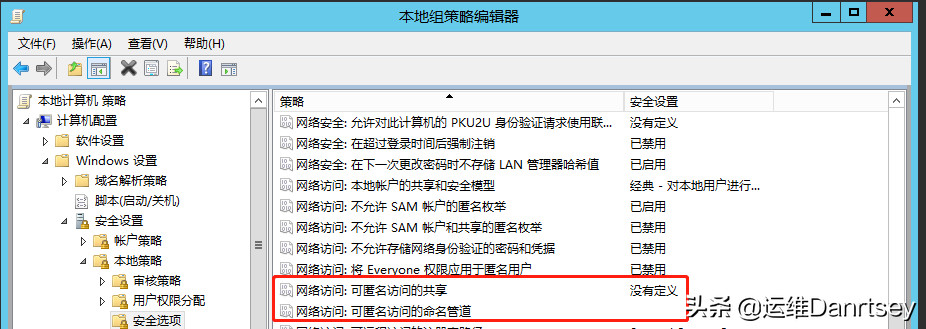
- “Network access: Named pipes that can be accessed anonymously”: Ensure this is empty.
- “Network access: Shares that can be accessed anonymously”: Ensure this is empty.
 Anonymous Access Security Options
2.3. Disabling Remote Registry Access
Remote Registry access can be exploited by attackers. Disabling it remotely enhances security.
Settings:
- “Network access: Remotely accessible registry paths”: Clear this value.
- “Network access: Remotely accessible registry paths and subpaths”: Clear this value.
2.4. Disabling the Guest Account
The Guest account, if enabled, poses a security risk. Ensure it is disabled.
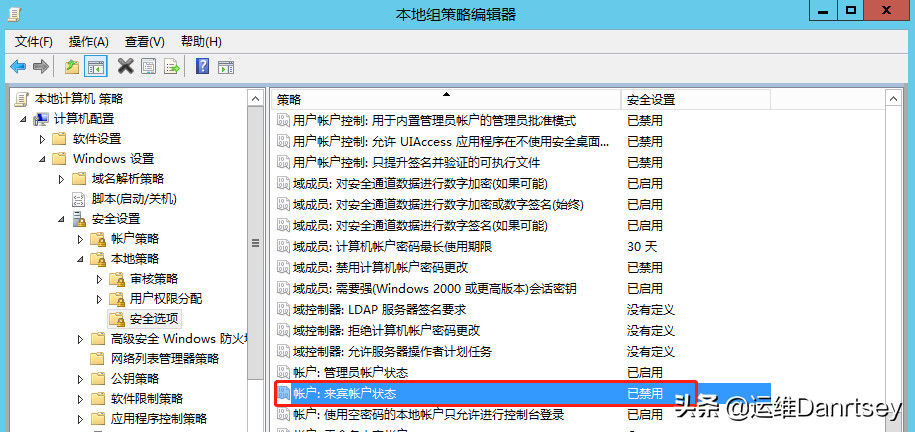
Setting: “Accounts: Guest account status” should be set to “Disabled”. Verify that it is indeed disabled.
 Guest Account Status Security Option
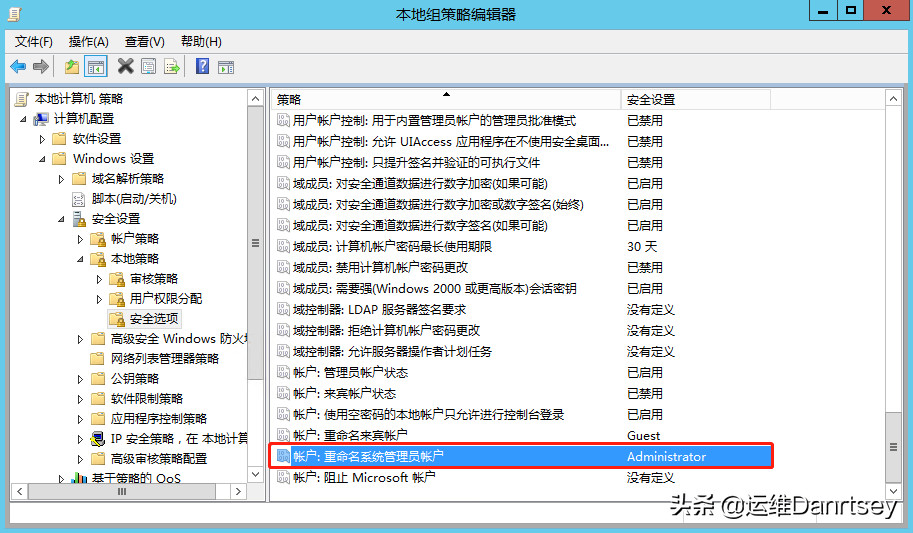
2.5. Renaming the Administrator Account
As mentioned earlier, renaming the default Administrator account is a key security best practice.
Setting: “Accounts: Rename administrator account”. Change the default “Administrator” to a less predictable name. Important Note: If you are currently logged in as Administrator, you will need to log out and back in as another administrative user to make this change. Caution: If you are not managing the server directly, renaming the account might cause login issues. If unsure, it’s best to avoid this step or consult with your IT administrator.
 Rename Administrator Account Security Option
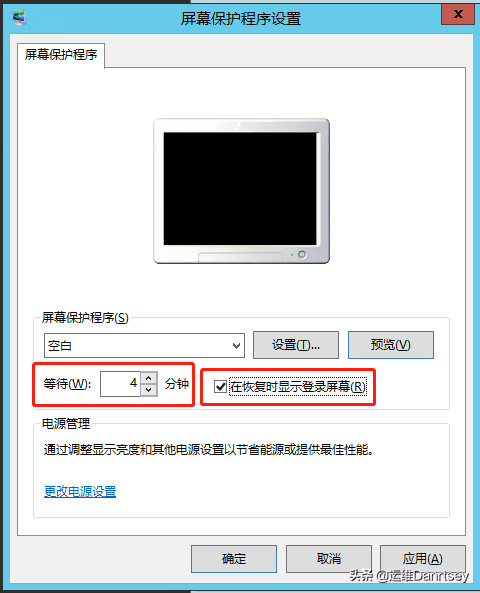
2.6. Enabling Password Protection for Screen Saver
Require a password to unlock the screen after the screen saver activates, preventing unauthorized access when the server is unattended.
Configuration Path: In Windows Server 2008 and Windows Server 2012, navigate to Control Panel -> Display -> Change screen saver. Select a screen saver, set the “Wait” time to no more than 300 seconds (5 minutes), and check “On resume, display logon screen.”
 Screen Saver Password Setting
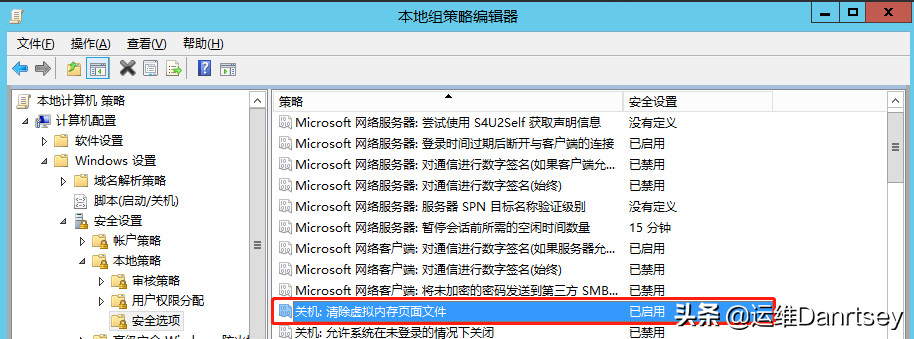
2.7. Clearing Virtual Memory Pagefile on Shutdown
Enhance data security by ensuring the virtual memory pagefile is cleared during system shutdown, preventing sensitive data from persisting.
Setting: “Shutdown: Clear virtual memory page file” should be set to “Enabled”. The default is “Disabled”.
 Clear Virtual Memory Pagefile on Shutdown Security Option
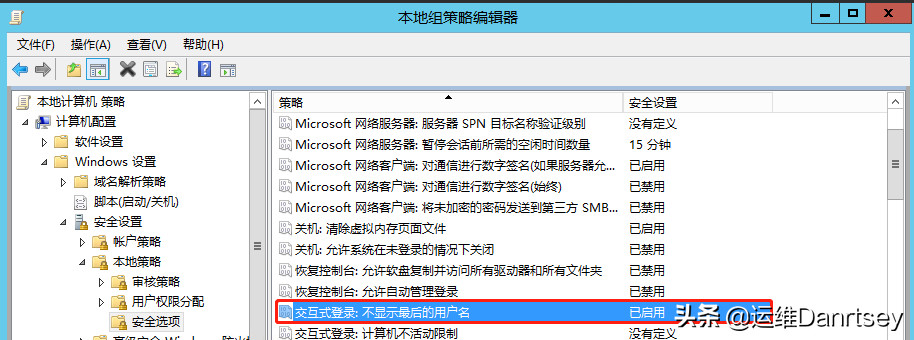
2.8. Do Not Display Last User Name
For enhanced security and privacy, prevent the last logged-on username from being displayed on the logon screen.
Setting: “Interactive logon: Do not display last user name” should be set to “Enabled”. The default is “Disabled”.
 Do Not Display Last User Name Security Option
III. Disabling Risky Services and Ports
Disabling unnecessary services and ports significantly reduces the attack surface of your Windows Server.
Configuration Path: Open Services management console by typing services.msc in the Run dialog.
Services to Disable or Set to Manual/Disabled:
- a. Remote Registry: This service is a significant security risk and should be disabled unless absolutely necessary for management purposes. Set Startup type to “Disabled”.
 Remote Registry Service Setting
-
b. Server: This service is responsible for SMB file sharing and related network functionalities. It’s a common target for attacks, especially ports 445, 139, and 135. Disable it if file sharing is not required. Set Startup type to “Manual”.
-
c. Shell Hardware Detection: This service is often unnecessary on servers and can be disabled. Set Startup type to “Disabled”.
 Shell Hardware Detection Service Setting
- d. Printer Spooler: If the server is not acting as a print server, disable this service. Set Startup type to “Disabled”.
 Printer Spooler Service Setting
- e. DHCP Client: If your server uses a static IP address, you can disable the DHCP Client service. Caution: If the server obtains its IP address automatically via DHCP, do not disable this service. First, verify your network configuration.
 DHCP Client Service Setting
IV. Port Management and Firewall Configuration
Managing open ports is critical to control network access and prevent unauthorized connections.
4.1. Blocking Ports 445, 135, 137, 138, 139
Ports 445, 135, 137, 138, and 139 are commonly exploited. Block these ports using Windows Firewall with Advanced Security or IP Security Policies.
Using IP Security Policies (Legacy Method):
Configuration Path: Control Panel -> Administrative Tools -> Local Security Policy -> IP Security Policies on Local Computer. Create a new IP security policy to block these ports.
-
Create IP Security Policy: Right-click “IP Security Policies on Local Computer” and select “Create IP Security Policy”.
-
Add Rule: Add a new rule, name it descriptively (e.g., “Block Dangerous Ports”).
-
IP Filter List: Create a new IP filter list.
- Source address: “Any IP Address”.
- Destination address: “My IP Address”.
- Source port: “Any”.
- Destination port: Add each port individually: 445, 135, 137, 138, 139.
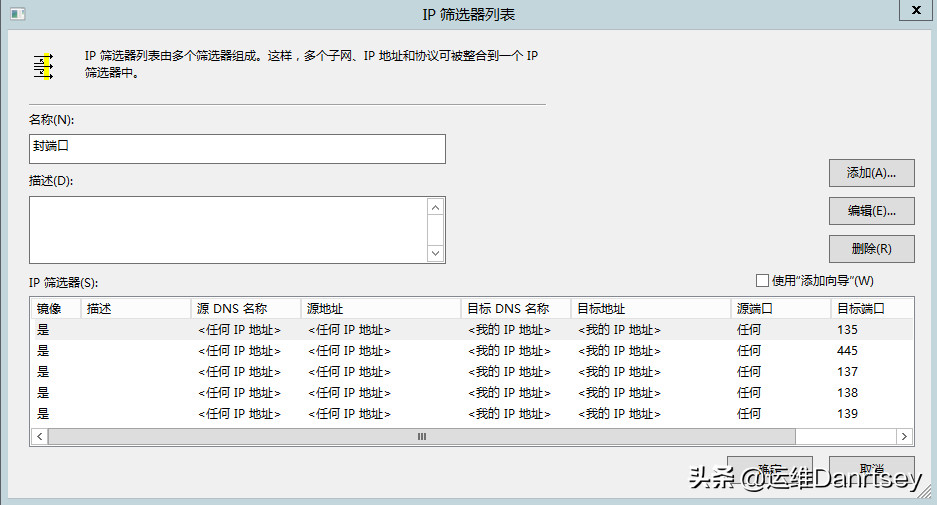 Creating IP Filter List for Port Blocking
- Filter Action: Set the filter action to “Block”.
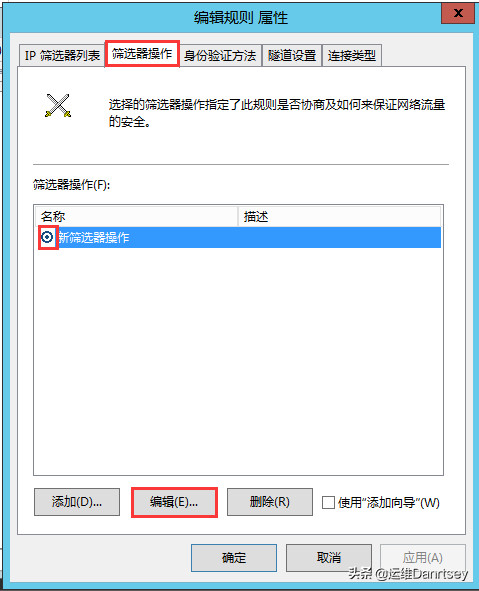 Setting Filter Action to Block
- Assign Policy: Right-click the newly created policy and select “Assign Policy”. The “Policy Assigned” status should change to “Yes”.
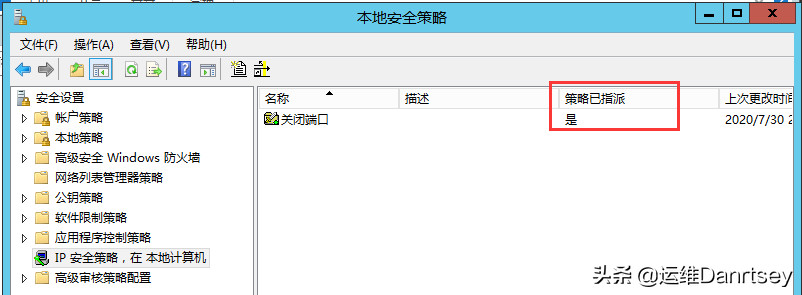 Assigning IP Security Policy
Note: Modern Windows Server versions utilize Windows Firewall with Advanced Security, which offers a more user-friendly interface for managing firewall rules. Consider using Windows Firewall for port blocking in contemporary environments.
4.2. Modifying Default Ports of Middleware and Applications
Changing default ports for common services, databases, and web servers makes it harder for attackers to locate and exploit vulnerabilities.
Recommendation: Modify default ports for all middleware, databases, and web servers. For ease of remembering, increment each digit of the default port number by one (e.g., if the default is 1433, change it to 2544 – this is just an example, choose ports strategically).
Examples:
- SQL Server (default 1433): Change to a non-standard port.
- RDP (Windows Remote Desktop, default 3389): Change to a higher, less common port.
- SSH (Linux, default 22): Change to a different port.
V. System Protection Measures
Implement additional system-level protections to further secure your Windows Server.
5.1. Enabling Data Execution Prevention (DEP)
Data Execution Prevention (DEP) helps protect against malware by preventing code execution from memory regions marked as non-executable.
Configuration Path: Computer -> Properties -> Advanced system settings -> Advanced -> Performance -> Settings -> Data Execution Prevention.
Setting: Select “Turn on DEP for essential Windows programs and services only”.
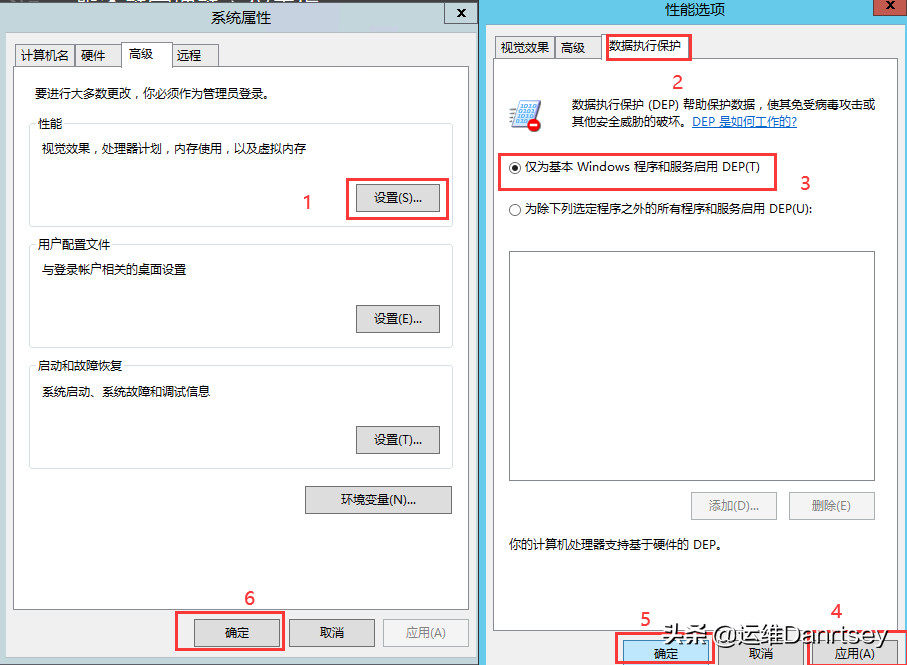 Data Execution Prevention (DEP) Setting
A system restart is required for these changes to take effect.
5.2. Installing Antivirus Software
Install and maintain up-to-date antivirus software. If you have a commercial antivirus solution, use it. If not, consider using a reputable free antivirus like Huorong Security (while being mindful of its origin and considering alternatives if necessary for your organization’s policies).
Caution: Avoid using 360 Antivirus, as it has been reported to create backdoors and consume local ports, potentially disrupting server applications.
5.3. Secure Password Management
Implement secure password management practices.
Recommendations:
- a. Unique and Complex Passwords: Ensure each server has a unique, complex password that meets the password complexity requirements outlined earlier.
- b. Disable “Remember Password” in Remote Tools: Disable the “Remember Password” feature in remote server tools (like Remote Desktop Client, SSH clients, database clients).
- c. Encrypted Password Storage: Store passwords in an encrypted Excel or similar document protected by a strong password. When needed, access the document, copy the password, and paste it into the login prompt. This enhances security compared to storing passwords in plain text or using easily compromised password managers.
By implementing these security best practices, including renaming the Administrator account and configuring robust security policies, you can significantly strengthen the security posture of your Windows Server and protect it from potential threats. Remember to regularly review and update these configurations to adapt to evolving security landscapes.