
What’s the Minecraft server address? It’s the key to unlocking a shared Minecraft experience, and at rental-server.net, we understand how crucial it is for connecting with other players. Discover how to find your server address and explore the best hosting options to elevate your gameplay with our expert server solutions, ensuring seamless and immersive adventures. Unlock dedicated resources, ensuring a lag-free environment, and giving you the power to customize your Minecraft world exactly how you want it by choosing a suitable server.
Table of Contents
- Understanding Minecraft Servers and Addresses
- Why You Need a Minecraft Server Address
- Finding Your Minecraft Server Address on PC
- Finding Your Minecraft Server Address on PS4/PS5
- Finding Your Minecraft Server Address on Xbox
- Troubleshooting Common Issues with Minecraft Server Addresses
- Choosing the Right Minecraft Server Hosting
- The Benefits of Using a Dedicated Minecraft Server
- Optimizing Your Minecraft Server for Performance
- Minecraft Server Security Best Practices
- Exploring Different Types of Minecraft Servers
- Setting Up a Minecraft Server: A Step-by-Step Guide
- Advanced Minecraft Server Configuration
- Understanding Minecraft Server Ports
- Utilizing Minecraft Server Commands
- Joining a Minecraft Server: A Detailed Guide
- The Role of Server Address in Minecraft Multiplayer
- Benefits of a Reliable Minecraft Server Address
- Exploring Free Minecraft Server Options
- Understanding Minecraft Server Address and IP Conflicts
- Minecraft Server Address and Dynamic IP Addresses
- Top Minecraft Server Hosting Providers in the USA
- Minecraft Server Address and Domain Names
- Ensuring Server Uptime and Reliability
- Utilizing Minecraft Server Monitoring Tools
- Understanding Minecraft Server Address Security
- Minecraft Server Address and Geographic Location
- Exploring Minecraft Server Communities
- Scaling Your Minecraft Server with Rental-Server.net
- Future Trends in Minecraft Server Hosting
- Frequently Asked Questions (FAQ) About Minecraft Server Addresses
1. Understanding Minecraft Servers and Addresses
What is a Minecraft server, and why is the address so important? A Minecraft server is a private or public network that allows multiple players to connect and play Minecraft together. The server address, often referred to as the IP address or hostname, is the unique identifier that players use to connect to a specific server. Think of it like a street address for your online Minecraft world. Without the correct address, players won’t be able to find and join your game. According to Mojang, millions of players connect to Minecraft servers every day, highlighting the importance of understanding server addresses.
Minecraft servers allow players to build, explore, and interact within a shared virtual world. These servers can range from small, private setups for friends to massive public communities with thousands of players. Each server can have its own unique rules, modifications (mods), and gameplay styles, offering a diverse range of experiences. Understanding the role and importance of the server address is crucial for both server administrators and players alike. The IP address is the backbone of Minecraft multiplayer and is necessary to create your own virtual playground.
2. Why You Need a Minecraft Server Address
Why is a Minecraft server address essential for multiplayer gaming? The Minecraft server address acts as the digital gateway to your chosen Minecraft world, enabling you and your friends to connect and collaborate in a shared gaming environment. Without it, joining a specific server is impossible, restricting you to single-player mode. A stable and reliable server address ensures consistent access to your Minecraft world, fostering a seamless and immersive multiplayer experience. To participate in any Minecraft multiplayer mode, whether it’s building elaborate structures, battling mobs, or simply exploring the landscape, you’ll need the correct server address.
Having a dedicated server address provides several advantages:
- Multiplayer Access: Connect with friends and other players from around the world.
- Customization: Tailor the gameplay experience with mods, plugins, and unique world settings.
- Community Building: Create or join a community of like-minded players.
- Persistence: Your world exists even when you’re not online, allowing for continuous progress.
Therefore, understanding how to find, use, and manage your Minecraft server address is a fundamental aspect of enjoying the full potential of the game.
3. Finding Your Minecraft Server Address on PC
How do I find my Minecraft server address on a PC? The process for finding your Minecraft server address on a PC involves a few simple steps using the command prompt. This address is crucial for allowing others to connect to your server.
Steps:
-
Open Command Prompt: Press the Windows key, type “cmd,” and press Enter.
-
Type
ipconfig: In the Command Prompt window, typeipconfigand press Enter. -
Locate IPv4 Address: Look for the line labeled “IPv4 Address.” The number next to it is your computer’s local IP address. This is the address you’ll use for players on your local network.
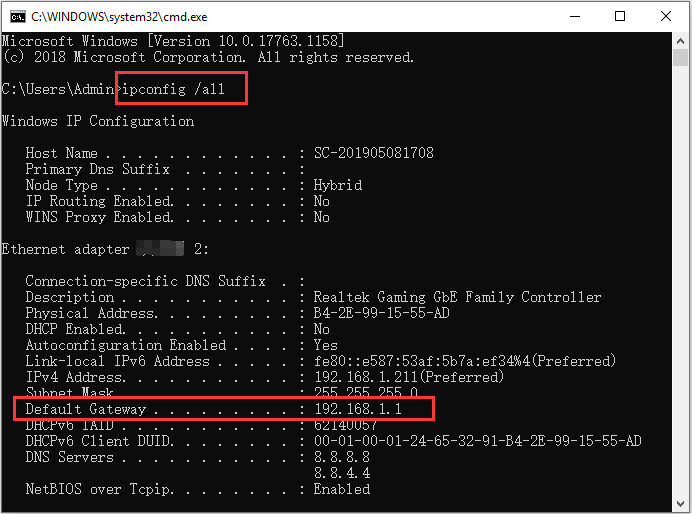 run ipconfig all in CMD
 -
Find Your Public IP Address: For players outside your local network, you’ll need your public IP address. You can find this by searching “what is my IP” on Google.
It’s important to note that your public IP address may change periodically, especially if you have a dynamic IP address assigned by your internet service provider (ISP). If this happens, you’ll need to update the server address you share with others. To avoid this, consider using a static IP address or a dynamic DNS (DDNS) service.
4. Finding Your Minecraft Server Address on PS4/PS5
How can I locate my Minecraft server address on a PlayStation 4 or 5? Finding your Minecraft server address on a PlayStation 4 (PS4) or PlayStation 5 (PS5) involves navigating through the console’s network settings. This is slightly different from finding it on a PC, but it’s still a straightforward process.
Steps for PS4:
-
Go to Settings: From the PS4 home screen, select “Settings.”
-
Navigate to Network: In the Settings menu, select “Network.”
-
View Connection Status: Choose “View Connection Status.”
-
Find IP Address: Your IP address will be listed on this screen. This is the address players on your local network will use.
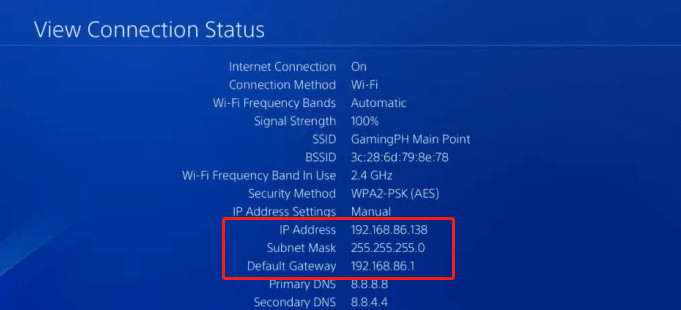 view connection status PS4
Steps for PS5:
- Go to Settings: From the PS5 home screen, select the gear icon to access “Settings.”
- Navigate to Network: In the Settings menu, select “Network.”
- View Connection Status: Choose “View Status” under “Connection Status.”
- Find IP Address: Your IP address will be listed on this screen.
As with PC, players outside your local network will need your public IP address, which you can find by searching “what is my IP” on Google. Ensure that your PS4/PS5 is connected to the internet to obtain an IP address.
5. Finding Your Minecraft Server Address on Xbox
How do I check my Minecraft server’s IP address on an Xbox console? If you’re hosting a Minecraft server from your Xbox, finding the server address involves navigating through the console’s network settings. Here’s how you can do it:
Steps:
- Go to Settings: From the Xbox home screen, navigate to “Settings.”
- Navigate to Network Settings: Select “Network,” then “Network settings.”
- Go to Advanced Settings: Choose “Advanced settings.”
- Find IP Settings: Select “IP settings.” Your IP address will be listed under the “IPv4 address” section.
Similar to PC and PlayStation, this IP address is for players on your local network. For players outside your network, you’ll need to provide your public IP address, which can be found by searching “what is my IP” on Google. Remember that dynamic IP addresses can change, so it’s a good idea to check it regularly or consider using a static IP address or DDNS service.
6. Troubleshooting Common Issues with Minecraft Server Addresses
What are some common problems with Minecraft server addresses and how can I fix them? Several issues can arise when dealing with Minecraft server addresses, preventing players from connecting to your server. Here are some common problems and their solutions:
-
Incorrect IP Address:
- Problem: Players are unable to connect because they are using the wrong IP address.
- Solution: Double-check the IP address you are providing to players. Ensure it’s your current public IP address if they are outside your local network.
-
Firewall Issues:
- Problem: The server’s firewall is blocking connections.
- Solution: Configure your firewall to allow incoming connections on the port Minecraft uses (default is 25565).
-
Port Forwarding Issues:
- Problem: Players outside your local network cannot connect because port forwarding is not set up correctly on your router.
- Solution: Access your router’s settings and set up port forwarding for port 25565 to the internal IP address of your server.
-
Dynamic IP Address:
- Problem: Your public IP address changes frequently, causing connection issues.
- Solution: Use a Dynamic DNS (DDNS) service to map a static hostname to your dynamic IP address.
-
Server Not Running:
- Problem: The Minecraft server is not running, so players cannot connect.
- Solution: Ensure that the Minecraft server application is running on your computer or server.
-
Outdated Minecraft Version:
- Problem: Players are using a different version of Minecraft than the server.
- Solution: Ensure that all players are using the same version of Minecraft as the server.
-
DNS Issues:
- Problem: Problems with DNS resolution can prevent players from connecting.
- Solution: Make sure your DNS settings are configured correctly and try flushing your DNS cache.
By addressing these common issues, you can ensure a smoother and more reliable experience for players connecting to your Minecraft server.
7. Choosing the Right Minecraft Server Hosting
What should I look for when choosing a Minecraft server hosting provider? Selecting the right Minecraft server hosting provider is essential for ensuring a smooth and enjoyable multiplayer experience. With numerous options available, it’s important to consider several key factors:
-
Performance:
- CPU: Choose a hosting plan with sufficient CPU cores to handle the number of players and the complexity of your server.
- RAM: Ensure the server has enough RAM to prevent lag and crashes, especially with mods and plugins.
- Storage: Consider the amount of storage space needed for your world data, mods, and backups. Solid State Drives (SSDs) generally offer better performance than traditional Hard Disk Drives (HDDs).
-
Uptime:
- Look for hosting providers that guarantee high uptime (99.9% or better) to ensure your server is consistently available. According to research by the Uptime Institute, downtime can cost businesses thousands of dollars per minute, highlighting the importance of reliable uptime.
-
Location:
- Choose a server location that is geographically close to your player base to minimize latency and improve connection speeds.
-
Customer Support:
- Opt for a provider with responsive and knowledgeable customer support to assist with any issues that may arise.
-
Scalability:
- Ensure the hosting plan can be easily scaled up or down as your server’s needs change.
-
Price:
- Compare pricing plans from different providers, but don’t sacrifice performance and reliability for a lower price.
-
Features:
- Consider features such as automated backups, DDoS protection, mod support, and easy-to-use control panels.
By carefully evaluating these factors, you can choose a Minecraft server hosting provider that meets your specific needs and provides a stable, high-performance environment for your players. At rental-server.net, we offer a variety of hosting plans tailored to different needs, ensuring you find the perfect fit for your Minecraft community.
8. The Benefits of Using a Dedicated Minecraft Server
What are the advantages of using a dedicated server for Minecraft? Opting for a dedicated Minecraft server offers numerous benefits over hosting a server on your personal computer. A dedicated server provides enhanced performance, reliability, and control, ensuring a superior multiplayer experience.
-
Improved Performance:
- Dedicated servers are specifically designed to handle the demands of running a Minecraft server, providing better CPU, RAM, and network resources than a personal computer. This results in reduced lag and smoother gameplay for all players.
-
Increased Uptime:
- Dedicated servers are hosted in professional data centers with redundant power, cooling, and network connections, ensuring high uptime and minimizing the risk of server downtime.
-
Enhanced Security:
- Dedicated server providers typically offer DDoS protection and other security measures to protect your server from malicious attacks.
-
Full Control:
- With a dedicated server, you have complete control over the server’s configuration, allowing you to customize the gameplay experience to your exact specifications.
-
Scalability:
- Dedicated servers can be easily scaled up or down as your server’s needs change, allowing you to accommodate more players or add more mods and plugins without sacrificing performance.
-
Professional Support:
- Dedicated server providers typically offer 24/7 customer support to assist with any issues that may arise.
By choosing a dedicated Minecraft server, you can provide your players with a stable, high-performance environment that enhances their overall gaming experience. rental-server.net offers a range of dedicated server options tailored to meet the needs of any Minecraft community.
9. Optimizing Your Minecraft Server for Performance
How can I optimize my Minecraft server to improve performance? Optimizing your Minecraft server is crucial for ensuring smooth gameplay, especially as your player base grows or you add more mods and plugins. Here are several strategies to improve your server’s performance:
-
Allocate Sufficient RAM:
- Ensure your server has enough RAM to handle the number of players and the complexity of your server. A good rule of thumb is to allocate at least 2GB of RAM for a small server and increase it as needed.
-
Use a Fast Storage Device:
- Store your server files on a Solid State Drive (SSD) for faster read and write speeds, which can significantly improve performance.
-
Optimize Server Settings:
- Adjust server settings such as
view-distance,max-tick-time, andspawn-animalsto reduce the load on the server.
- Adjust server settings such as
-
Install Performance-Enhancing Mods:
- Use mods like “OptiFine” or “Phosphor” to improve the game’s rendering and lighting, reducing lag.
-
Regularly Restart Your Server:
- Restarting your server periodically can help clear out memory leaks and improve overall performance.
-
Monitor Server Performance:
- Use tools like “Spark” to monitor your server’s performance and identify areas that need optimization.
-
Limit the Number of Entities:
- Reduce the number of entities (mobs, items, etc.) in your world by setting limits on mob spawning and clearing out unnecessary items.
-
Use a Proxy Server:
- Implement a proxy server like “BungeeCord” to distribute the load across multiple servers, improving performance for large communities.
-
Optimize Redstone Circuits:
- Redstone circuits can be resource-intensive, so optimize them by using efficient designs and minimizing unnecessary components.
By implementing these optimization techniques, you can significantly improve the performance of your Minecraft server and provide a smoother, more enjoyable experience for your players.
10. Minecraft Server Security Best Practices
How can I secure my Minecraft server from potential threats? Securing your Minecraft server is essential to protect it from malicious attacks, griefing, and other security threats. Here are some best practices to enhance your server’s security:
-
Use a Strong Password:
- Set a strong, unique password for your server’s administration account and any other accounts with administrative privileges.
-
Enable Whitelisting:
- Enable whitelisting to restrict access to your server to only approved players.
-
Install a Firewall:
- Use a firewall to block unauthorized access to your server.
-
Use Anti-Griefing Plugins:
- Install anti-griefing plugins to protect your world from vandalism and theft.
-
Regularly Backup Your Server:
- Create regular backups of your server data to protect against data loss due to crashes, corruption, or attacks.
-
Keep Your Server Software Up-to-Date:
- Regularly update your Minecraft server software to patch security vulnerabilities.
-
Monitor Server Logs:
- Monitor your server logs for suspicious activity and investigate any potential security breaches.
-
Limit Administrative Privileges:
- Grant administrative privileges only to trusted players and limit the number of players with these privileges.
-
Use Two-Factor Authentication:
- Enable two-factor authentication for administrative accounts to add an extra layer of security.
-
Protect Against DDoS Attacks:
- Use a hosting provider that offers DDoS protection to mitigate the impact of distributed denial-of-service attacks.
By implementing these security best practices, you can significantly reduce the risk of security breaches and ensure a safe and enjoyable environment for your players.
11. Exploring Different Types of Minecraft Servers
What are the different types of Minecraft servers available? Minecraft servers come in various types, each offering a unique gameplay experience. Here are some of the most popular types of Minecraft servers:
-
Survival Servers:
- These servers focus on the classic Minecraft survival experience, where players must gather resources, build shelters, and defend themselves against mobs.
-
Creative Servers:
- Creative servers provide players with unlimited resources and the ability to build anything they can imagine.
-
Mini-Game Servers:
- Mini-game servers offer a variety of fun and competitive games, such as Capture the Flag, Hunger Games, and Murder Mystery.
-
Roleplay Servers:
- Roleplay servers encourage players to create characters and immerse themselves in a fictional world, often with complex storylines and rules.
-
Factions Servers:
- Factions servers allow players to form groups and compete for territory and resources.
-
Pixelmon Servers:
- Pixelmon servers combine Minecraft with the world of Pokémon, allowing players to catch, train, and battle Pokémon.
-
Skyblock Servers:
- Skyblock servers challenge players to survive on a small floating island with limited resources.
-
Hardcore Servers:
- Hardcore servers feature a permadeath system, where players are banned from the server if they die.
-
Vanilla Servers:
- Vanilla servers offer a pure, unmodified Minecraft experience without any mods or plugins.
-
Modded Servers:
- Modded servers incorporate various mods to enhance the gameplay experience, adding new features, items, and mechanics.
Each type of server caters to different preferences and playstyles, offering a diverse range of experiences for Minecraft players.
12. Setting Up a Minecraft Server: A Step-by-Step Guide
How can I set up my own Minecraft server? Setting up your own Minecraft server can seem daunting, but it’s a manageable process if you follow these step-by-step instructions:
Step 1: Download the Minecraft Server Software:
- Go to the official Minecraft website and download the server software for your operating system.
Step 2: Create a Server Folder:
- Create a new folder on your computer to store the server files.
Step 3: Place the Server File in the Folder:
- Move the downloaded server file (usually named
minecraft_server.jar) into the newly created folder.
Step 4: Run the Server File:
- Double-click the server file to run it. This will generate several new files and folders, including
eula.txt.
Step 5: Accept the EULA:
- Open the
eula.txtfile and changeeula=falsetoeula=trueto accept the Minecraft End User License Agreement.
Step 6: Configure the Server:
- Open the
server.propertiesfile in a text editor to configure various server settings, such as the server name, game mode, and port.
Step 7: Port Forwarding (If Needed):
- If you want players outside your local network to be able to connect to your server, you’ll need to set up port forwarding on your router for port 25565 (the default Minecraft server port).
Step 8: Start the Server:
- Run the server file again to start the server.
Step 9: Connect to Your Server:
- Launch Minecraft and select “Multiplayer.”
- Click “Add Server” and enter your server’s IP address (your local IP address for players on your local network, or your public IP address for players outside your network).
- Click “Join Server” to connect to your server.
Step 10: Customize Your Server:
- Install mods and plugins to customize the gameplay experience.
By following these steps, you can set up your own Minecraft server and create a unique multiplayer experience for you and your friends.
13. Advanced Minecraft Server Configuration
What are some advanced configuration options for Minecraft servers? Once you have a basic Minecraft server up and running, you can explore advanced configuration options to further customize the gameplay experience. Here are some advanced configuration options:
-
Server Properties:
- The
server.propertiesfile allows you to configure various server settings, such as the game mode, difficulty, maximum number of players, and world generation settings.
- The
-
Whitelist:
- Enable the whitelist to restrict access to your server to only approved players.
-
Op Permissions:
- Grant operator (op) permissions to trusted players, allowing them to use administrative commands.
-
Command Blocks:
- Enable command blocks to create complex and automated systems in your world.
-
Resource Packs:
- Use resource packs to customize the look and feel of the game.
-
Data Packs:
- Use data packs to add new features, items, and mechanics to the game without using mods.
-
Plugins:
- Install plugins to add new functionality to your server, such as anti-griefing tools, economy systems, and custom commands.
-
Mods:
- Install mods to significantly alter the gameplay experience, adding new content and mechanics.
-
BungeeCord:
- Use BungeeCord to create a network of interconnected Minecraft servers, allowing players to seamlessly move between different worlds and game modes.
-
Database Integration:
- Integrate your server with a database to store player data, track statistics, and manage economies.
By exploring these advanced configuration options, you can create a truly unique and customized Minecraft server experience.
14. Understanding Minecraft Server Ports
Why are Minecraft server ports important and how do they work? Minecraft server ports are essential for enabling connections between players and the server. A port is a virtual point where network connections start and end. The default port for Minecraft servers is 25565.
-
How Ports Work:
- When a player connects to a Minecraft server, their client sends a request to the server’s IP address and port.
- The server listens for incoming connections on the specified port.
- If the connection is successful, the server and client can exchange data, allowing the player to join the game.
-
Port Forwarding:
- If you want players outside your local network to be able to connect to your server, you’ll need to set up port forwarding on your router.
- Port forwarding tells your router to direct incoming traffic on port 25565 to the internal IP address of your server.
-
Firewall Configuration:
- Ensure that your server’s firewall is configured to allow incoming connections on port 25565.
-
Multiple Servers:
- If you’re running multiple Minecraft servers on the same computer, you’ll need to assign each server a different port.
Understanding how Minecraft server ports work is crucial for troubleshooting connection issues and ensuring that players can connect to your server.
15. Utilizing Minecraft Server Commands
What are some essential Minecraft server commands and how do I use them? Minecraft server commands allow administrators to manage and control various aspects of the server, from player management to world customization. Here are some essential Minecraft server commands:
/op <playername>: Grants operator (op) permissions to a player, allowing them to use administrative commands./deop <playername>: Revokes operator (op) permissions from a player./kick <playername> [reason]: Kicks a player from the server./ban <playername> [reason]: Bans a player from the server, preventing them from rejoining./pardon <playername>: Unbans a player from the server./tp <playername> <x> <y> <z>: Teleports a player to the specified coordinates./gamemode <mode> <playername>: Changes a player’s game mode (e.g., survival, creative, adventure, spectator)./time set <time>: Sets the game time (e.g., day, night)./weather <weather>: Sets the weather (e.g., clear, rain, thunder)./give <playername> <item> [quantity]: Gives a player the specified item./say <message>: Sends a message to all players on the server./stop: Stops the server./whitelist add <playername>: Adds a player to the whitelist./whitelist remove <playername>: Removes a player from the whitelist./whitelist list: Lists all players on the whitelist./whitelist reload: Reloads the whitelist.
To use these commands, you must have operator (op) permissions on the server. Simply type the command into the server console or in-game chat (preceded by a forward slash /).
16. Joining a Minecraft Server: A Detailed Guide
How do I join a Minecraft server and what do I need? Joining a Minecraft server is a straightforward process that allows you to connect with other players and explore new worlds. Here’s a detailed guide:
Step 1: Obtain the Server Address:
- You’ll need the server address (IP address or hostname) from the server administrator.
Step 2: Launch Minecraft:
- Open the Minecraft game client on your computer.
Step 3: Navigate to the Multiplayer Menu:
- Click on the “Multiplayer” button on the main menu.
Step 4: Add the Server:
- Click on the “Add Server” button.
- Enter the server name (any name you choose) and the server address in the appropriate fields.
- Click “Done.”
Step 5: Join the Server:
- The server will now appear in your server list.
- Select the server and click “Join Server.”
Step 6: Troubleshooting Connection Issues:
- If you are unable to connect, ensure that you have entered the correct server address.
- Check your internet connection and firewall settings.
- Make sure that you are using the same version of Minecraft as the server.
- Contact the server administrator for assistance.
By following these steps, you can easily join a Minecraft server and start playing with other players.
17. The Role of Server Address in Minecraft Multiplayer
Why is the server address critical for Minecraft multiplayer? The server address plays a vital role in Minecraft multiplayer, acting as the unique identifier that allows players to connect to a specific server.
-
Unique Identification:
- The server address (IP address or hostname) uniquely identifies a Minecraft server on the internet.
-
Connection Point:
- Players use the server address to connect to the server and join the game.
-
Routing Traffic:
- The server address is used by network devices (routers, switches, etc.) to route network traffic to the correct server.
-
DNS Resolution:
- If a server uses a hostname instead of an IP address, the Domain Name System (DNS) is used to resolve the hostname to an IP address.
-
Port Specification:
- The server address may also include a port number, which specifies the port on which the server is listening for connections (default is 25565).
Without the correct server address, players would not be able to connect to the desired Minecraft server, making the server address a fundamental component of Minecraft multiplayer.
18. Benefits of a Reliable Minecraft Server Address
What advantages does a stable server address offer for Minecraft? A reliable Minecraft server address offers several benefits, ensuring a smooth and enjoyable multiplayer experience for players.
-
Consistent Connectivity:
- A stable server address ensures that players can consistently connect to the server without having to update their server list.
-
Ease of Access:
- A memorable and easy-to-share server address makes it easier for players to invite their friends to join the server.
-
Community Building:
- A consistent server address helps build a stable and long-lasting community of players.
-
Branding:
- A custom hostname (e.g.,
play.example.com) can enhance the server’s branding and make it more recognizable.
- A custom hostname (e.g.,
-
Reduced Downtime:
- A reliable server address is often associated with a stable and well-maintained server, reducing the risk of downtime.
-
Improved Player Retention:
- A consistent and reliable server address contributes to a positive player experience, improving player retention.
By providing a reliable Minecraft server address, you can create a welcoming and stable environment for your players, fostering a thriving community.
19. Exploring Free Minecraft Server Options
Are there any free Minecraft server hosting options available? While setting up a Minecraft server from scratch offers the most control, it can be technically challenging. Fortunately, several providers offer simplified setup, often including one-click installation, mod packs, and resource management tools. Some of these services are free, but they come with limitations.
-
Limited Resources:
- Free Minecraft server hosting providers typically offer limited CPU, RAM, and storage resources, which may result in lag and performance issues.
-
Restricted Features:
- Free hosting plans may restrict access to certain features, such as custom domains, plugin support, and DDoS protection.
-
Advertisements:
- Some free hosting providers may display advertisements on your server or website.
-
Downtime:
- Free hosting plans may experience more frequent downtime than paid plans.
-
Limited Support:
- Free hosting providers typically offer limited customer support.
Despite these limitations, free Minecraft server hosting can be a good option for small servers with a limited number of players. However, for larger servers or those requiring more performance and features, a paid hosting plan is recommended.
20. Understanding Minecraft Server Address and IP Conflicts
What happens if there’s an IP conflict with my Minecraft server address? IP conflicts can occur when two or more devices on a network are assigned the same IP address, leading to connection issues and network instability.
-
Symptoms of IP Conflicts:
- Players may be unable to connect to the server.
- The server may experience intermittent connection issues.
- Other devices on the network may experience connection problems.
-
Causes of IP Conflicts:
- Manual IP address assignment.
- DHCP server misconfiguration.
- Static IP address assignment within the DHCP range.
-
Resolving IP Conflicts:
- Ensure that all devices on the network are configured to obtain IP addresses automatically via DHCP.
- If you need to assign a static IP address to your server, choose an IP address outside the DHCP range.
- Check your router’s DHCP settings to ensure that the DHCP range is properly configured.
- Restart your router and all devices on the network.
By properly managing IP addresses and resolving IP conflicts, you can ensure a stable and reliable network environment for your Minecraft server.
21. Minecraft Server Address and Dynamic IP Addresses
How do dynamic IP addresses affect my Minecraft server address? Dynamic IP addresses, assigned by your internet service provider (ISP), can change periodically, causing issues with your Minecraft server address.
-
Impact of Dynamic IP Addresses:
- Players may be unable to connect to the server if the IP address changes.
- You’ll need to update the server address you share with players whenever your IP address changes.
-
Dynamic DNS (DDNS):
- A Dynamic DNS (DDNS) service can help mitigate the impact of dynamic IP addresses.
- DDNS maps a static hostname to your dynamic IP address, automatically updating the hostname whenever your IP address changes.
-
DDNS Providers:
- Several DDNS providers are available, such as No-IP, DynDNS, and FreeDNS.
-
Configuration:
- You’ll need to create an account with a DDNS provider and configure your router or server to update the DDNS record whenever your IP address changes.
By using a DDNS service, you can provide players with a stable and consistent server address, even with a dynamic IP address.
22. Top Minecraft Server Hosting Providers in the USA
Who are the leading Minecraft server hosting providers in the USA? Choosing the right Minecraft server hosting provider is essential for ensuring a smooth and enjoyable multiplayer experience. Here are some of the top Minecraft server hosting providers in the USA:
| Provider | Key Features | Price Range |
|---|---|---|
| Apex Hosting | Easy setup, 24/7 support, DDoS protection, one-click modpack installation | $7.49 – $59.99 per month |
| Shockbyte | Affordable pricing, instant setup, 100% uptime guarantee, modpack support | $2.50 – $39.99 per month |
| BisectHosting | Wide range of plans, custom control panel, daily backups, dedicated IP addresses | $6.99 – $79.99 per month |
| MCProHosting | Premium hardware, 24/7 support, global server locations, DDoS protection | $7.99 – $119.99 per month |
| ScalaCube | Multi-server support, custom modpack creation, DDoS protection, flexible pricing | $5.00 – $96.00 per month |
| Hostinger | User-friendly interface, SSD storage, automated backups, 99.9% uptime guarantee | $6.99 – $29.99 per month |
| GGServers | High-performance servers, 24/7 support, DDoS protection, global server locations | $4.00 – $32.00 per month |
| CubedHost | Custom solutions, high-performance hardware, dedicated support, advanced control panel | Contact for custom pricing |
| ServerBlend | High-performance servers, 24/7 support, DDoS protection, custom control panel | $15.00 – $120.00 per month |
| MelonCube Hosting | Easy setup, affordable pricing, 24/7 support, modpack support | $3.00 – $30.00 per month |
These providers offer a range of plans and features to suit different needs and budgets. Consider factors such as performance, uptime, customer support, and pricing when choosing a