Encountering the frustrating “We are unable to serve your request” error while automating tasks with Claude? You’re not alone. This error, often related to server-side issues or fraud detection mechanisms, can disrupt your automation workflows and hinder productivity. Fortunately, there are effective steps you can take to troubleshoot and overcome this hurdle. This guide provides a comprehensive, step-by-step approach to navigate Claude’s server request errors and ensure a seamless automation experience.
Understanding and Addressing the “We Are Unable to Serve Your Request” Message
The “We are unable to serve your request” error typically indicates that Claude’s servers are rejecting your automation attempt. This can stem from various factors, including session invalidity, triggered fraud detection systems, or temporary server glitches. To effectively resolve this, we’ll focus on establishing a clean and valid session for your automation tasks by leveraging Chrome profiles and cookie management.
Step-by-Step Guide to Troubleshooting Claude Server Errors
Here’s a detailed walkthrough to help you bypass the “we are unable to serve your request” error and optimize your Claude automation process:
Step 1: Exporting Cookies from a Valid Claude Session
Begin by ensuring you have a fully functional and valid Claude session in your regular Chrome browser. Log in to Claude (cloud.ai) and interact with the platform as you normally would to confirm the session is active and error-free. Once verified, the first crucial step is to export your cookies. This captures the session information needed for seamless automation.
Image alt text: Step 1: Click the icon to copy cookies to clipboard, initiating the cookie export process for Claude session data.
Step 2: Creating a New Chrome Profile for Automation
Next, set up a dedicated Chrome profile specifically for your Claude automation. This isolates your automation session and prevents conflicts with your regular browsing activity. Navigate to your browser settings and create a new Chrome profile. Within your automation tool, locate the Chrome Profile settings.
Image alt text: Step 2: Access Chrome Profile Settings by clicking on ‘Setting’ then ‘Chrome Profile Setting’ within your automation tool interface.
Step 3: Importing Cookies into the New Profile
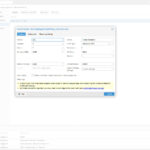
In the Chrome Profile settings of your automation tool, create a new profile. This is where you’ll paste the cookies you exported in Step 1. By importing these cookies, you’re essentially transferring your valid Claude session to this new, isolated Chrome profile, which will be used for automation. After pasting the cookies, save the new profile.
Image alt text: Step 3: Create New Chrome Profile, paste exported Claude cookies, and click ‘Create’ to finalize profile setup for automation.
Step 4: Launching and Testing the New Profile
Launch the newly created Chrome profile within your automation tool. This opens a new Chrome window running under the dedicated profile. Visit cloud.ai in this new window to verify that the imported cookies have successfully established a valid session. Briefly interact with Claude to ensure everything is working as expected.
Image alt text: Step 4: Click the Launch Icon next to the profile to initiate a new Chrome window using the configured profile for Claude automation testing.
Step 5: Closing the Test Window
After confirming a valid Claude session in the launched profile, close the Chrome window. It’s crucial to close the window properly to ensure the automation process starts with a clean slate.
Image alt text: Step 5: Click on ‘close window’ to properly terminate the test Chrome window after verifying the Claude session, preparing for automation setup.
Step 6: Initiating New Automation with the Chrome Profile
Now, begin creating your automation workflow. Select the option to create a new automation and specify that you want to use the Chrome profile you just configured.
Image alt text: Step 6: Click on ‘Add New automation using a chrome profile’ to start building your automated workflow leveraging the newly configured Chrome profile.
Step 7: Handling the Initial Server Request Error
The first time you run the automation, you might still encounter the “we are unable to serve your request” error. This is often due to Claude’s fraud detection system initially flagging the new automation attempt. Don’t worry; this is a temporary hurdle. Immediately stop the automation recording when you see this error. Navigate to Claude AI within the automation window and click the “I’m done” button (or similar confirmation). This action signals that you are a legitimate user.
Image alt text: Step 7: Go to Claude AI interface in the automation and Click on ‘I m Done’ to acknowledge and bypass the initial server request error prompt.
Step 8: Restarting Automation Recording
After clicking “I’m done,” restart the automation recording process. This second attempt should proceed without the server error.
Image alt text: Step 8: Click on the ‘+’ Icon to initiate a new recording session, restarting the automation process after addressing the initial error.
Step 9: Initiate Recording Actions
Click on the “Click to record” button (or the equivalent in your automation tool) to begin recording the specific steps you want to automate within Claude.
Image alt text: Step 9: Click on ‘Click to record’ to enable action recording and capture the steps for your Claude automation workflow.
Step 10: Confirm “I’m Done” Again in Automation
Once you’ve recorded the initial actions (like clicking “I’m done” on Claude or any other necessary first steps to establish a stable session), click “I’m done” in your automation tool to finalize this initial recording segment.
Image alt text: Step 10: Click ‘I am done in the automation’ to finalize the initial recording phase and prepare for subsequent automation steps.
Step 11 & 12: Adding and Recording Further Automation Steps
Click the “+” icon to add more steps to your automation workflow and then click “Record” to continue recording the desired actions within Claude.
Image alt texts: Step 11: Click on the ‘+’ Icon to add additional steps to your automation workflow. Step 12: Click on ‘Record’ to continue recording actions within the Claude interface for automation.
Step 13: Record Complete Workflow
Record all the necessary click and type steps that constitute your complete automation workflow. This could include interacting with Claude’s interface, inputting prompts, and extracting responses. Once finished recording all steps, click “I’m done” again.
Image alt text: Step 13: Record Click and Type steps as per requirement, completing the automation workflow recording, and finalize by clicking ‘I m Done’.
Step 14: Save and Name Your Automation
Finally, rename your automation to something descriptive and click “Save” to store your completed workflow.
Image alt text: Step 14: Rename the Automation and Click on ‘Save’ to store the finalized and named automation workflow for future use.
Optimizing Your Automation and Preventing Future Errors
To further enhance your Claude automation and proactively avoid the “we are unable to serve your request” error, consider these best practices:
- Implement Error Monitoring: Integrate a scrape step at the beginning of your automation to detect the “we are unable to serve your request” error. If detected, trigger a notification or logic to alert you or automatically retry the initial steps.
- Maintain Valid Cookies: Regularly refresh your cookies by repeating Step 1 to ensure your automation always uses a valid Claude session. Cookie validity can expire, leading to server errors.
- Respect Rate Limits: Avoid sending excessively rapid requests to Claude, as this can trigger fraud detection and result in server errors. Implement delays between automation steps if necessary.
- Check Claude’s Status: Before running automations, quickly check if Claude’s servers are experiencing any known outages or issues that might be causing the error.
Conclusion
By meticulously following these steps, you can effectively troubleshoot and resolve the “we are unable to serve your request” error in your Claude automation workflows. Establishing a dedicated Chrome profile with valid cookies, understanding the initial error as a fraud detection mechanism, and implementing best practices will lead to a smoother, more reliable automation experience with Claude. Remember to adapt these steps to your specific automation tool and workflow for optimal results.