
VMware vCenter Server is a cornerstone of vSphere environments, centralizing the management of ESXi hosts and virtual machines. It delivers essential features like high availability and fault tolerance, making it indispensable for robust virtual infrastructures. Historically, vCenter Server could be deployed on either a Windows machine or as a virtual appliance. However, it’s crucial to note that vCenter Server 6.7 marks the final release supporting Windows-based modules. Future versions are exclusively available as the vCenter Server Appliance (VCSA). While this guide focuses on installing vCenter Server 6.7 on Windows Server 2016, understanding the deprecation of Windows-based vCenter is vital for long-term infrastructure planning.
vCenter Server 6.7 on Windows is still a viable option for existing environments or specific use cases, especially for those not yet ready to migrate to VCSA. This guide provides a detailed walkthrough of a clean installation.
Quick Links: Download vCenter 6.7 | vCenter 6.7 Release Notes | What’s New in vSphere | VMware vSphere Documentation | vSphere Central Resources
Software Prerequisites for Windows vCenter Server 6.7
Before initiating the installation of VMware vCenter Server and modules for Windows, careful consideration of software requirements is paramount. Ensuring compatibility and proper configuration at this stage prevents potential issues down the line.
- Operating System: A 64-bit Windows Server operating system is mandatory. Supported versions start from Windows Server 2008 SP2 and extend to newer releases compatible with vSphere 6.7 at the time of its release. It’s always best practice to consult the latest VMware compatibility guide to confirm the most suitable and supported Windows Server version.
- Database: For smaller deployments (up to 20 hosts and 200 VMs), the bundled internal PostgreSQL database offers a straightforward option. However, for larger environments or those requiring enterprise-level database features, external database support is available. Supported external databases include:
- Microsoft SQL Server: Versions starting from 2008 R2 SP2 and later. Check the Database Interoperability Matrix for a comprehensive list of compatible SQL Server versions.
- Oracle: Versions 11g and 12c are supported. Again, refer to the Database Interoperability Matrix for precise version details.
- Database Permissions: When utilizing an external database, the designated account for vCenter Server authentication needs appropriate database privileges. This typically entails:
- Oracle: DBA role.
- SQL Server:
sysadminserver role ordb_ownerfixed database role.
For detailed permission requirements, refer to the Database Permission Requirements documentation.
- Third-Party Compatibility: Crucially, verify the compatibility of any third-party software or plugins that integrate with your vSphere environment. This includes backup solutions, antivirus software, monitoring tools, and other utilities. These components may require updates to ensure seamless operation with vSphere 6.7.
- ESXi Host Compatibility: ESXi hosts intended to be managed by vCenter Server 6.7 must be running version 6.0 or later. Older versions like 5.5 and earlier are not supported and lack a direct upgrade path to 6.7.
- VMware Product Interoperability: Always consult the Product Interoperability Matrix to confirm compatibility with other VMware products within your ecosystem.
- Release Notes and KB Articles: Given that vSphere 6.7 was a relatively new release at the time of its launch, thorough review of the Release Notes and Important information before upgrading to vSphere 6.7 KB article is highly recommended. These resources provide the most up-to-date information on compatibility and potential issues.
Architectural Planning for vCenter Server 6.7 on Windows
While vCenter Server on Windows offers a familiar installation experience, strategic architectural decisions are vital for optimal performance and scalability. It’s also important to remember that vCenter 6.7 is the last version to include Windows modules, making VCSA the strategic direction for future vSphere deployments.
- Deprecation of Windows Modules: As highlighted, future vCenter Server versions will exclusively be appliance-based (VCSA). For new deployments, and especially for long-term planning, consider VCSA as the primary deployment model. Migration tools and guides are available to transition from Windows vCenter to VCSA. Resources like the vCenter Server Appliance 6.7 Install Guide and Migrating Windows vCenter Server to VCSA 6.7 can aid in understanding and executing this migration.
- Deployment Topology: Plan your vCenter Server topology according to VMware’s recommendations outlined in vCenter Server and Platform Services Controller Deployment Types. Understanding the different deployment models (embedded vs. external Platform Services Controller – PSC) is crucial. For vSphere 6.7, the embedded deployment model is often suitable for many environments.
- vCenter and PSC Architecture: Familiarize yourself with vCenter Server and Platform Services Controller architecture. VMware provides helpful video resources on vCenter Server and Platform Services Architecture.
- Topology Planning Tool: For complex environments or upgrade scenarios, the vSphere Topology and Upgrade Planning Tool (here) can assist in designing an appropriate vCenter architecture.
- Embedded PSC: For many deployments, especially greenfield vSphere 6.7 implementations, the embedded PSC model, where both vCenter Server and PSC are on the same server, is a common and simplified approach. This guide will focus on this embedded deployment.
- Enhanced Linked Mode: vSphere 6.7 introduced Embedded PSC with Enhanced Linked Mode (more info). This offers native vCenter Server High Availability (HA) and eliminates SSO site boundaries, enhancing manageability and resilience.
Hardware Sizing for Windows vCenter Server 6.7
Appropriate hardware allocation is critical for vCenter Server performance. Resource requirements scale based on the size of your vSphere environment.
- Deployment Options: Windows-based vCenter Server can be installed on either a physical server or a virtual machine.
- Embedded PSC Hardware: For Windows vCenter Server with an embedded PSC, VMware provides sizing guidelines based on the number of hosts and VMs:
- Tiny: (Up to 10 hosts, 100 VMs) – 2 CPUs, 10 GB RAM.
- Small: (Up to 100 hosts, 1000 VMs) – 4 CPUs, 16 GB RAM.
- Medium: (Up to 400 hosts, 4000 VMs) – 8 CPUs, 24 GB RAM.
- Large: (Up to 1000 hosts, 10,000 VMs) – 16 CPUs, 32 GB RAM.
- X-Large: (Up to 2000 hosts, 35,000 VMs) – 24 CPUs, 48 GB RAM (introduced in vSphere 6.5).
- External PSC Hardware: If deploying the PSC on a separate Windows machine (external PSC), it requires a minimum of 2 CPUs and 4 GB of RAM.
- Storage Considerations: For environments with a high number of LUNs and paths per ESXi host (more than 512 LUNs and 2048 paths), VMware recommends sizing vCenter Server as “Large” or “X-Large” to handle the increased metadata load.
- Disk Space: The Windows vCenter Server installation requires specific free disk space:
- Program Files: 6 GB.
- Program Data: 8 GB.
- System folder: 3 GB.
- The PSC machine (if separate) requires: Program Files 1 GB, Program Data 2 GB, System folder 1 GB.
- CPU Compatibility: Be aware that vSphere 6.7 dropped support for certain older Intel and AMD CPUs. Consult the Release Notes for a complete list of unsupported processors to ensure your hardware is compatible.
Additional Pre-Installation Considerations
Beyond software, architecture, and hardware, several other factors should be addressed before starting the vCenter Server 6.7 on Windows installation.
- Third-Party Software Interference: Temporarily disable any third-party software, such as antivirus scanners, that might interfere with the installation process.
- Service Account Permissions: If you intend to run vCenter Server services under a domain user account instead of the Local System account, ensure this account:
- Is a member of the local administrators group on the Windows Server.
- Has the “Log on as a service” right.
- Has the “Act as part of the operating system” right.
- Verify that the local machine policy permits granting “Log on as a batch job” rights to new local users.
- NTP Configuration: Synchronize all vSphere components, including vCenter Server and ESXi hosts, to the same NTP (Network Time Protocol) server to ensure accurate timekeeping across the environment.
- FQDN Resolution: Proper DNS configuration with forward and reverse lookup for the vCenter Server FQDN (Fully Qualified Domain Name) is essential. Ensure the FQDN resolves correctly before installation.
- Port Requirements: Review the Required Ports for vCenter Server and PSC documentation and ensure that necessary ports are open in your firewall.
- Configuration Maximums: Familiarize yourself with vSphere 6.7 configuration maximums, available at Configuration Maximums for VMware vSphere 6.7.
- TLS Configuration: vSphere 6.7 enables TLS 1.2 by default and disables TLS 1.0 and TLS 1.1 for enhanced security. Refer to the Release Notes for more details on TLS settings.
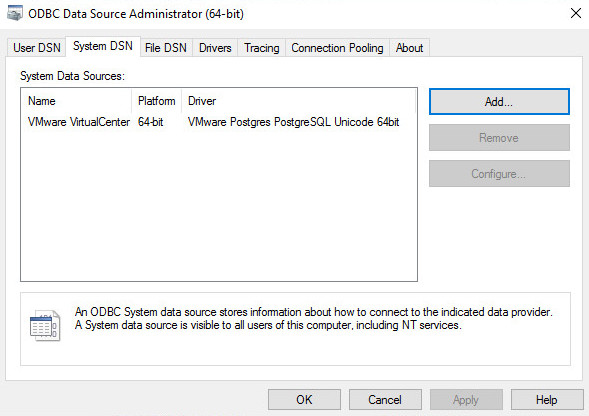
Creating a 64-bit ODBC Data Source
If you plan to use an external SQL database for vCenter Server, configuring a 64-bit ODBC (Open Database Connectivity) data source is a prerequisite.
- Open ODBC Data Source Administrator: Access it via Control Panel > Administrative Tools > ODBC Data Sources (64-bit).
- System DSN: Navigate to the System DSN tab.
- Add Data Source: Click Add.
- Select Driver: Choose the appropriate driver, typically “SQL Server Native Client 11.0” or “Microsoft ODBC Driver for SQL Server” (you might need to install the driver if it’s not present).
- Configuration: Input the necessary details to connect to your external SQL database server, including the server name, database name, and authentication method.
- Test Connection: Crucially, test the data source connection to ensure it’s working correctly before proceeding with the vCenter Server installation.
If you are using the embedded PostgreSQL database, this step is skipped as the System DSN is automatically configured during the installation process.
 odbc
odbc
Step-by-Step Installation of vCenter Server 6.7 on Windows
With prerequisites addressed, proceed with the installation:
- Mount ISO and Run Installer: Download the “VMware vCenter Server and Modules for Windows” ISO from VMware downloads (v6.7.0 Download). Mount the ISO image to your Windows Server. Right-click
autorun.exeand select Run as administrator to launch the VMware vCenter Installer. - Select vCenter Server for Windows: In the installer menu, ensure vCenter Server for Windows is selected and click Install.
 Windows_vCenter67_1
- Welcome and Next: The vCenter Server 6.7 Installer window will open. Click Next to proceed.
 Windows_vCenter67_2
- Accept EULA: Accept the End User License Agreement and click Next.
 Windows_vCenter67_3
- Deployment Type: Choose the deployment type. For this guide, select Embedded Platform Services Controller for a simplified, single-server deployment. Click Next. (Remember, for external PSC deployments, the PSC component must be installed first). The installer will check for sufficient server resources at this stage and display an error if requirements aren’t met.
 Windows_vCenter67_4
- System Name (FQDN): Enter the Fully Qualified Domain Name (FQDN) of your Windows Server in the System Name field. Click Next.
 Windows_vCenter67_5
- SSO Configuration: Configure Single Sign-On (SSO). You can either create a new SSO domain or join an existing one. If creating a new domain:
- Leave the default domain name
vsphere.localor specify a custom SSO domain name (avoid using your Active Directory domain name). - Set a strong password for the SSO administrator account (
[email protected]by default). - Provide a vCenter Site name. Click Next. Note: vCenter 6.7 is the last version requiring a SSO site name.
- Leave the default domain name
 Windows_vCenter67_6
- Service Account: Choose to run vCenter services using the Local System account or specify a custom service account. If using a custom account, ensure it has the necessary permissions as outlined in the “Other Considerations” section. Click Next.
 Windows_vCenter67_7
- Database Configuration: Select Embedded PostgreSQL database or choose Use external database and select the pre-configured DSN for your external database. Click Next.
 Windows_vCenter67_8
- Port Settings: Accept the default port configurations unless you have specific port requirements. Click Next.
 Windows_vCenter67_9
- Installation Directories: Choose the directories for installing vCenter services or accept the defaults. Click Next.
 Windows_vCenter67_10
- Customer Experience Improvement Program (CEIP): Select whether to join the VMware Customer Experience Improvement Program. Click Next.
 Windows_vCenter67_11
- Review and Install: Review all configuration settings on the summary page. Click Install to begin the vCenter Server 6.7 installation process.
 Windows_vCenter67_12
- Installation Completion: Once the installation completes successfully, click Finish.
 Windows_vCenter67_13
Post-Installation Configuration
After successful installation of vCenter Server 6.7 on Windows, perform these essential post-installation steps:
-
Access vCenter: Connect to vCenter Server using its IP address or FQDN. Open a web browser and navigate to
https://<vcenter_fqdn_or_ip>. -
Launch vSphere Client: Choose either Launch vSphere Client (HTML5) or Launch vSphere Web Client (FLEX). While the Flash-based Flex client is deprecated, the HTML5 vSphere Client is the recommended option for its modern interface and future compatibility.
-
Licensing: Apply a valid vCenter Server license key within the 60-day evaluation period.
- VMware Licensing Portal: If you have purchased vCenter Server licenses, log in to your VMware licensing portal to retrieve your license keys. Contact your VMware account manager if keys are missing.
- Login to vSphere Client: Log in to the vSphere Client using the SSO administrator credentials (
[email protected]or your custom SSO admin account). - Navigate to Licensing: From the Menu, select Administration, and then under Licensing, choose Licenses.
 Windows_vCenter67_16
- Add New License: Click Add New Licenses.
- Enter License Key: Enter your vCenter Server license key and click Next.
- License Name (Optional): Assign a name to the license (optional). Click Next.
- Finish: Click Finish to add the license.
 Windows_vCenter67_15
- Assign License: Go to Assets, select your vCenter Server instance (initially in evaluation mode), and click Assign License. Choose the newly added license key and click OK.
-
Configure Active Directory Integration (Optional): Integrate vCenter Server with your Active Directory domain for centralized user and group management.
- Domain Join Verification: From the Menu, go to Administration, then Single Sign On, and Configuration. Check the Active Directory Domain tab to verify if vCenter is already domain-joined.
- Add Identity Source: If not domain-joined or to add an Identity Source, go to the Identity Sources tab and click Add Identity Source.
- Active Directory Details: Enter the Active Directory domain details and click OK.
 Windows_vCenter67_18
 -
Permissions Configuration: Grant permissions to Active Directory users and groups on vCenter objects (Datacenters, Clusters, VMs, etc.) for role-based access control. Refer to vSphere Permissions documentation for detailed information.
-
Adding ESXi Hosts: Start adding ESXi hosts to your vCenter Server.
- Navigate to Hosts and Clusters: From the Menu, select Hosts and Clusters.
- Create Datacenter: Right-click your vCenter Server instance and choose New Datacenter. Name the datacenter and click OK.
- Add Host: Right-click the newly created Datacenter and select Add Host. Follow the wizard to add your ESXi hosts.
Configuring clusters and advanced vCenter features is beyond the scope of this installation guide. Refer to the comprehensive VMware vSphere documentation for further configuration and management details.
Please share this guide if you found it helpful!