
Interfacing with third-party companies often presents unique technical challenges. One common scenario arises when a partner only provides access to a view within their database, sometimes even requiring direct database calls. This situation necessitates establishing connections between different database systems. This guide will walk you through the process of setting up a SQL Server to remotely link to an Oracle server.
Table of Contents
Installing Oracle Data Access Components (ODAC)
Oracle Data Access Components (ODAC) are essential software tools that enable applications to access Oracle databases. Think of them as the bridge facilitating communication between your SQL Server and the Oracle database.
1. ODAC Package Download Location
- Official ODAC Download Page: Oracle ODAC Downloads
- Version Compatibility is Key: It is crucial to select the ODAC version that corresponds to your Oracle database version. In this example, we’ll use 64-bit ODAC 12.2c Release 1 (12.2.0.1.0) Xcopy for Windows x64.
- Download File Name: You should download a ZIP file named similar to
ODAC122010Xcopy_x64.zip.
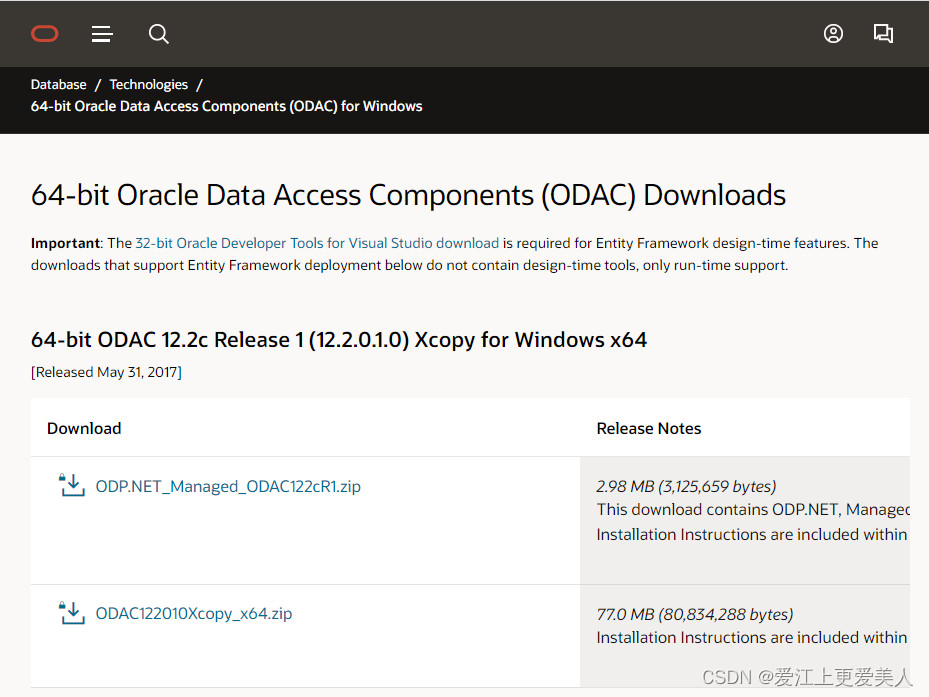 Oracle ODAC Download Page: Navigate to the official Oracle website to download the Oracle Data Access Components (ODAC) required for connecting SQL Server to Oracle.
2. Extracting the ODAC Package
- Create a Directory: On your SQL Server, create a dedicated directory to house the ODAC files. Extract the contents of the downloaded ZIP package into this newly created directory.
- Explore the Extracted Folders: After extraction, you’ll find several folders within the directory. Here’s a brief overview of some key folders:
- instantclient_11_2: This is the foundational Oracle client. All ODAC components rely on this client to function. It’s the base package required for connectivity.
- oledb: Contains the OLE DB provider, essential for establishing linked server connections.
- asp.net, asp.net4, odp.net4, odp.net20: These folders contain components for different .NET and ASP.NET versions, which might be needed depending on your application requirements but are not essential for basic SQL Server linking.
- oramts: Includes Oracle MTS Recovery Service, useful in distributed transaction scenarios.
- network: Initially, this folder is less important during installation but becomes relevant later for storing the
tnsnames.orafile, which contains Oracle connection details.
3. Installing ODAC Components
- Open Command Prompt as Administrator: Launch Command Prompt with “Run as administrator” privileges. Navigate to the directory where you extracted the ODAC package using the
cdcommand. - Execute the Installation Script: Run the
install.batscript with the necessary parameters:install.bat all D:ERP_Oracle Oracle true - Understanding Installation Parameters:
- First Parameter:
all: Theallparameter instructs the script to install all components and the client found within the extracted folders. If you only need specific components, like the OLE DB provider, you can specifyoledbinstead ofall(e.g.,install.bat oledb D:ERP_Oracle Oracle). - Second Parameter:
D:ERP_Oracle: This is the installation directory. Adjust this path to your desired installation location. It’s recommended to avoid spaces, parentheses, or non-English characters in the path. - Third Parameter:
Oracle: This is the ORACLE HOME NAME. You can customize this name; it doesn’t have to be “Oracle.” This name is used when writing to the Windows Registry. For instance, the command above will create a registry key atHKEY_LOCAL_MACHINESOFTWAREOracleKEY_Oracle, where “Oracle” is the name you provided. - Fourth Parameter:
true: Generally, you only need the first three parameters. The installer automatically includes dependent components. However, if you want to install only the specified component and exclude dependencies, usefalseas the fourth parameter. For example,install.bat asp.net D:ERP_Oracle Oracle falsewill install only ASP.NET components without its dependencies.
- First Parameter:
 ODAC Installation Directory via Command Prompt: This screenshot shows the command prompt executing the ODAC installation script, highlighting the parameters used for installation and the installation path.
4. Setting Environment Variables
- Define ORACLE_HOME: Add a new system environment variable named
ORACLE_HOMEand set its value to your ODAC installation path (e.g.,D:OracleClient). - Update Path Variable: Edit the
Pathsystem environment variable to include the following:%ORACLE_HOME%;%ORACLE_HOME%bin;. This ensures that Windows can find the Oracle client libraries.
 Environment Variables Configuration: This image displays the System Environment Variables window, showing the ORACLE_HOME variable and the updated Path variable that includes Oracle client paths.
5. Configuring the tnsnames.ora File
- Purpose of
tnsnames.ora: This file is crucial for Oracle client to resolve Oracle database connection aliases (TNS names) to connect strings. - Location: The
tnsnames.orafile should be placed inD:ERP_Oraclenetworkadmin(or your installation path’snetworkadminsubdirectory). - Copy from Sample: Copy the
tnsnames.orafile fromD:ERP_OraclenetworkadminsampletoD:ERP_Oraclenetworkadmin. - Edit
tnsnames.ora: Opentnsnames.orawith a text editor and configure it with your Oracle database connection details. Here’s a template example:
ORCL =
  (DESCRIPTION =
    (ADDRESS_LIST =
      (ADDRESS = (PROTOCOL = TCP)(HOST = your_oracle_host)(PORT = 1521))
    )
    (CONNECT_DATA =
      (SERVICE_NAME = your_oracle_service_name)
    )
  )
Replace your_oracle_host, 1521 (Oracle default port), and your_oracle_service_name with your actual Oracle server details.
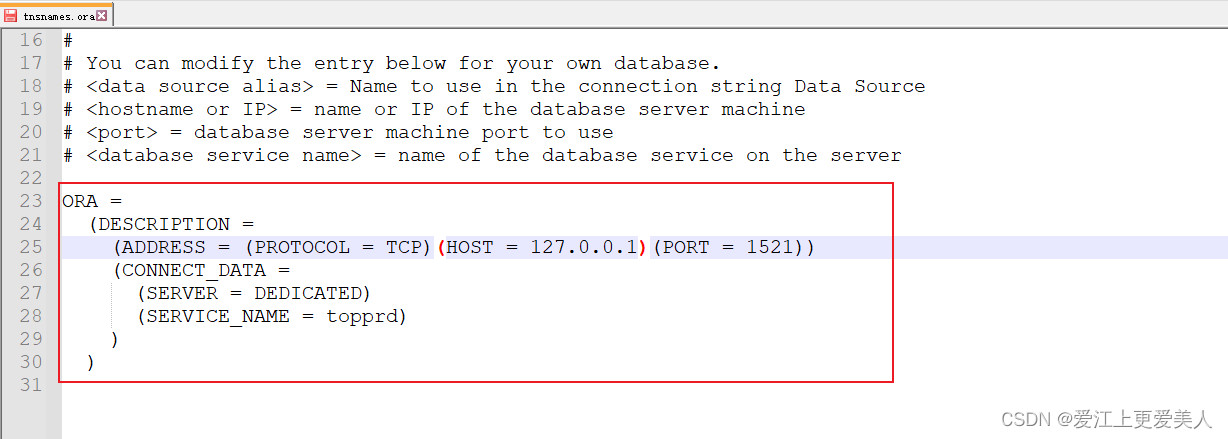 tnsnames.ora Configuration Example: This image shows a sample configuration within the tnsnames.ora file, highlighting the key parameters like HOST, PORT, and SERVICE_NAME that need to be configured for Oracle database connection.
6. Important Notes
- Uninstalling ODAC: To uninstall, navigate to your ODAC installation directory in the command prompt and run:
uninstall.bat all D:ERP_Oracle. - Log Files: Both
install.batanduninstall.batgenerate log files (install.loganduninstall.logrespectively) in the installation directory for troubleshooting.
7. Common Issues During ODAC Installation
- Issue 1: OracleOracleMTSRecoveryService fails to start after reboot, with
omtsreco.exereporting errors.- Cause: Missing Microsoft Visual C++ Redistributable.
- Solution: Ensure Microsoft Visual C++ 2015 Redistributable (x64) or a later compatible version is installed on the server.
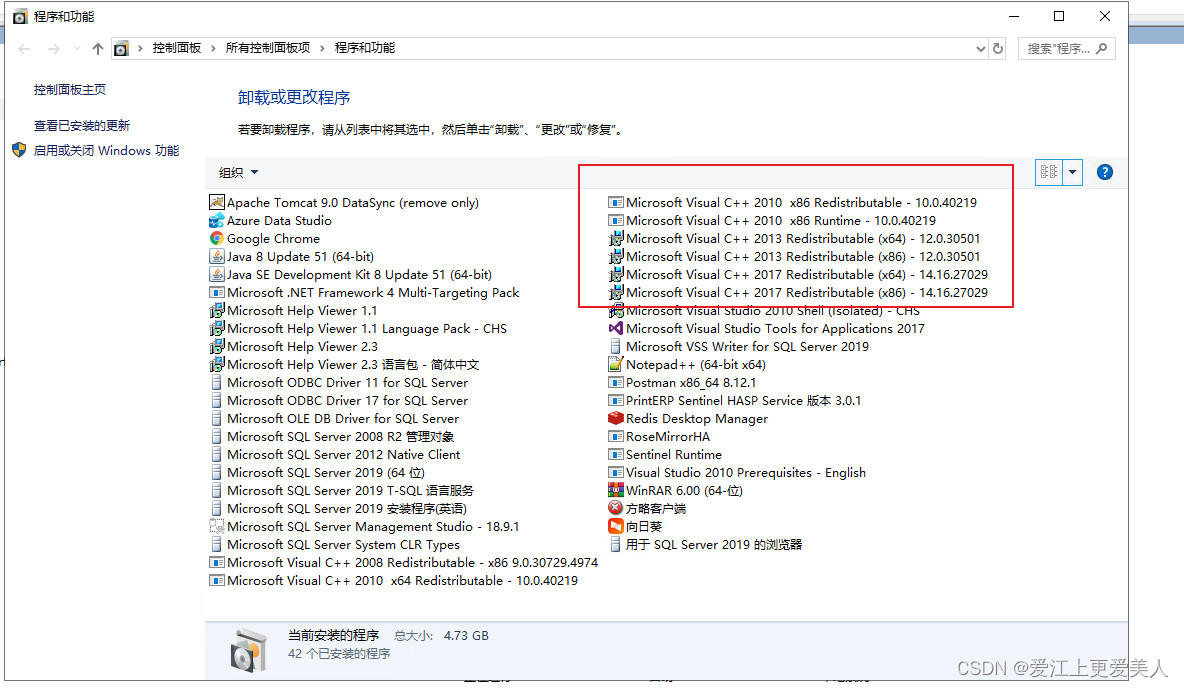 Microsoft Visual C++ Redistributable Solution: This image shows the Control Panel Programs and Features window, highlighting the Microsoft Visual C++ Redistributable packages as a solution to the ODAC installation issue.
- Issue 2: “Oracle Provider for OLE DB” doesn’t appear in SQL Server Linked Server provider list after multiple attempts.
- Cause: Potentially incomplete or corrupted ODAC installation.
- Solution: Reinstall the ODAC package to ensure a clean and complete installation.
Linking SQL Server to Oracle Remotely
Tested Environment: SQL Server 2019 (15.0.2000.5), Oracle 12c (12.2.0.1.0), Windows Server 2016
1. Creating an Oracle Linked Server Using SQL Server Management Studio (SSMS)
- 1.1 Open SSMS: Launch SQL Server Management Studio and connect to your SQL Server instance using ‘sa’ or an equivalent administrator account. In “Object Explorer,” expand “Server Objects,” right-click on “Linked Servers,” and select “New Linked Server…”.
 New Linked Server in SSMS: This screenshot shows the SQL Server Management Studio interface, highlighting the "Linked Servers" node in Object Explorer and the "New Linked Server…" option.
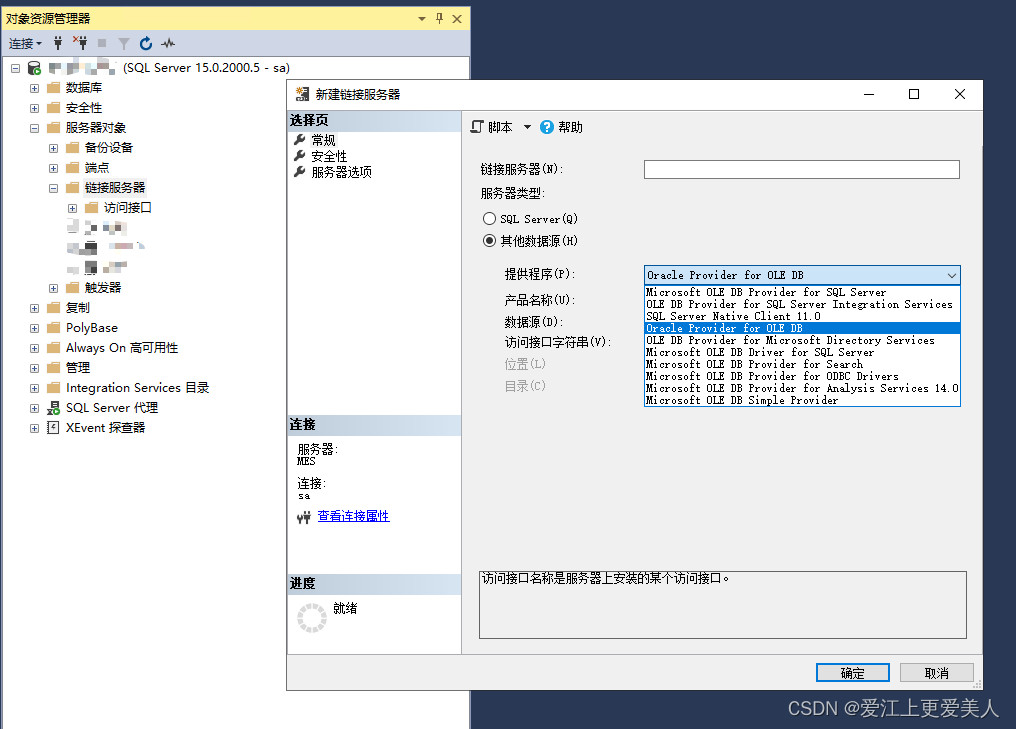
-
1.2 Configure Linked Server Properties (General Tab): In the “New Linked Server” dialog, fill in the details as follows:
- Linked server: Provide a name for your linked server (e.g.,
ORACLE_LINK). This is the alias you’ll use in SQL Server to refer to the Oracle server. - Server type: Choose “Other data source.”
- Provider: Select “Oracle Provider for OLE DB” (important for 64-bit systems).
- Product name: Enter “Oracle”. This is a fixed value required for Oracle linked servers.
- Data source: Enter the TNS name you configured in your
tnsnames.orafile (e.g.,ORCL). - Provider string: You can leave this blank or optionally enter
MSDASQL.
- Linked server: Provide a name for your linked server (e.g.,
-
1.3 Configure Security (Security Tab): Navigate to the “Security” tab. Select “Be made using this security context” and enter the username and password for an Oracle user account that SQL Server will use to connect to the Oracle database.
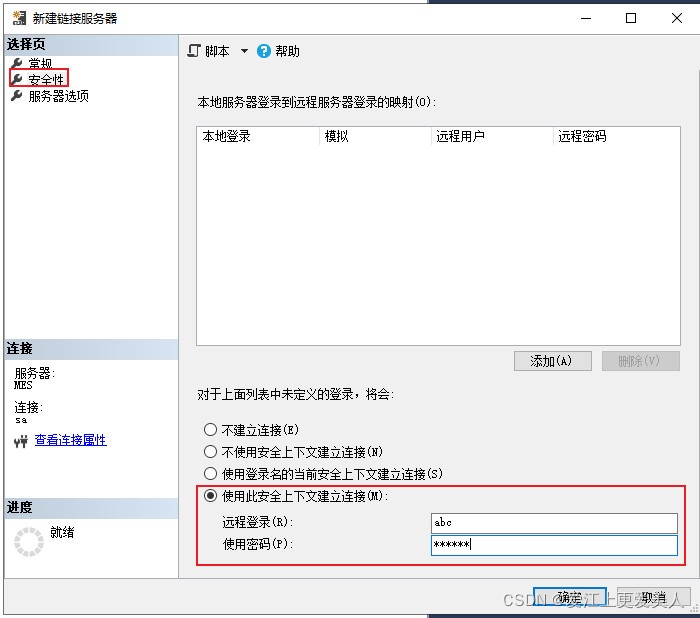 New Linked Server Dialog – Security Tab: This screenshot shows the "Security" tab, emphasizing the "Be made using this security context" option and the fields for Oracle username and password.
- 1.4 Configure Server Options (Server Options Tab): In the “Server Options” tab, ensure that RPC and RPC Out are set to True.
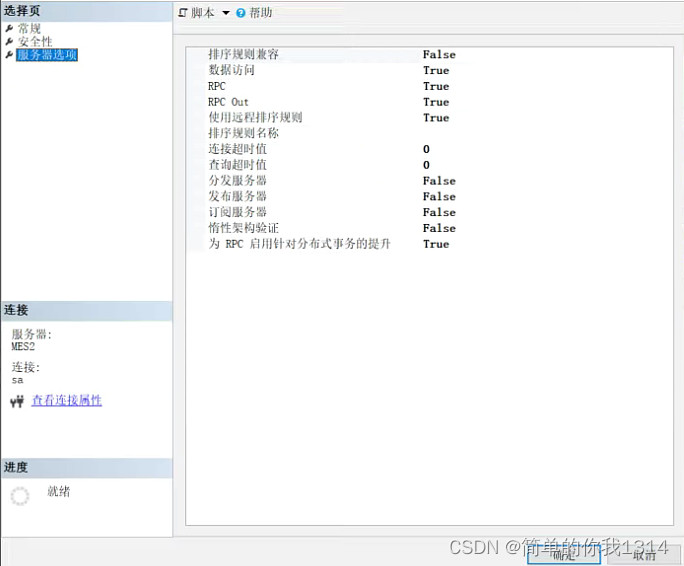 New Linked Server Dialog – Server Options Tab: This image shows the "Server Options" tab, specifically highlighting the RPC and RPC Out options set to True for enabling remote procedure calls.
- 1.5 Test Connection: After completing these steps, click “OK.” If everything is correctly configured, the linked server should be created successfully, and you can expand the Linked Servers node to see your new Oracle linked server.
2. Creating an Oracle Linked Server Using T-SQL Commands
Alternatively, you can use T-SQL commands to create the linked server. Execute the following scripts in SQL Server Management Studio, replacing placeholders with your actual values:
-- Create Linked Server
EXEC master.dbo.sp_addlinkedserver @server = N'ORACLE_LINK', @srvproduct=N'Oracle', @provider=N'OraOLEDB.Oracle', @datasrc=N'ORCL'
-- Configure Security Credentials
EXEC master.dbo.sp_addlinkedsrvlogin @rmtsrvname = N'ORACLE_LINK', @locallogin = NULL ,@useself = N'False', @rmtuser = N'oracle_username', @rmtpassword = N'oracle_password'
Replace:
ORACLE_LINKwith your desired linked server name.ORCLwith your TNS name fromtnsnames.ora.oracle_usernameandoracle_passwordwith the Oracle credentials.
3. Common Issues When Creating Oracle Linked Servers
- Issue 1: Error: “Cannot create an instance of OLE DB provider “OraOLEDB.Oracle” for linked server “ORA”.”
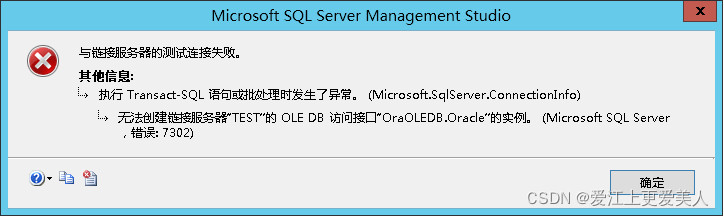 Linked Server Creation Error – OLE DB Provider Instance: This error message screenshot shows the "Cannot create an instance of OLE DB provider 'OraOLEDB.Oracle' for linked server" error during linked server creation.
- **Cause**: "Allow inprocess" option is not enabled for the Oracle OLE DB provider.
- **Solution**: In SSMS, navigate to "Linked Servers" -> "Providers" -> "OraOLEDB.Oracle". Right-click "OraOLEDB.Oracle" and select "Properties." Check the "Allow inprocess" box.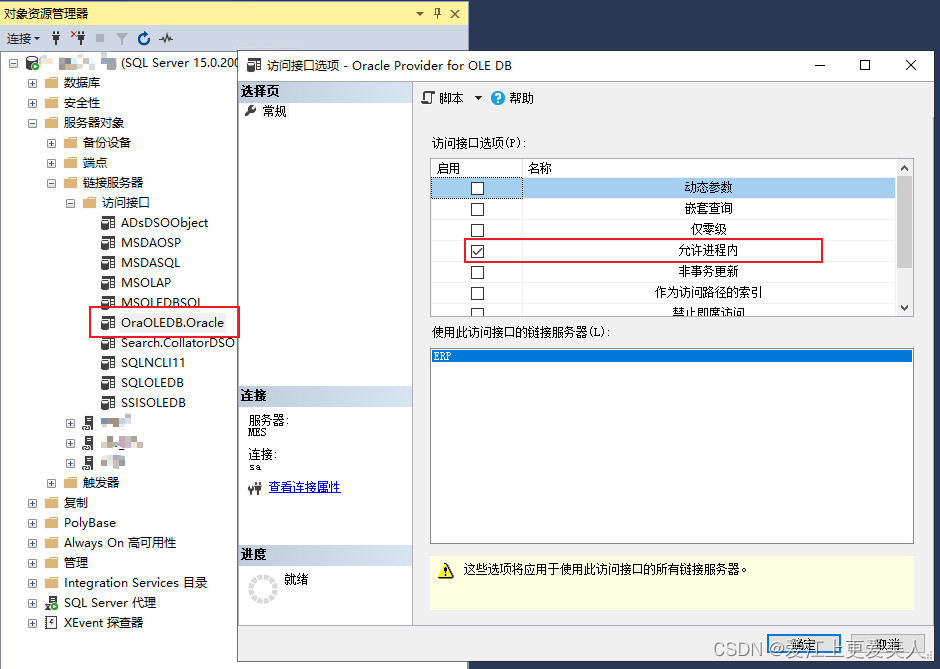 Enable Allow Inprocess for Oracle Provider: This image shows the Provider Properties dialog for OraOLEDB.Oracle, highlighting the "Allow inprocess" checkbox that needs to be enabled.
- Issue 2: Error: “ORA-12154: TNS:could not resolve the connect identifier specified.”
- Cause: Incorrect TNS name or misconfiguration in
tnsnames.ora. - Solution: Double-check the TNS name used in the linked server configuration and verify that the
tnsnames.orafile is correctly configured with the right Oracle database connection details (HOST, PORT, SERVICE_NAME) and is placed in the correct directory.
- Cause: Incorrect TNS name or misconfiguration in
Conclusion
Connecting SQL Server to Oracle might seem complex initially, but by meticulously following these steps, you can successfully establish a robust link between these powerful database systems. Remember, perseverance and attention to detail are key to overcoming any technical hurdle. With patience and careful configuration, you can seamlessly integrate your SQL Server environment with Oracle, unlocking new possibilities for data access and interoperability.