
In the realm of server management, a static IP address is often a cornerstone of reliable network infrastructure. Unlike dynamic IP addresses assigned by DHCP servers, static IPs remain constant, ensuring consistent accessibility and stability for your Windows Server 2019. This is particularly crucial for services that require a fixed address for clients or other systems to connect, such as web servers, database servers, and remote access gateways.
This comprehensive guide will walk you through the process of configuring a static IP address for both IPv4 and IPv6 protocols on your Windows Server 2019. Whether you are deploying a new server or optimizing an existing one, understanding how to set a static IP is an essential skill for any server administrator.
Prerequisites
Before we begin, ensure you have the following:
- A Windows Server 2019, hosted on a VPS or Dedicated Server.
- Remote Desktop Protocol (RDP) access to your server with administrative privileges.
Step 1: Access Network Adapter Settings
The first step is to navigate to the network adapter settings within your Windows Server 2019 environment. This is where you will configure the static IP address.
- Open Control Panel: Click on the Start Menu and type “Control Panel”. Select the Control Panel app.
- Navigate to Network and Internet: In the Control Panel, click on Network and Internet.
- Open Network and Sharing Center: Click on Network and Sharing Center.
- Change Adapter Settings: On the left-hand pane, click on Change adapter settings. This will display a list of your server’s network adapters.
 Accessing Network Adapter Settings in Windows Server 2019 Control Panel
Step 2: Locate Your IP Details
Before configuring a static IP, you need to gather the necessary IP address information. For Snel customers, this information is readily available in your client area.
- Go to My.snel.com: Open your web browser and navigate to the Snel client area at My.snel.com.
- Navigate to your Server: Locate and select your VPS or Dedicated Server.
- Access Network Interfaces: Click on the Network tab and then select Interfaces.
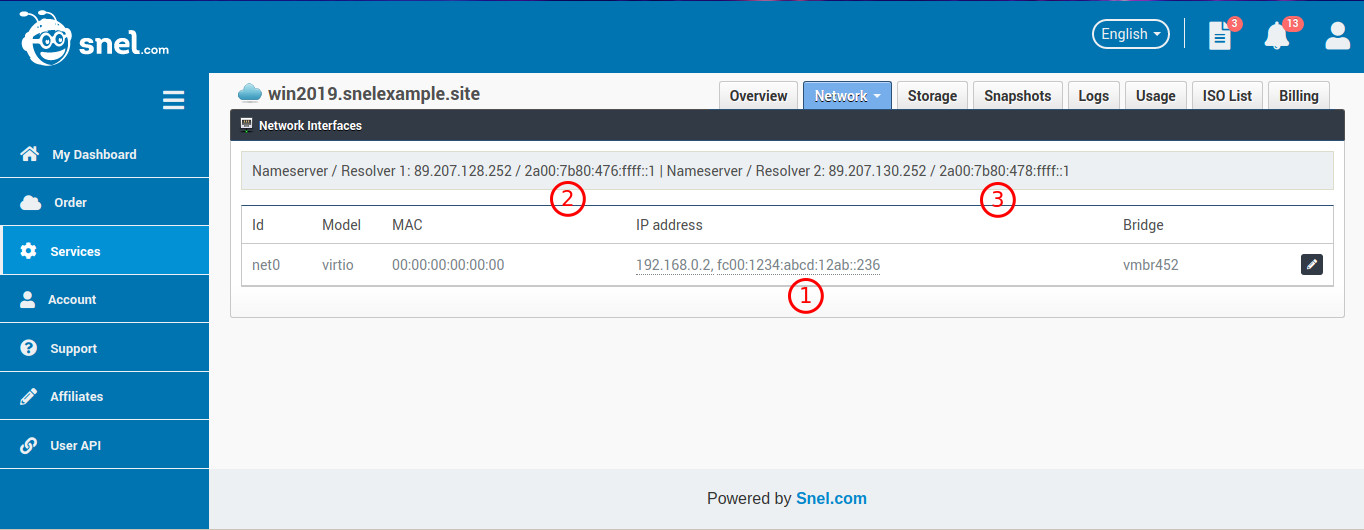
Here, you will find the essential network details, including your IPv4 and IPv6 addresses, subnet masks, default gateways, and DNS server addresses. Note down these details, as you will need them in the following steps.
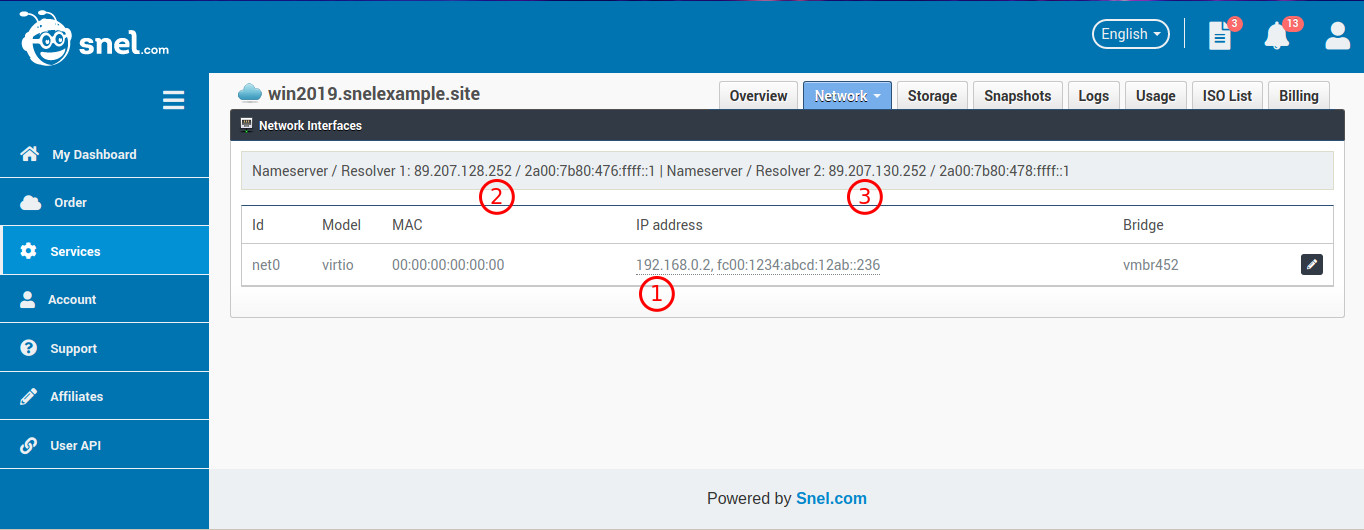 Network Interfaces Section in Snel Control Panel Showing IP Addresses
If you are unsure about any of these values, do not hesitate to contact the Snel Support team for assistance.
Step 3: Configure Static IPv4 Address
Now that you have gathered your IPv4 details, you can proceed to configure the static IPv4 address on your Windows Server 2019.
- Open Ethernet Properties: In the Network Connections window (from Step 1), right-click on your Ethernet adapter and select Properties.
- Select IPv4: In the Ethernet Properties window, scroll down and find Internet Protocol Version 4 (TCP/IPv4). Select it by clicking once, and then click on the Properties button.
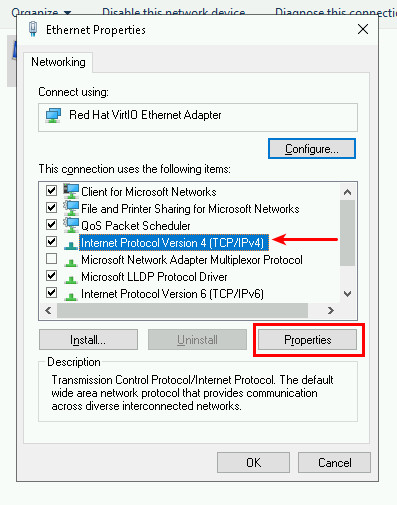 IPv4 Properties Window in Windows Server 2019 for Static IP Configuration
-
Enter Static IP Details: In the Internet Protocol Version 4 (TCP/IPv4) Properties window, select Use the following IP address.
- IP address: Enter the IPv4 address you noted down from the Snel client area. (e.g., 192.168.0.2)
- Subnet mask: Enter the subnet mask (e.g., 255.255.255.0).
- Default gateway: Enter the default gateway address (e.g., 192.168.0.1).
-
Enter DNS Server Addresses: Select Use the following DNS server addresses.
- Preferred DNS server: Enter the primary DNS server address from your Snel client area.
- Alternate DNS server: Enter the secondary DNS server address (optional, but recommended).
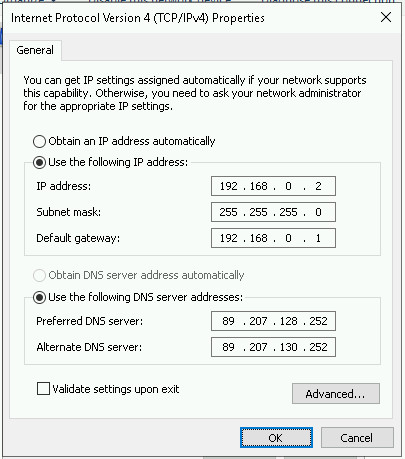 Configuring Static IPv4 Address Details in Windows Server 2019
- Apply Configuration: Click OK in the IPv4 Properties window, and then click Close in the Ethernet Properties window.
Step 4: Obtain IPv6 Address Details
If you require IPv6 connectivity, you will also need to configure a static IPv6 address. Similar to IPv4, you can find your IPv6 details in the Snel client area.
- Navigate to Network Interfaces (Snel Client Area): Return to the Network tab and Interfaces section in your My.snel.com client area, as you did in Step 2.
- Locate IPv6 Details: Find the IPv6 section. Note down the following information:
- IPv6 address: (e.g., fc00:1234:abcd:12ab::236)
- Subnet prefix length: (e.g., 48)
- Default gateway: (e.g., fc00:1234:abcd::1)
- IPv6 DNS server addresses.
 Locating IPv6 Address Details in Snel Control Panel Interface
Again, if you have any questions, Snel Support is available to help.
Step 5: Configure Static IPv6 Address
With your IPv6 information at hand, you can now configure the static IPv6 address on your Windows Server 2019.
- Open Ethernet Properties: If you closed the Ethernet Properties window, repeat Step 1 and Step 2 of “Step 3: Configure Static IPv4 Address” to access the Ethernet Properties window again.
- Select IPv6: In the Ethernet Properties window, find and select Internet Protocol Version 6 (TCP/IPv6), then click Properties.
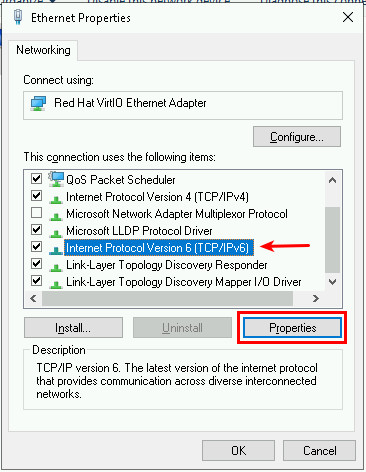 IPv6 Properties Option in Ethernet Adapter Properties
-
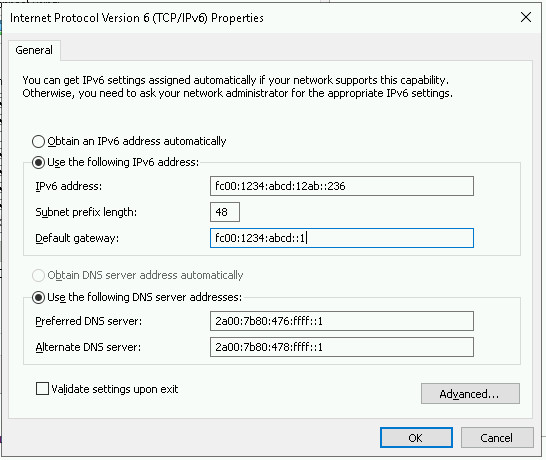
Enter Static IPv6 Details: In the Internet Protocol Version 6 (TCP/IPv6) Properties window, select Use the following IPv6 address.
- IPv6 address: Enter the IPv6 address you noted from the Snel client area. (e.g., fc00:1234:abcd:12ab::236)
- Subnet prefix length: Enter the subnet prefix length (e.g., 48).
- Default gateway: Enter the IPv6 default gateway address (e.g., fc00:1234:abcd::1).
-
Enter IPv6 DNS Server Addresses: Select Use the following DNS server addresses.
- Preferred DNS server: Enter the primary IPv6 DNS server address.
- Alternate DNS server: Enter the secondary IPv6 DNS server address (optional).
 Configuring Static IPv6 Address Settings in Windows Server 2019
- Apply Configuration: Click OK in the IPv6 Properties window, and then click Close in the Ethernet Properties window.
Conclusion
Congratulations! You have successfully configured a static IP address for both IPv4 and IPv6 on your Windows Server 2019. By following these steps, you’ve ensured that your server maintains a consistent and predictable IP address, crucial for reliable server operations and accessibility.
Setting a static IP address is a fundamental aspect of server administration. This configuration provides stability for your services and simplifies network management. Remember to always keep your IP address information secure and consult with your hosting provider’s documentation or support if you encounter any difficulties.