Inspired by the enduring craftsmanship of antique wood boxes, This Old House general contractor Tom Silva presents a timeless woodworking project: the handcrafted serving tray. This guide delves into creating a robust and beautiful serving tray, emphasizing the box joint—a technique celebrated for its strength and simplicity, offering triple the surface area and holding power of a basic butt joint, yet less complex than a dovetail. Perfect for both novice and seasoned woodworkers, this project utilizes readily available materials and tools to transform your woodworking skills into a functional piece of art. Whether you choose walnut, as Silva did, or another hardwood, this Serving Tray Woodworking project promises a rewarding experience and a lasting addition to your home.
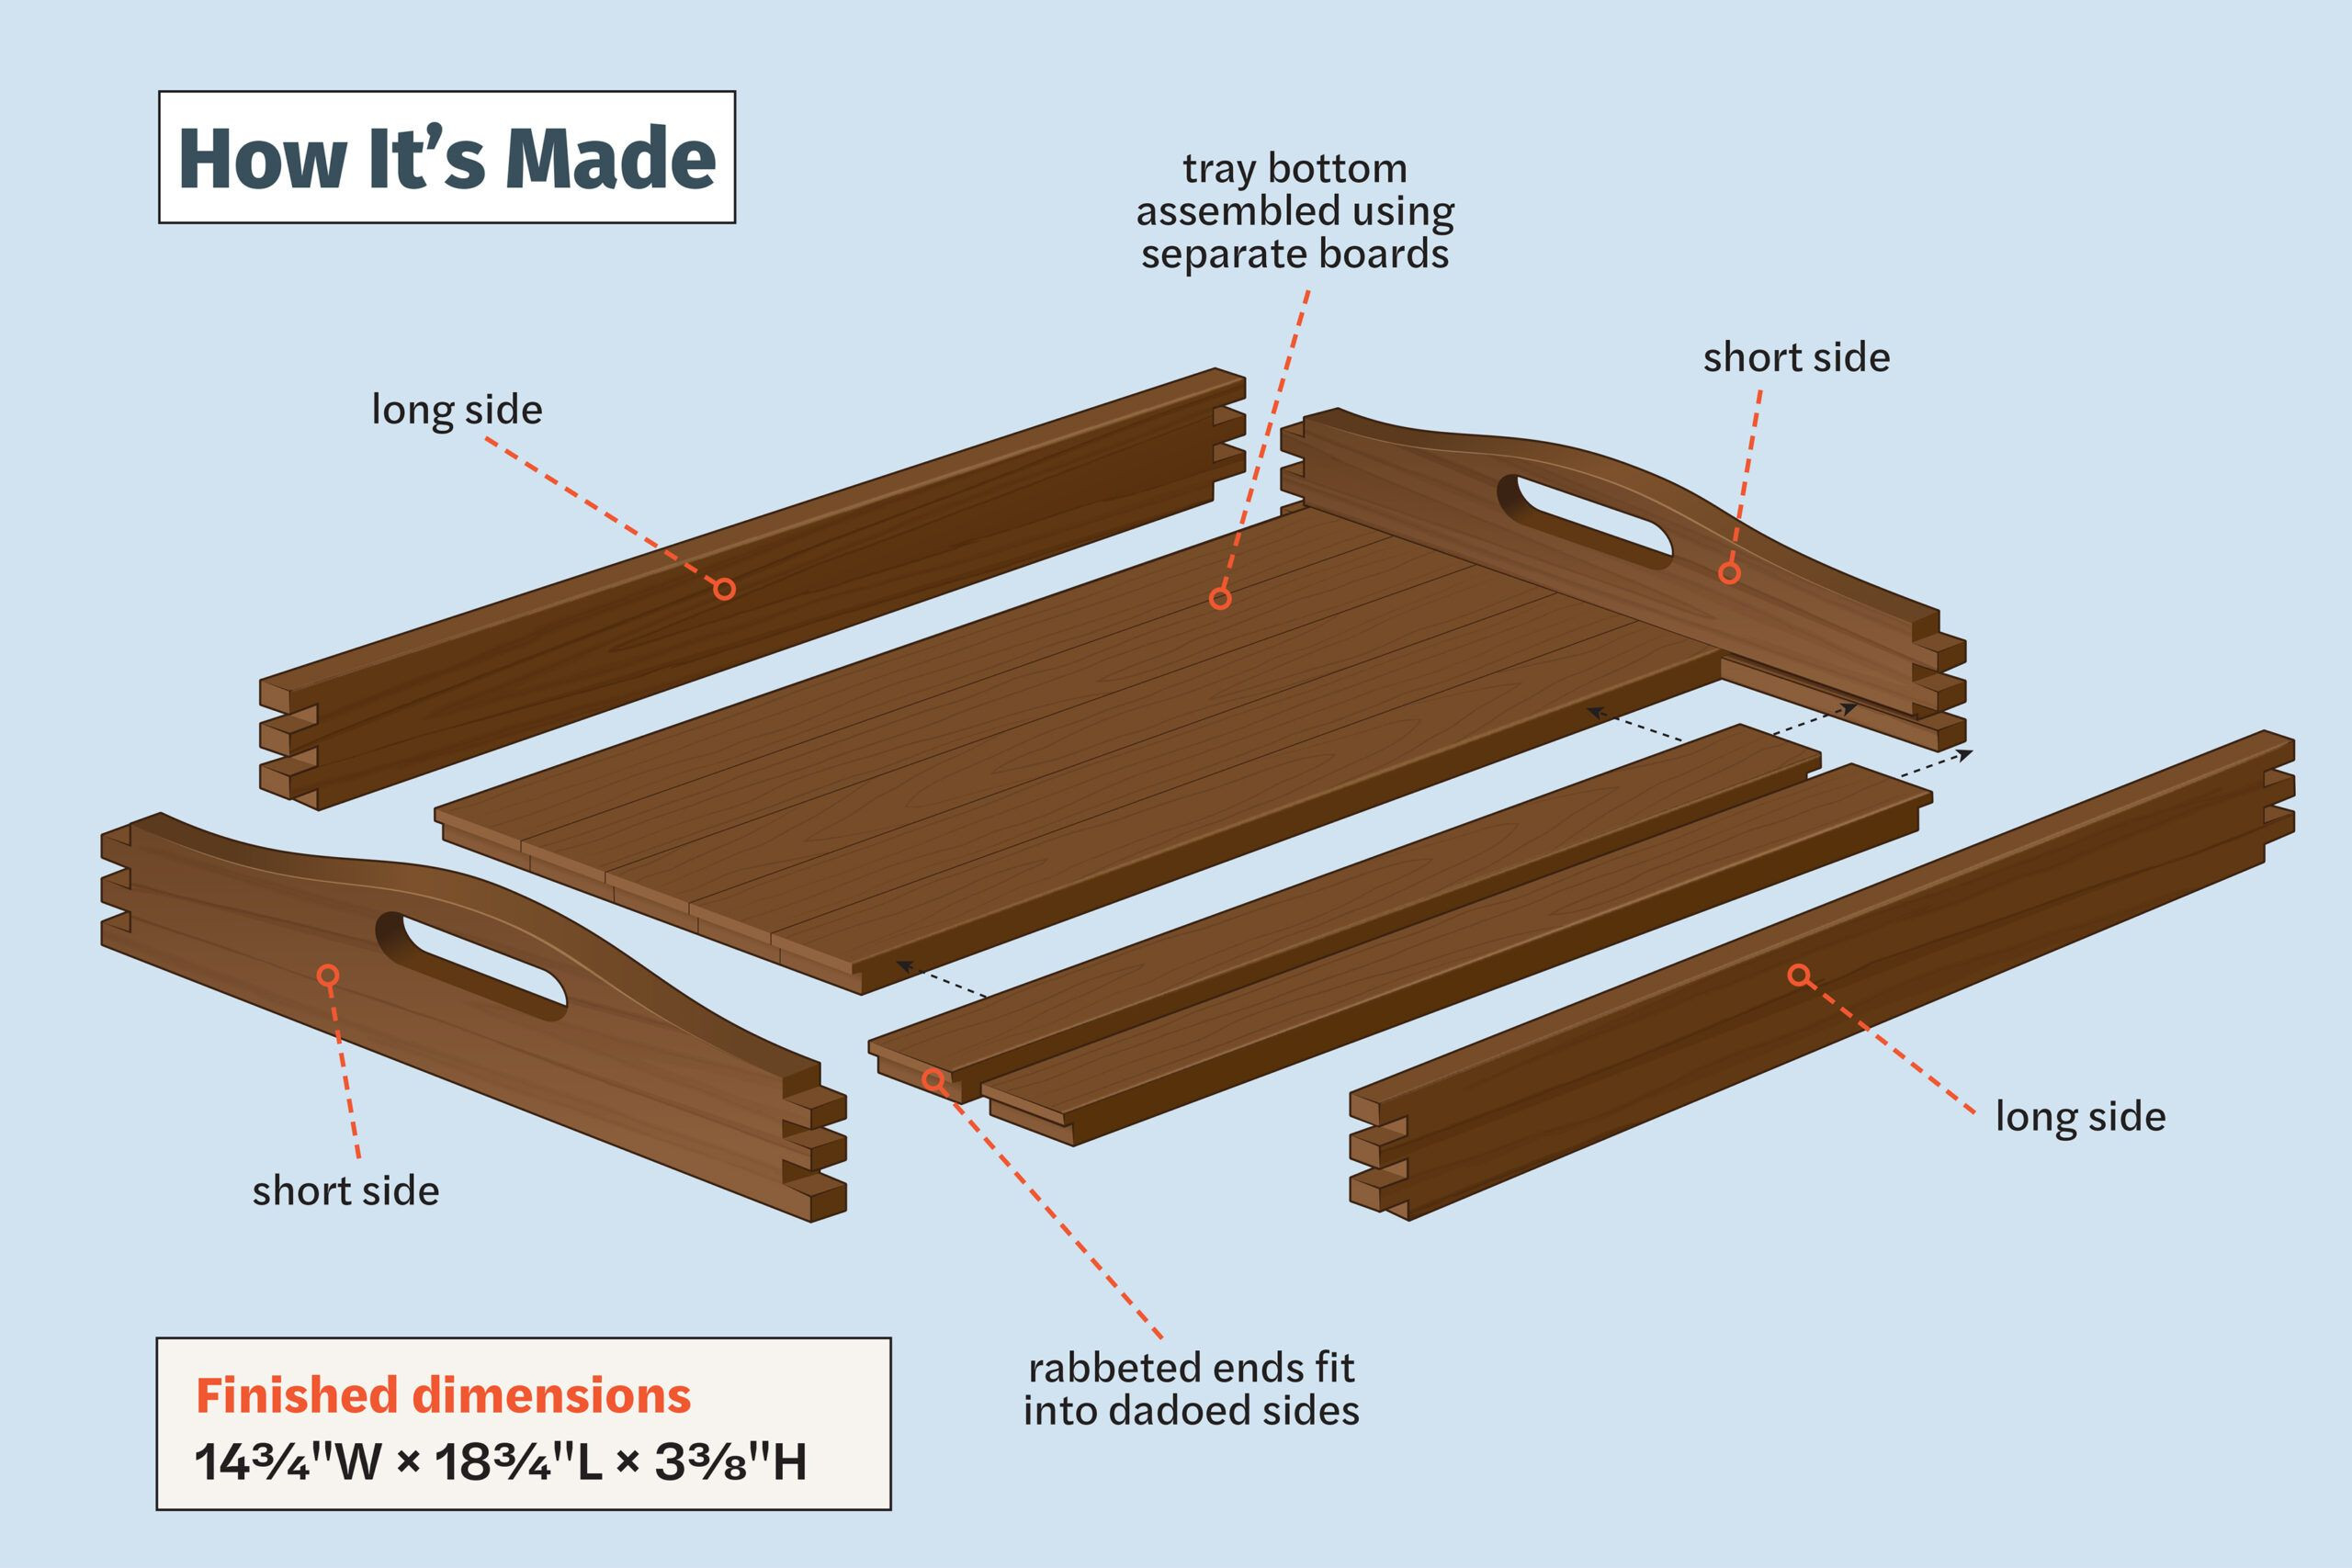 a diagram of the parts of a walnut serving tray
Diagram illustrating the components of a walnut serving tray, essential for serving tray woodworking projects.
Tools and Materials for Your Wood Serving Tray Project
Embarking on this serving tray woodworking journey requires specific tools and materials to ensure a smooth and successful build. Gather the following to prepare your workspace:
Materials:
- 1×8 pine, 72 inches long (for jigs and sled)
- 1/2 × 8 walnut, 72 inches long (for the tray itself)
- 3/4 × 4 plywood, 14 inches long (for handle template)
- 2×4 scrap, 4 inches long (for blade guard)
- CA glue (superglue for jig assembly)
- Wood glue (for tray joinery)
- Four 2-inch No. 8 wood screws (for sled construction)
- 120- and 220-grit sandpaper and sanding blocks (for finishing)
- Mineral oil or food-safe oil (for finishing and protection)
- Double-stick tape (for template application)
Tools:
Table saw
Dado blade set
Miter gauge
Clamps
Screwdrivers
Pin nails
Sanding blocks
Forstner or spade bit
Jigsaw or band saw
Router
Flush trim router bit
Safety glasses
Measuring tape
Pencil
Cut List: Precision Cuts for a Perfect Serving Tray
Accuracy in cuts is paramount for successful serving tray woodworking. Utilize this detailed cut list to prepare each component of your project:
| Component | Material | Dimensions | Quantity |
|---|---|---|---|
| Sled | |||
| Base | 1×8 pine or MDF | 20 inches long | 1 |
| Fence | 1×4 pine | 20 inches long | 1 |
| Guide rails | 3/4 x 3/8 pine | 12 inches long | 2 |
| Blade guard | 2×3 or 2×4 scrap | 4 inches long | 1 |
| Jig | |||
| Fence | 1×4 pine | 18 inches long | 1 |
| Square Pins | 3/8 x 3/8 pine | 4 inches long | 2 |
| Handle Template | 3/4-inch plywood | Custom to handle design | 1 |
| Tray | |||
| Short sides | 1/2 x 3 3/8 walnut | 14 3/4 inches long | 2 |
| Long sides | 1/2 x 2 1/4 walnut | 18 3/4 inches long | 2 |
| Floor pieces | 1/2 x 1 31/32 walnut | 18 1/8 inches long | 7 |
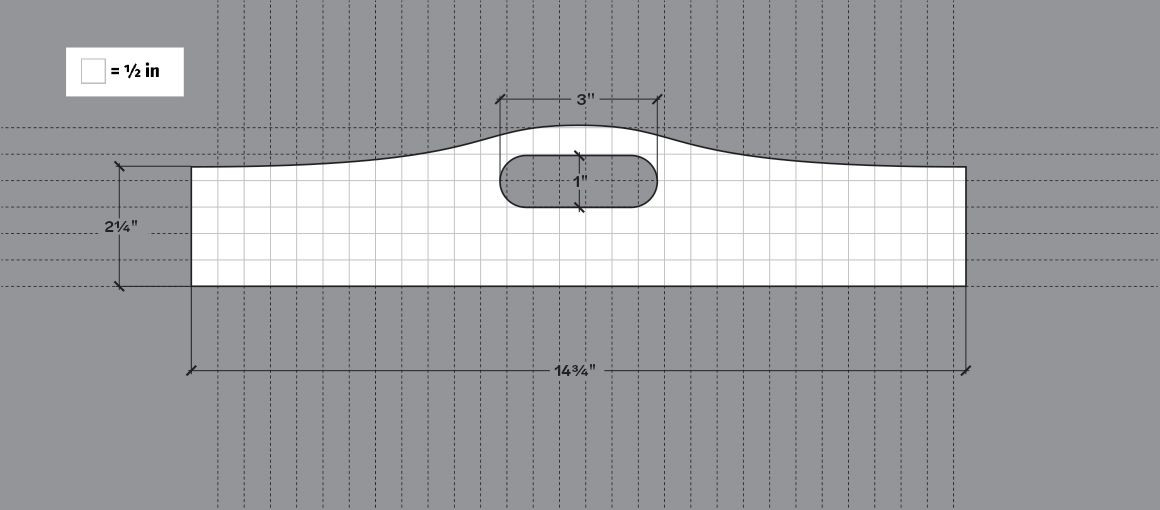 detailed measurements of the handle of a walnut serving tray
Detailed measurements for crafting the handle of a walnut serving tray, crucial for achieving ergonomic design in serving tray woodworking.
Building Essential Jigs: Setting the Stage for Success
Before assembling the serving tray, constructing precise jigs is crucial. These jigs ensure accuracy in cuts and joints, elevating the professionalism of your woodworking serving tray.
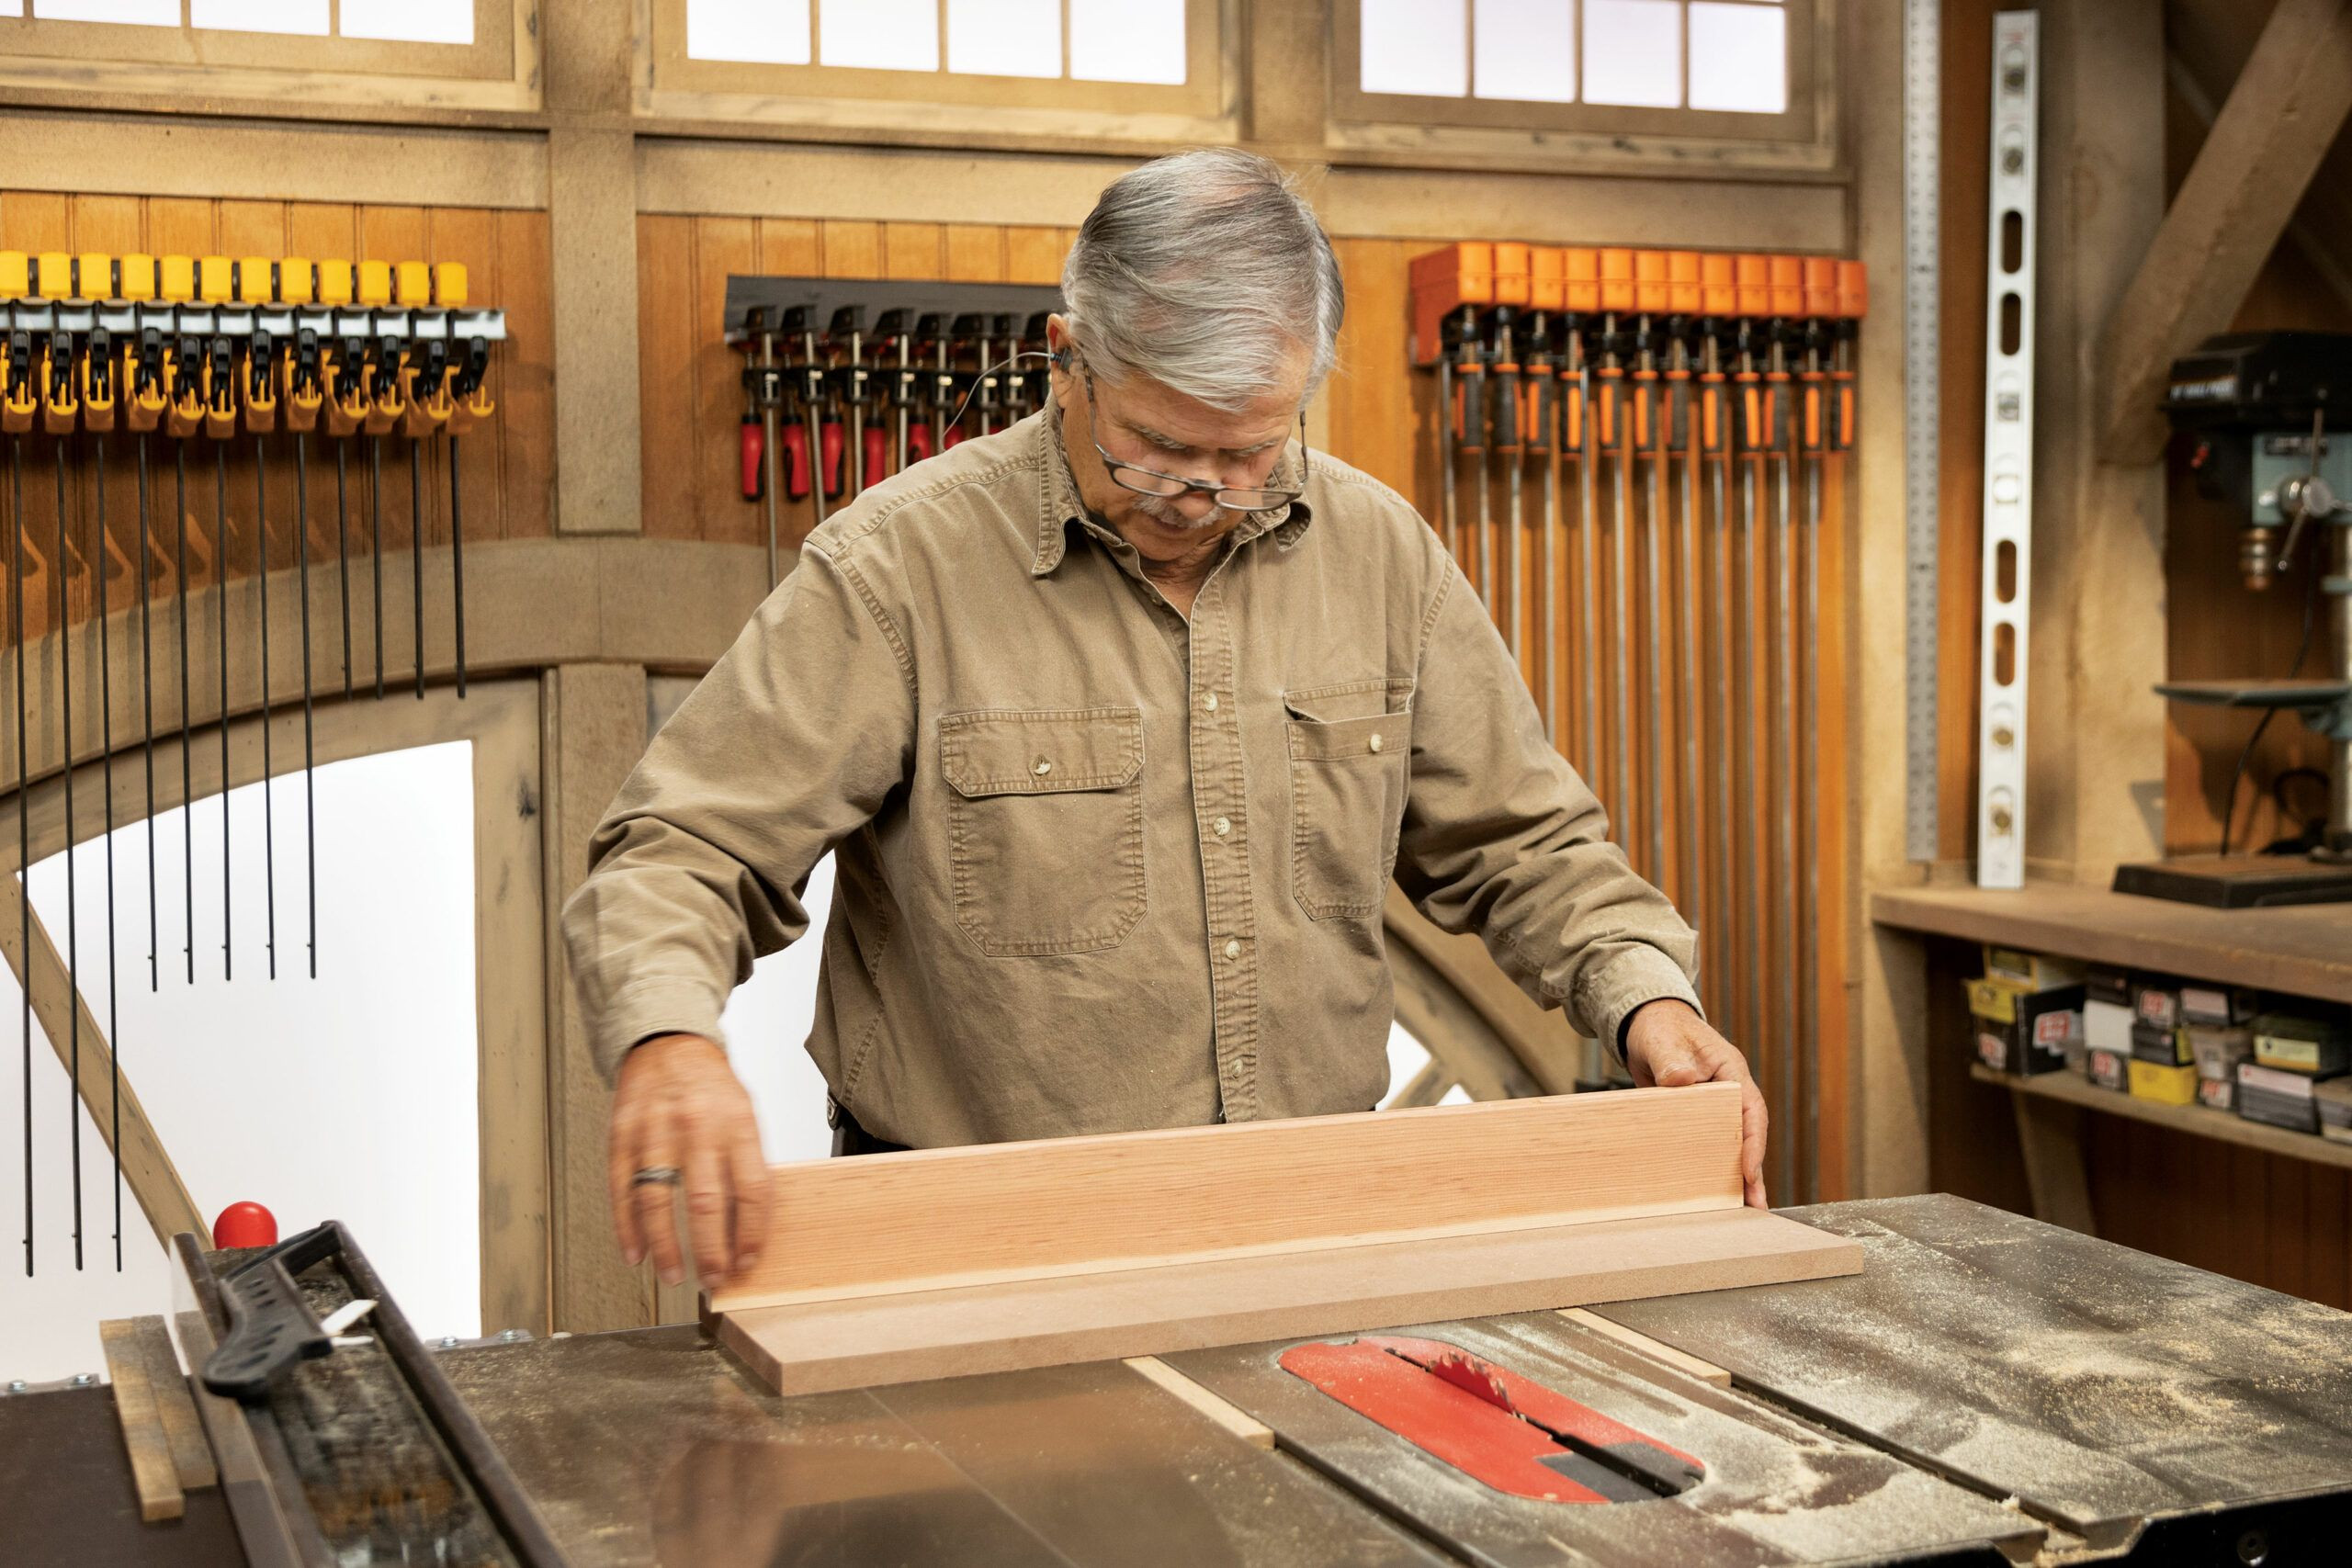
Constructing the Sled
A table saw sled is essential for safely and accurately cutting components for your serving tray woodworking project. Begin by placing guide rails into your table saw slots. Apply a few drops of super glue to the top of these rails. Position the sled base firmly against the table saw surface, then carefully lower it onto the glued rails, applying even pressure until the glue sets. Reinforce the bond by driving short pin nails into each rail from underneath. Finally, clamp and screw the sled fence to the base, ensuring it is positioned 5 inches from and perfectly parallel to the sled’s front edge.
 constructing the sled of a walnut serving tray
Step-by-step process of constructing a sled for precise cuts in serving tray woodworking.
Preparing the Dado Blade
For creating the box joints in your serving tray, a dado blade is necessary. First, attach a sacrificial 2×4 block to the fence’s back center to serve as a blade guard. Adjust your dado set to a 3/8-inch width and install it in the table saw. Set the blade height to 1¼ inches. Lock the table-saw fence at 10 inches from the blade and make a pass with the sled. To fine-tune the blade height, lay a piece of your 1/2-inch tray material flat on the sled. Gradually raise the dado set, approximately 1/16 inch at a time, until it slightly exceeds the material’s thickness. This ensures clean and precise box joints for your serving tray woodworking project.
Building the Box-Joint Jig
The box-joint jig is indispensable for creating consistent and tight joints in your serving tray woodworking. Start by clamping the jig fence against the sled fence. Make a pass with the dado blade to create a notch in the center of the jig fence. Unclamp the fence and take one of the 3/8-inch square pins. Apply super glue to it and insert it into the notch, ensuring it protrudes towards the front of the sled. Utilize the second square pin as a spacer. Place it between the first pin in the jig and the dado blades. Re-clamp the jig fence to the sled. This setup ensures that the glued pin accurately guides the spacing for each box-joint notch, crucial for uniform joints in your wooden serving tray.
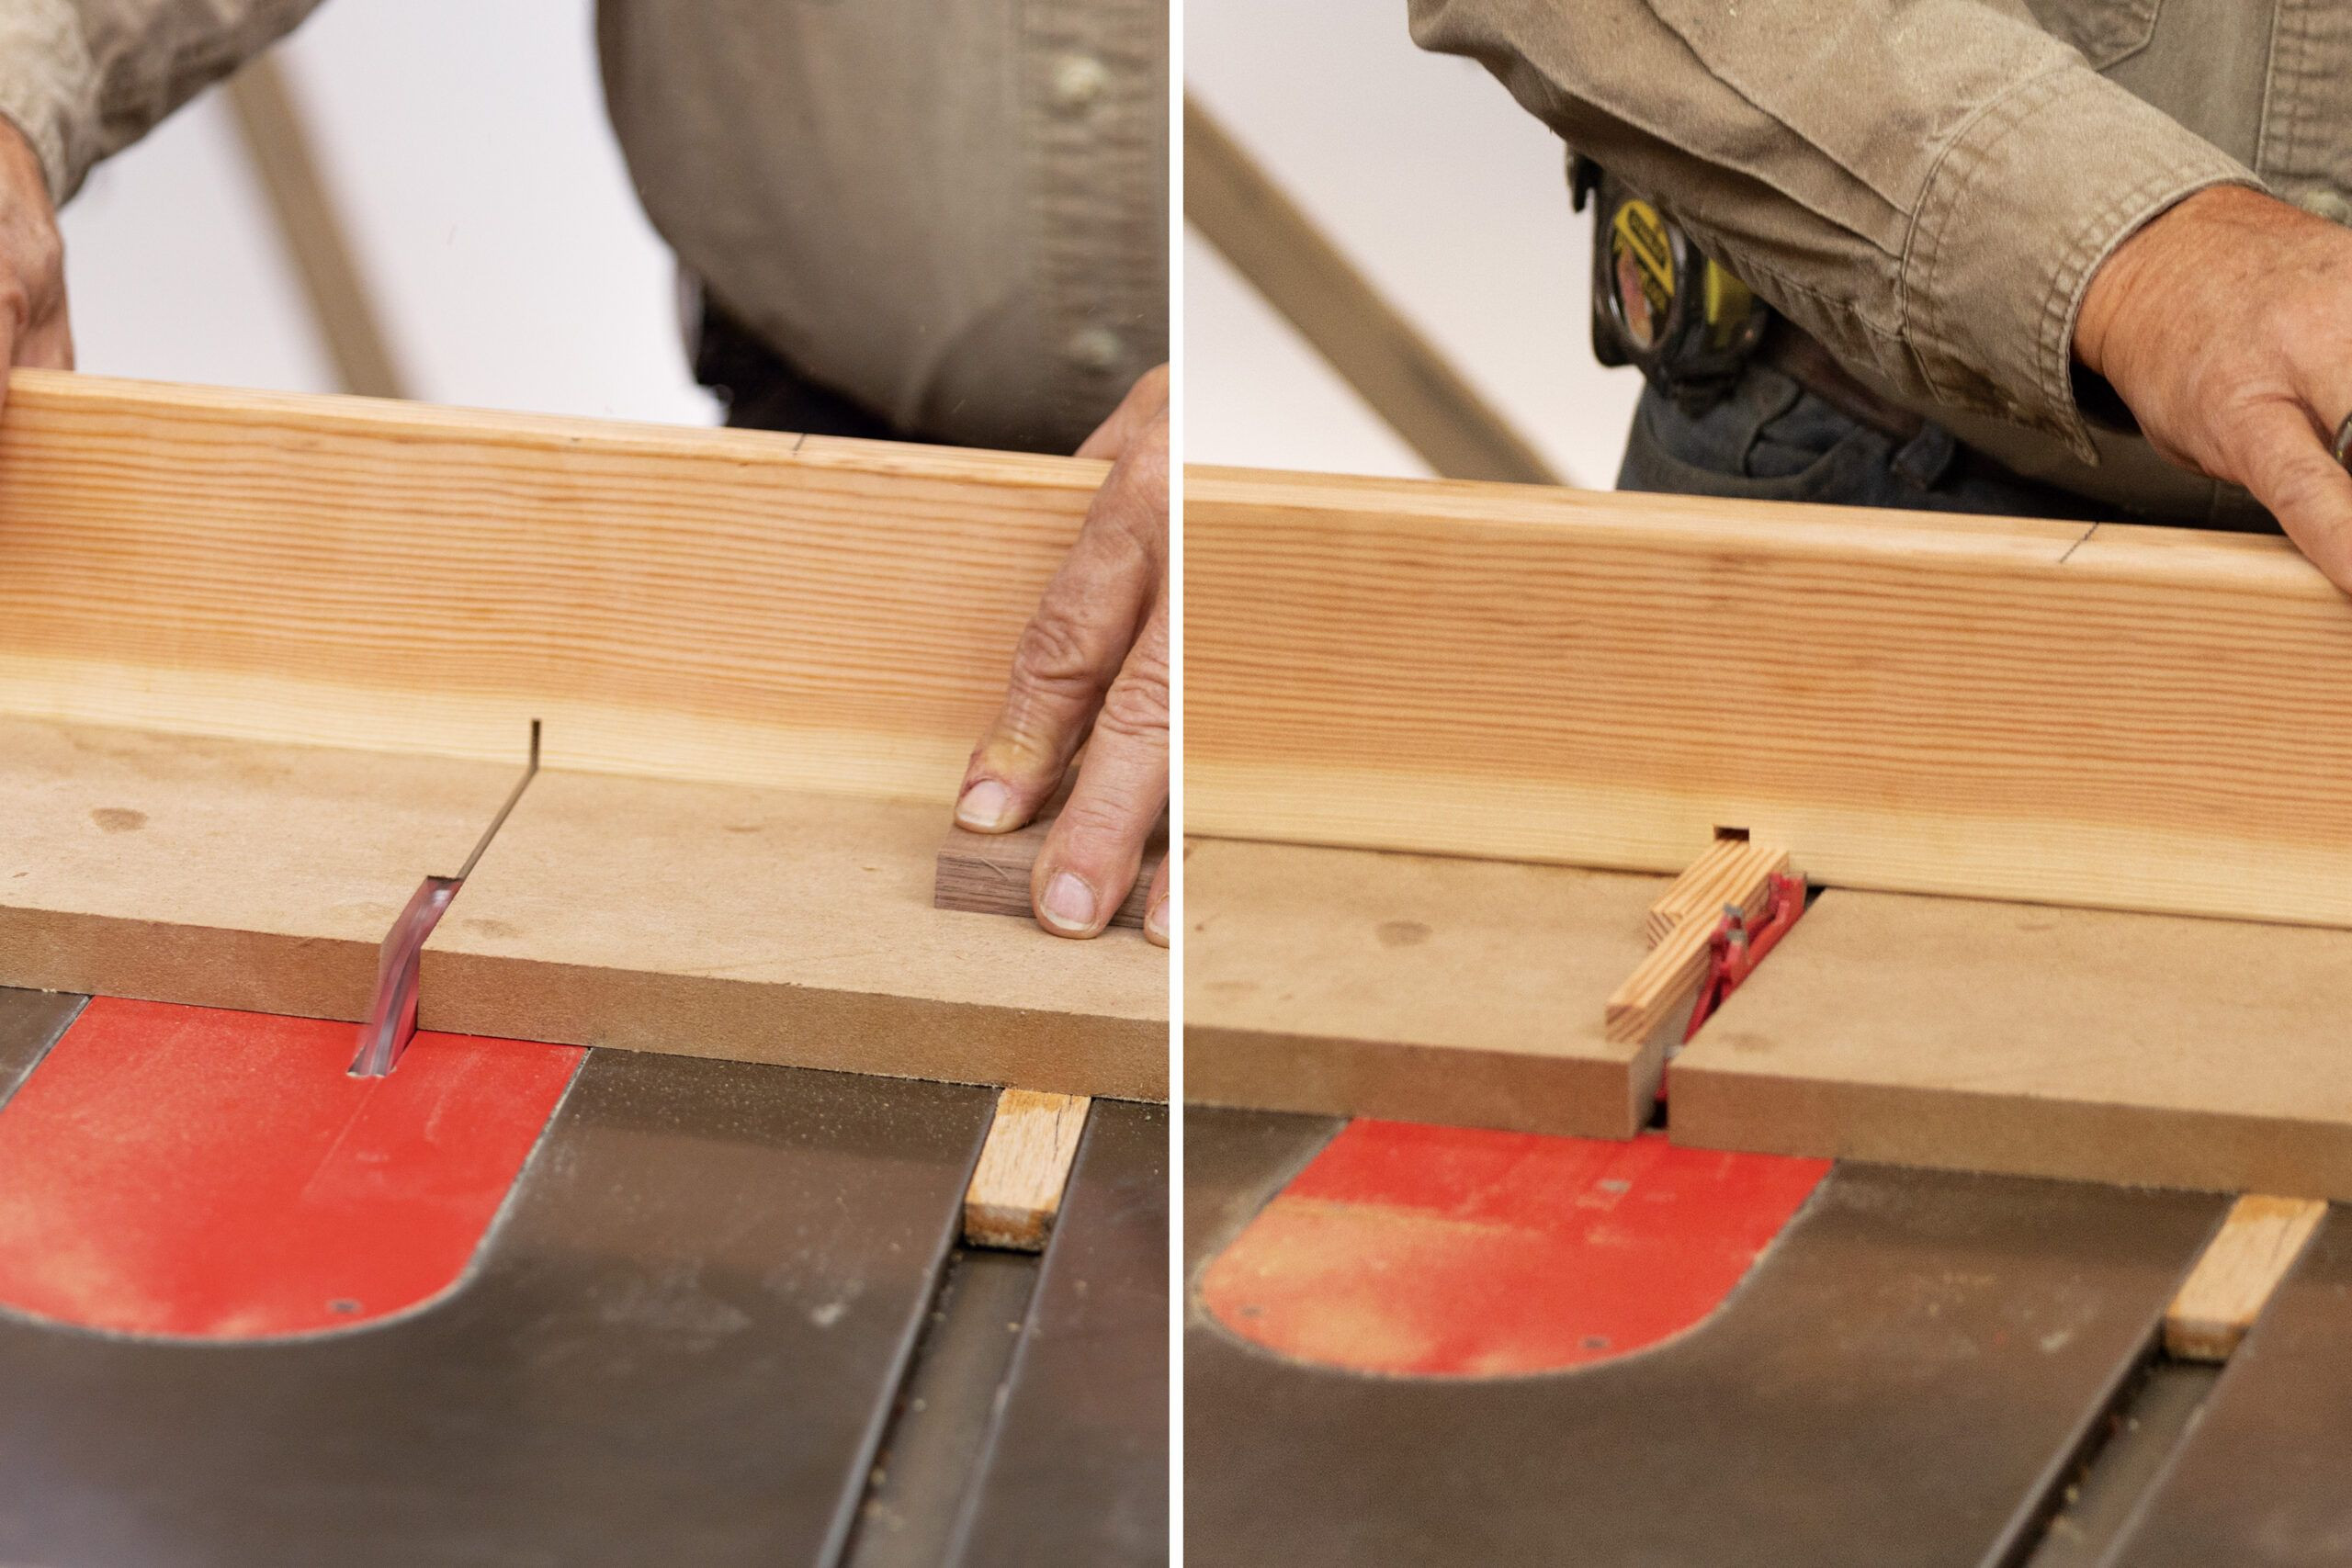 cutting the box-joint jig for a walnut serving tray
Cutting a box-joint jig, a critical step for creating precise joinery in serving tray woodworking.
Step-by-Step Guide to Assembling Your Walnut Serving Tray
With jigs prepared, you’re now ready to assemble your walnut serving tray. Follow these steps to bring your serving tray woodworking project to life:
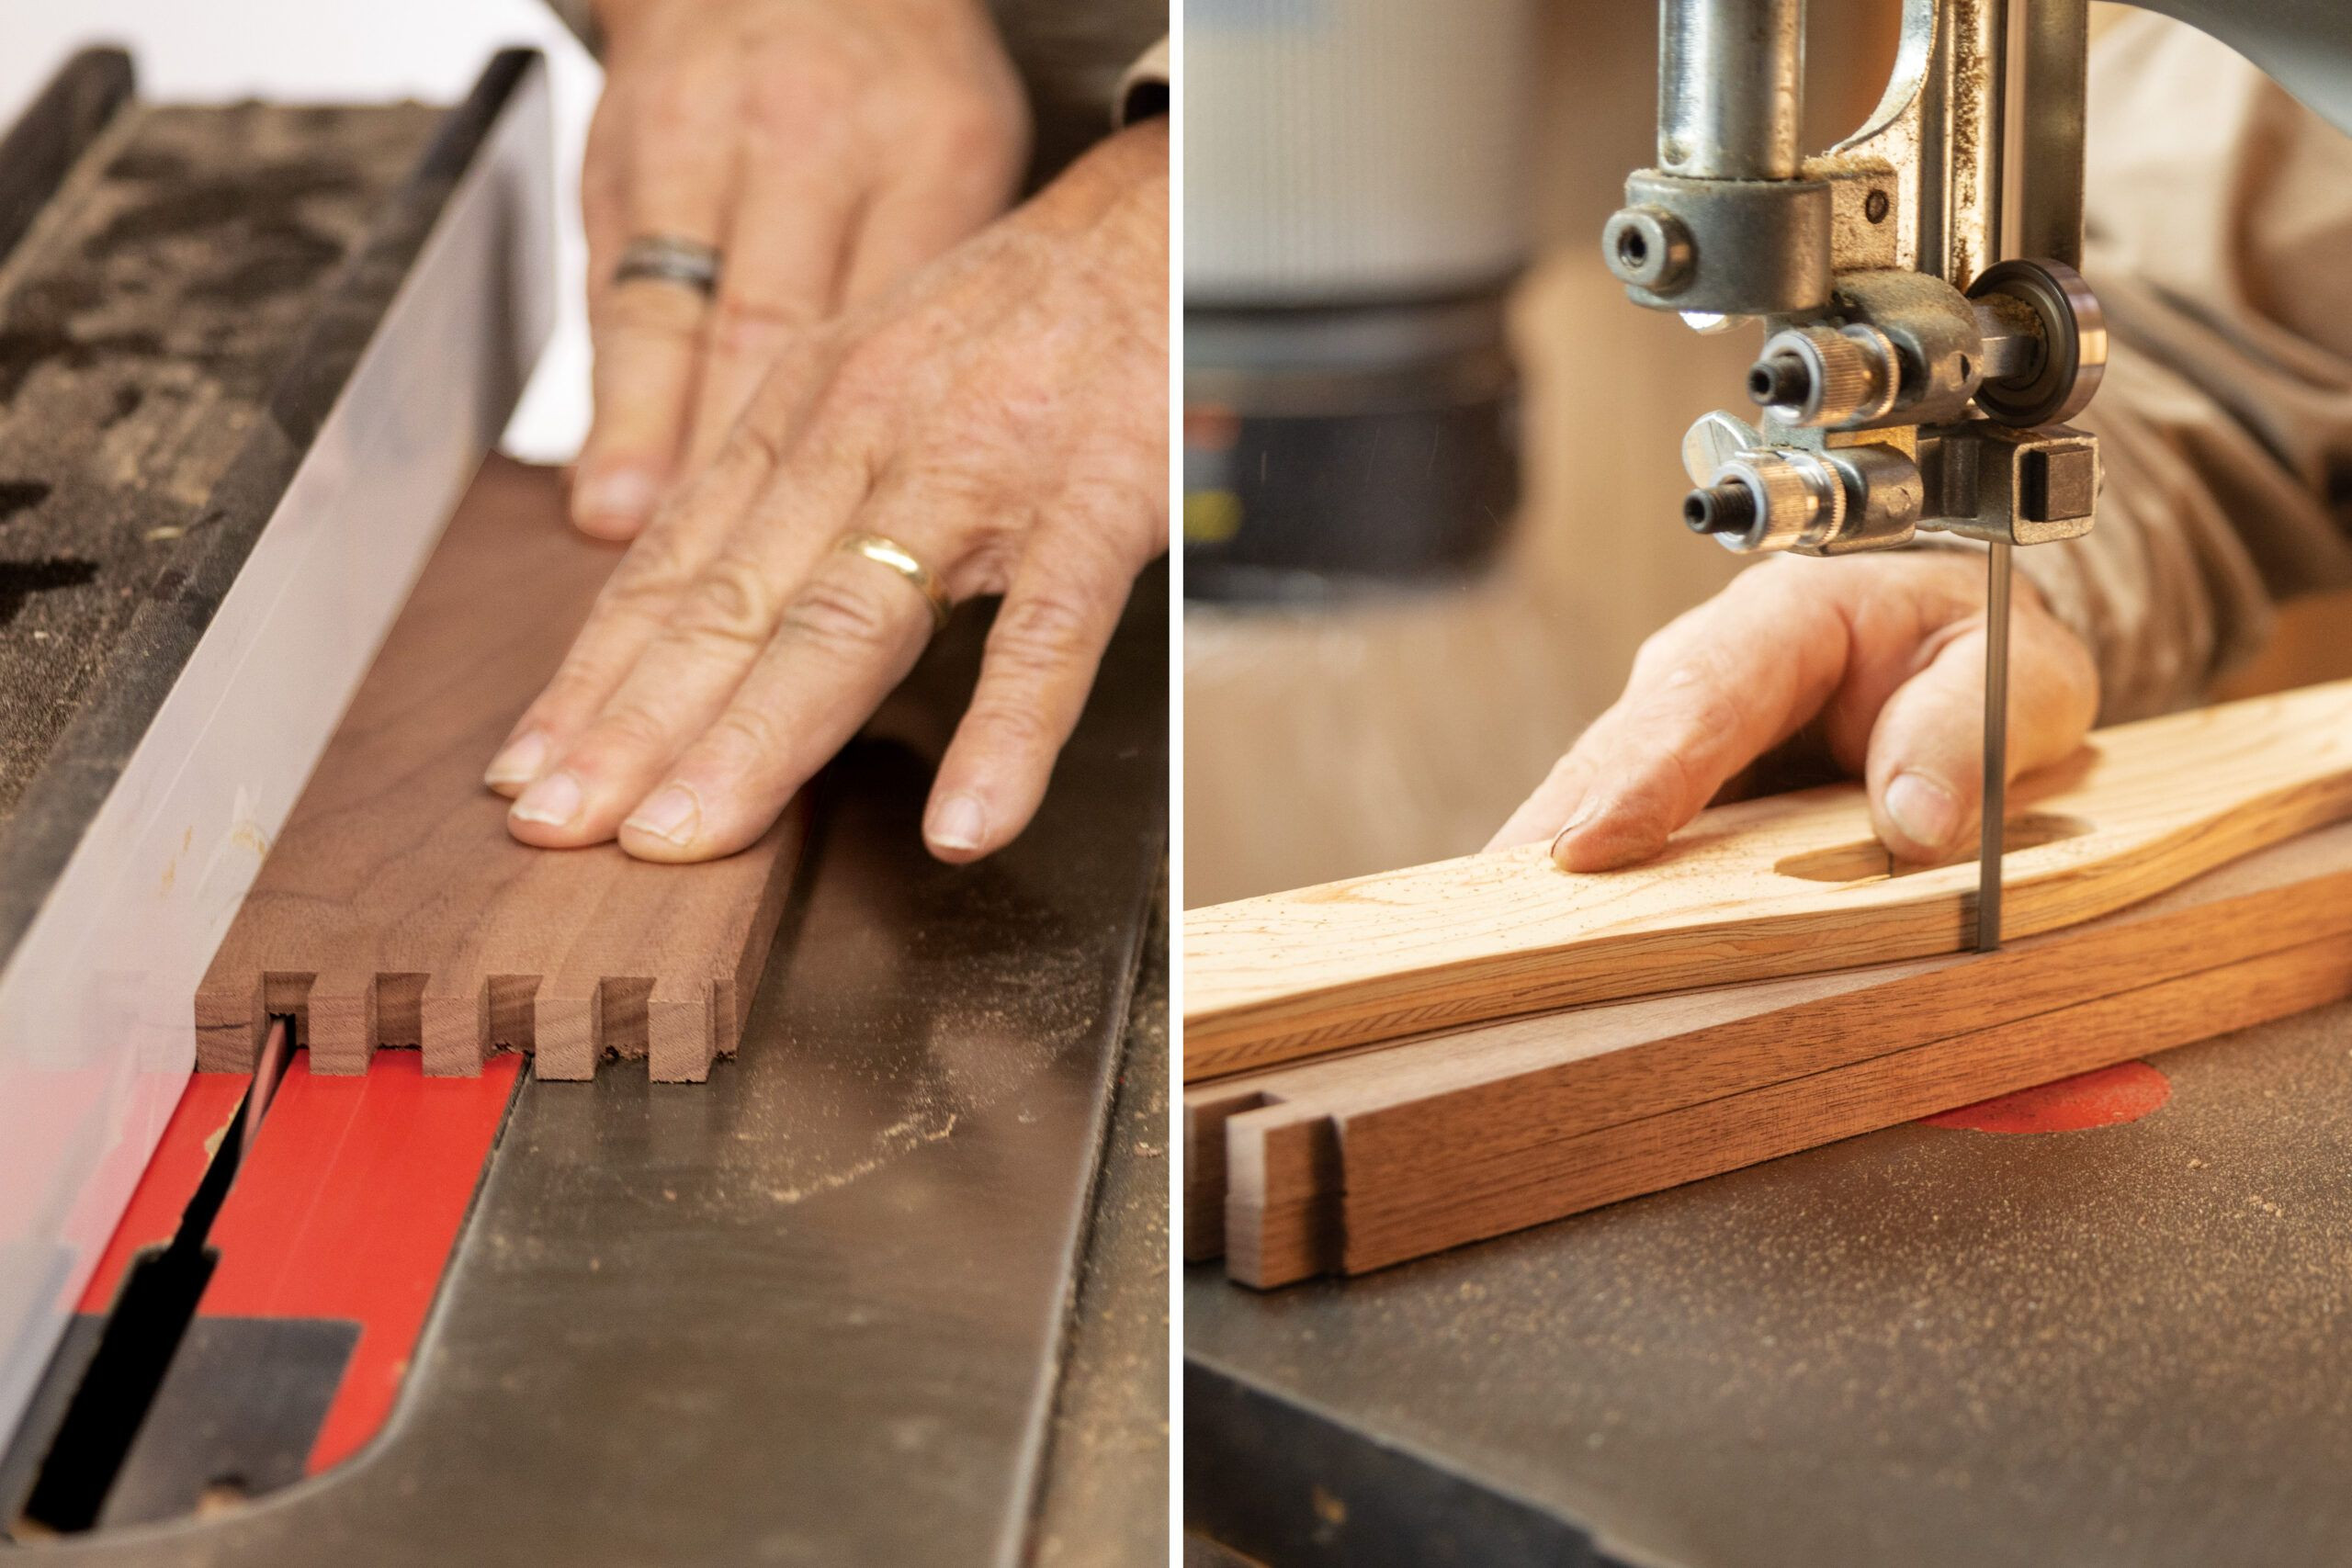
Step 1: Cutting Box Joints on Short Sides
Begin by marking the bottom edge on each short side piece. Position a short side with its marked edge against the pin on your jig. Make the first notch cut. Then, place this newly cut notch directly over the jig pin. Cut another notch. Continue this process, pegging each new notch onto the pin, until you have created four notches at both ends of each short side. This technique ensures consistent and even box joints, essential for strong corners in your wooden serving tray.
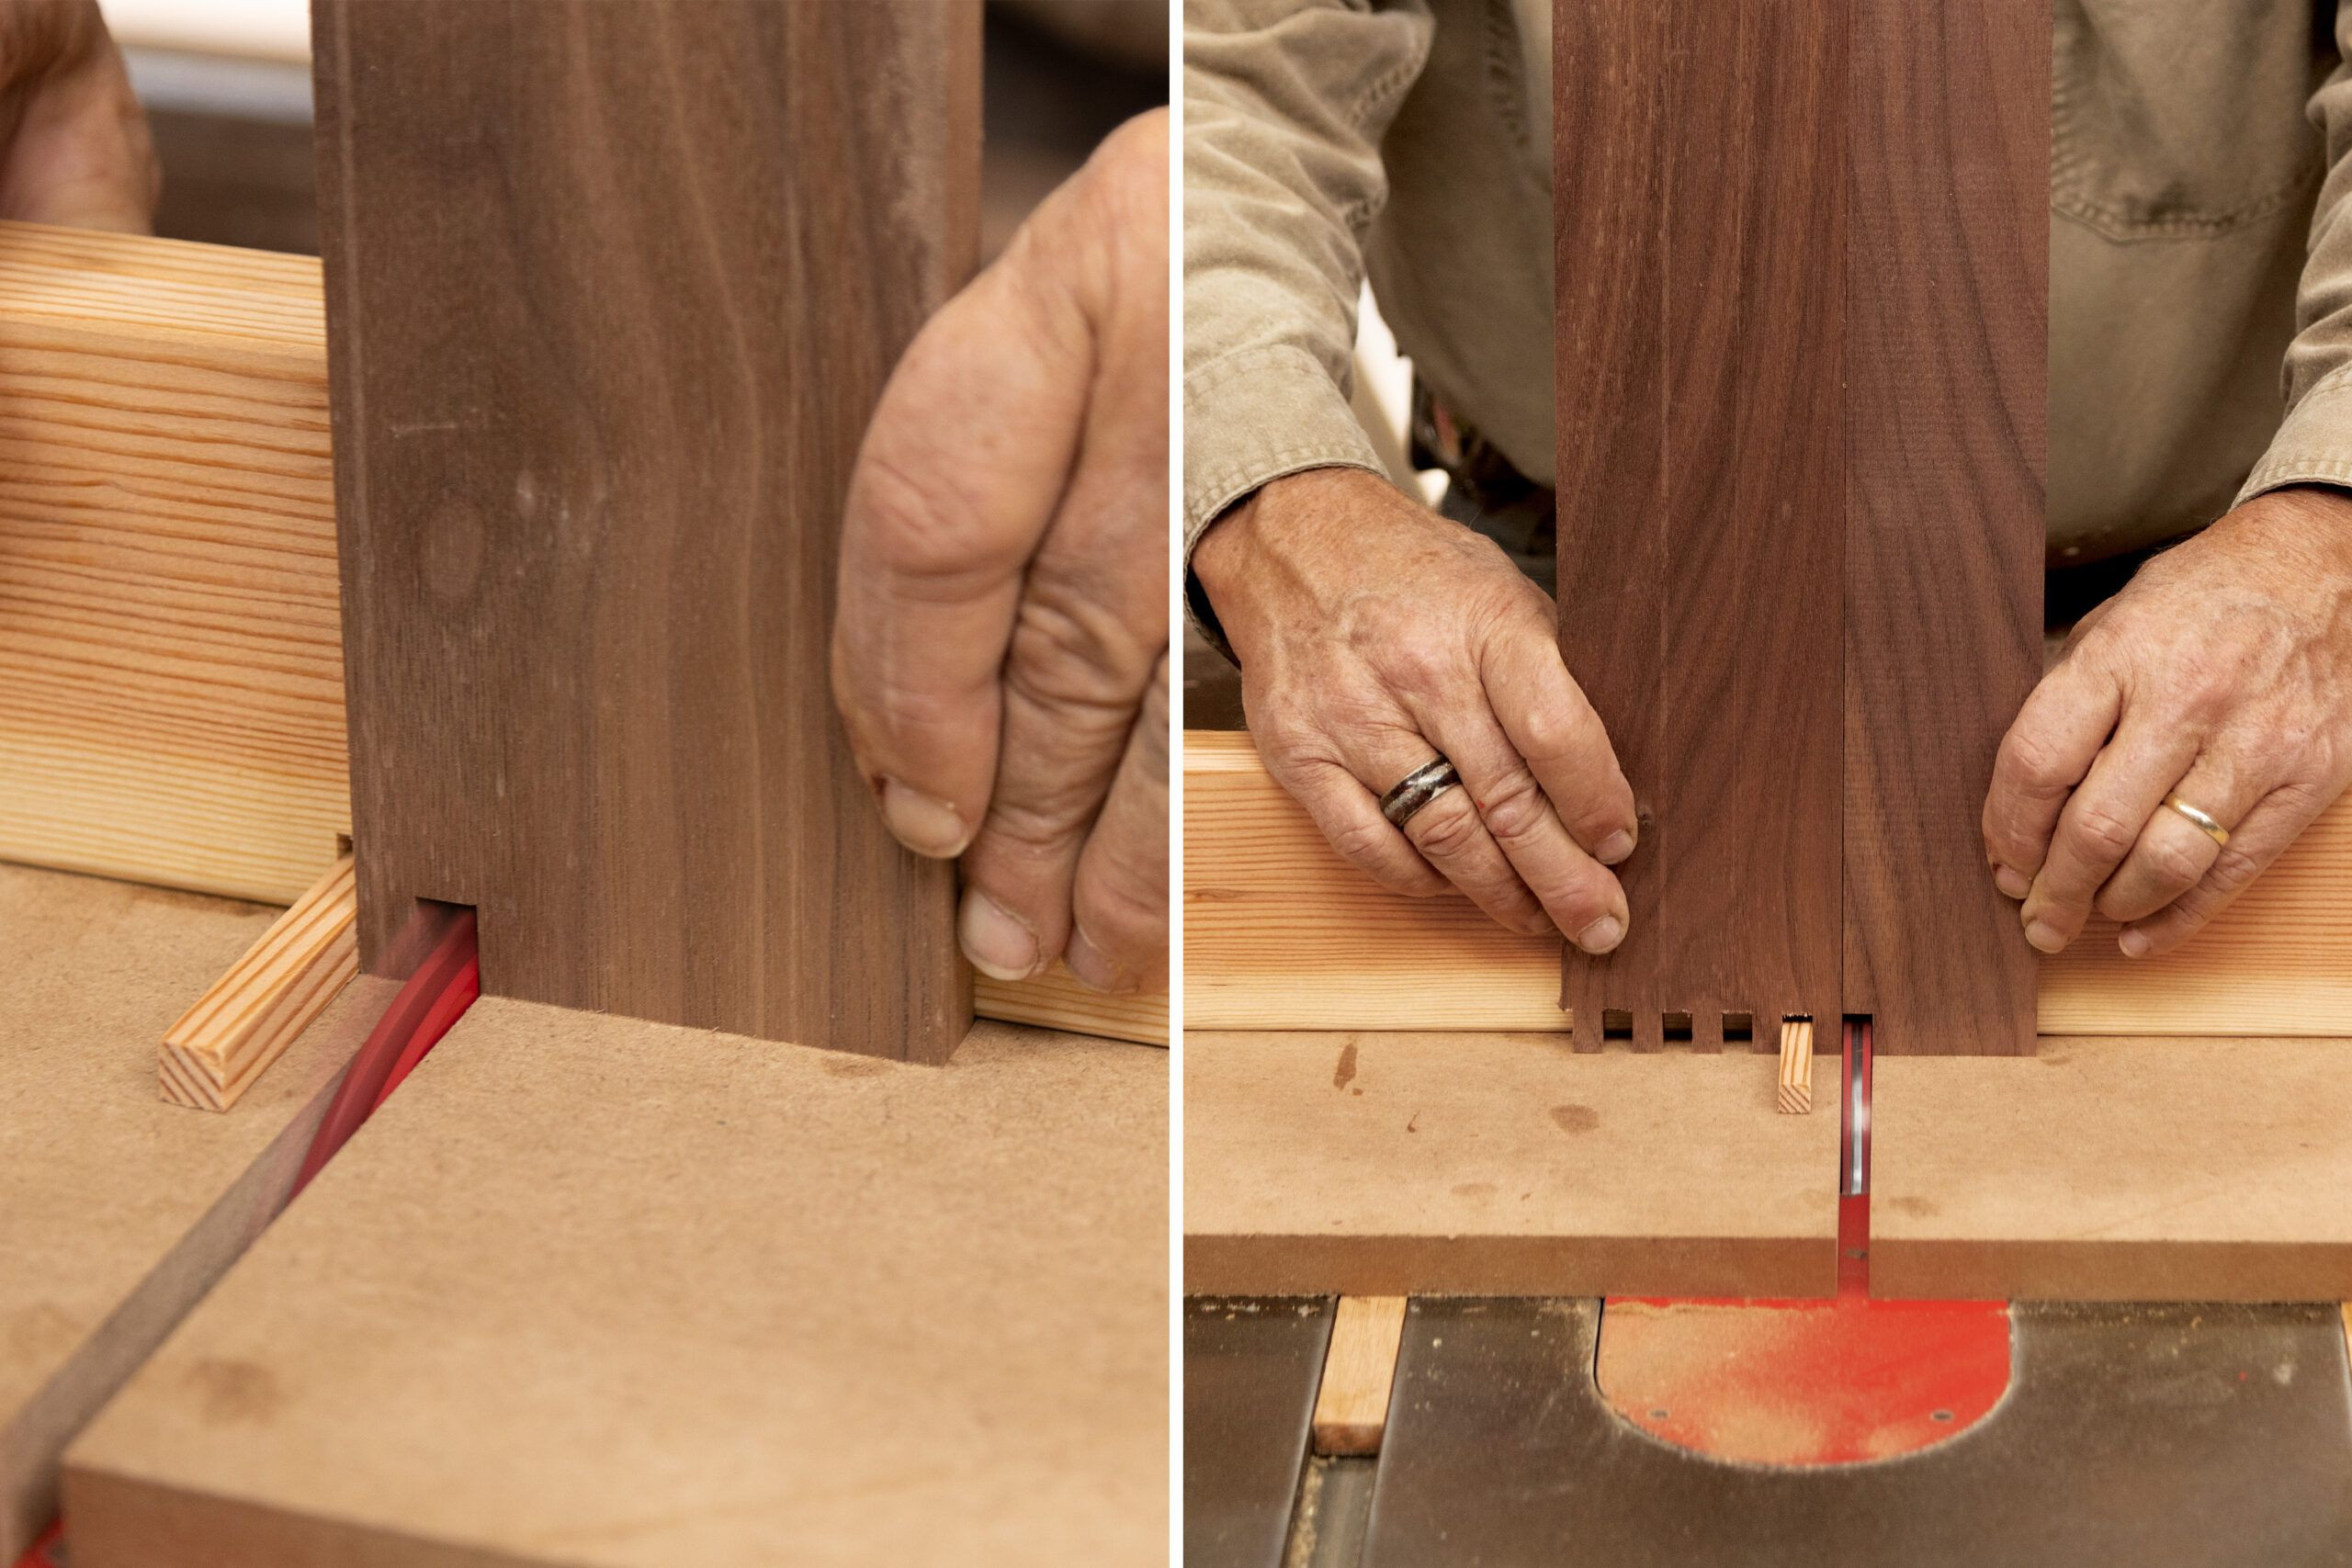 cutting the box joints of a walnut serving tray
Cutting box joints on the short sides of the serving tray, a foundational step in serving tray woodworking.
Step 2: Cutting Corresponding Box Joints
To ensure the long sides interlock perfectly with the short sides, position a short side with its first notch over the jig pin. The marked bottom edge of the short side should be to the right of the dado blade. Now, align the marked edge of a long side against the short piece, ensuring the blade will cut a notch into the bottom edge of the long side. Remove the short side and continue this process, creating a total of three notches in the long side. Repeat this for both ends of both long sides. This method guarantees that the box joints will align precisely, creating robust corners for your serving tray woodworking project.
 cutting the corresponding box joints of a walnut serving tray
Cutting corresponding box joints on the long sides to match the short sides, ensuring seamless joinery in serving tray woodworking.
Step 3: Creating Grooves for the Tray Bottom
Switch from the dado set to a standard blade for this step. Set the blade height to 3/8 inch and adjust the saw fence to 7⁄16 inch from the blade. With the bottom edge of a short side against the fence and the inside face down, cut a kerf. Adjust the fence slightly away from the blade by about 1⁄16 inch and make another pass on each short side. These grooves will securely hold the bottom pieces of your serving tray, adding structural integrity to your woodworking creation.
Step 4: Shaping the Handles
Utilize double-stick tape to temporarily attach the plywood template to the short sides of your serving tray. Using a Forstner or spade bit, carefully drill out the rounded ends of the handle holes. Then, employ a jigsaw to roughly cut out the handle holes. For the outer contoured edge above the handle, you can use either a jigsaw or a band saw. This step shapes the functional and aesthetic handles of your wooden serving tray, enhancing its usability and design.
Step 5: Routing the Handle Cutouts
With the template still securely taped to the short sides, use a router equipped with a top-bearing flush trim bit. Carefully clean up the handle holes and the curved upper edges. The router ensures smooth, refined edges that perfectly match your template, giving a professional finish to the handles of your serving tray woodworking project.
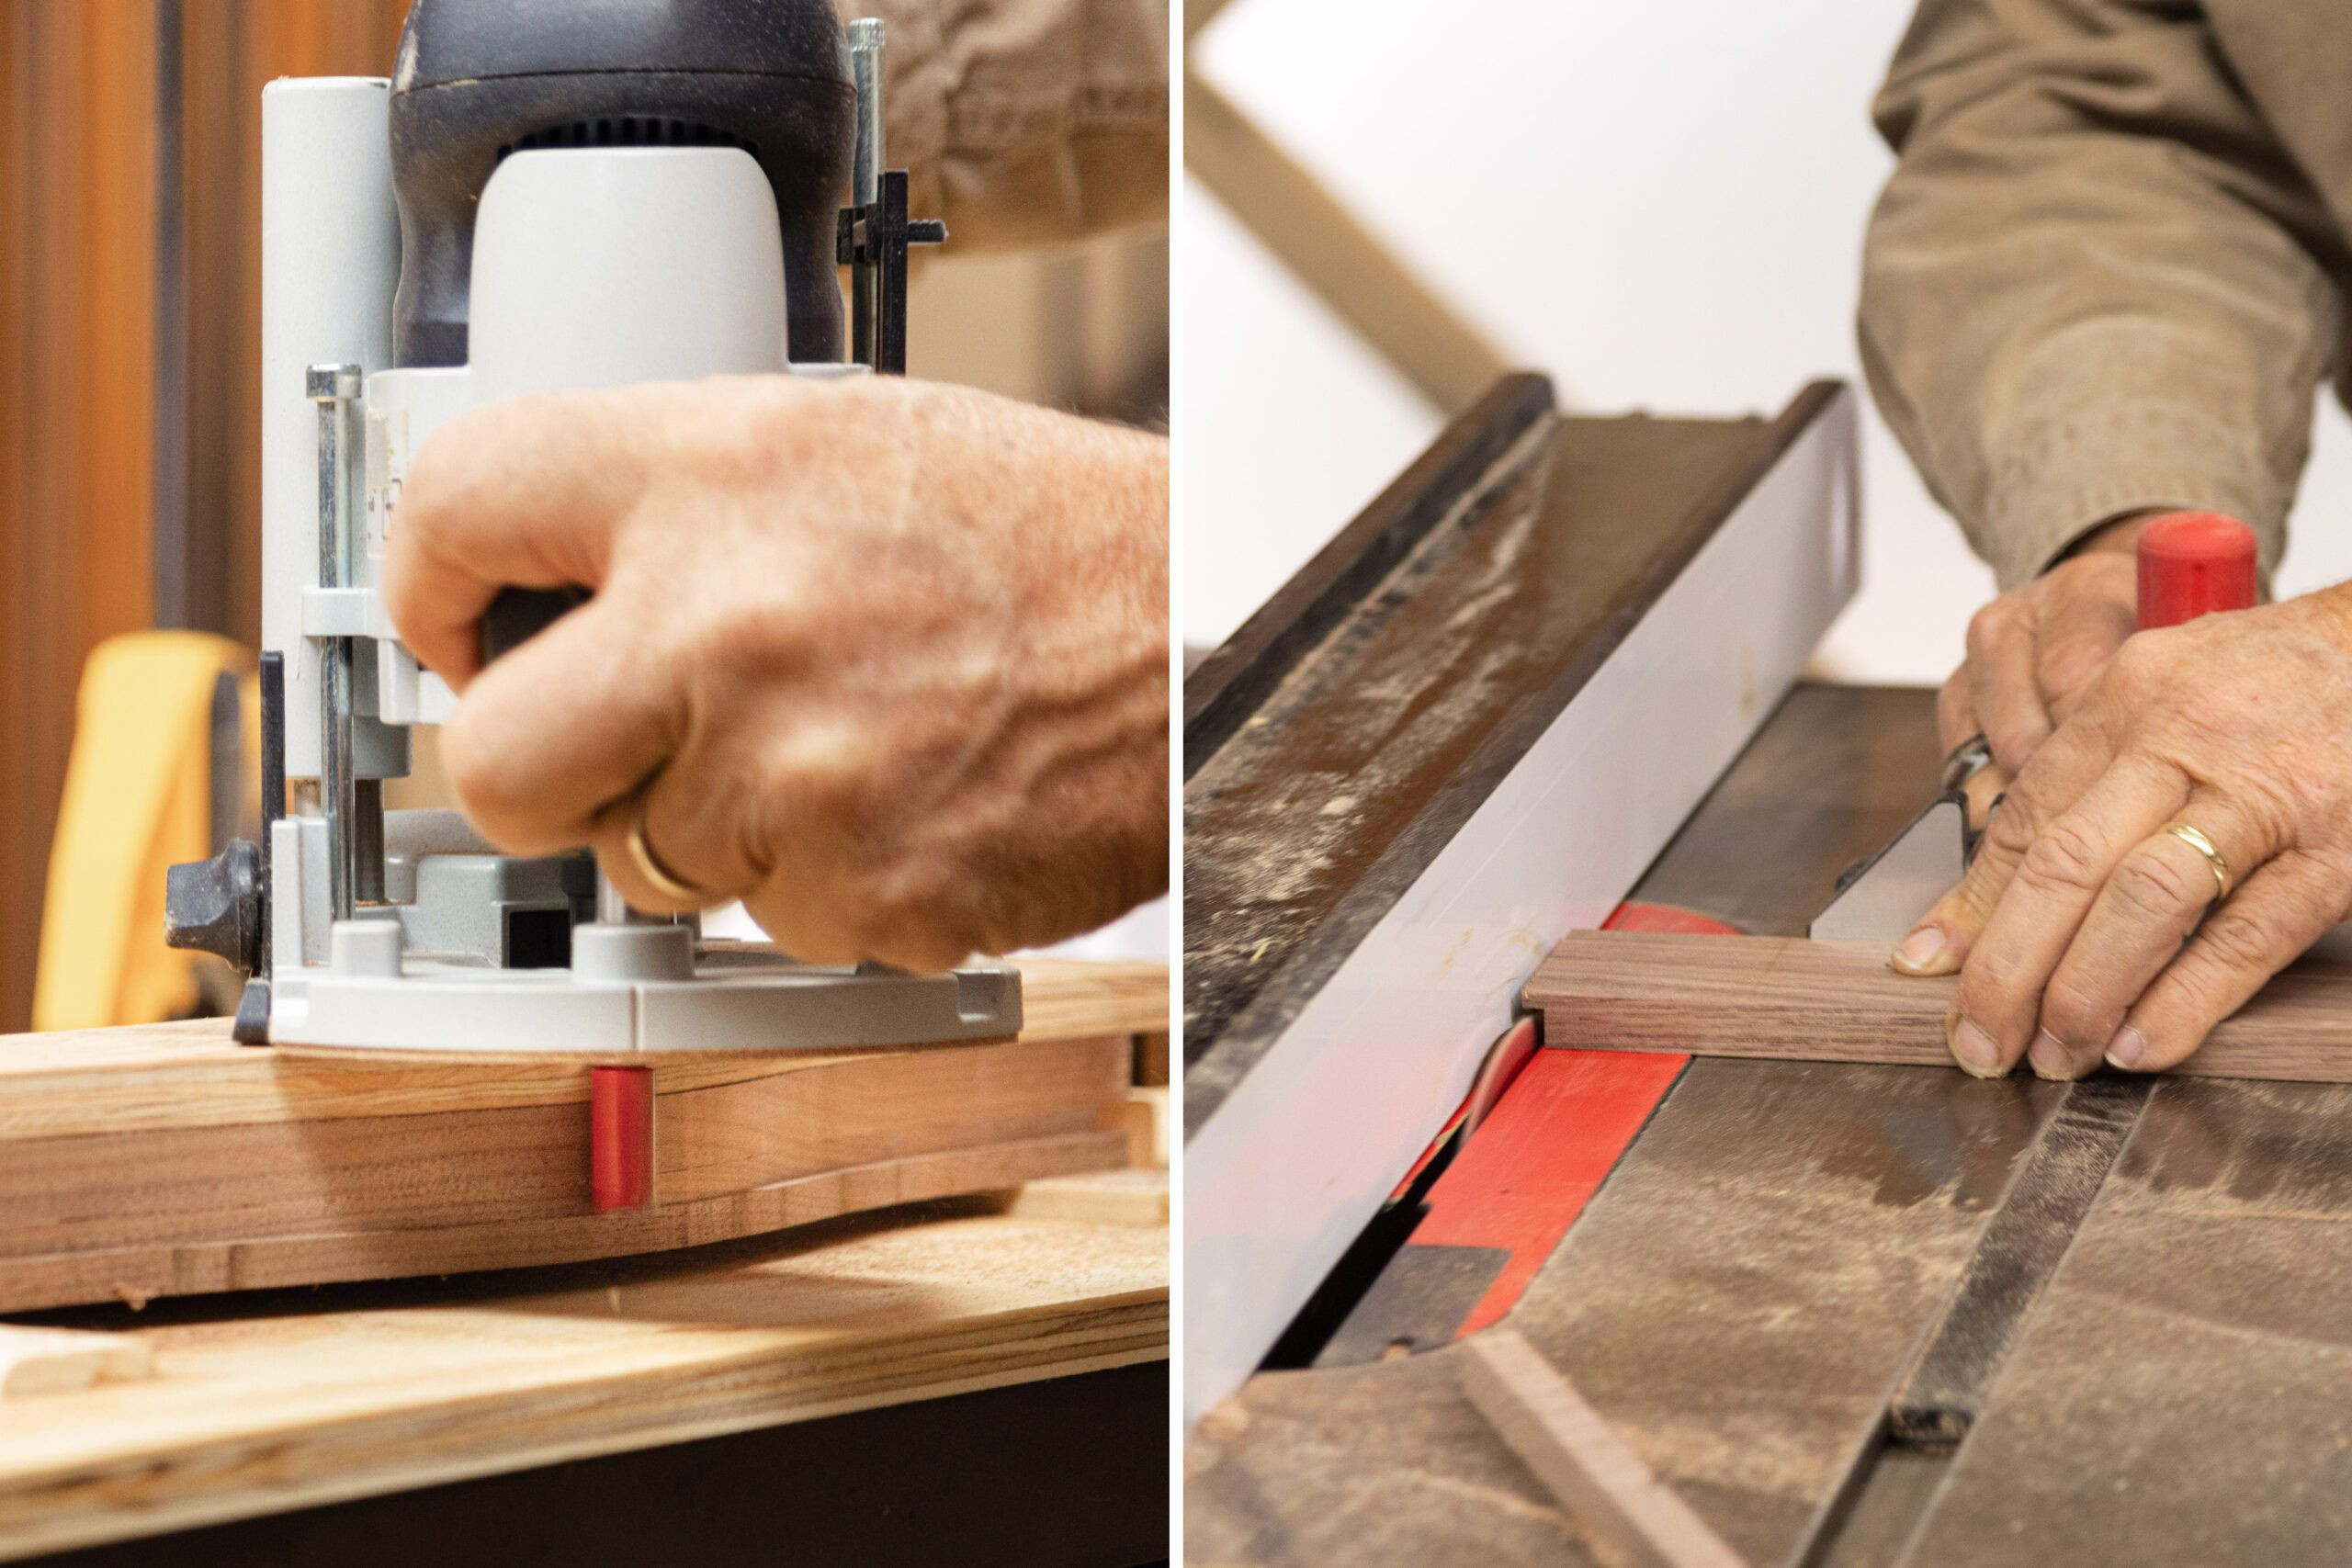 routing the cutouts and the trim for a walnut serving tray
Routing handle cutouts and trim for a smooth, professional finish in serving tray woodworking.
Step 6: Rabbeting the Bottom Pieces
For a snug fit of the tray bottom, set your table saw blade to a height of 3/8 inch and position the fence 3⁄16 inch from the blade. Using a miter gauge for control and safety, make several passes on each end of the seven bottom pieces. This process cuts a 1/8-by-3⁄16-inch tongue, or rabbet, on each end. These rabbeted edges will fit perfectly into the grooves you cut in Step 3, ensuring a solid tray bottom for your woodworking serving tray.
Step 7: Assembling the Tray Structure
Apply wood glue to the mating surfaces of the box joints on one end of the short sides and both ends of one long side. Ensure the bottom grooves are facing inward, and carefully slide the box joints together. Next, slide the bottom pieces into the prepared grooves, with their rabbeted sides facing downwards. This begins the physical assembly of your serving tray, bringing together the sides and bottom into a cohesive woodworking project.
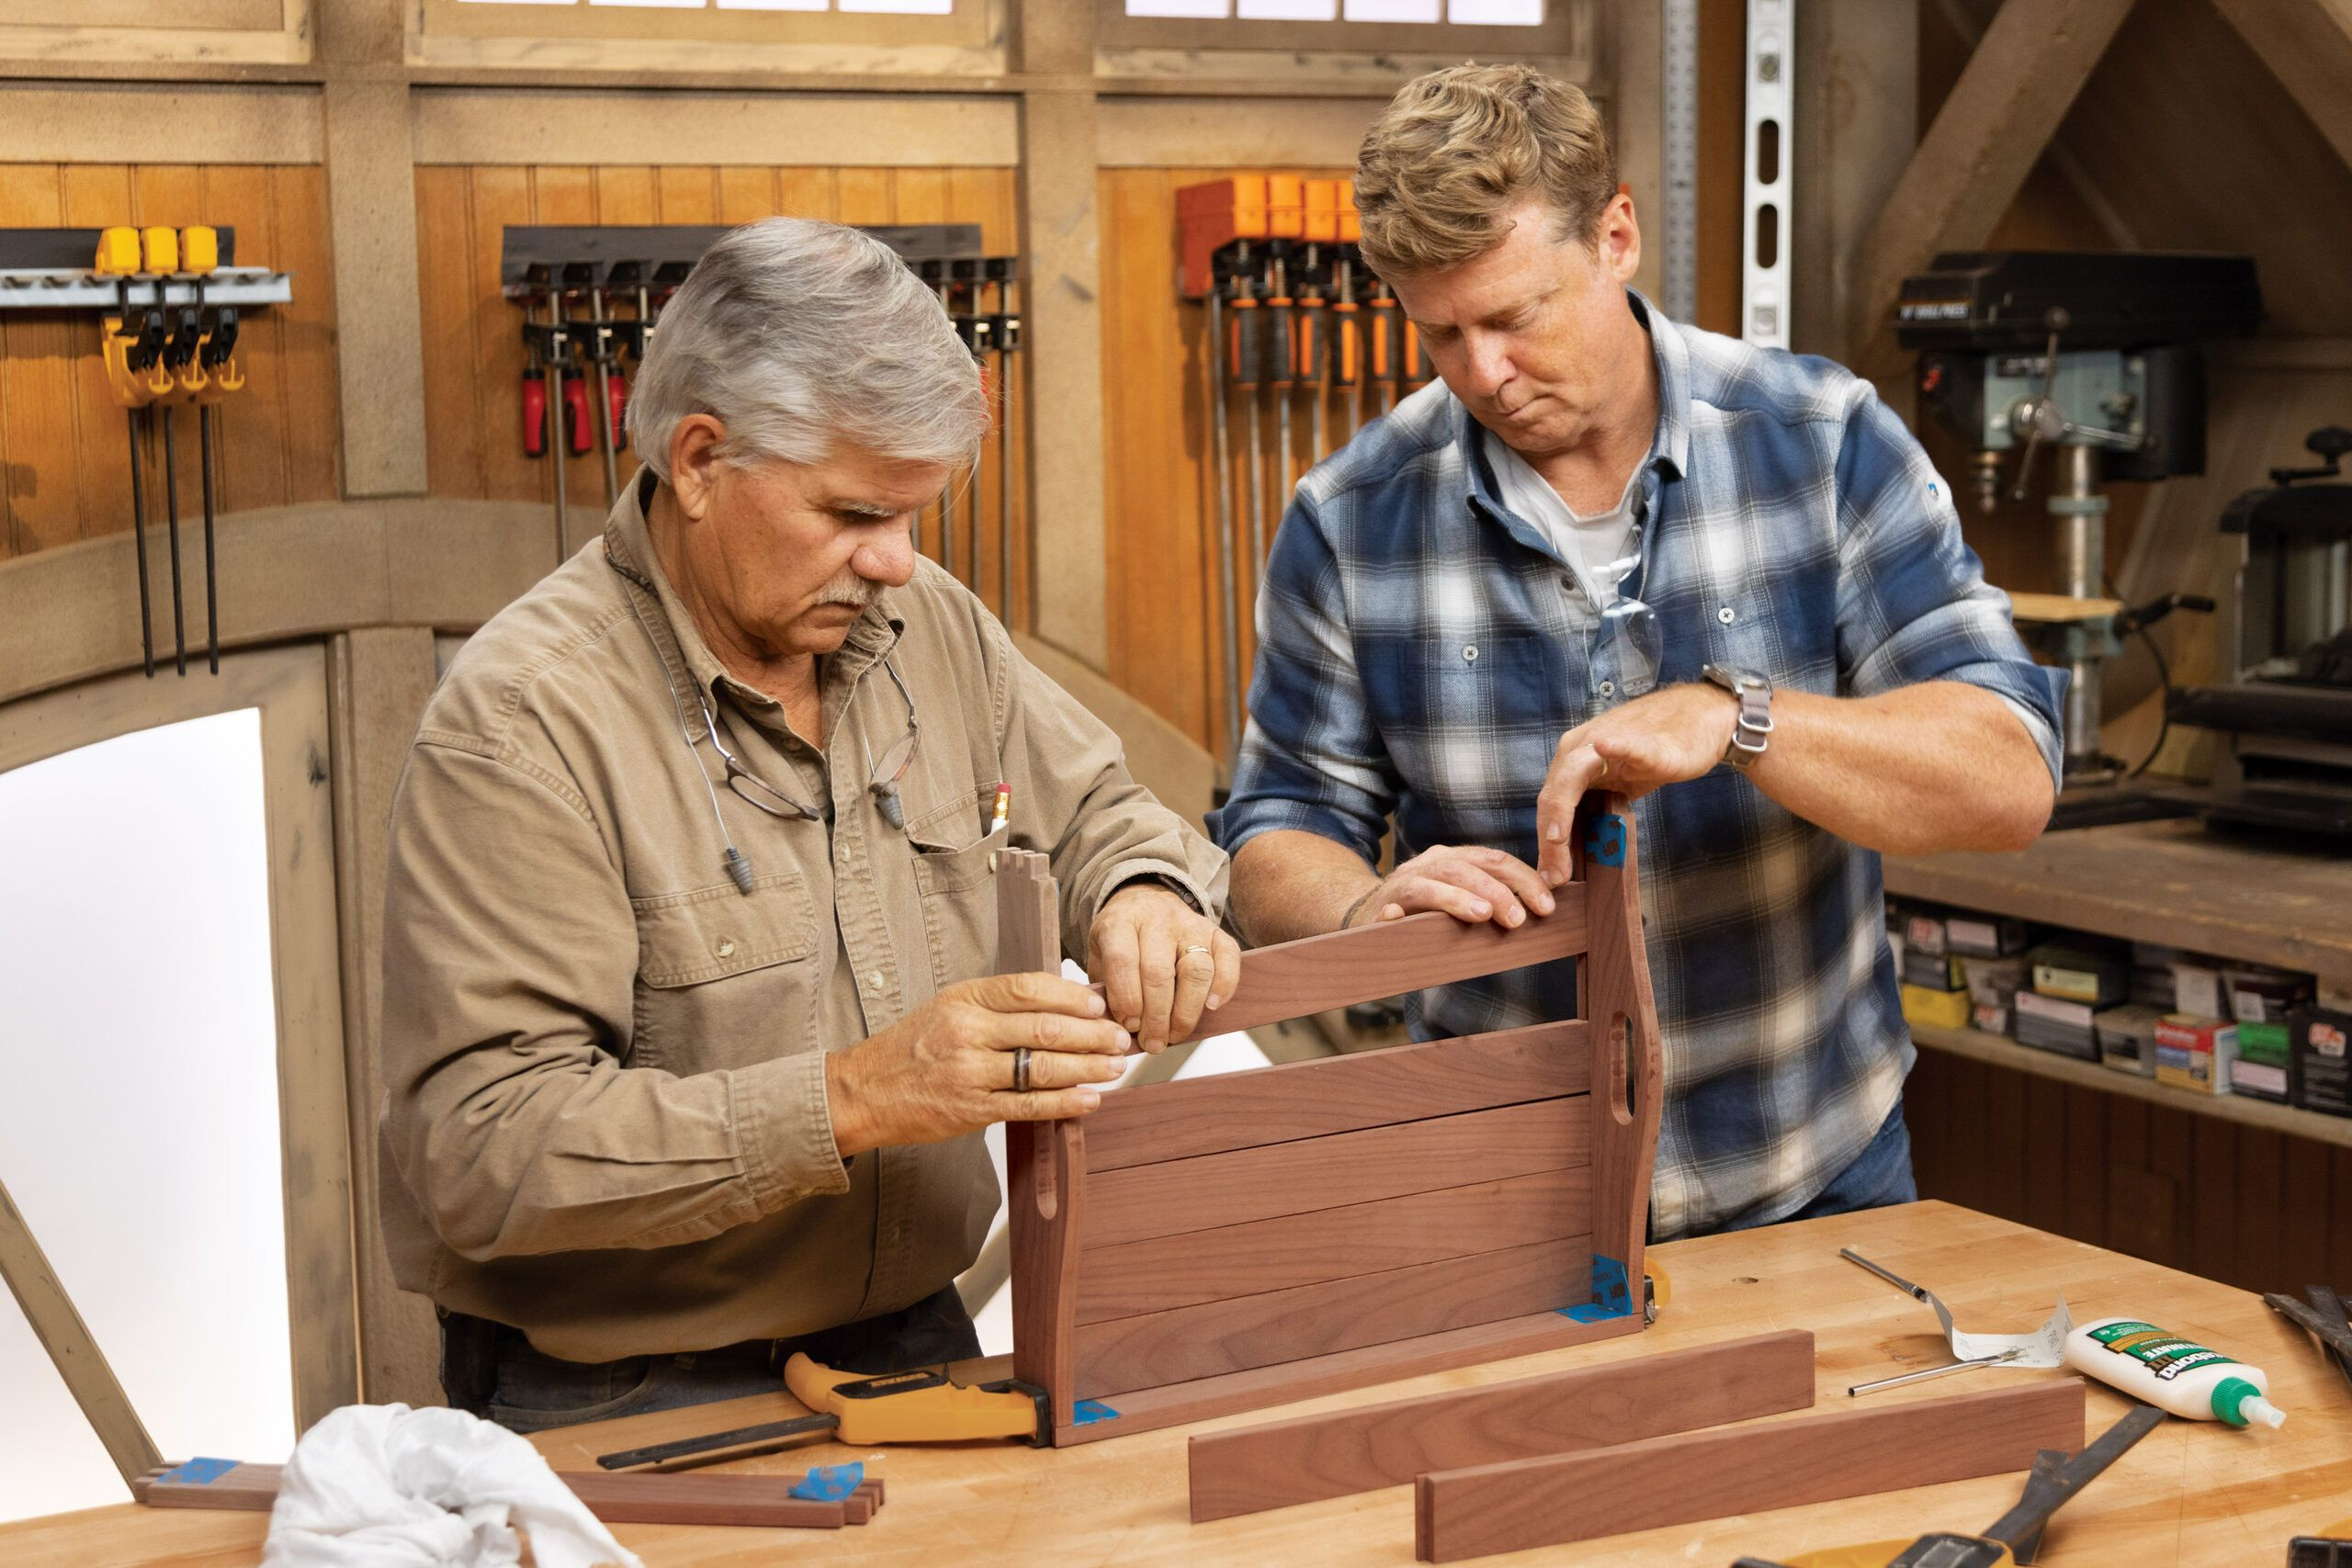 assembling the pieces of a walnut serving tray
Assembling the serving tray with wood glue and box joints, a crucial step in creating a durable wooden serving tray.
Step 8: Adding the Final Side and Clamping
Before applying glue to the final long side, perform a dry fit to ensure all pieces align correctly. If the last floor piece is slightly too wide, carefully rip it to a narrower width for a perfect fit. Once satisfied with the fit, apply wood glue to the remaining box joints. Slide the final long side into position to complete the tray’s structure. Loosely place bar clamps around the corners to hold the assembly together. Check the tray for squareness, then tighten the clamps evenly. Immediately wipe off any excess glue with a damp cloth. Allow the glue to dry completely, ensuring a strong and lasting bond for your serving tray woodworking creation.
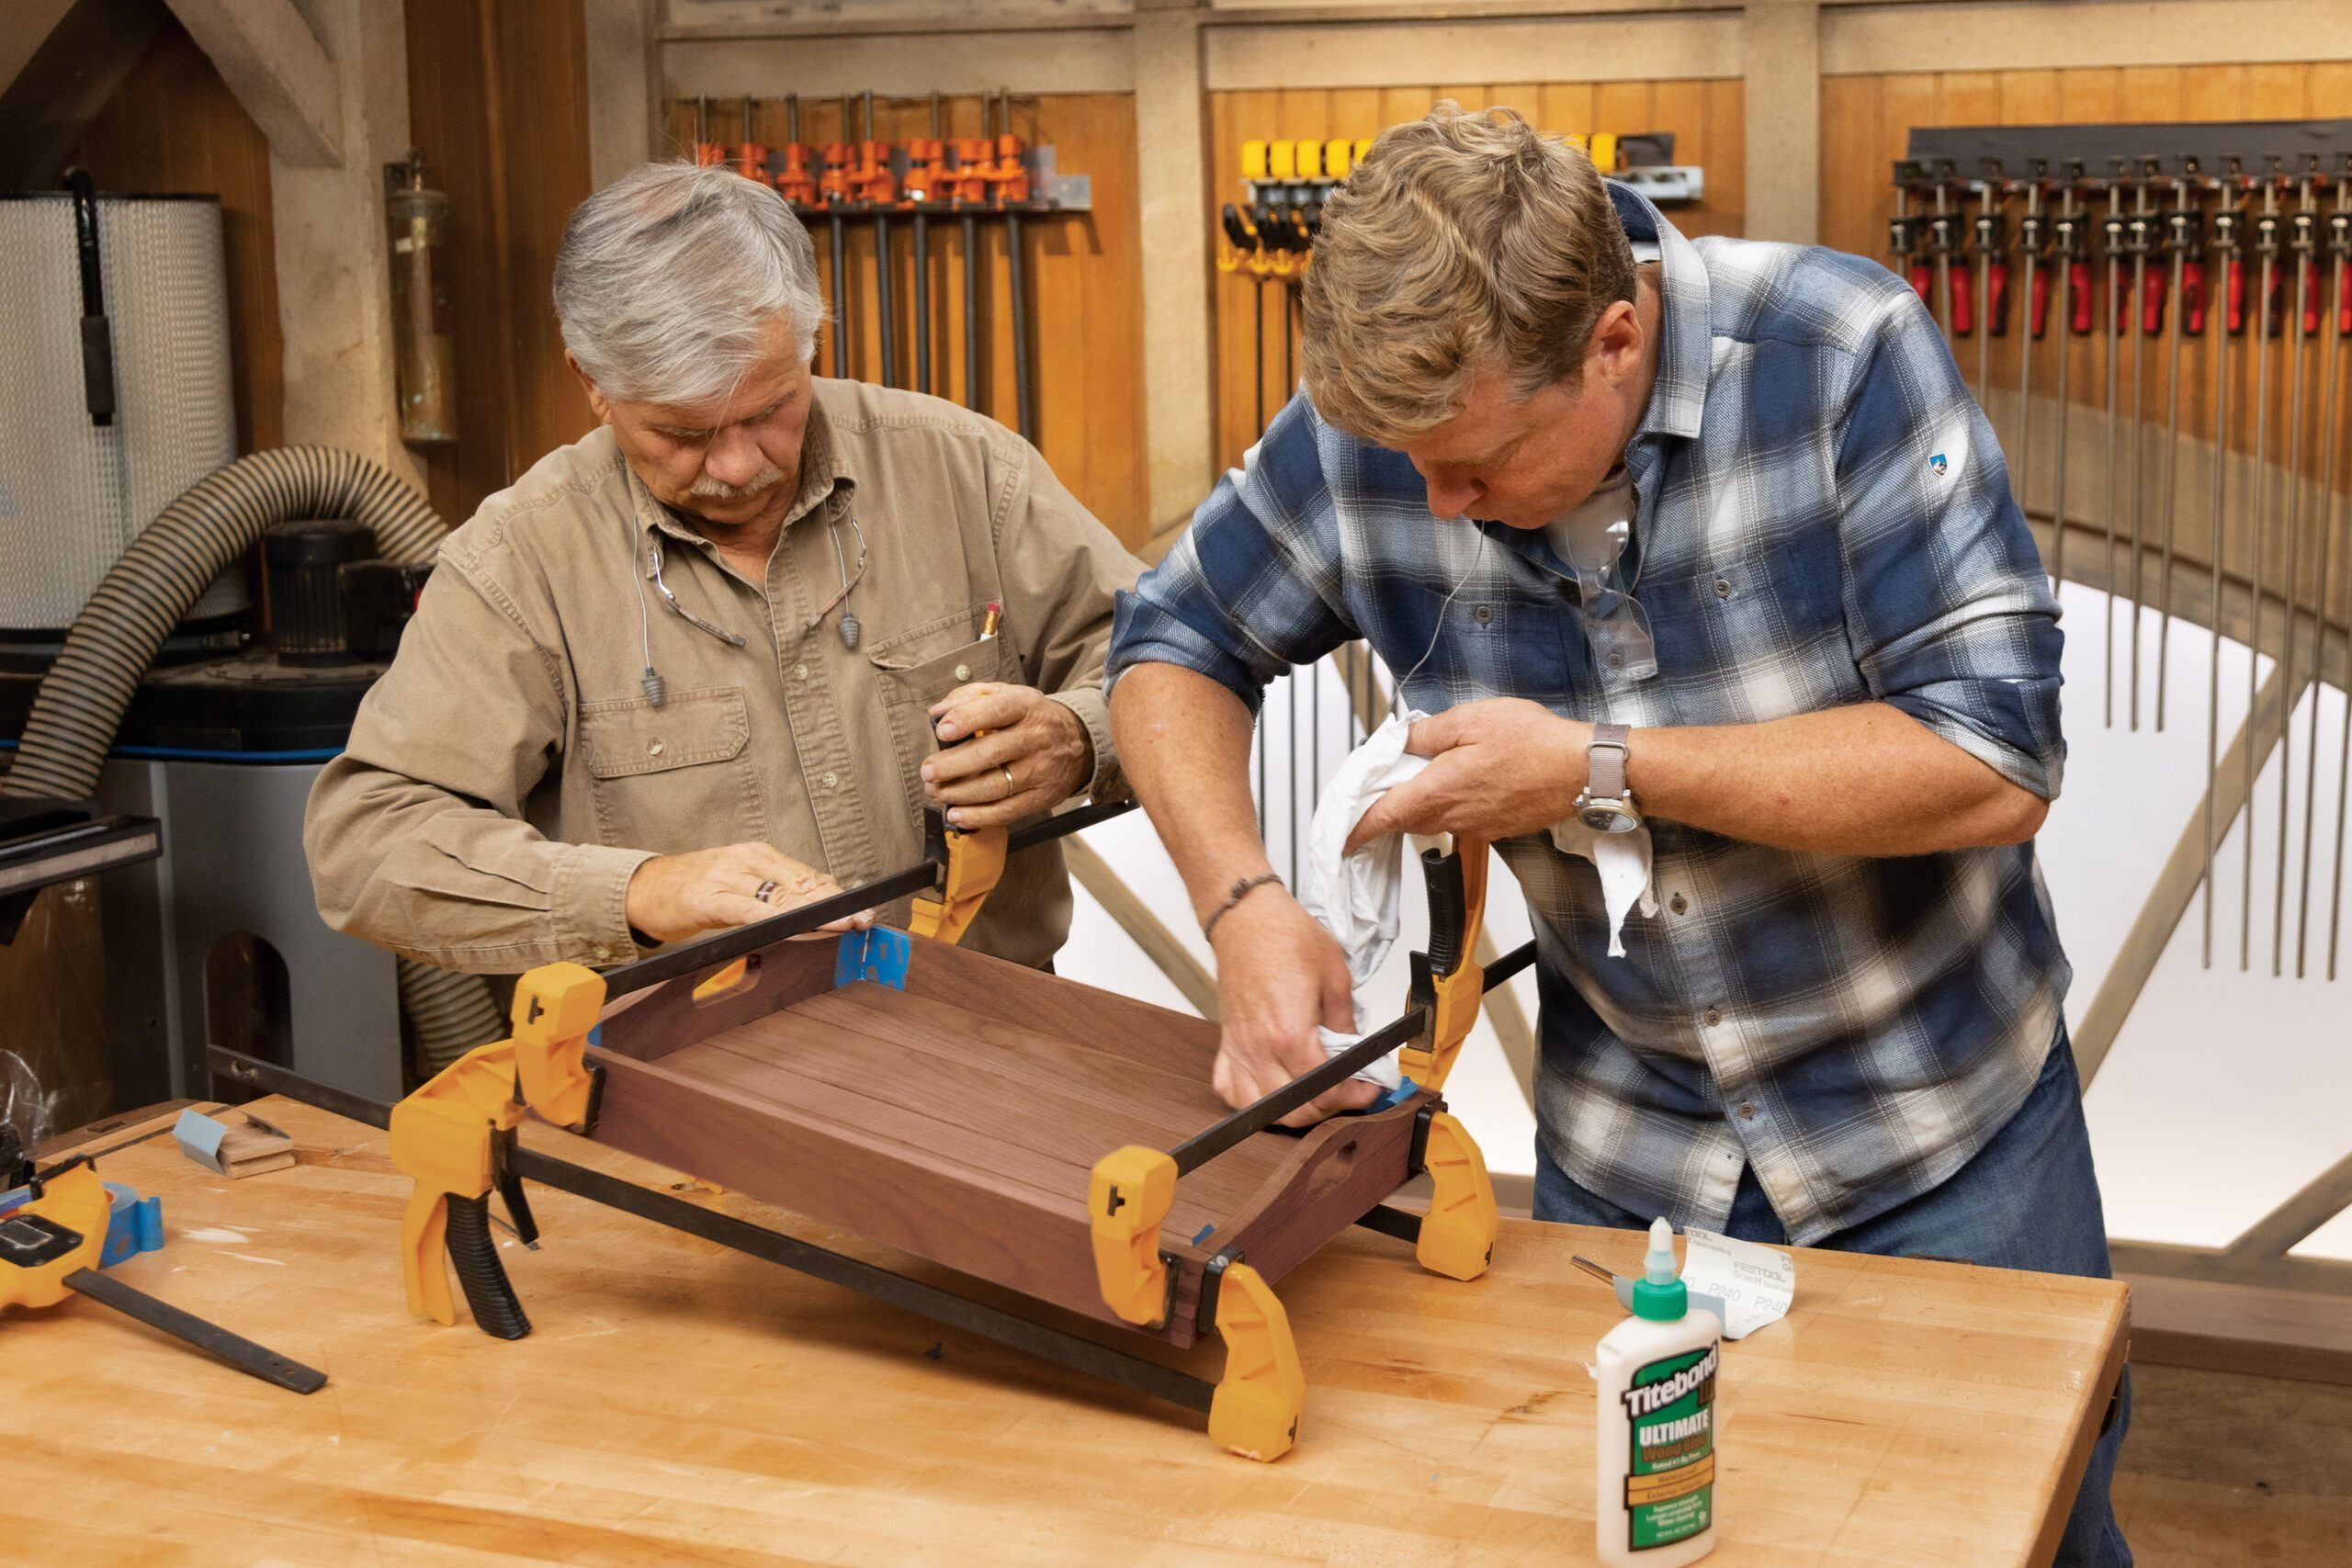 adding the final side to a serving tray to complete the project
Adding the final side and clamping the serving tray to ensure a tight bond during the woodworking process.
Finishing and Care: Preserving Your Woodworking Masterpiece
The final stages of serving tray woodworking involve finishing and care to protect and beautify your creation.
The Finishing Touches
After the glue has fully dried, it’s time to refine the surface of your wooden serving tray. Begin sanding all surfaces, paying close attention to the joints to make them perfectly flush. Start with a 120-grit sandpaper to smooth out any imperfections, then progress to a finer 220-grit for a silky smooth finish. Once sanded, choose your finish. Mineral oil is an excellent, food-safe option that enhances the wood’s natural beauty. Alternatively, consider tung oil or clear polyurethane for increased durability. Apply your chosen finish according to the manufacturer’s guidelines, allowing adequate drying time between coats. Multiple coats can deepen the luster and provide enhanced protection, beautifully highlighting the walnut grain of your handmade serving tray.
Maintaining Your Serving Tray
Proper care will ensure your walnut serving tray remains beautiful and functional for years. Follow these simple maintenance tips:
- After each use, clean the tray with a soft, damp cloth.
- Avoid immersing the tray in water or prolonged exposure to moisture, which can damage the wood.
- Periodically reapply mineral oil or wax to maintain the wood’s shine and protective layer.
- Store the tray in a cool, dry environment to prevent warping when not in use.
- Regularly inspect your serving tray for any signs of damage and promptly address any minor repairs to prolong its life.
Conclusion: Your Handcrafted Serving Tray – A Legacy of Woodworking
Creating a walnut serving tray is more than just a woodworking project; it’s an exercise in craftsmanship that yields a functional piece of art. By following these detailed steps and utilizing the robust box joint technique, you can craft a serving tray that is both beautiful and built to last. Whether you are expanding your woodworking repertoire or just beginning, this project offers a satisfying blend of skill-building and creative accomplishment. Enjoy the process of serving tray woodworking and take pride in a piece that will serve and impress for years to come. Start your woodworking project today and create a legacy of handmade elegance.