
A Raspberry Pi might be the most budget-friendly route to a Network Attached Storage (NAS) server, but as many DIY enthusiasts discover, the path to cheap data storage can be fraught with unexpected challenges. While dedicated NAS devices offer plug-and-play simplicity, venturing into the Raspberry Pi NAS world means embracing a steeper learning curve and potentially encountering a few bumps along the road.
This isn’t intended to be another dry step-by-step guide. Instead, it’s a candid look at the realities of setting up a Raspberry Pi Nas Server, drawing from firsthand experiences of trial, error, and the occasional tech-induced headache. If you’re considering this DIY project, understanding the potential pitfalls is just as crucial as knowing the potential rewards.
If ease of use and guaranteed reliability are your top priorities, pre-built NAS solutions are readily available. These devices, often running Windows-based systems, offer a smoother, albeit pricier, experience. But for those drawn to the Raspberry Pi’s versatility and affordability, the DIY NAS route remains an intriguing option.
The Raspberry Pi NAS Server Gamble: Hardware Hurdles
For those of us with champagne tastes and a beer budget, the Raspberry Pi 4 Model B, with its 8GB of RAM, seems like the perfect starting point. However, even with a relatively recent model, the journey isn’t always smooth. My own experience involved more than one Raspberry Pi and a graveyard of SD cards. These tiny computers, while robust in concept, can be surprisingly delicate in practice. SD card corruption, power issues, and even physical mishaps like snapped HDMI cables can quickly derail your NAS aspirations.
My initial foray involved a starter kit that, in retrospect, felt more like a beginner’s curse. The first Raspberry Pi refused to boot, the included SD card fractured during removal from its case, and another SD card met an untimely demise, seemingly burnt out in action.
 Two SD cards – one snapped and one burnt.
My initial experiences were less than ideal, highlighting the potential hardware vulnerabilities when building a Raspberry Pi NAS. (Image credit: Luke Hughes)
Eventually, a replacement Raspberry Pi arrived, pre-loaded with Raspberry Pi OS, the Raspberry Pi Foundation’s own Linux distribution. This offered a glimmer of hope, the promise of setting up an FTP server and Plex server for media streaming, and perhaps even a personal cloud storage solution. But as with many DIY tech projects, the initial setup was just the beginning of the adventure.
Linux Learning Curve: Software Setbacks on your Raspberry Pi NAS
 A Raspberry Pi
A Raspberry Pi device, highlighting the power and activity LEDs. Troubleshooting often involves observing these lights for diagnostic clues. (Image credit: Luke Hughes)
Just when you think you’ve overcome the hardware hurdles, the software side of building a Raspberry Pi NAS server can present its own set of challenges. Linux, while powerful and flexible, demands a certain level of command-line familiarity. For users accustomed to graphical interfaces, navigating the terminal can feel like learning a new language.
In my case, overconfidence proved to be my downfall. After managing to get the system running, I attempted to permanently mount external hard drives using the command line. In a moment of late-night coding fueled by fatigue, I misconfigured the mount settings. A reboot later, and the entire system was rendered unbootable.
The lesson learned: permanently mounting drives in /etc/fstab, a common step in setting up a Raspberry Pi NAS, requires careful attention to detail. It’s crucial to use persistent device IDs (like UUIDs) rather than device names that can change upon reboot. And perhaps most importantly, the ‘nofail’ mount option is your friend, preventing boot failures if a drive isn’t present at startup.
 The male end of a mini-HDMI cable snapped off in a Pi
Physical mishaps like a broken HDMI port can add to the frustration of setting up a Raspberry Pi NAS server. (Image credit: Luke Hughes)
The recovery process often involves booting into maintenance mode, Linux’s version of safe mode. However, even this can be tricky if you’re not familiar with the intricacies of Linux system administration. In my experience, even accessing maintenance mode was initially hampered by a locked root (administrator) account, adding another layer of complexity.
Ultimately, reimaging the SD card and starting from scratch became the most efficient solution. This time, with a more cautious approach and a better understanding of the pitfalls, the Raspberry Pi NAS server finally started to function as intended. Exploring containerization technologies like Docker could further enhance the system’s robustness by isolating applications and minimizing the impact of potential software issues.
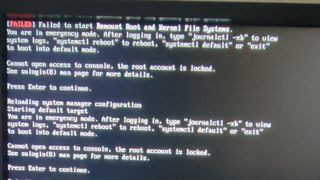 The maintenance mode screen in Raspberry Pi OS.
The maintenance mode screen in Raspberry Pi OS, a critical tool for system recovery and troubleshooting. (Image credit: Luke Hughes)
Read more about Raspberry Pi and Linux:
- The best Raspberry Pi distros right now
- Raspberry Pi could be taking some big leaps forward in 2023
- Raspberry Pi Code Editor wants to help the next generation of programmers
Raspberry Pi NAS: A Balancing Act of Cost and Complexity
Despite the initial struggles, there’s a certain satisfaction in seeing a Raspberry Pi function as a personal NAS server. The device’s compact size and low power consumption are undeniably appealing. And the sheer versatility of the Raspberry Pi platform means it can be adapted for a wide range of tasks beyond just file storage.
However, it’s essential to acknowledge the trade-offs. Building a Raspberry Pi NAS server is a project that demands time, patience, and a willingness to learn. It’s not a plug-and-play solution, and it’s certainly not foolproof. Data loss due to hardware or software failures is a real possibility if proper backups and redundancy measures are not implemented.
The key takeaway? Approach a Raspberry Pi NAS project with realistic expectations. It’s a fantastic learning experience and a budget-friendly way to experiment with network storage. But if your primary need is rock-solid reliability and ease of use, a dedicated, pre-built NAS device might be a less stressful and ultimately more practical choice.
The standalone Raspberry Pi 4 Model B starts at around $35/£35, with prices varying based on RAM configuration. Remember to factor in the cost of SD cards, external hard drives, and potentially a powered USB hub for reliable operation.
Explore further into Raspberry Pi and NAS solutions:
- The best Raspberry Pi distros right now
- Raspberry Pi could be taking some big leaps forward in 2023
- Raspberry Pi Code Editor wants to help the next generation of programmers