
Proxy servers act as intermediaries between your computer and the internet, offering various benefits like enhanced security, privacy, and access control. Understanding and configuring your Proxy Server Settings is crucial for leveraging these advantages effectively. This guide provides a detailed overview of proxy server settings and how to set them up across different operating systems and browsers.
As for what a proxy server is, it functions as a gateway between you and the internet. When you request to visit a website, your request first goes through the proxy server. The proxy server then forwards your request to the website on your behalf. When the website responds, the proxy server receives the response and then passes it back to you.
Proxy servers are versatile tools that perform numerous functions. They can scan for viruses to protect your network from malware, act as a firewall to control network access, improve connection speeds through caching frequently accessed data, and hide your public IP address to enhance your online privacy.
Navigating the world of online privacy can be complex. There are many concepts to grasp, including understanding what a reverse proxy is and distinguishing between VPNs, proxies, and Tor. While proxies offer a degree of privacy, for robust protection and encryption of your internet traffic, a Virtual Private Network (VPN) is generally recommended. Avast SecureLine VPN provides a reliable solution to hide your online activities from prying eyes and secure your digital identity. Importantly, VPNs are often simpler to set up compared to proxy servers, offering a user-friendly alternative for comprehensive online security.
[Free trial
Download Avast SecureLine VPN](https://www.avast.com/download-thank-you.php?product=SLN)
[Free trial
Download Avast SecureLine VPN](https://www.avast.com/download-thank-you.php?product=SLM)
[Free trial
Install Avast SecureLine VPN](https://play.google.com/store/apps/details?id=com.avast.android.vpn&referrer=utm_source%3Davast_com%26utm_medium%3Dacademy)
Get it for PC, Mac, iOS
[Free trial
Install Avast SecureLine VPN](https://apps.apple.com/app/apple-store/id793096595?pt=421899&ct=avast.com_academy&mt=8)
Get it for Mac, PC, Android
Unlike VPNs, proxies, especially free web-based proxies, don’t guarantee robust protection. Public proxy services can sometimes slow down your connection and may pose security risks. Therefore, understanding how to properly configure proxy server settings on your devices and browsers is essential.
If you are setting up a proxy provided by an organization like a company or school, you might need specific details from your IT department. This is especially true when you need to enter a script name, known as a Proxy Auto-Configuration (PAC) file, or the proxy’s IP address and port number. Always consult your IT support if you lack this information. If you are using a private proxy server you’ve acquired or set up yourself, you should already have these details available.
Finding Your Proxy Settings in Windows
Before you begin setting up a proxy server, it’s helpful to check your current proxy settings in Windows. This can provide information about your network configuration and whether a proxy is already in use.
Here’s how to find proxy settings on Windows:
- Click the Start Menu and select Settings (the gear icon).
- Go to Network & Internet.
- Select Proxy from the left-hand menu.
- Here, you will find information regarding both automatic and manual proxy settings.
Setting Up a Proxy Server on Windows
To configure your Windows PC to use a proxy server, follow these steps for Windows 8 and Windows 10:
- Press the Windows key + I simultaneously to open the Windows Settings.
- In Windows 10, navigate to Settings > Network & Internet > Proxy. In Windows 8, go to Settings > Network Proxy.
- In the “Manual proxy setup” section, toggle the “Use a Proxy Server” switch to On. Ensure that the “Automatically detect settings” option is also enabled.
- Windows will automatically detect if your network (like a business or school network) has an automatic proxy setup. If it does, Windows will display the details and guide you through any specific instructions.
- If Windows detects a PAC file, under “Automatic Proxy Setup”, switch the Use setup script toggle to On.
- Enter the script address provided by your network administrator and click Save.
Congratulations! You have now successfully configured your proxy settings in Windows using an automatic setup script.
Manually Configuring Proxy Settings in Windows
If your organization does not use automatic proxy configuration, you may need to set up your proxy manually in Windows 8 or Windows 10. Here’s how:
-
Press the Windows key + I keys together to access the Windows Settings menu.
-
In Windows 10, go to Settings > Network & Internet > Proxy. For Windows 8, navigate to Settings > Network Proxy.
-
Scroll down to the “Manual proxy setup” section and set the “Use a Proxy Server” switch to On.
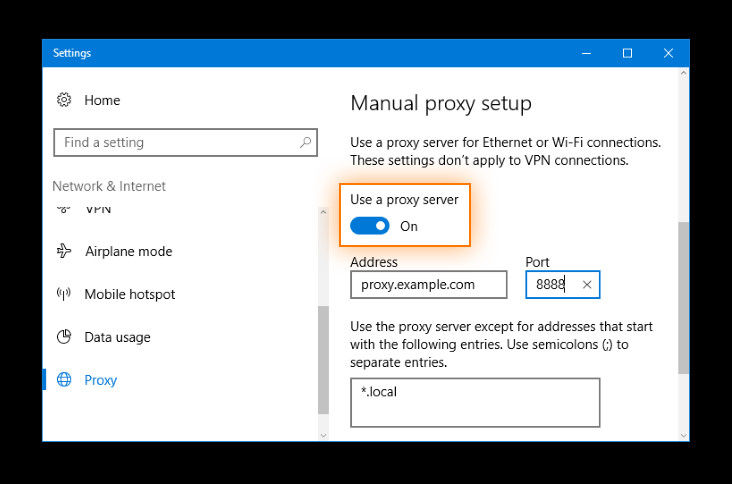 Manual proxy server settings for Windows 10
 -
In the “Address” field, type the proxy server address or IP address. In the “Port” field, enter the proxy port number. Obtain these details from your IT support or proxy provider.
-
If your proxy server requires authentication, check the “Proxy server requires password” box. Enter your username and password in the respective fields.
-
Click Save to apply the manual proxy settings.
You have now completed the manual proxy server setup on Windows. Your internet traffic will now be routed through the configured proxy server.
Setting Up a Proxy Server on macOS
For Mac users running macOS 10.15 Catalina or later versions, the process to set up a proxy server is straightforward. Earlier macOS versions follow a similar procedure.
-
Open System Preferences. You can do this by clicking the Apple menu in the top-left corner and selecting System Preferences.
-
Click on the Network icon to access network settings.
-
Select your active network connection, typically Ethernet or Wi-Fi, from the list on the left.
-
Click Advanced, then navigate to the Proxies tab.
-
To use automatic proxy configuration, check Auto Proxy Discovery. To manually configure, check Secure Web Proxy (HTTPS). Enter the proxy server address and port number in the fields provided.
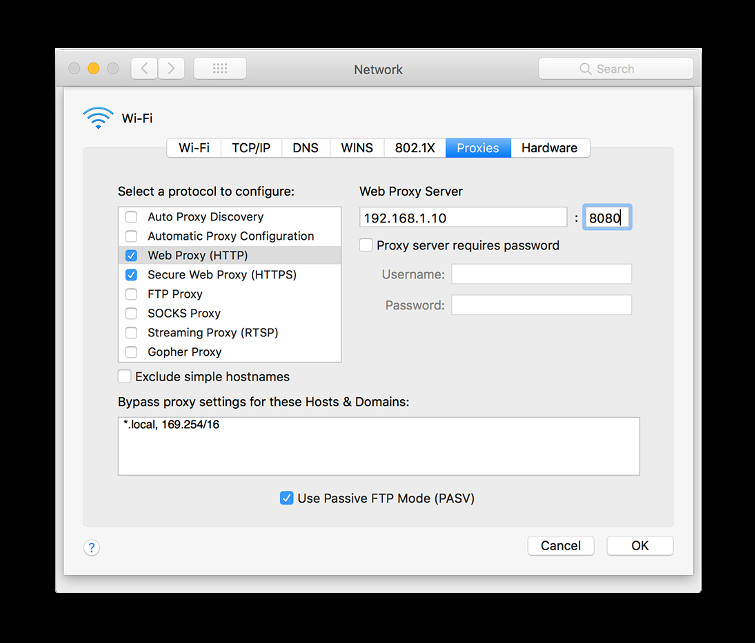 macOS proxy server settings
 -
To use a Proxy Auto-Configuration (PAC) file, check Automatic Proxy Configuration and enter the PAC file URL in the “URL” field.
-
If the proxy server requires authentication, check the “Proxy server requires password”. Enter your username and password.
-
Click OK to save the proxy configuration.
Your Mac is now configured to use the proxy server for internet access.
Configuring Proxy Settings in Google Chrome
Google Chrome, by default, utilizes the proxy settings configured in your operating system (Windows or macOS). To manage proxy settings through Chrome itself, follow these steps:
- Open the Chrome menu by clicking the three vertical dots in the top-right corner and select Settings.
- Scroll to the bottom of the Settings page and click Advanced.
- Under the “System” section, click Open your computer’s proxy settings.
- This action will redirect you to your operating system’s network and proxy settings where you can follow the instructions for Windows or macOS detailed above to configure your proxy server settings.
Essentially, setting up a proxy server for Google Chrome involves adjusting your system-wide proxy settings.
Setting Up Proxy Settings in Safari
Safari, similar to Chrome, is configured by default to use the proxy settings defined in your macOS. To adjust proxy settings from within Safari:
-
Click on Safari in the menu bar, then select Preferences.
-
Go to the Advanced tab. Under the “Proxies” section, click Change Settings….
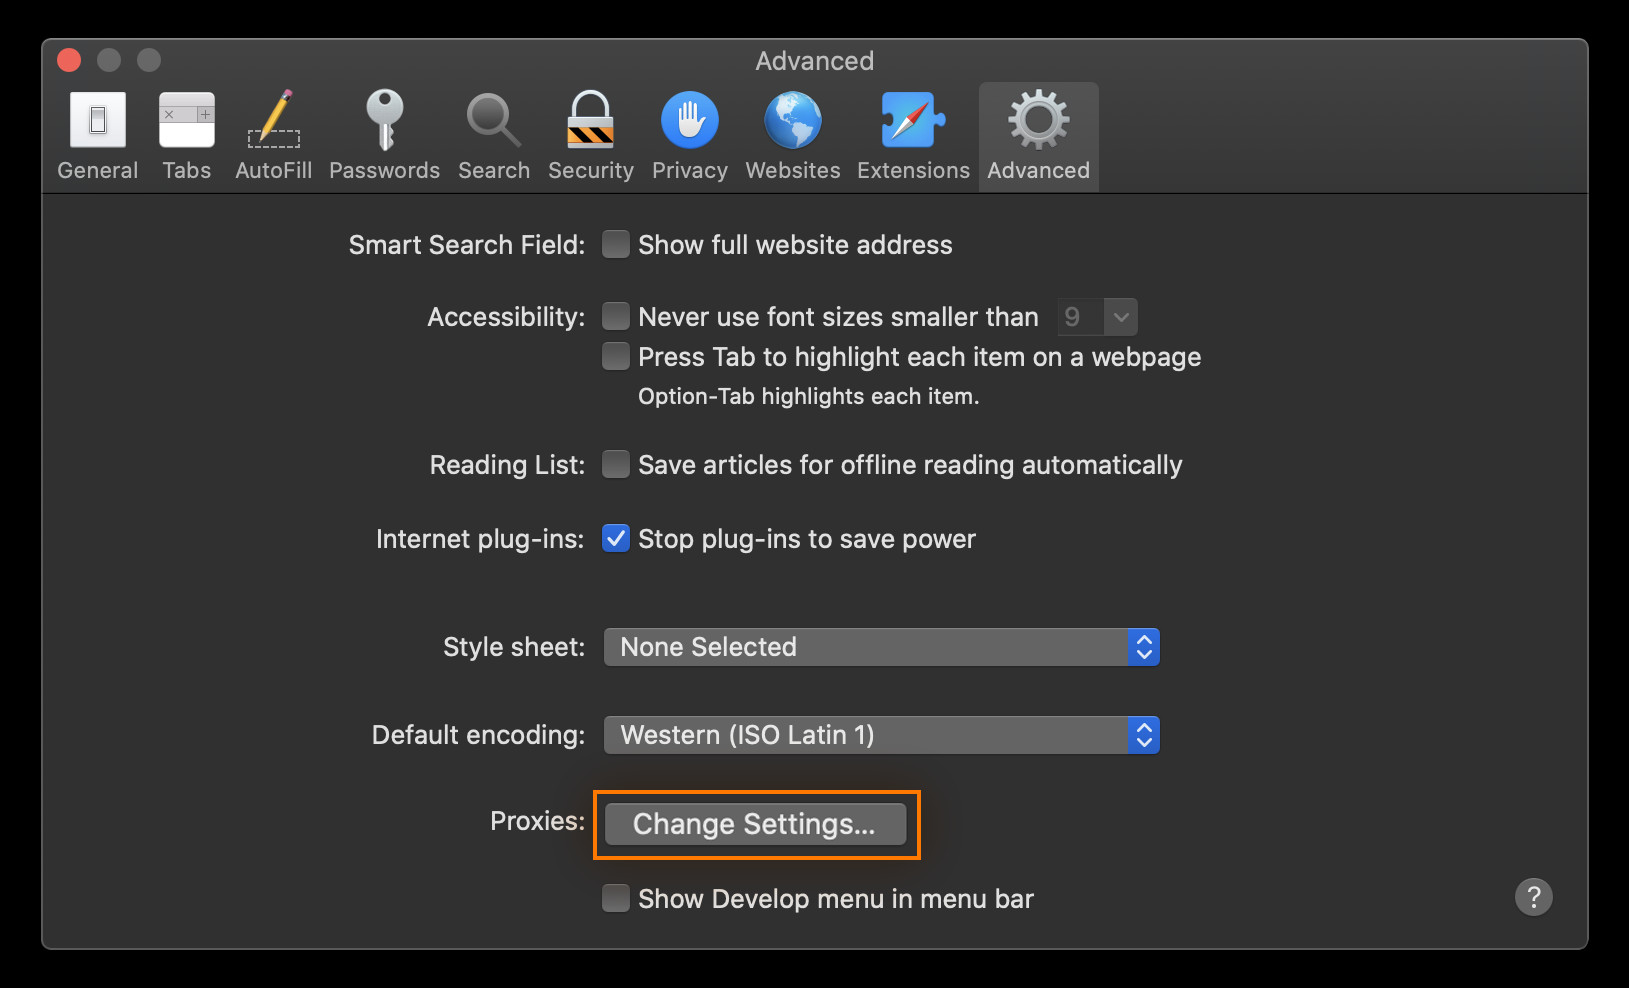 Changing proxy settings in Safari on macOS
 -
You will be redirected to the macOS Network settings, specifically the Proxies tab. Follow the macOS proxy setup instructions provided earlier to configure your proxy server settings.
Configuring Proxy Settings in Microsoft Edge
Microsoft Edge, based on Chromium, also defaults to using the proxy settings configured in Windows. To manage proxy settings from within Edge:
- In Microsoft Edge, click the three horizontal dots (Menu button) in the top-right corner and select Settings.
- Click on System in the left sidebar.
- Click Open your computer’s proxy settings.
- This will open the Windows proxy settings, where you can follow the Windows 10 proxy setup instructions detailed previously.
Setting Up Proxy Settings in Firefox
Firefox differs from other browsers as it does not automatically use system proxy settings. You need to configure proxy settings directly within Firefox:
-
Open the Firefox menu by clicking the three horizontal lines in the top-right corner and select Settings (or Options on some systems).
-
Click on Privacy & Security in the left sidebar.
-
Scroll down to the “Proxy” section and click Settings….
-
In the “Connection Settings” window, you can choose from several options:
- Auto-detect proxy settings for this network: Firefox will attempt to automatically detect proxy settings.
- Use system proxy settings: Firefox will use the proxy settings configured in your operating system.
- Manual proxy configuration: Select this to manually enter your proxy server details. Enter the proxy address and port number for HTTP Proxy, SSL Proxy, etc., as needed.
- Auto-proxy configuration URL: If you have a PAC file URL, enter it here.
 Firefox proxy server settings
 -
Select your preferred option and enter the necessary details. Click OK to save your settings.
Setting Up Proxy Settings in Internet Explorer
While Internet Explorer is outdated, some users and organizations may still need to use it. Internet Explorer, by default, uses Windows proxy configurations. To set up a proxy from within IE:
- Open the Internet Explorer toolbar and select Internet Options (usually found under the gear icon in the top-right corner).
- Go to the Connections tab.
- Click LAN settings.
- Check the box labeled “Use a proxy server for your LAN”.
- Enter the proxy server address and port number when prompted.
- Click OK to save your settings.
Setting Up Proxy Settings on Android
On Android devices, proxy settings are configured per Wi-Fi network and are primarily used by the web browser. Other apps might bypass these settings. For system-wide proxy and app coverage, consider using a VPN.
-
Open Android Settings and tap Wi-Fi to view available networks.
-
Long-press the Wi-Fi network name you want to configure and tap Modify Network.
-
Tap Advanced Options.
.png)
Alt text: Android Wi-Fi network settings, expanded to show advanced options and proxy configuration. -
Tap Proxy and select Manual to enter proxy details manually. Input your proxy hostname and port.
Alternatively, select Proxy Auto-Config to use a PAC file and enter the PAC address. -
Tap SAVE to apply the settings.
Setting Up Proxy Settings on iOS
Configuring proxy settings on iOS devices is also done per Wi-Fi network.
- Go to Settings > Wi-Fi.
- Tap on the name of your active Wi-Fi connection (the blue “i” icon).
- Scroll down to HTTP Proxy and tap Configure Proxy.
- Choose Manual to enter proxy details. Enter the hostname, port, and authentication details if required.
Alternatively, select Automatic if your network uses Web Proxy Auto-Discovery Protocol (WPAD) or requires a Proxy Auto-Config (PAC) file, and enter the PAC file URL if needed. - Tap back to the Wi-Fi network details to save the settings.
Secure Your Online Privacy with Ease
Proxy servers can be beneficial, especially in organizational environments, offering control and security. However, their setup can be technically involved and is often managed by IT professionals.
For a more user-friendly and comprehensive online privacy solution, consider Avast SecureLine VPN. VPNs provide robust encryption and anonymity, protecting your online activities and sensitive information with a simple click or tap. Enjoy seamless online privacy across your devices with a VPN that is both easy to use and highly secure.
[Free trial
Download Avast SecureLine VPN](https://www.avast.com/download-thank-you.php?product=SLN)
[Free trial
Download Avast SecureLine VPN](https://www.avast.com/download-thank-you.php?product=SLM)
[Free trial
Install Avast SecureLine VPN](https://play.google.com/store/apps/details?id=com.avast.android.vpn&referrer=utm_source%3Davast_com%26utm_medium%3Dacademy)
Get it for PC, Mac, iOS
[Free trial
Install Avast SecureLine VPN](https://apps.apple.com/app/apple-store/id793096595?pt=421899&ct=avast.com_academy&mt=8)
Get it for Mac, PC, Android