
The Domain Name System (DNS) is a fundamental part of the internet, acting as a directory that translates user-friendly domain names into IP addresses that computers use to connect to websites. Think of it as the internet’s phone book, allowing you to type in names like “rental-server.net” instead of complex numerical addresses. DNS servers are the systems that perform this translation, making the internet easily accessible.
On Android devices running version 9 and above, a feature called Private DNS enhances your online privacy and security when connected to Wi-Fi networks. Private DNS encrypts your DNS queries, preventing your internet service provider (ISP) and potential cybercriminals from monitoring your browsing activity. This added layer of protection is beneficial for all your apps.
However, you might occasionally encounter an error message: “Private Dns Server Cannot Be Accessed” when trying to connect to a Wi-Fi network, whether it’s a public hotspot or your home network. This issue often arises because some public Wi-Fi providers block certain DNS servers, or there might be a configuration conflict on your phone.
While this problem sometimes resolves itself within a few minutes, it can persist, leaving you without internet access. This article will guide you through the steps to troubleshoot and fix the “Private DNS Server Cannot Be Accessed” error, so you can get back online quickly.
Understanding Why “Private DNS Server Cannot Be Accessed” Occurs
The root cause of the “Private DNS Server Cannot Be Accessed” error usually lies with the DNS server your Android phone is attempting to use. There are a couple of common scenarios that trigger this issue:
- Problem with the Current DNS Server: The DNS server your phone is configured to use might be temporarily unavailable, experiencing technical difficulties, or blocked by the network you are trying to connect to.
- DNS Server Conflict: A conflict can occur between the Private DNS server settings on your phone and the DNS server settings of the Wi-Fi router you are connected to. This mismatch can prevent successful DNS resolution and internet access.
Step-by-Step Solutions to Resolve the Private DNS Issue
Fortunately, resolving the “Private DNS Server Cannot Be Accessed” issue on your Android device is usually straightforward. The primary solutions involve adjusting your Private DNS settings. You can either disable Private DNS entirely or switch it to automatic mode. Here’s how to do it:
-
Access your phone’s Settings menu. This is typically done by tapping the gear icon on your app drawer or notification shade.
-
Navigate to “Network & internet” settings. The exact wording may slightly vary depending on your Android device, but look for options related to network connections.
-
Look for “Advanced” or “Other internet connections.” You might need to tap on an “Advanced” option or a similarly named setting to reveal further network options.
-
Select “Private DNS.” Scroll through the options until you find “Private DNS” and tap on it.
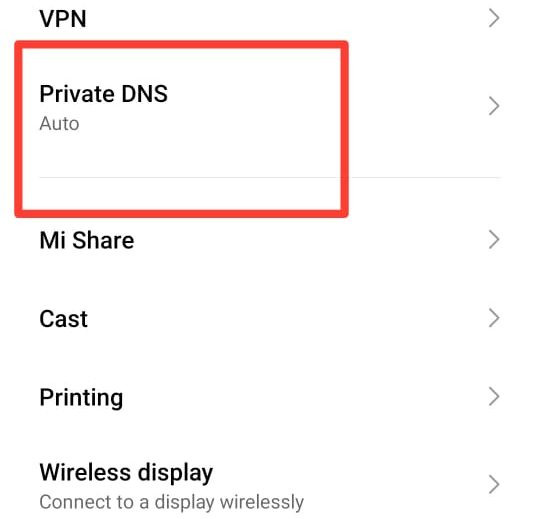 Navigating to Private DNS settings on Android
-
Choose “Off” or “Automatic.” In the pop-up window that appears, you’ll see options for Private DNS. Select either “Off” or “Automatic.”
-
Tap “Save” to apply your changes. This will save your new Private DNS setting.
After making these changes, your phone should attempt to reconnect to the internet. Open your web browser or any app that requires internet access to check if the connection has been restored.
Understanding the Options:
-
Off: Selecting “Off” completely disables the Private DNS feature. This means your DNS queries will no longer be encrypted, and you will be browsing without the added privacy protection of Private DNS. While this often resolves the connection issue, it’s generally less secure than using Private DNS.
-
Automatic: Choosing “Automatic” instructs your phone to use the DNS server provided by the network you are connected to. In most cases, this will be the DNS server of the Wi-Fi router. This option allows for internet connectivity while potentially still benefiting from some level of DNS security if the network itself supports secure DNS protocols.
Advanced Option: Setting a Specific Private DNS Provider Hostname
The Private DNS menu also offers a third, more advanced option: “Private DNS provider hostname.” This allows you to manually configure your phone to use a specific third-party DNS server. Using third-party DNS providers can offer benefits such as improved speed, reliability, and enhanced privacy compared to default ISP-provided DNS servers. Popular and trusted public DNS providers include Google DNS and Cloudflare DNS.
This option is particularly useful if you want to ensure your phone uses a specific DNS server, regardless of the Wi-Fi network’s default settings. To configure a custom DNS server:
-
Follow steps 1-4 above to access the Private DNS settings.
-
In step 5, select the “Private DNS provider hostname” option.
 Selecting Private DNS provider hostname on Android
-
Enter the hostname of your chosen DNS provider.
- For Google Public DNS: Type
dns.googleas the hostname.
- For Google Public DNS: Type
 Entering Google DNS hostname on Android
* **For Cloudflare DNS:** Type `1dot1dot1dot1.cloudflare-dns.com` as the hostname.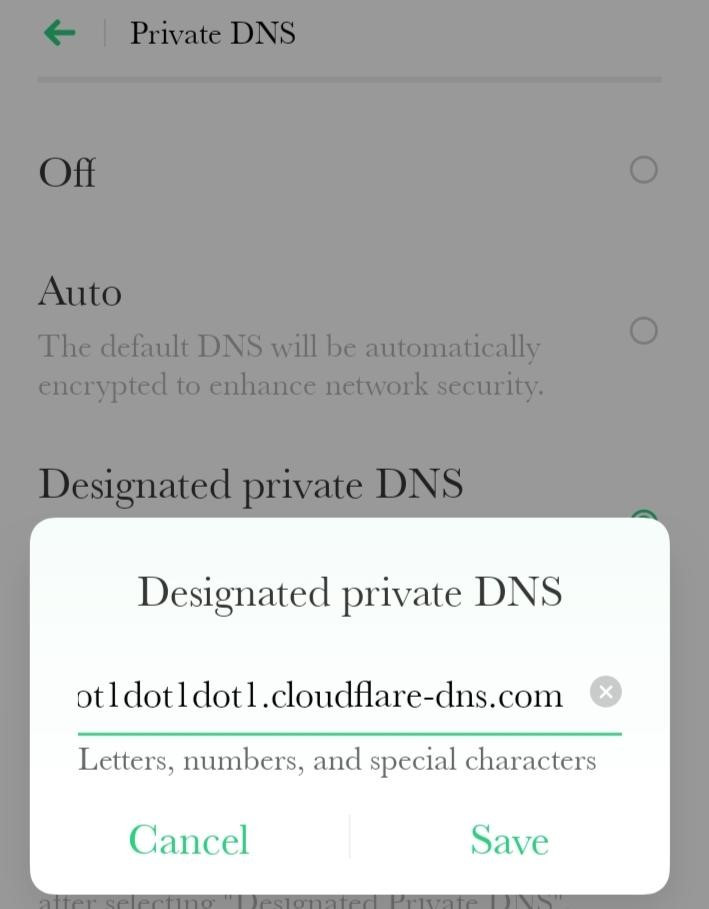 Entering Cloudflare DNS hostname on Android
- Tap “Save.”
By following these steps and selecting one of the methods, you should be able to successfully resolve the “Private DNS Server Cannot Be Accessed” error on your Android phone and restore your internet connection. Choose the DNS setting that best balances your needs for connectivity, privacy, and security.