Encountering the “DNS Server Not Responding” error while browsing can be incredibly frustrating. This message, indicating a problem with your DNS server, often leaves users puzzled about the root cause and how to resolve it.
The Domain Name System (DNS) is fundamental to internet functionality. It acts as the internet’s phonebook, translating user-friendly domain names like rental-server.net into numerical IP addresses that computers use to locate servers. Without DNS, navigating the internet using domain names would be impossible, forcing users to memorize complex IP addresses instead.
Therefore, DNS issues are critical, especially for web-based services. Addressing them promptly is crucial. This guide thoroughly explains the “DNS Server Not Responding” error, exploring its common causes and providing 11 effective methods to fix it swiftly.
Understanding the “DNS Server Not Responding” Error
The “DNS Server Not Responding” error signifies that your device cannot communicate with a DNS server. This communication breakdown prevents your device from translating domain names into IP addresses, effectively blocking access to websites. Fortunately, several common solutions exist, including restarting your modem or router, clearing your DNS cache, adjusting DNS server settings, examining firewall configurations, and updating your network drivers.
Before diving into solutions, it’s essential to fully understand the “DNS Server Not Responding” error. DNS, or Domain Name System, is the system that converts easily readable domain names (like www.rental-server.net) into IP addresses (such as 192.168.1.1).
This system relies on a distributed network of DNS servers that store domain information and their corresponding IP addresses. When you type a domain name into your browser, your computer queries these DNS servers to obtain the correct IP address, enabling connection to the website and other online services.
The DNS service is undeniably crucial for internet operation. Without it, online services would be severely impaired. The “DNS Server Not Responding” error is one of several issues that can arise from DNS server malfunctions.
This error can manifest in various messages, such as “The DNS server is not responding,” “Device or resource (DNS server) is not responding,” and can appear across different devices and applications.
In web browsers, you might encounter messages like “This Site Can’t Be Reached” and specific error codes like DNS_PROBE_FINISHED_NXDOMAIN. The image below illustrates how this error appears in Google Chrome.
 DNS Server Not Responding Error Message in Chrome Browser
Alt text: Screenshot of “DNS Server Not Responding” error page in Google Chrome browser, indicating a website cannot be reached due to DNS issues.
In the following sections, we will investigate the typical causes of this error and present actionable solutions to help you resolve it and restore your internet connectivity.
Common Causes of the “DNS Server Not Responding” Error
The “DNS Server Not Responding” error can stem from various sources. Identifying the cause is the first step towards effective troubleshooting. Here are some of the most frequent reasons behind this error.
Temporary DNS Server Outages
DNS servers, like any other server, can experience temporary downtime. High traffic loads or unforeseen outages can make a DNS server temporarily unresponsive. In such cases, your device will fail to get a response, leading to the error.
Network Connection Problems
Issues with your local network connection are a significant contributor. A weak Wi-Fi signal, a damaged Ethernet cable, or incorrect network configuration settings can disrupt communication between your device and the DNS server. These disruptions can manifest as the “DNS Server Not Responding” error.
Corrupted DNS Cache
Your operating system maintains a DNS cache to store recently accessed IP addresses. This cache speeds up website loading by bypassing the need to query a DNS server for frequently visited sites. However, this cache can become corrupted or outdated over time, leading to conflicts and the “DNS Server Not Responding” error.
Incorrect DNS Server Settings
Manually configured DNS settings, if incorrect, can also be the culprit. Using outdated or invalid DNS server addresses will prevent your device from connecting to a working DNS server and resolving domain names correctly. This can often happen if a user has attempted to set up a custom DNS server but entered the details incorrectly, or if the previously working custom DNS server is no longer operational. In scenarios where No Dns Server Is Assigned, the device defaults to automatic DNS resolution, but misconfigurations can still occur.
Firewall or Antivirus Interference
Firewall and antivirus software are essential for online security, but overly aggressive settings can sometimes block legitimate network communications, including DNS queries. If your security software is too restrictive, it might mistakenly prevent your device from reaching the DNS server, resulting in the “DNS Server Not Responding” error.
Misconfigured Network Adapters
Network adapters are the hardware components that enable your computer to connect to a network and the internet. If the settings for these adapters are incorrectly configured, or if the adapter driver is outdated or corrupted, it can lead to various network problems, including the “DNS Server Not Responding” error.
11 Proven Methods to Fix the “DNS Server Not Responding” Error
This section provides a step-by-step guide through practical solutions to resolve the “DNS Server Not Responding” error. These methods are designed to address the common causes outlined above, helping you restore your internet connection.
1. Run Network Troubleshooter
Before attempting more complex solutions, utilize the built-in network diagnostics tools available on your operating system. These tools can automatically detect and sometimes fix common network problems.
Here’s how to access network diagnostics on macOS and Windows:
macOS Network Diagnostics
- Press and hold the Option key, then click the Wi-Fi icon in the menu bar.
- Select Open Wireless Diagnostics from the dropdown menu.
- Follow the on-screen instructions in the setup wizard. Click Continue to proceed through the diagnostic steps.
- Review the Summary section for any detected issues. Click the info icon next to each item for detailed information.
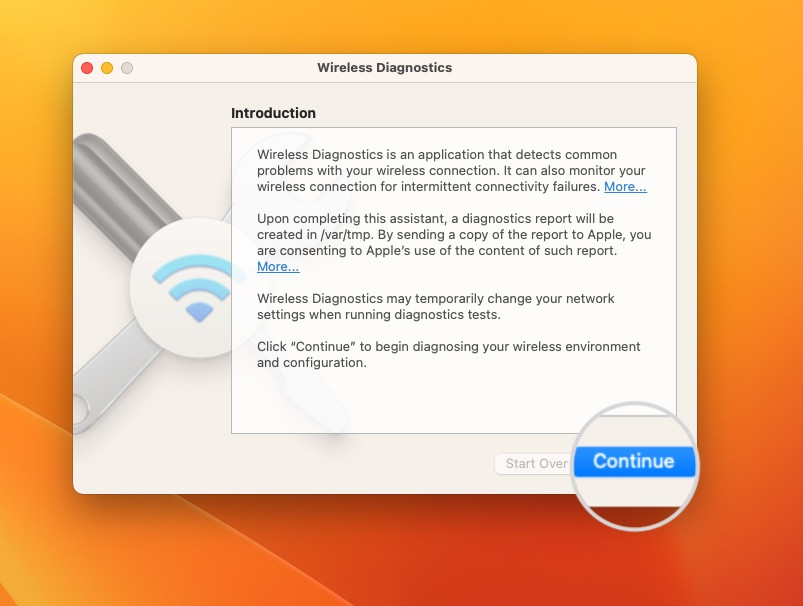 Network Diagnostics Utility on macOS
Alt text: Screenshot of macOS Wireless Diagnostics window, showing network summary and options to continue troubleshooting.
Windows Network Troubleshooter
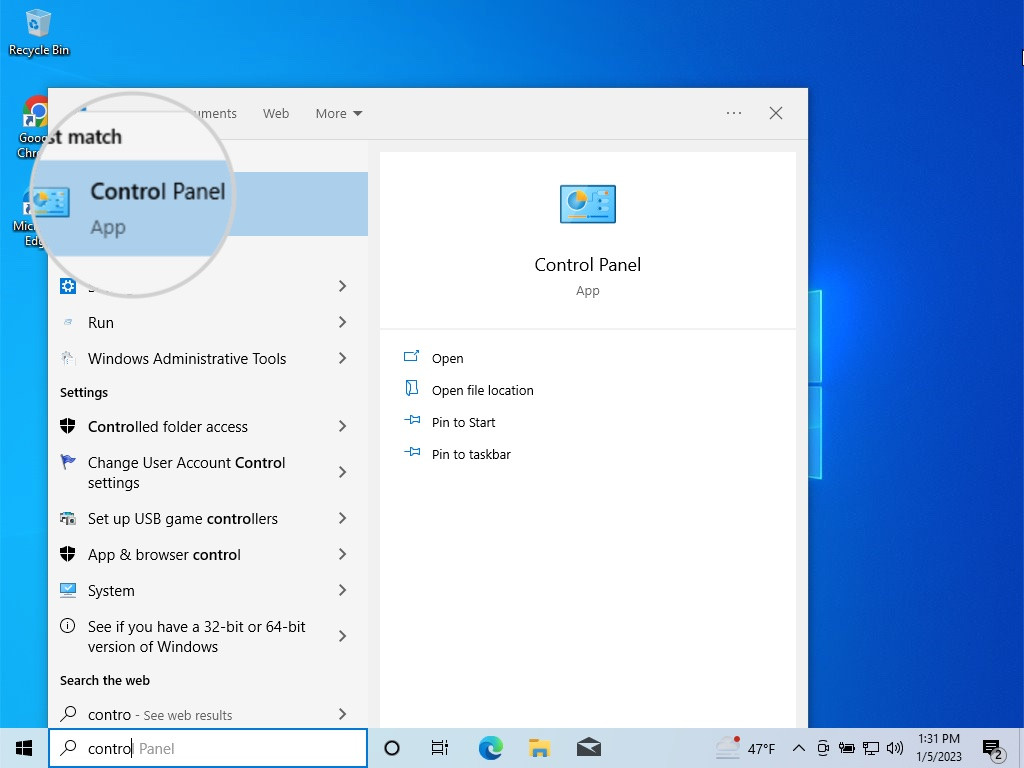
- Open the Start Menu and type “control panel”.
- Click on Control Panel to open it.
- Select Network and Internet > Network and Sharing Center.
- Click Troubleshoot problems under Change your networking settings.
- Go to Additional troubleshooters > Internet Connections > Run the troubleshooter.
- The troubleshooter will display any identified problems and suggest fixes. Follow the prompts to apply any recommended repairs.
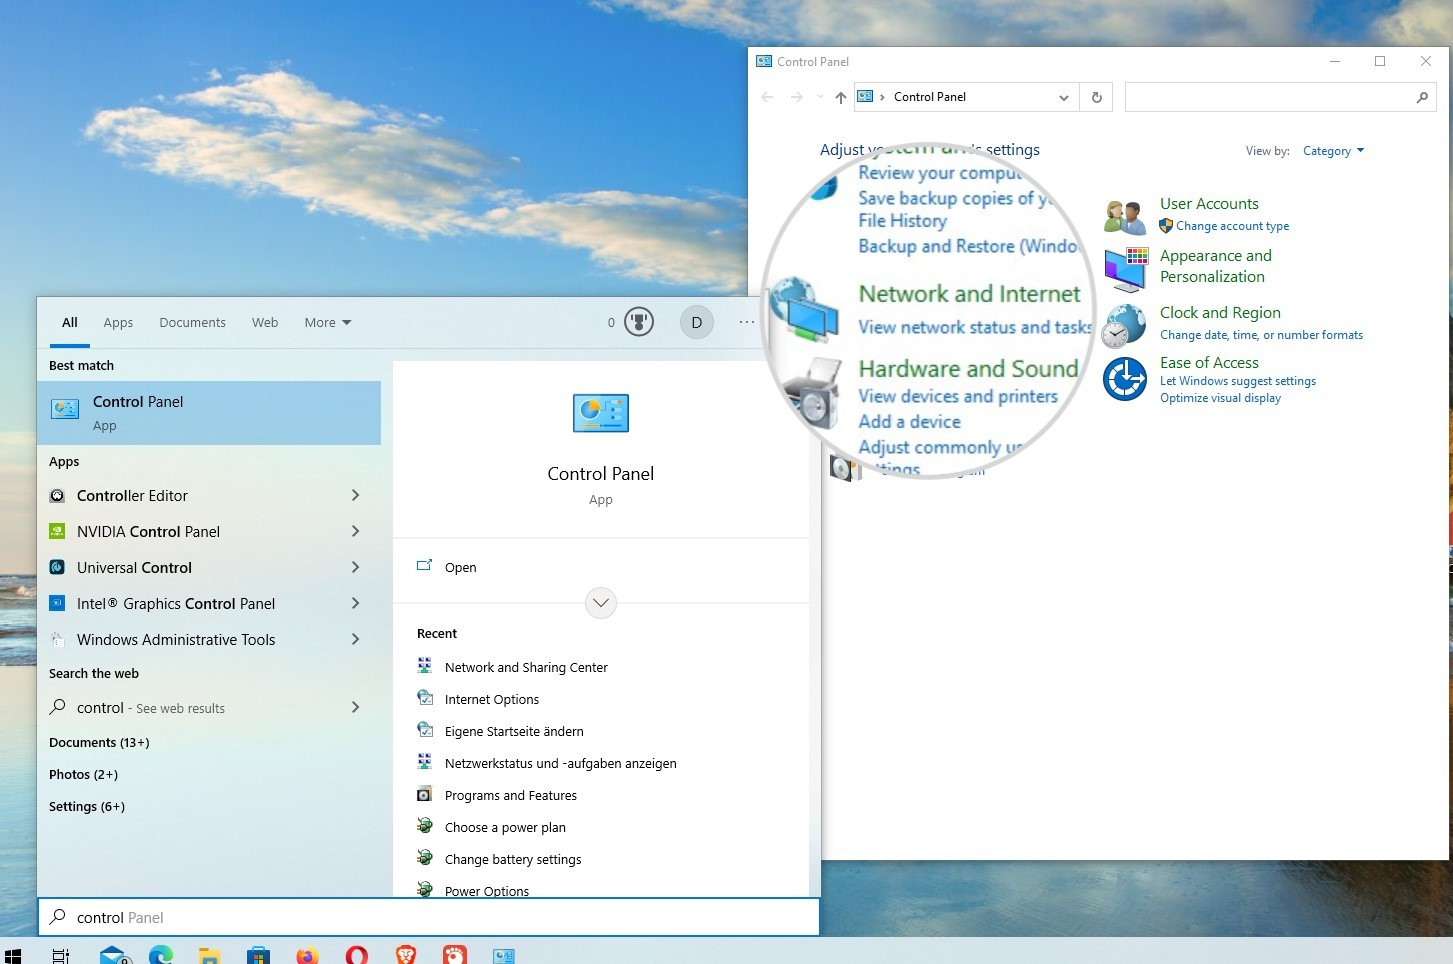 Windows Network Troubleshooting Options
Alt text: Screenshot of Windows Network and Sharing Center, highlighting the “Troubleshoot problems” option for network diagnostics.
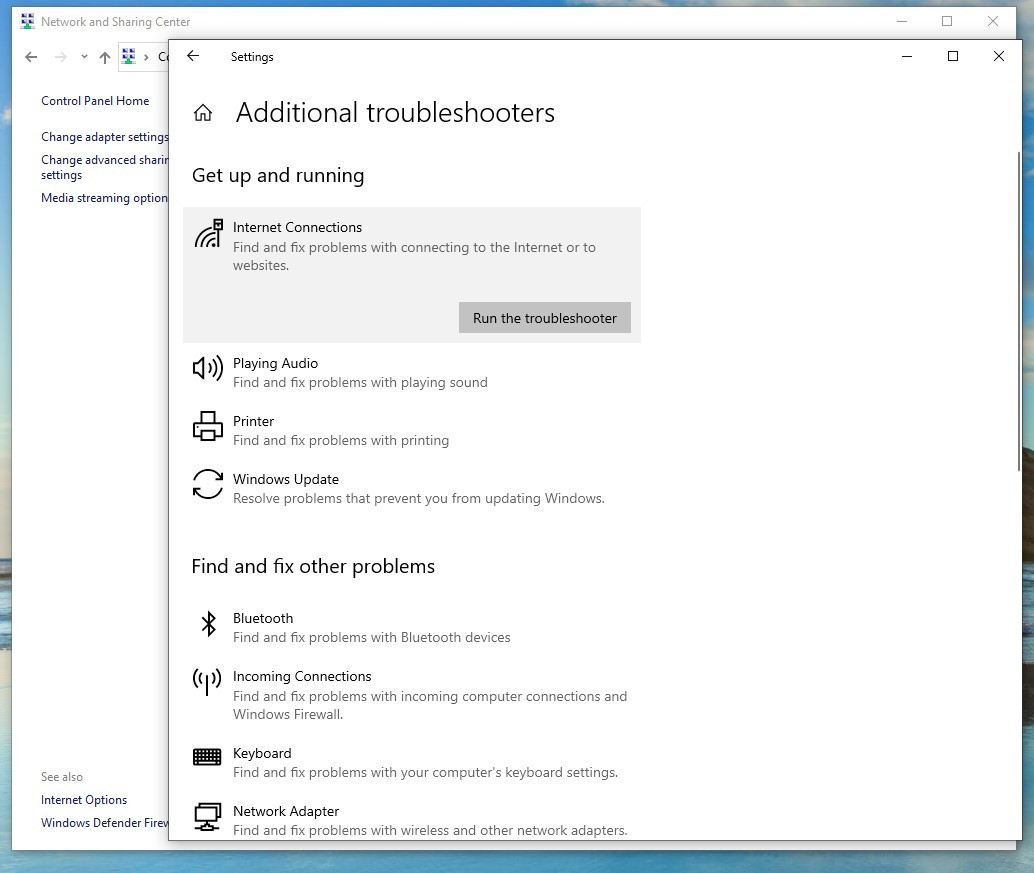 Running Internet Connections Troubleshooter on Windows
Alt text: Screenshot of Windows Troubleshoot problems window, specifically running the Internet Connections troubleshooter.
2. Try a Different Web Browser
A simple yet effective troubleshooting step is to test website access using a different browser. If the error disappears in an alternative browser, the issue likely resides within your primary browser – possibly due to corrupted cache files, a faulty installation, or problematic extensions. For instance, if you typically use Google Chrome, try accessing the website with Mozilla Firefox or Microsoft Edge.
3. Test on Another Device
To isolate whether the problem is specific to your device, attempt to access the problematic website on a different device connected to the same network. For example, if you are using a desktop computer, try loading the website on your smartphone using Wi-Fi. If the error does not appear on the second device, it suggests the problem is localized to your original device. For a more conclusive test, disable Wi-Fi on your phone and use mobile data instead. If it works on mobile data but not Wi-Fi, the issue is likely with your local network or device settings.
4. Restart Your Computer in Safe Mode
Operating system glitches or software conflicts can sometimes trigger the “DNS Server Not Responding” error. Third-party software, in particular, can interfere with standard DNS resolution processes.
Restarting your computer in Safe Mode can help determine if a third-party application is causing the problem. Safe Mode starts your operating system with only essential services and drivers, disabling most third-party software.
Starting Windows 10 in Safe Mode
- Open the Start Menu.
- Hold down the SHIFT key and click Restart.
- In the recovery menu, select Troubleshoot > Advanced options.
- Choose Startup Settings from the Advanced Options menu, then click Restart.
- After restart, you will see a list of startup options. Press 4 or F4 for Safe Mode.
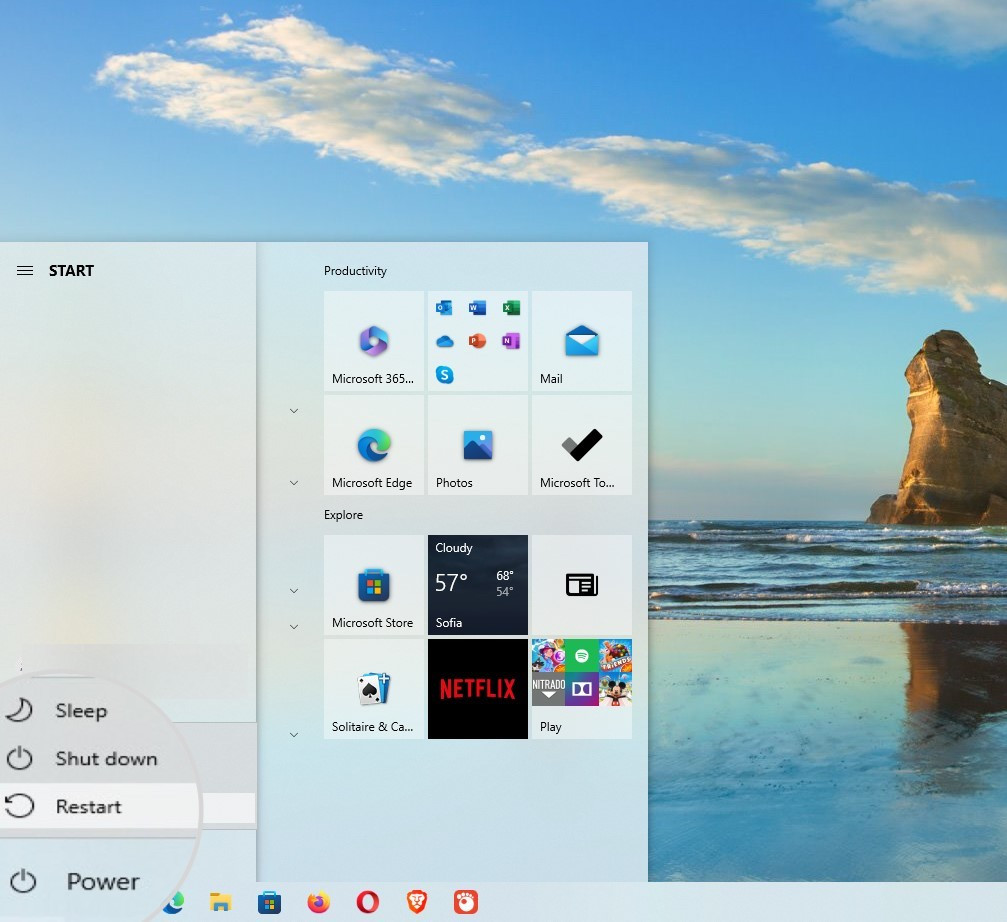 Restart Options in Windows for Safe Mode
Alt text: Screenshot of Windows restart options menu, highlighting the Shift+Restart method to access advanced startup options.
Booting macOS in Safe Mode
- Restart your Mac by clicking the Apple menu > Restart.
- Immediately after the restart begins, press and hold the SHIFT key.
- Release the SHIFT key when you see the login window. Your Mac will now be in Safe Mode.
Once in Safe Mode, test if the error persists in your browser. If the error is gone in Safe Mode, it indicates that a third-party application is likely the cause. Common culprits include overly restrictive firewall or antivirus software, or other network-interfering applications.
5. Restart Your Router and Modem
Issues with your internet router or modem are frequent causes of DNS errors. Routers maintain their own caches, which can become outdated or corrupted, leading to DNS resolution problems.
Restarting your router and modem is a straightforward way to resolve many network issues.
- Turn off your router and modem by pressing their respective Power buttons.
- Wait for a few minutes (at least 30 seconds) to ensure they completely reset.
- Turn your modem back on first, wait for it to fully initialize, and then turn on your router.
- After both devices have restarted, check if the “DNS Server Not Responding” error is resolved.
6. Temporarily Disable Antivirus and Firewall
Antivirus and firewall software protect your system from online threats, but they can sometimes mistakenly block legitimate internet traffic, including DNS requests, leading to the “DNS Server Not Responding” error.
Temporarily disabling your antivirus or firewall can help determine if they are interfering with your DNS connection.
Disabling Firewall on macOS
- Click on the Apple menu > System Settings.
- Select Network, then click Firewall.
- Toggle the Firewall switch to the Off position.
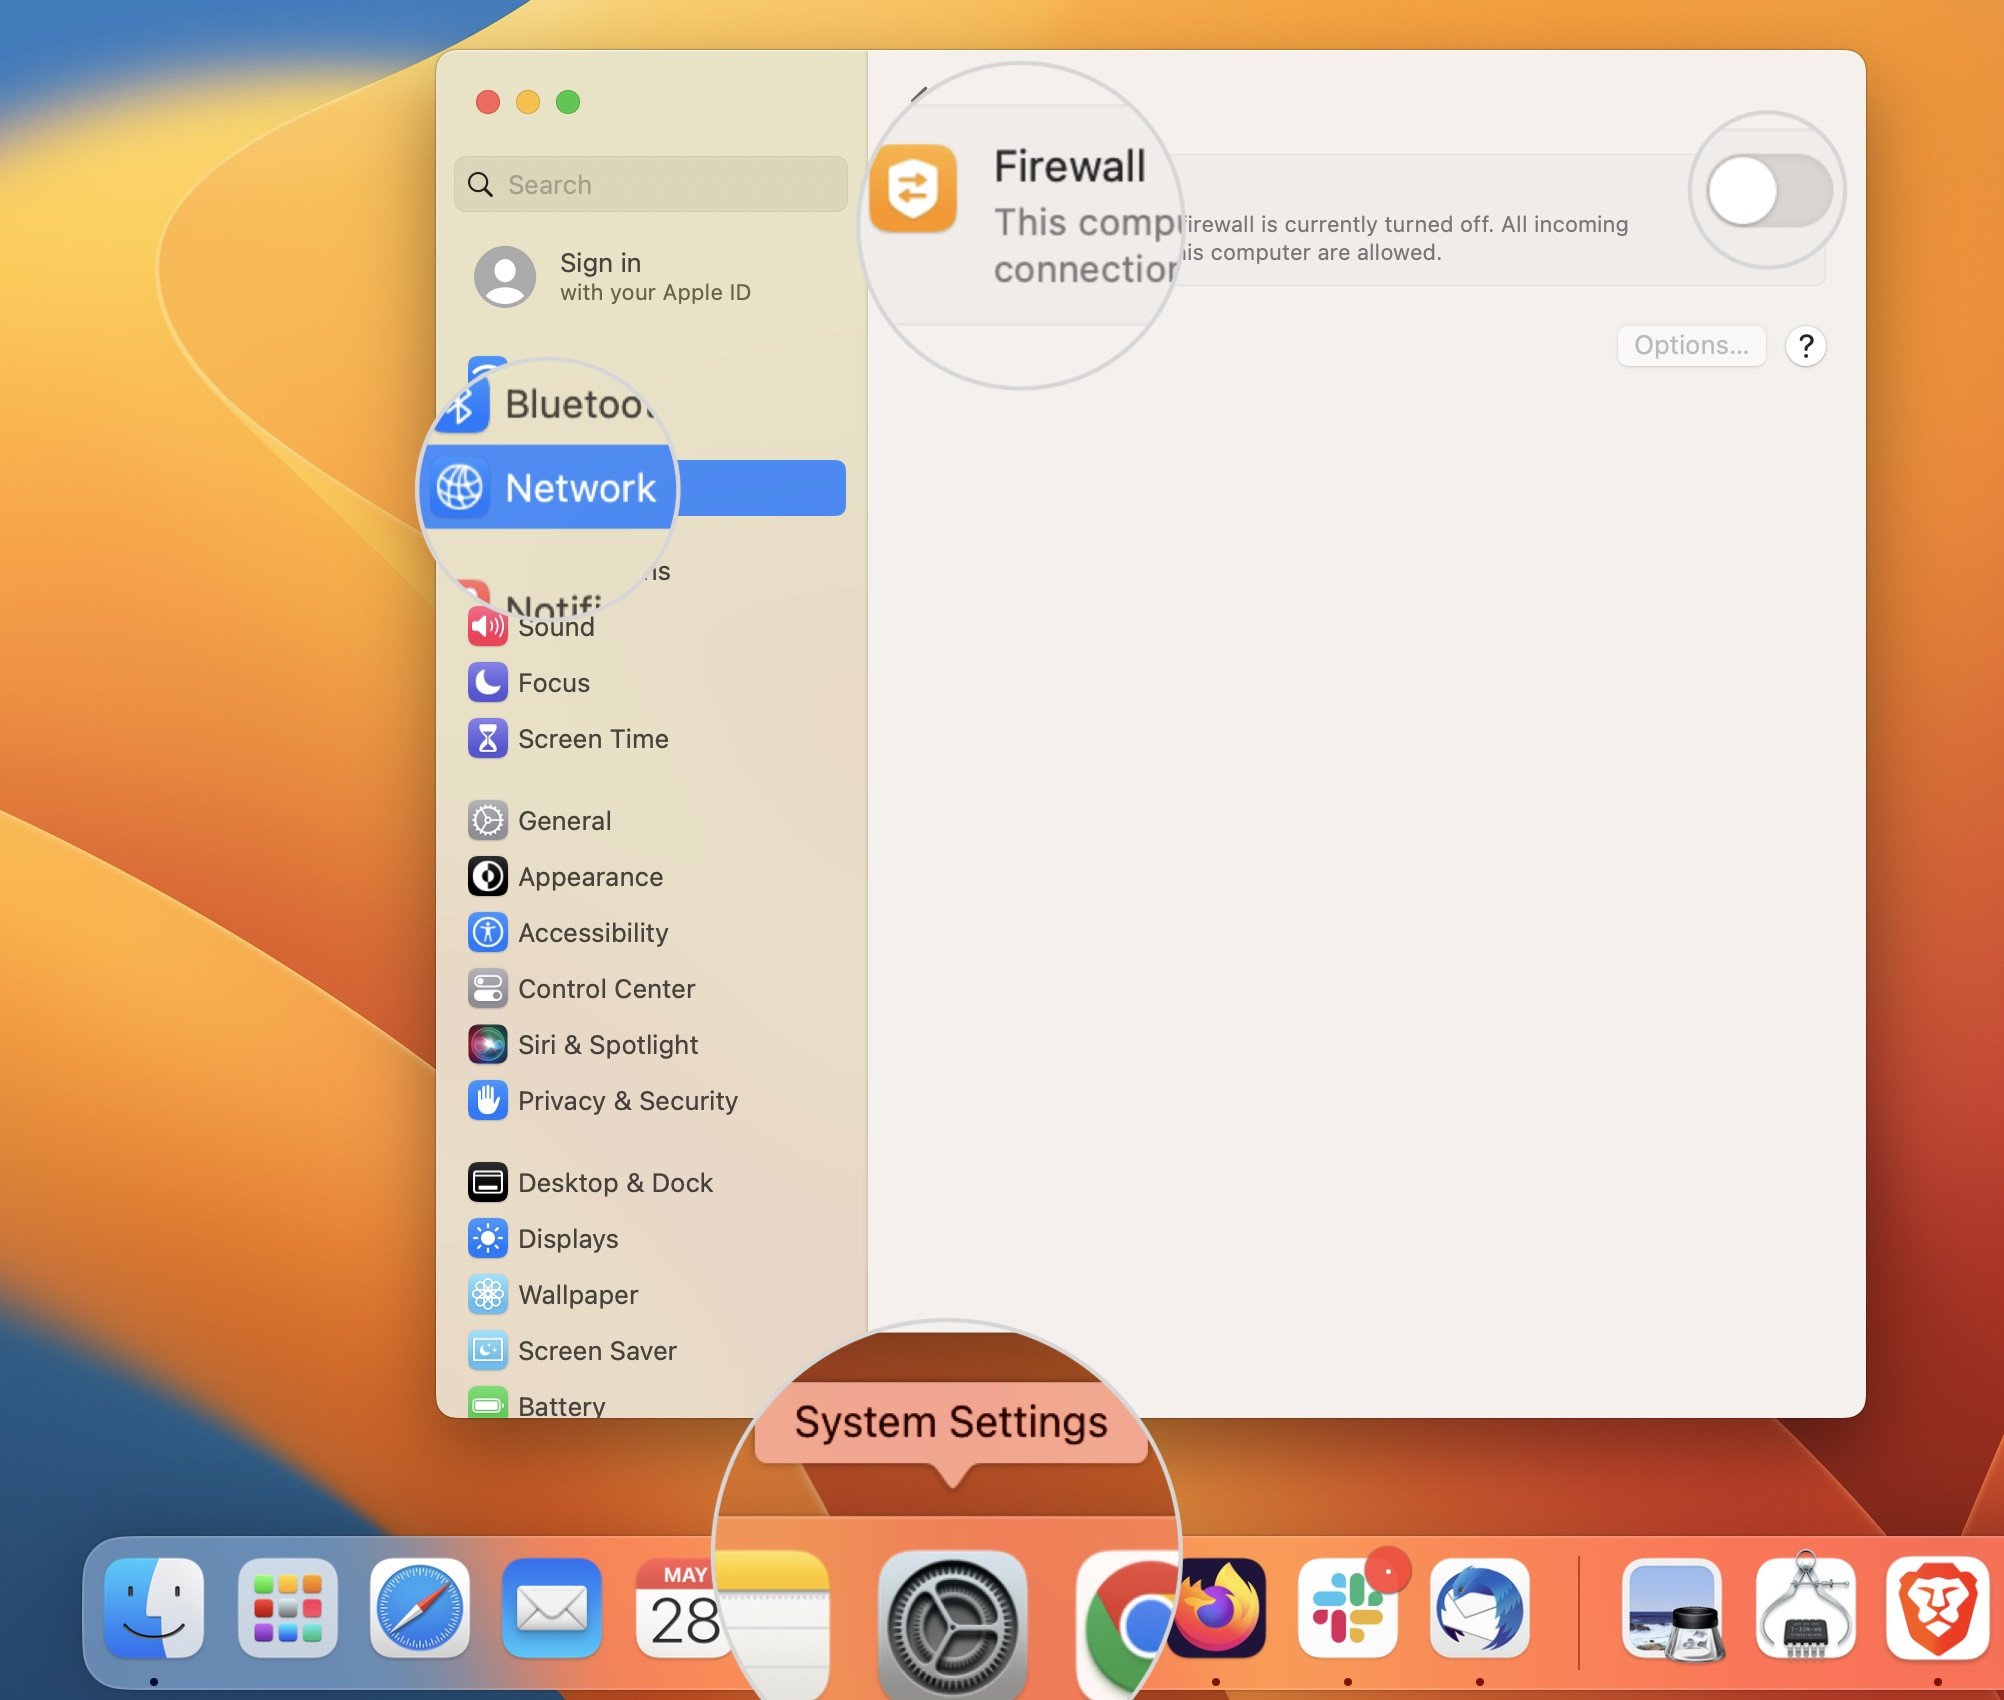 Disabling Firewall in macOS System Settings
Alt text: Screenshot of macOS Firewall settings panel, showing the toggle switch in the “Off” position.
Disabling Firewall on Windows
- Open the Start Menu > Settings > Update & Security.
- Select Windows Security > Firewall & network protection.
- Choose the active network profile (Domain network, Private network, or Public network).
- Under Microsoft Defender Firewall, toggle the switch to Off.
 Accessing Windows Firewall Settings
Alt text: Screenshot of Windows Security settings, highlighting the “Firewall & network protection” option.
 Disabling Windows Defender Firewall
Alt text: Screenshot of Windows Firewall & network protection settings, showing the toggle switch for Microsoft Defender Firewall in the “Off” position.
After temporarily disabling your security software, try accessing the website again. If the site loads correctly, your security software is likely the cause. Re-enable your antivirus and firewall and investigate their settings to see if you can create an exception for DNS traffic or the specific website you are trying to access.
7. Disable Secondary Network Connections
Having multiple active network connections can sometimes cause conflicts. Your device might switch between networks, leading to unstable connections and DNS resolution issues. Conflicting network configurations can also disrupt DNS settings, potentially leading to a “no DNS server is assigned” scenario.
To avoid potential conflicts, disable any secondary or unused network connections, keeping only your primary internet connection active.
Disabling Network Connections on macOS
- Open Apple menu > System Settings > Network.
- Select the network you want to remove from the list of Known Networks. Click the three dots menu next to the network name and select Forget This Network.
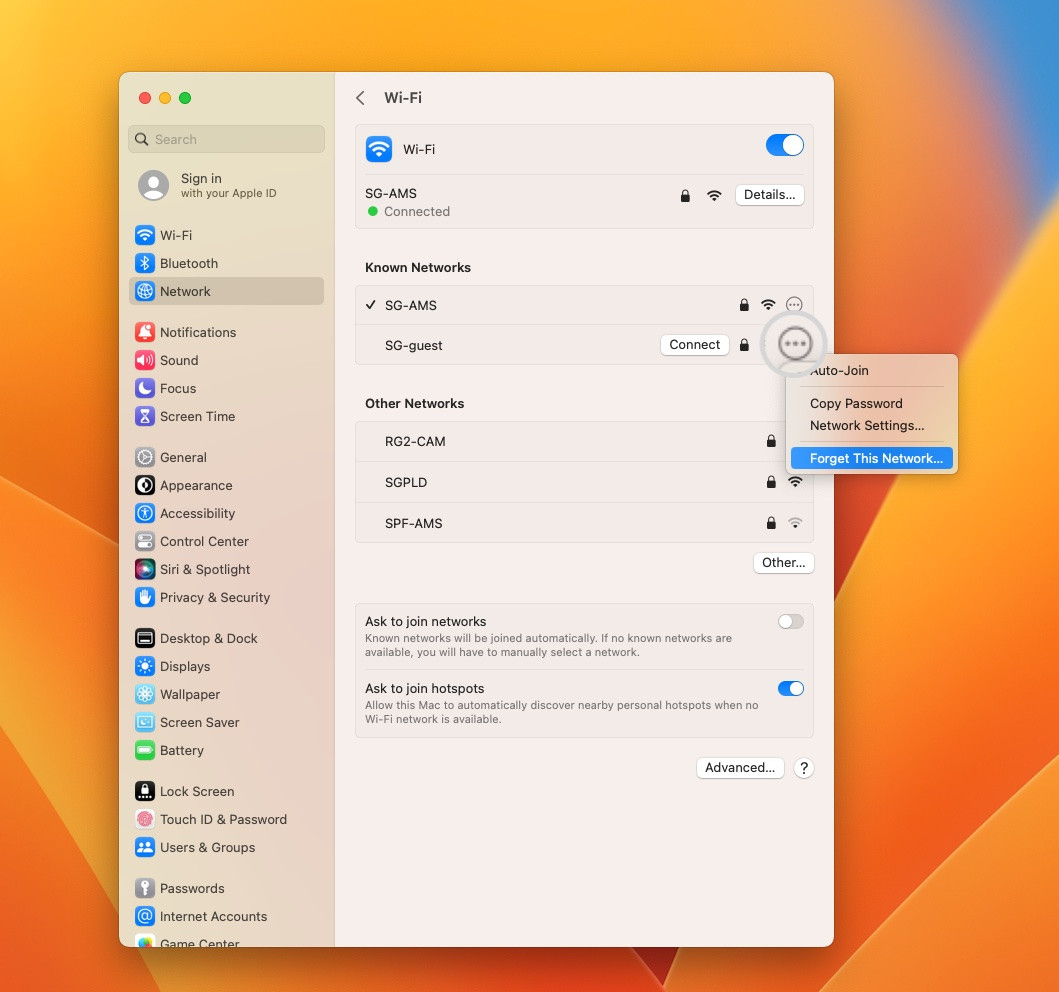 Disabling a Network Connection on macOS
Alt text: Screenshot of macOS Network settings, showing the three-dots menu and “Forget This Network” option for disabling a network connection.
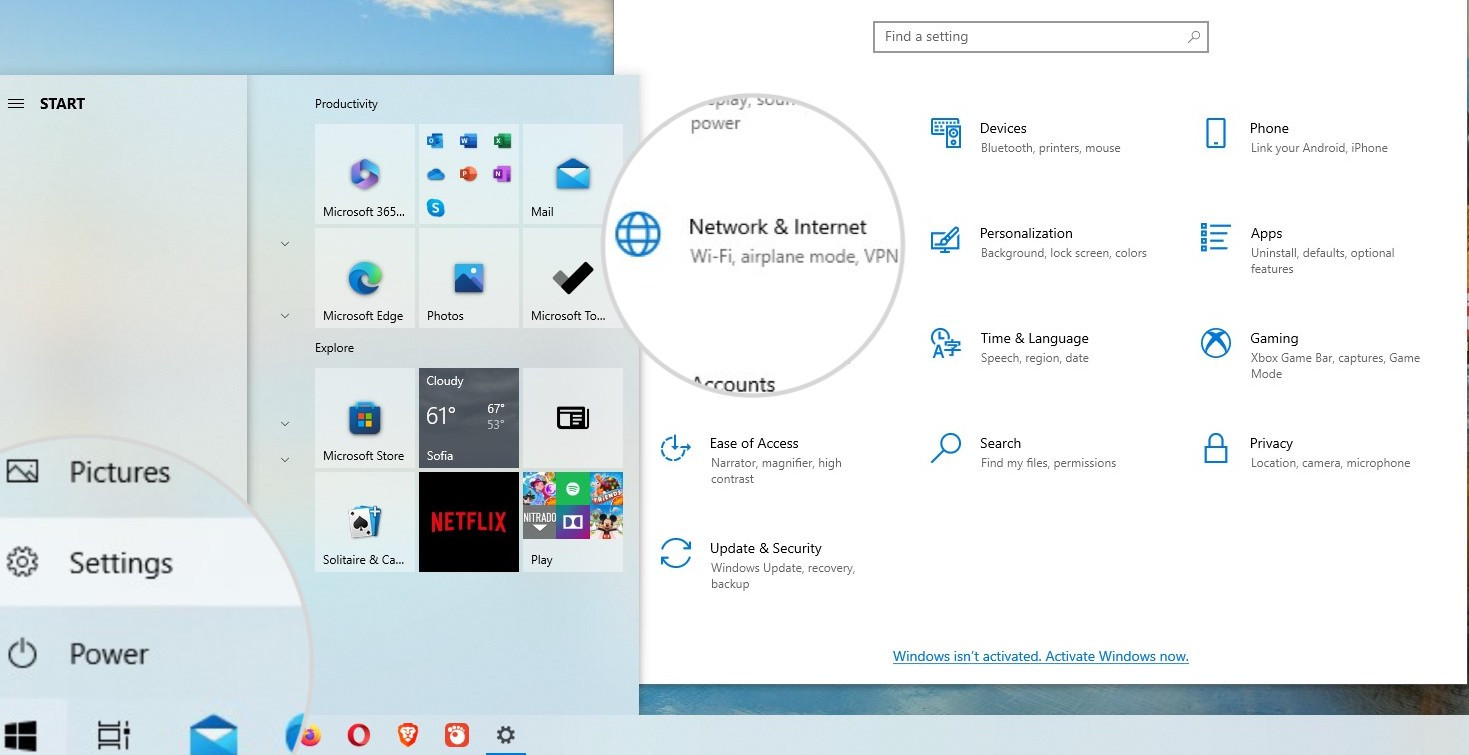
Disabling Network Connections on Windows
- Open Start Menu > Settings > Network & Internet.
- Select Change adapter options.
- Right-click on the secondary network connection you want to disable and choose Disable.
 Accessing Adapter Options in Windows Network Settings
Alt text: Screenshot of Windows Network & Internet settings, highlighting the “Change adapter options” link.
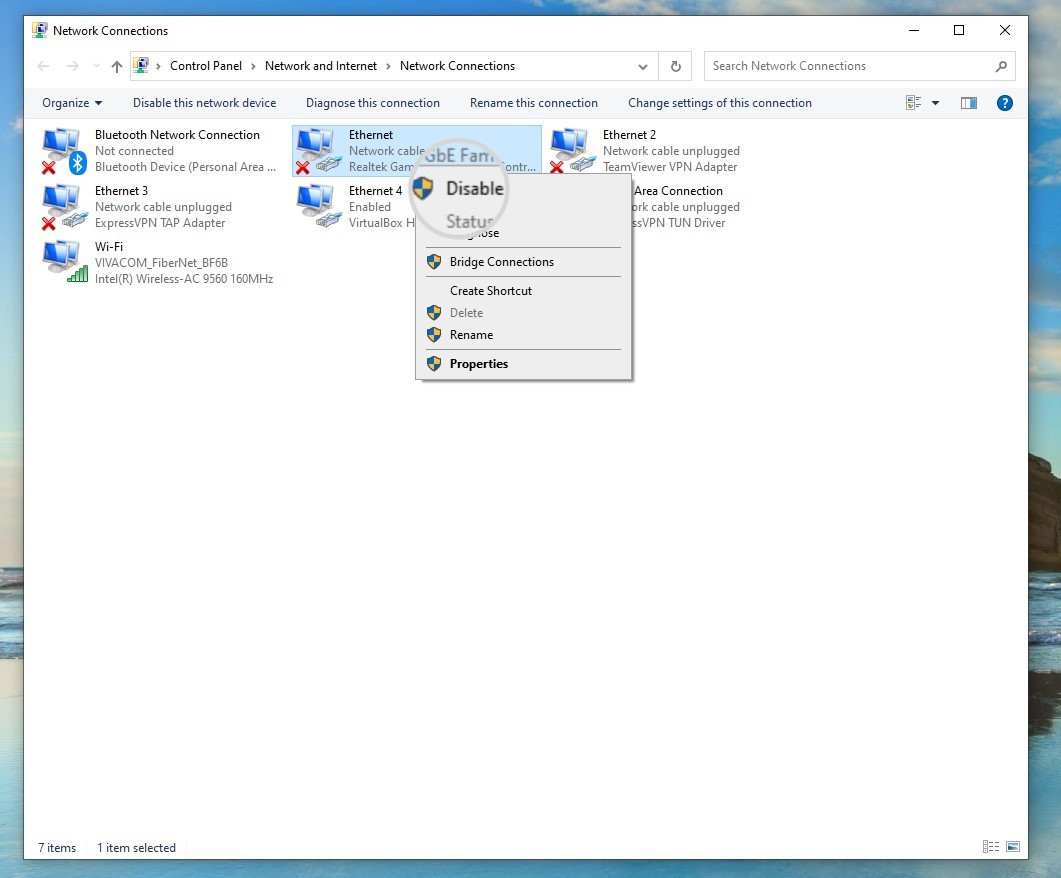 Disabling a Network Adapter on Windows
Alt text: Screenshot of Windows Network Connections window, showing the “Disable” option when right-clicking on a network adapter.
8. Change Your DNS Server Address
Your device relies on DNS server addresses to translate domain names. If the configured DNS server is unresponsive or experiencing issues, or if no DNS server is assigned, you will likely encounter errors.
Switching to public and reliable DNS servers like Google Public DNS or Cloudflare DNS can often resolve these issues. These services offer fast and dependable DNS resolution.
- Google Public DNS servers: 8.8.8.8 and 8.8.4.4
- Cloudflare DNS servers: 1.1.1.1 and 1.0.0.1
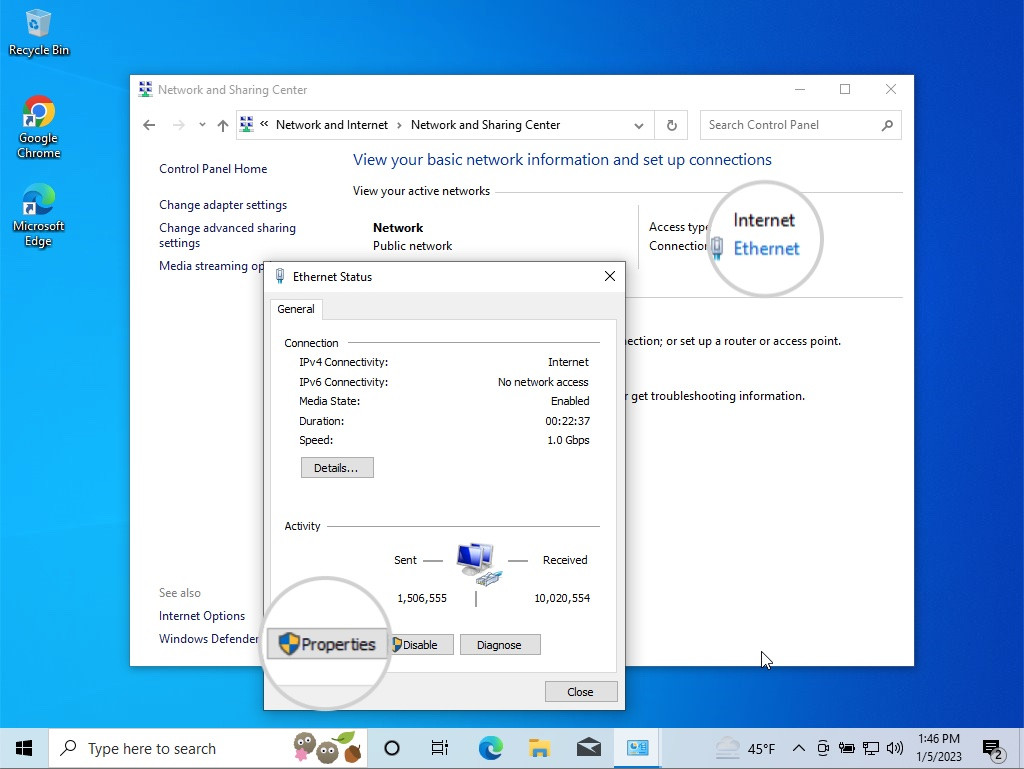
Changing DNS Servers on Windows
- Open Start Menu and type “control panel”.
- Click on Control Panel.
- Select Network and Internet > Network and Sharing Center.
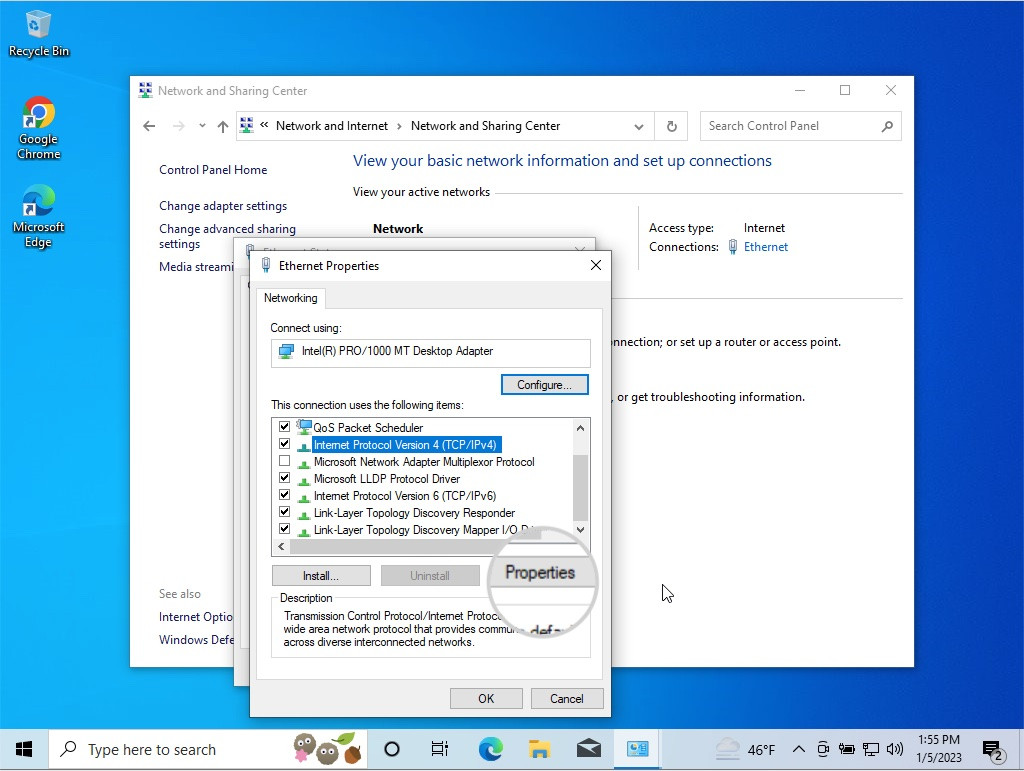
- Click on your active network connection name next to “Connections”.
- In the Network Connection Status window, click Properties.
- Select Internet Protocol Version 4 (TCP/IPv4) and click Properties.
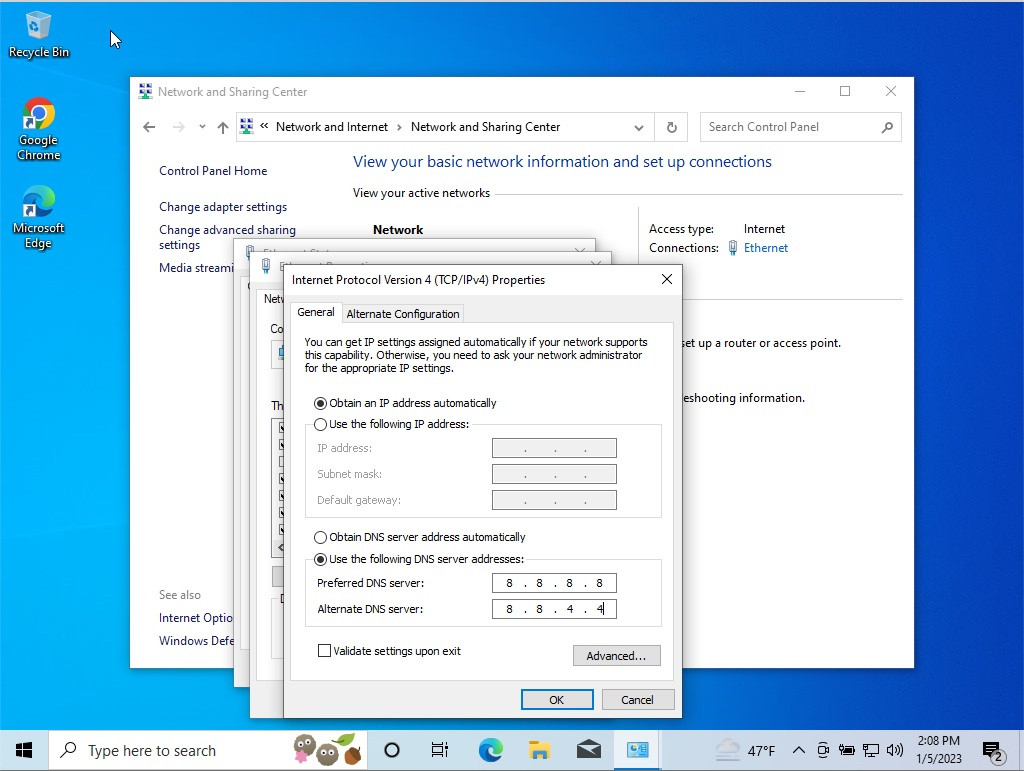
- Choose Use the following DNS server addresses.
- Enter your preferred DNS server in the Preferred DNS server field (e.g., 8.8.8.8) and a backup DNS server in the Alternate DNS server field (e.g., 8.8.4.4).
- Click OK in both Properties windows to save changes.
 Accessing Control Panel in Windows for DNS Settings
Alt text: Screenshot of Windows Start Menu, highlighting the Control Panel icon.
 Opening Network Properties in Windows
Alt text: Screenshot of Windows Network Connection Status window, highlighting the “Properties” button.
 Accessing IPv4 Properties for DNS Settings in Windows
Alt text: Screenshot of Windows Network Connection Properties window, highlighting “Internet Protocol Version 4 (TCP/IPv4)” and the “Properties” button.
 Setting Custom DNS Servers in Windows IPv4 Properties
Alt text: Screenshot of Windows Internet Protocol Version 4 (TCP/IPv4) Properties window, showing the “Use the following DNS server addresses” option selected and fields for Preferred and Alternate DNS servers filled.
Changing DNS Servers on macOS
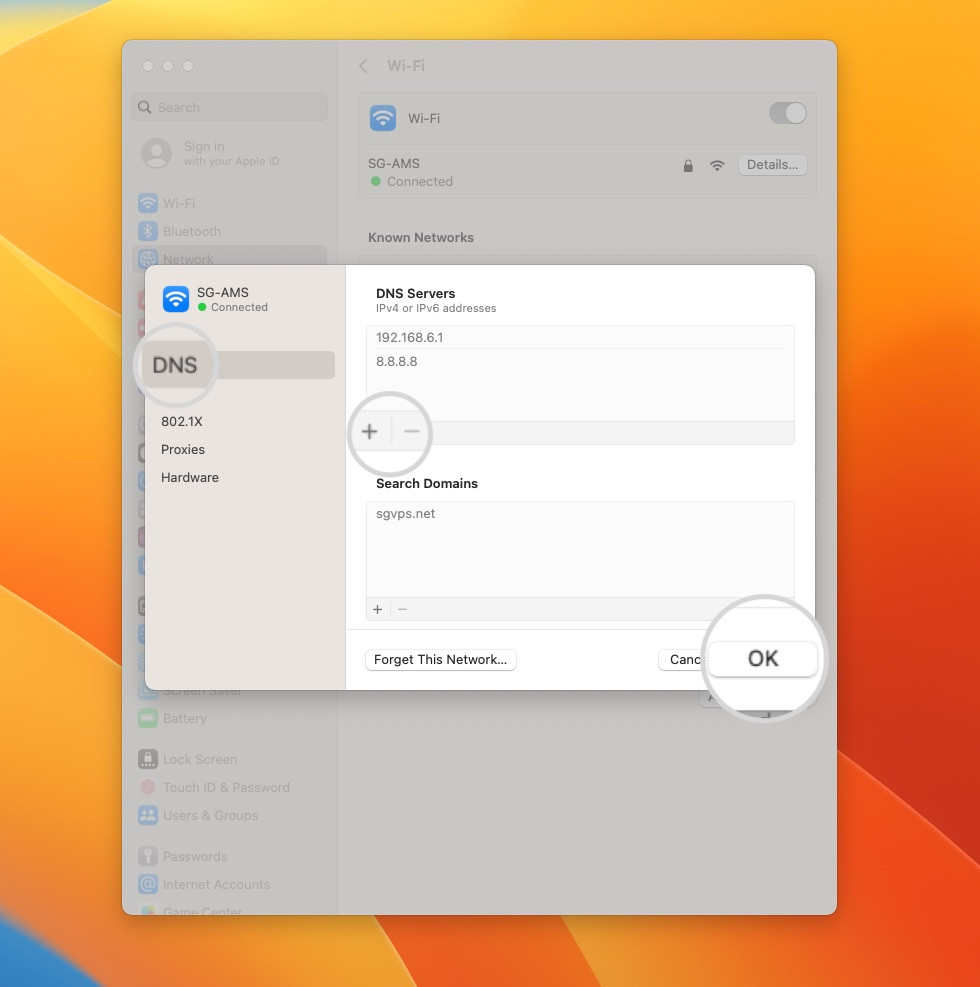
- Open Apple menu > System Settings > Network.
- Select your active network connection and click Details.
- Go to the DNS tab.
- Click the + button under DNS Servers to add a new DNS server address.
- Enter your preferred DNS server address (e.g., 8.8.8.8). Click the + again to add an alternate server (e.g., 8.8.4.4).
- Click OK to save changes.
 Accessing Network Settings on macOS for DNS Configuration
Alt text: Screenshot of macOS Network settings panel.
 Setting Custom DNS Servers on macOS
Alt text: Screenshot of macOS Network Details window, DNS tab, showing the “+” button to add DNS servers and fields for entering DNS server addresses.
9. Flush Your DNS Cache
An outdated or corrupted DNS cache on your operating system can lead to incorrect website IP address resolution, causing the “DNS Server Not Responding” error. Clearing or flushing your DNS cache forces your system to fetch fresh DNS information, often resolving these issues.
Flushing DNS Cache on Windows
- Open Command Prompt as an administrator. (Search for “cmd”, right-click “Command Prompt” and select “Run as administrator”).
- Type the command
ipconfig /flushdnsand press Enter. - A successful flush will display the message “Successfully flushed the DNS Resolver Cache”.
Flushing DNS Cache on macOS
- Open Terminal (Finder > Go > Utilities > Terminal).
- For macOS Monterey and later, use the command:
sudo dscacheutil -flushcache; sudo killall -HUP mDNSResponderand press Enter. - Enter your administrator password when prompted and press Enter.
Flushing DNS Cache on Linux
- Open Terminal.
- For systems using systemd-resolved (common in newer Ubuntu versions), use either:
sudo resolvectl flush-cachesorsudo systemd-resolve --flush-cachesand press Enter. - Enter your administrator password if prompted.
10. Update Network Adapter Drivers
Outdated or faulty network adapter drivers can cause a range of network issues, including DNS errors. Updating to the latest drivers ensures optimal performance and compatibility.
- Open Device Manager (Search for “device manager” in the Start Menu).
- Expand the Network adapters category.
- Right-click on your network adapter and select Update driver.
- Choose Search automatically for drivers. Windows will search for and install the latest available drivers.
 Accessing Device Manager in Windows to Update Drivers
Alt text: Screenshot of Windows Start Menu, highlighting the Device Manager icon.
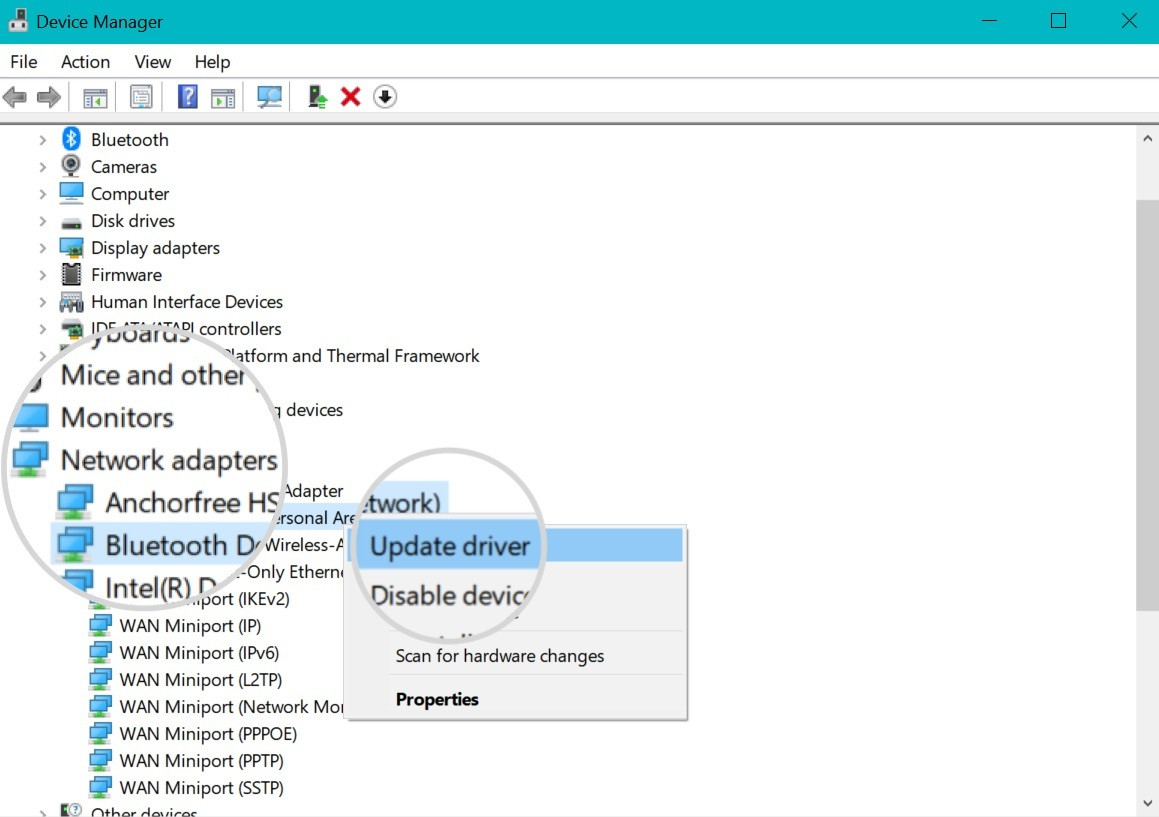 Updating Network Adapter Driver in Windows Device Manager
Alt text: Screenshot of Windows Device Manager, showing Network adapters expanded and the “Update driver” option selected for a network adapter.
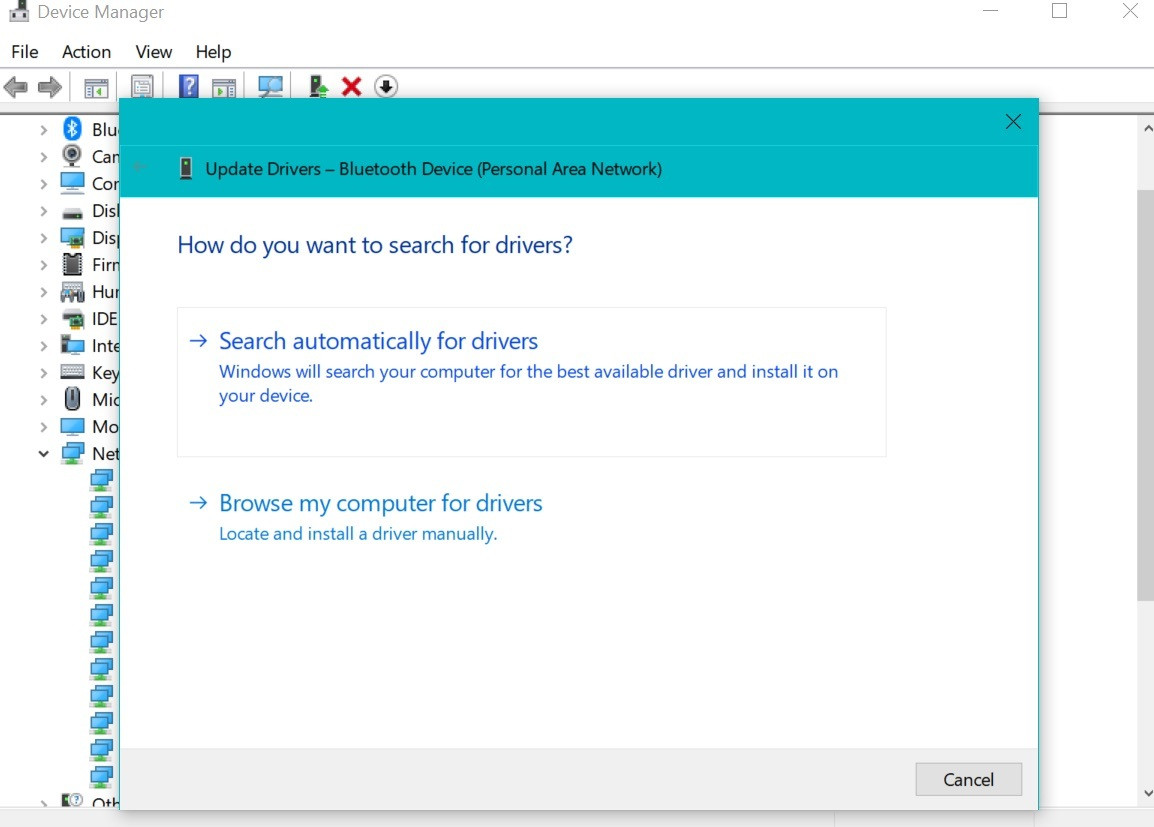 Automatic Driver Update Search in Windows
Alt text: Screenshot of Windows Update Drivers window, showing the “Search automatically for drivers” option selected.
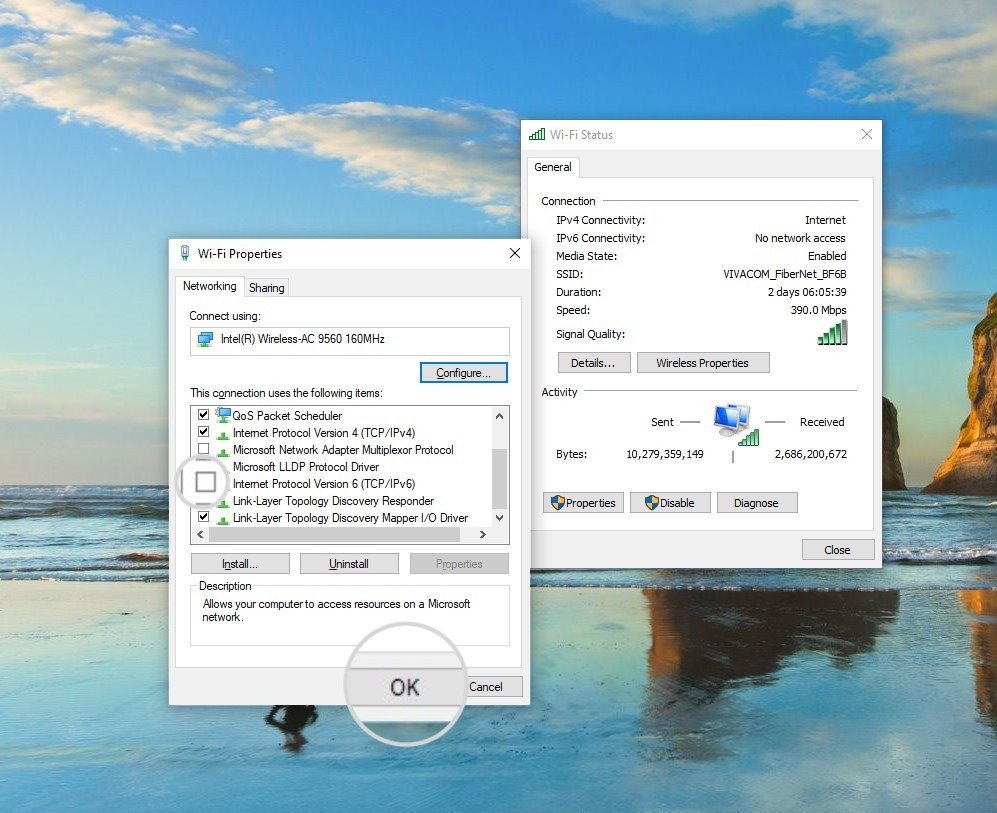
11. Disable Internet Protocol Version 6 (IPv6)
IPv6 is the latest internet protocol, intended to replace IPv4. However, due to its ongoing adoption, compatibility issues can sometimes arise, leading to network connectivity problems, including DNS errors. In some cases, disabling IPv6 can resolve “DNS Server Not Responding” errors, particularly if your ISP or network infrastructure is not fully IPv6 compatible.
Disabling IPv6 on Windows
- Open Control Panel.
- Select Network and Internet > Network and Sharing Center.
- Click on your active network connection.
- In the Network Connection Status window, click Properties.
- Uncheck the box next to Internet Protocol Version 6 (TCP/IPv6).
- Click OK to save changes.
 Accessing Control Panel in Windows to Disable IPv6
Alt text: Screenshot of Windows Start Menu, highlighting the Control Panel icon.
 Opening Network Properties to Disable IPv6 in Windows
Alt text: Screenshot of Windows Network Connection Status window, highlighting the “Properties” button.
 Disabling IPv6 in Windows Network Adapter Properties
Alt text: Screenshot of Windows Network Connection Properties window, showing “Internet Protocol Version 6 (TCP/IPv6)” unchecked.
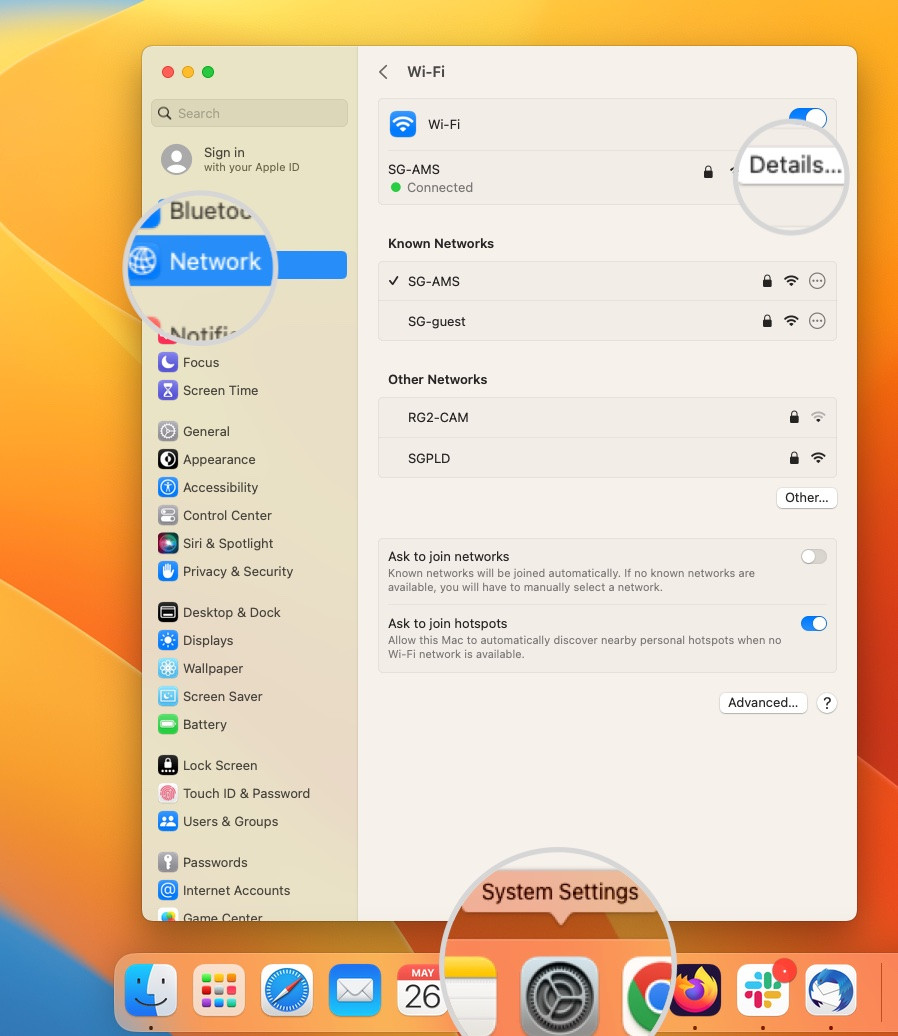
Disabling IPv6 on macOS
- Open Apple menu > System Settings > Network.
- Select your active network connection and click Details.
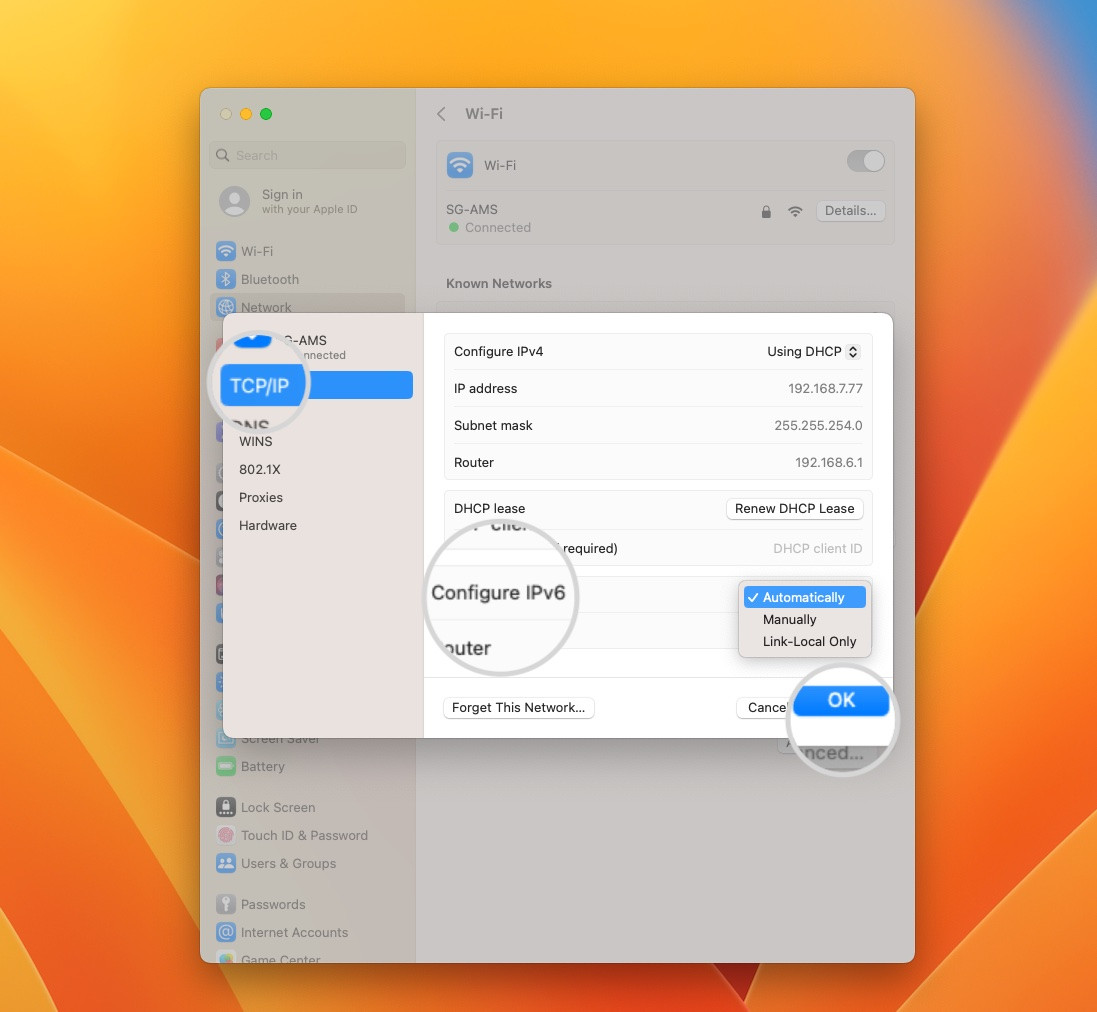
- Go to the TCP/IP tab.
- In the Configure IPv6 dropdown menu, select Off. If “Off” is not available, try “Link-local only”.
- Click OK to save changes.
 Accessing Network Details on macOS to Disable IPv6
Alt text: Screenshot of macOS Network settings, showing the “Details” button for a network connection.
 Disabling IPv6 on macOS Network Settings
Alt text: Screenshot of macOS Network Details window, TCP/IP tab, showing the “Configure IPv6” dropdown menu set to “Off”.
Alternatively, you can disable IPv6 via Terminal on macOS using the command: $ networksetup -setv6off Ethernet && networksetup -setv6off Wi-Fi.
Conclusion
The “DNS Server Not Responding” error, while often perplexing initially, usually stems from a limited set of common causes. The core issue is consistently the same: your device loses its ability to communicate with a DNS server, preventing access to websites and online services. Understanding the potential sources of this error and knowing effective troubleshooting techniques can significantly reduce frustration and expedite resolution. This guide has outlined the most frequent causes and provided practical, step-by-step solutions. We trust that these methods will prove valuable in restoring your internet connection and ensuring smooth browsing.
DNS Server Not Responding FAQ
How do I find my DNS server?
You can locate your DNS server settings within your operating system’s network preferences.
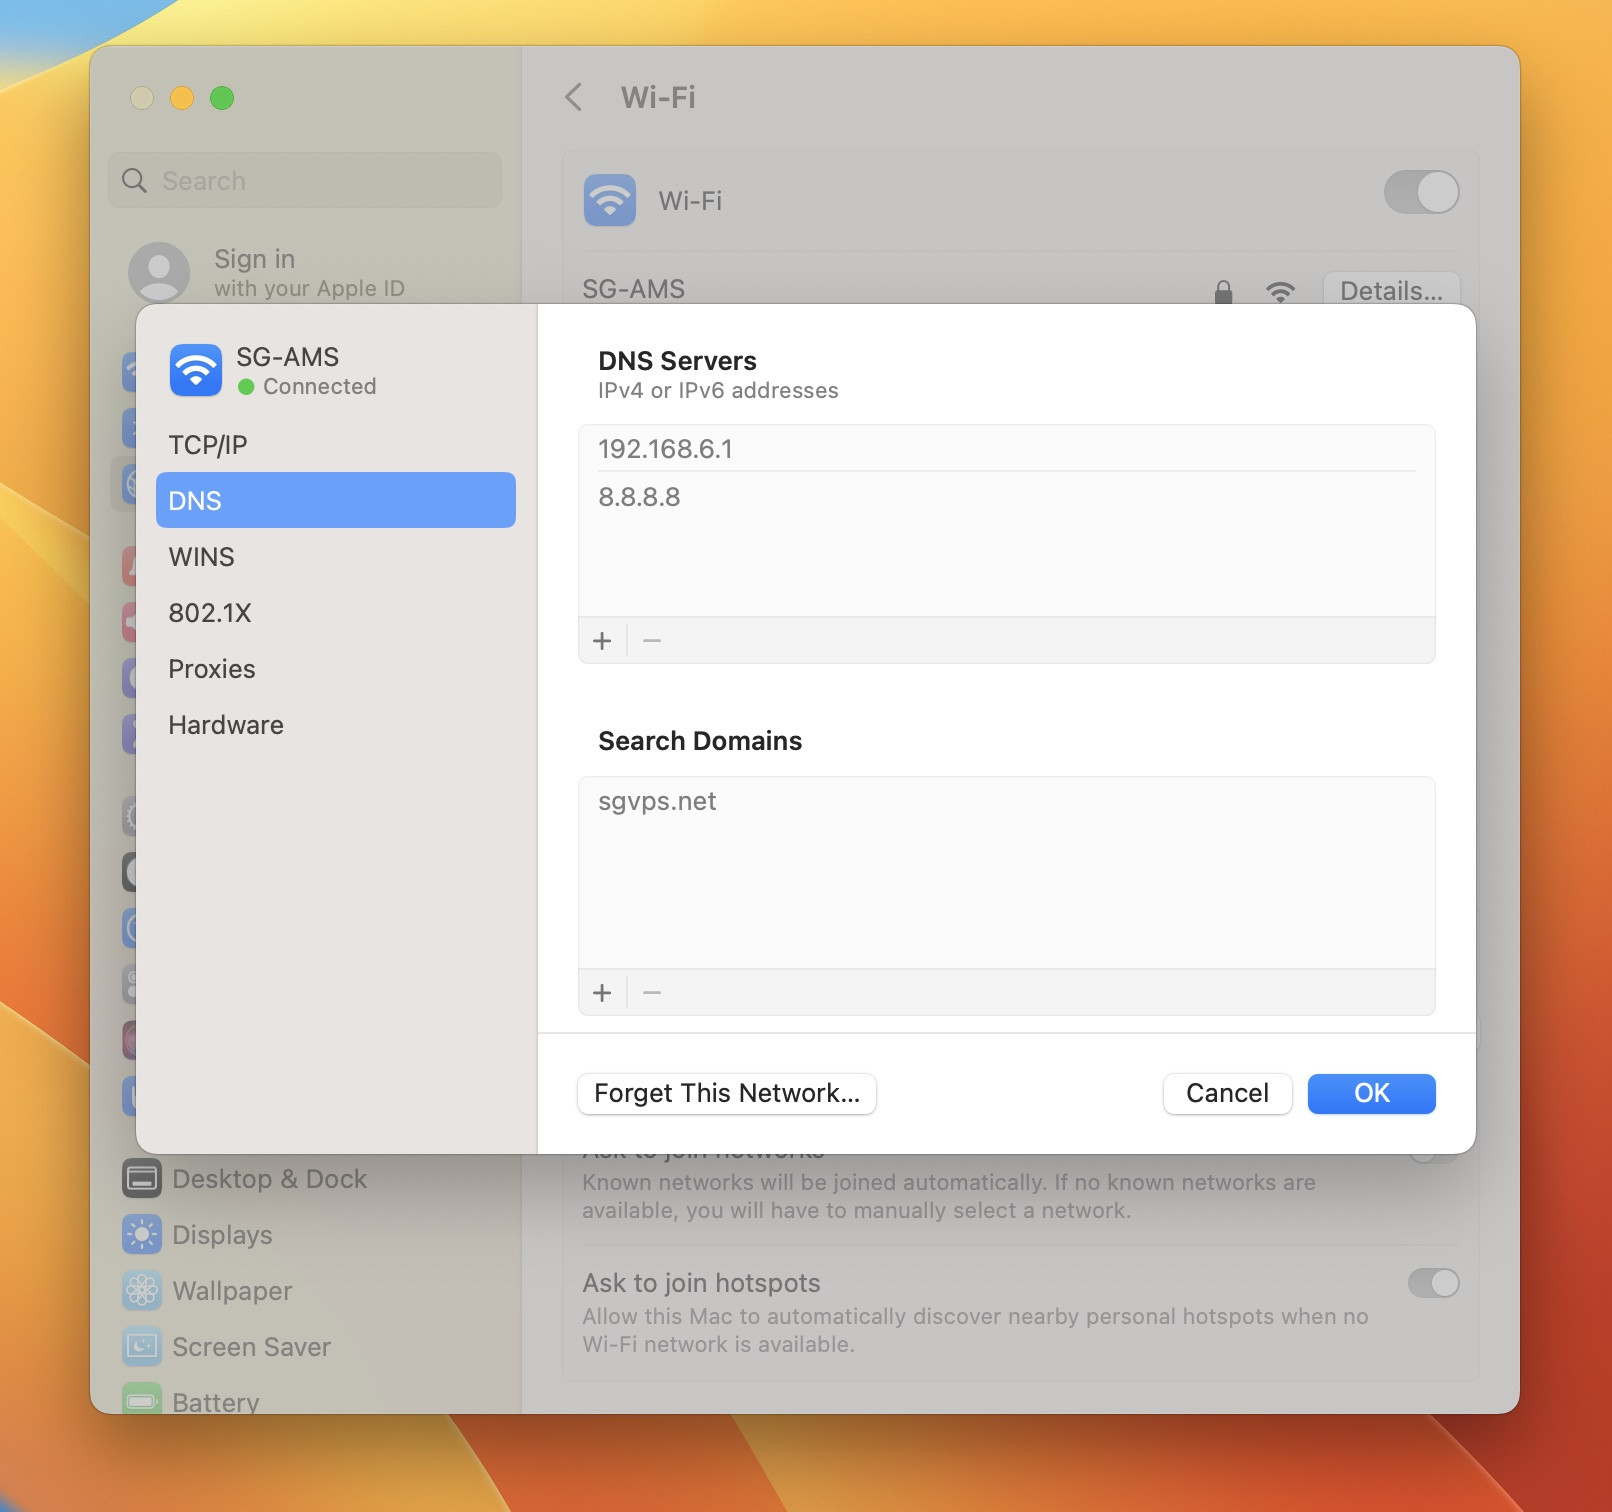
Finding DNS Server on macOS
- Open Apple menu > System Settings > Network.
- Select your active network connection, then click Details > DNS.
- DNS server addresses are listed under DNS Servers.
 Finding DNS Servers in macOS Network Settings
Alt text: Screenshot of macOS Network Details window, DNS tab, highlighting the list of DNS Servers.
Alternatively, use Terminal: Open Terminal (Finder > Go > Utilities > Terminal) and run the command: $ scutil --dns | grep 'nameserver[[0-9]*]'.
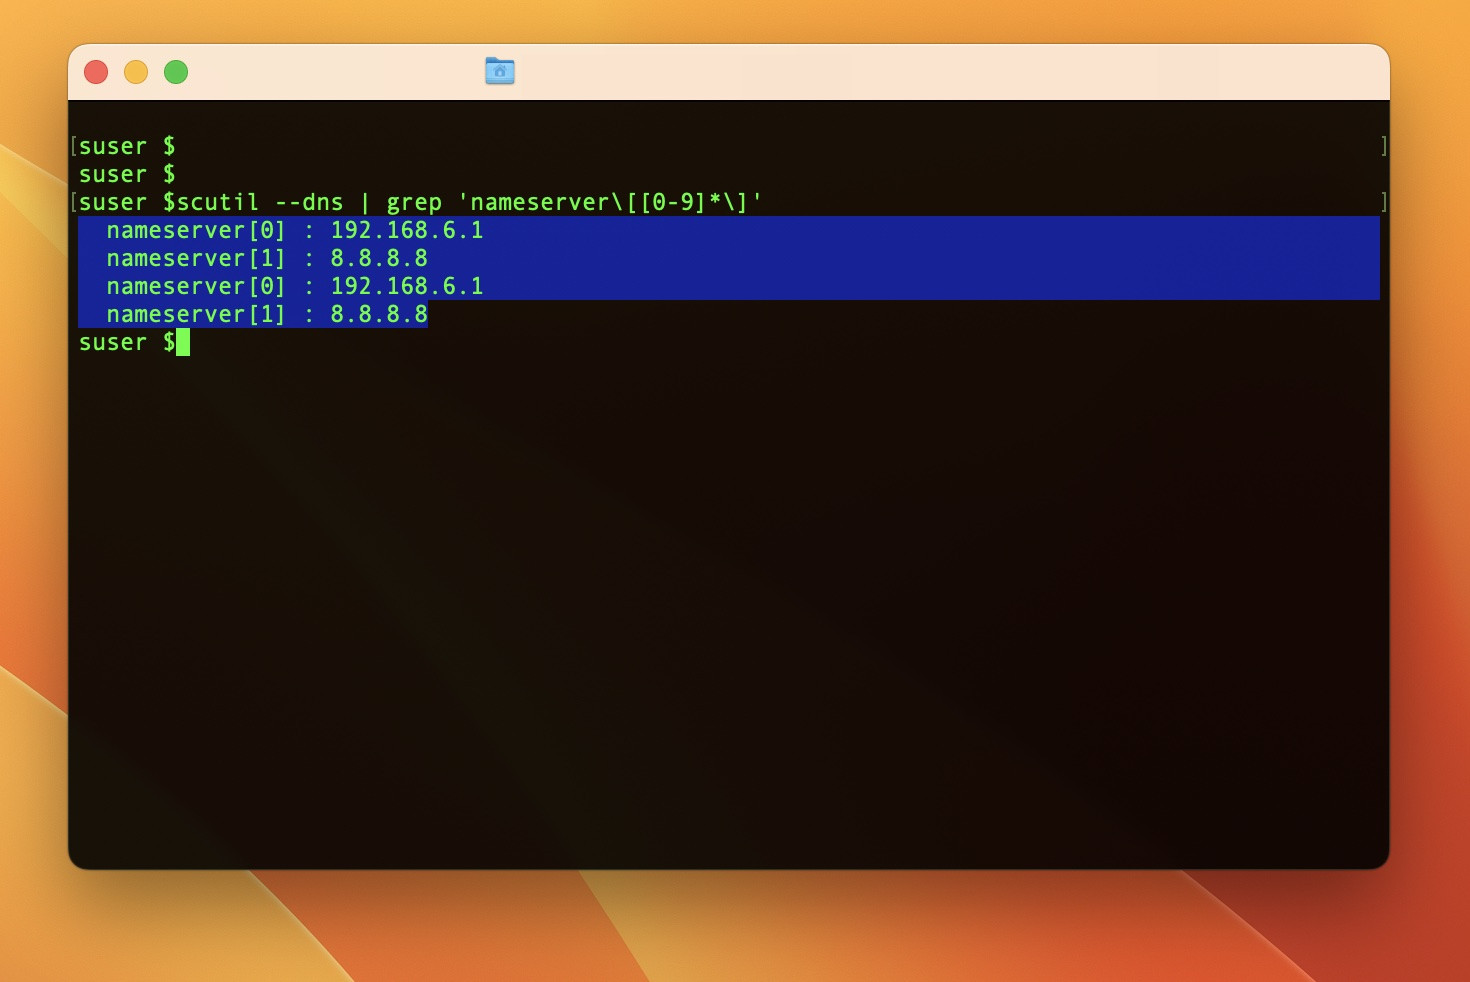 Finding DNS Servers in macOS Terminal
Alt text: Screenshot of macOS Terminal window, showing the output of the `scutil –dns | grep ‘nameserver[[0-9]]’` command, displaying DNS server addresses.*
Finding DNS Server on Windows
- Open Control Panel > Network and Internet > Network and Sharing Center.
- Click on your active network connection name next to “Connections” and then click Details.
- DNS servers are listed in the Network Connection Details window.
 Finding DNS Servers in Windows Network Connection Details
Alt text: Screenshot of Windows Network Connection Details window, highlighting the “DNS Servers” entry and associated IP addresses.
Alternatively, use Command Prompt: Open Command Prompt and run the command ipconfig /all. Scroll down to find DNS Servers under your network adapter information.
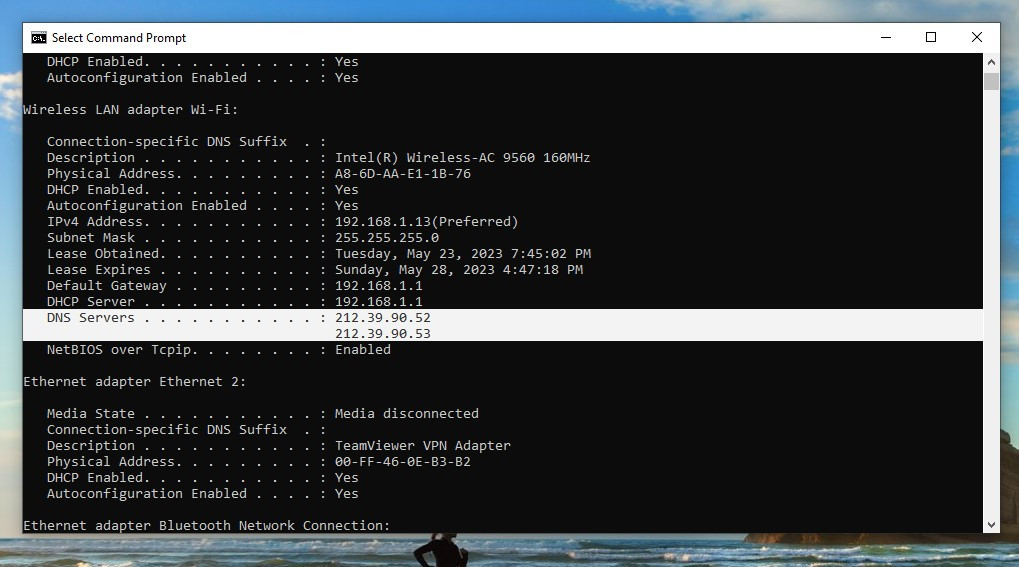 Finding DNS Servers in Windows Command Prompt
Alt text: Screenshot of Windows Command Prompt window, showing the output of the ipconfig /all command, highlighting the “DNS Servers” section and associated IP addresses.
How do I know if I have DNS problems?
A primary symptom of DNS problems is the inability to access websites by domain name. Your browser will typically display error messages like “This Site Can’t Be Reached” or “Hmm. We’re having trouble finding that site,” often accompanied by DNS-related error codes such as DNS_PROBE_FINISHED_NXDOMAIN.
You can also test DNS server responsiveness by pinging the DNS server address. Use Terminal on macOS or Command Prompt on Windows. For example, to ping the DNS server address 192.168.6.1, use the command: $ ping 192.168.6.1.
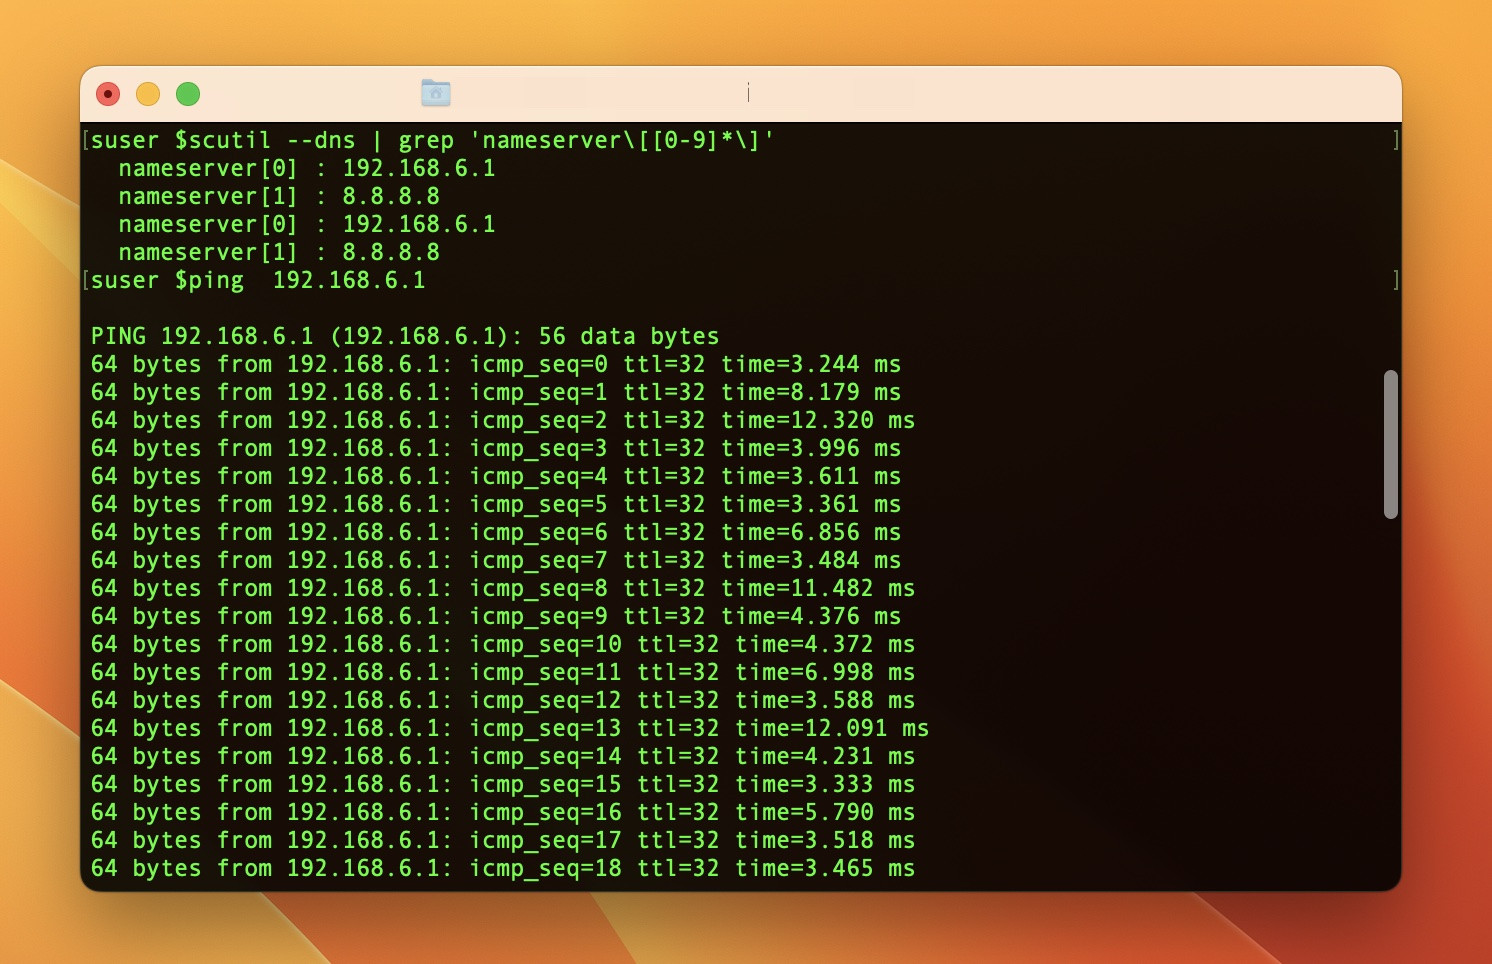 Pinging a DNS Server Address in macOS Terminal
Alt text: Screenshot of macOS Terminal window, showing the output of the ping 192.168.6.1 command, indicating successful data packet responses from the DNS server.
Consistent responses indicate the DNS server is working. No responses or timeouts suggest a problem.
Is it safe to reset DNS?
Yes, resetting your DNS is entirely safe and often beneficial. Flushing your DNS cache is a recommended routine maintenance step. It ensures your DNS resolver has the most current information, resolves DNS-related errors, and helps prevent DNS spoofing attacks by clearing out potentially corrupted or manipulated cached entries.