Minecraft offers endless possibilities, from intricate building projects to thrilling adventures. For those hosting multiplayer experiences, the key to a smoothly running and customized server lies within a single, powerful file: server.properties. This unassuming text document is the control panel for your Minecraft server, dictating everything from game difficulty to player limits and beyond.
This guide will explore the intricacies of the server.properties file, providing you with the knowledge to optimize your Minecraft server for peak performance and tailored gameplay. Whether you’re aiming to reduce lag, enhance security, or simply fine-tune the game to your liking, understanding this file is the first step.
Understanding the Minecraft Server Properties File
 Minecraft server properties
The server.properties file is essentially a configuration file that governs the settings of your Minecraft server. It’s a plain text file, easily editable with any standard text editor, and resides in the same directory as your minecraft_server.jar file. Think of it as the server’s DNA, defining its fundamental characteristics and behavior in a multiplayer environment.
What Exactly is server.properties?
In technical terms, server.properties is where all the crucial settings for your Minecraft multiplayer server are stored. It’s structured as a list of properties, each defined by a key-value pair.
- Keys: These are the settings names (e.g.,
difficulty,max-players). Crucially, you should not alter these keys. - Values: These are the specific configurations you assign to each setting (e.g.,
easy,20). These are the parts you will edit to customize your server.
Lines starting with # are comments. These are notes for administrators and are ignored by the server software. You can safely disregard or modify comments without affecting gameplay.
Important: After making any changes to server.properties, you must restart your Minecraft server for the modifications to take effect. Alternatively, some server implementations may support the /reload command in the console or in-game, but restarting is generally the safest method to ensure all changes are properly applied.
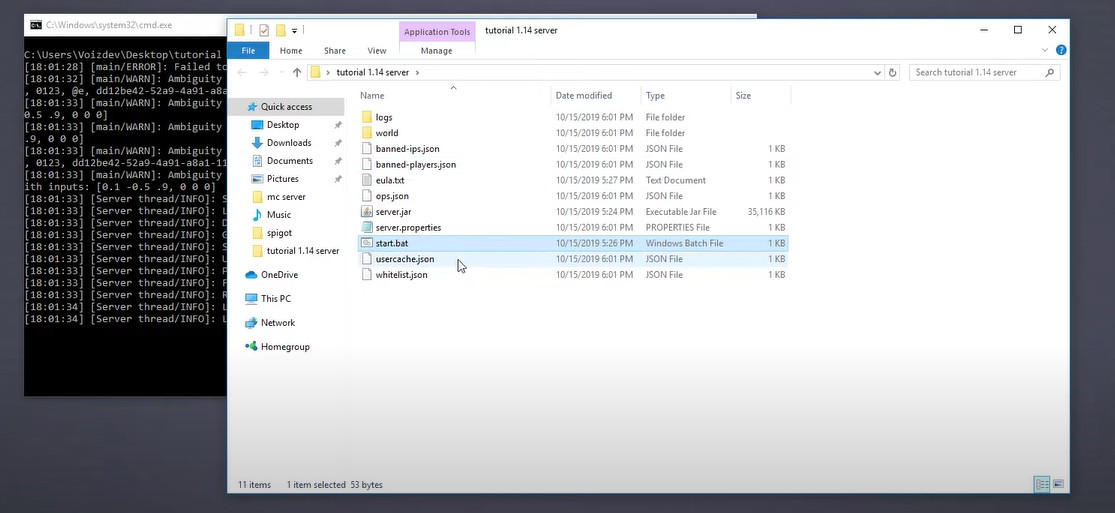
Accessing Your server.properties File
Locating the server.properties file is straightforward:
- Navigate to your Server Directory: This is the folder where you placed your
minecraft_server.jarfile when setting up your server. - Find server.properties: Look for a file named
server.propertieswithin this directory.
You can open server.properties with any text editor, such as:
- Notepad (Windows)
- TextEdit (Mac)
- Nano or Vim (Linux)
- Online Web Editors (often provided by hosting panels)
Do not search for this file in your Minecraft Client folder. server.properties is exclusively located within the server files.
What if server.properties is Missing Properties or Doesn’t Exist?
It’s not uncommon to find that your server.properties file seems to be missing settings, especially after updating your server to a newer Minecraft version. This is because updates often introduce new server properties.
In such cases, or if the server.properties file is missing entirely, don’t worry! Upon server startup, the Minecraft server software will automatically generate a new server.properties file. This newly generated file will include all the latest properties and set them to their default values.
This auto-generation feature ensures your server always has a functional configuration file, even after updates or accidental deletions.
Optimizing Your Minecraft Server for Performance
Server lag is the bane of any Minecraft multiplayer experience. Optimization is about minimizing lag and ensuring a smooth, responsive environment for all players. While completely eliminating lag can be challenging, especially on heavily populated servers, understanding and tweaking your server settings can significantly improve performance.
Reducing Lag: Key Strategies
Lag often arises from resource bottlenecks. Here are common culprits and how server.properties and other techniques can help:
- Redstone Contraptions: Complex redstone builds, especially those involving rapid clock circuits or large-scale automated farms, can consume significant server resources, leading to TPS (Ticks Per Second) drops and lag.
- Solution: Encourage players to build efficient redstone contraptions. Consider using plugins that limit redstone activity or optimize redstone processing. Educate players about minimizing unnecessary redstone complexity.
- Mob Grinders and Automated Farms: Large numbers of entities (mobs, items) can strain server resources.
- Solution: Limit the size and number of mob grinders. Optimize farm designs to reduce entity counts.
server.propertiessettings likespawn-limits(configurable inbukkit.ymlor similar configuration files) can help control mob populations.
- Solution: Limit the size and number of mob grinders. Optimize farm designs to reduce entity counts.
- View Distance: The
view-distancesetting inserver.propertiesdictates how many chunks each player’s client loads around them. A higher view distance means more chunks are processed by the server, increasing load.- Solution: Reduce
view-distance. A value between 6-8 is often a good balance between visual range and performance. Experiment to find the optimal setting for your server.
- Solution: Reduce
- Server Software: The choice of server software significantly impacts performance.
- Solution: Consider using optimized server software like Paper. As mentioned in the original article, Paper is a highly optimized fork of Spigot, known for its performance enhancements and lag reduction features.
Leveraging Plugins for Optimization
Plugins can be invaluable tools for server optimization. They can address specific lag-inducing issues and provide fine-grained control over server behavior. Some common optimization plugin categories include:
- Lag Prevention/Reduction: Plugins that optimize entity processing, redstone mechanics, chunk loading, and other performance-critical aspects.
- World Management: Plugins that facilitate world pre-generation, chunk optimization, and world border management.
- Monitoring and Diagnostics: Plugins that provide insights into server performance, helping identify lag sources.
Popular optimization plugins include:
- ClearLagg: Reduces lag by removing excessive entities and items.
- NoChunkLag: Optimizes chunk loading and unloading.
- Spark: A performance profiler to pinpoint lag sources.
World Pre-generation: Preparing Your World for Smoothness
Pregenerating your world is a proactive step to minimize lag spikes during gameplay, especially when players explore new areas. World generation is resource-intensive. By pre-generating chunks, you shift this load to server startup, resulting in smoother gameplay later.
The Chunky plugin is a popular choice for world pre-generation. Here’s how to use it:
- Install Chunky: Place the Chunky plugin JAR file in your server’s
pluginsfolder. - Start and Stop Server: Start your server to load the plugin, then stop it again.
- Run Chunky Commands: In the server console, execute the following commands:
/chunky radius <radius>(e.g.,/chunky radius 5000for a 5000-block radius around spawn)/chunky start
The server will begin pre-generating chunks within the specified radius. This process can take time, and the server might experience temporary lag during pre-generation, which is normal. Once completed, exploration within the pre-generated area will be significantly smoother.
Caution: Avoid excessively large pre-generation radii (e.g., above 20,000 blocks), as this can be extremely resource-intensive and potentially cause more lag during the pre-generation process itself.
Optimizing Configuration Files: Bukkit.yml, Spigot.yml, Paper.yml
Beyond server.properties, other configuration files like bukkit.yml, spigot.yml, and paper.yml (depending on your server software) offer further optimization opportunities. These files control more advanced server behaviors.
Here are some key settings to consider optimizing, as highlighted in the original article:
Bukkit.yml:
spawn-limits: Control the maximum number of monsters, animals, and other entities spawned in the world. Lowering these limits can reduce entity processing load.chunk-gc(Chunk Garbage Collection): Configures how often the server cleans up unloaded chunks. Adjustingperiod-in-tickscan affect memory usage and performance.ticks-per(Spawn Ticks): Sets the frequency of entity spawning. Increasing these values reduces spawn rates, potentially improving performance.autosave: Determines how often the server saves the world data. Frequent autosaves can cause brief lag spikes. Increasing the interval (e.g., to 6000 ticks or more) can reduce these spikes but increases the risk of data loss in case of crashes.
Spigot.yml:
max-tick-time: Sets limits on how long the server can spend processing tile entities and entities per tick. Setting this too low can lead to instability, but excessively high values might mask performance issues.mob-spawn-range: Defines how far from players mobs can spawn. Reducing this range can decrease mob processing.entity-activation-range: Controls the distance at which entities become “active” and start processing AI. Reducing these ranges, especially for animals and monsters, can significantly improve performance, especially on servers with many entities.merge-radius: Determines how close dropped experience orbs and items need to be to merge into a single entity. Increasing these values slightly can reduce entity counts.nerf-spawner-mobs: When enabled, reduces the AI processing of mobs spawned from spawners, improving performance around farms.
Paper.yml:
Paper.yml offers even more granular optimization options compared to Spigot and Bukkit. Some key settings to explore include:
max-auto-save-chunks-per-tick: Limits the number of chunks saved per tick, smoothing out save operations.optimize-explosions: Improves explosion performance.mob-spawner-tick-rate: Controls how often mob spawners check for spawning opportunities. Increasing this can reduce spawner activity and lag.container-update-tick-rate: Sets how often containers (chests, hoppers, etc.) update their contents. Increasing this can reduce load, especially in areas with many containers.max-entity-collisions: Limits the number of collisions an entity can be involved in per tick, potentially improving performance in crowded areas.despawn-ranges: Fine-tunes entity despawn distances.
Accessing and Editing Configuration Files:
These .yml files are typically located in the main server directory or in subfolders like config or spigot. You can edit them using the same text editors used for server.properties.
Always back up your configuration files before making significant changes. Incorrect settings can negatively impact your server’s stability or gameplay.
Managing Server Difficulty
Minecraft server difficulty dictates the aggressiveness of hostile mobs, hunger mechanics, and other gameplay challenges. You can adjust the difficulty to suit your player base’s preferences.
Changing Difficulty via Commands
 Minecraft difficulty command example
You can dynamically change the server difficulty using in-game commands without requiring a server restart. This is useful for adjusting difficulty on the fly.
Prerequisites: You must be a server operator (admin) to use difficulty commands.
Steps:
- Open the Chat: Press
Tor/in-game to open the chat window. - Type the Difficulty Command: Enter the command
/difficulty <difficulty>. Replace<difficulty>with one of the following:peacefuleasynormalhard- Example:
/difficulty hardsets the difficulty to Hard.
- Execute the Command: Press Enter to send the command. The server difficulty will change immediately.
- Verify: You can check the current difficulty using the command
/difficultywithout specifying a difficulty level.
Changing Difficulty via Server Configuration
For a persistent difficulty setting that applies every time the server starts, you can modify the difficulty property in server.properties.
Steps:
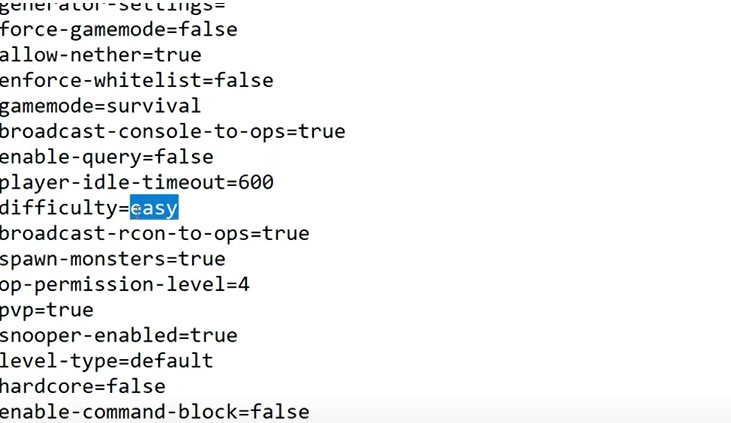
- Open server.properties: Locate and open the
server.propertiesfile in your server directory. - Find the
difficultyProperty: Search for the linedifficulty=. - Set the Difficulty Value: Change the value after the
=sign to one of the following numerical values:0: Peaceful1: Easy2: Normal3: Hard- Example:
difficulty=3sets the difficulty to Hard.
- Save the File: Save your changes to
server.properties. - Restart the Server: Restart your Minecraft server for the new difficulty setting to take effect.
Choosing the Right Minecraft Server JAR
The “JAR” file you use to run your Minecraft server significantly impacts performance, features, and modding capabilities. Here’s an overview of popular server JAR options:
-
Paper: The recommended choice for most servers, especially those prioritizing performance and stability. Paper is a highly optimized fork of Spigot, offering substantial lag reduction, bug fixes, and exploit prevention. It retains Bukkit plugin compatibility. Ideal for servers of all sizes.
-
Spigot: A widely used server JAR built upon the Bukkit API. Spigot enables plugin support and offers some performance improvements over Vanilla, but it’s generally less optimized than Paper. Suitable for servers needing plugin functionality but where extreme performance is not the top priority.
-
Bukkit: The project Spigot is based on. While historically significant, Bukkit is no longer actively developed. Spigot and Paper are generally preferred due to their continued updates and optimizations.
-
Vanilla: The official server JAR provided by Mojang. Vanilla servers are unoptimized and lack plugin support. Recommended only for very small, private servers with a handful of players where simplicity is paramount. Vanilla servers can become laggy with more than a few concurrent players.
-
Fabric: A lightweight and modular modding platform focused on modern Minecraft versions and snapshots. Fabric prioritizes fast updates and stability. It has a growing mod ecosystem and is a strong alternative to Forge, particularly for newer game versions.
-
Forge: The most established and versatile modding API for Minecraft. Forge boasts a vast library of mods and offers extensive customization possibilities. However, Forge mods can sometimes be resource-intensive, and Forge updates can lag behind Minecraft version releases. Best suited for servers heavily focused on modded gameplay, especially with established modpacks.
-
Purpur: An advanced fork of Paper and Tuinity, offering highly granular configuration options for creating unique and customized gameplay experiences. Purpur provides extensive control over game mechanics but might deviate from the “vanilla” feel. Recommended for experienced server administrators seeking deep customization and performance tuning.
-
Airplane: A relatively new server JAR focused on high performance for large-scale servers and networks. Airplane is designed to handle many players with minimal lag and can leverage modern multi-core CPUs effectively. Still under active development but shows promise for large communities.
Recommendation: For most users, Paper provides the best balance of performance, stability, plugin compatibility, and ease of use. It’s an excellent starting point for any Minecraft server and offers a solid foundation for both vanilla-like and plugin-enhanced gameplay.
Conclusion
Mastering your server.properties file is crucial for anyone serious about running a successful Minecraft server. By understanding its settings and how they impact gameplay and performance, you can tailor your server to provide the best possible experience for your players. From optimizing performance to customizing difficulty and choosing the right server JAR, the knowledge within this guide empowers you to take full control of your Minecraft server environment.
If you encounter any issues or have further questions about your Minecraft server setup, don’t hesitate to seek help from the Minecraft server community or consult online resources. Building and managing a Minecraft server is a continuous learning process, and there’s always more to discover!