
Creating your own Minecraft server opens up a world of exciting possibilities, allowing you to build, explore, and adventure with friends. However, setting up a server that’s accessible beyond your local network requires a crucial step: understanding and configuring Minecraft Server Ports. Without proper port configuration, your meticulously crafted world remains isolated, preventing friends from joining your adventures.
This guide will delve into the essential aspects of Minecraft server ports, explaining what they are, why they are important, and how to configure them on Windows, macOS, and Linux operating systems. By the end of this tutorial, you’ll have a solid understanding of how to make your Minecraft server accessible to players around the globe.
What are Minecraft Server Ports and Why Do They Matter?
In the realm of computer networking, ports act like virtual doorways that allow specific types of network traffic to enter or exit your network. Imagine your home as your local network, and each room as a different application or service. Ports are like the doors to these rooms, each labeled for a specific purpose. For Minecraft servers, these ports are the designated pathways through which game data travels, enabling players to connect to your server from the internet.
When you set up a Minecraft server, it listens for incoming connections on a specific port. By default, Minecraft: Java Edition uses port 25565, while Minecraft: Bedrock Edition utilizes ports 19132-19133 (both TCP and UDP). These default ports are widely recognized, making initial setup easier. However, to allow players outside your home network to connect, you need to configure your router to forward traffic arriving at these ports to your computer running the Minecraft server. This process is known as port forwarding.
Without correctly configured Minecraft server ports, players attempting to connect from outside your local network will be unable to reach your server. Their connection requests will be blocked by your router’s firewall, effectively keeping your server invisible to the outside world. Therefore, understanding and properly setting up Minecraft server ports is paramount to hosting a multiplayer Minecraft experience.
Step-by-Step Guide to Setting Up Minecraft Server Ports
Making your Minecraft server accessible involves a series of steps, starting with configuring the server port within the Minecraft server files, then allowing this port through your computer’s firewall, and finally, setting up port forwarding on your router. Let’s break down each step:
Step 1: Configuring the Minecraft Server Port in server.properties
The first step is to ensure your Minecraft server is configured to use the port you intend to forward. This is done within the server.properties file, a configuration file located in your Minecraft server directory.
-
Navigate to your Minecraft server directory. This is the folder where you initially set up your Minecraft server, containing files like
server.jar(for Java Edition). -
Locate the
server.propertiesfile. This file is usually a text-based configuration file. -
Open
server.propertieswith a text editor. Right-click on the file and choose to open it with a text editor like Notepad (Windows), TextEdit (macOS), or Nano/Vim (Linux). -
Find the
server-portline. Scroll through the file until you find the line that readsserver-port=25565(or a different port number if it has been previously modified).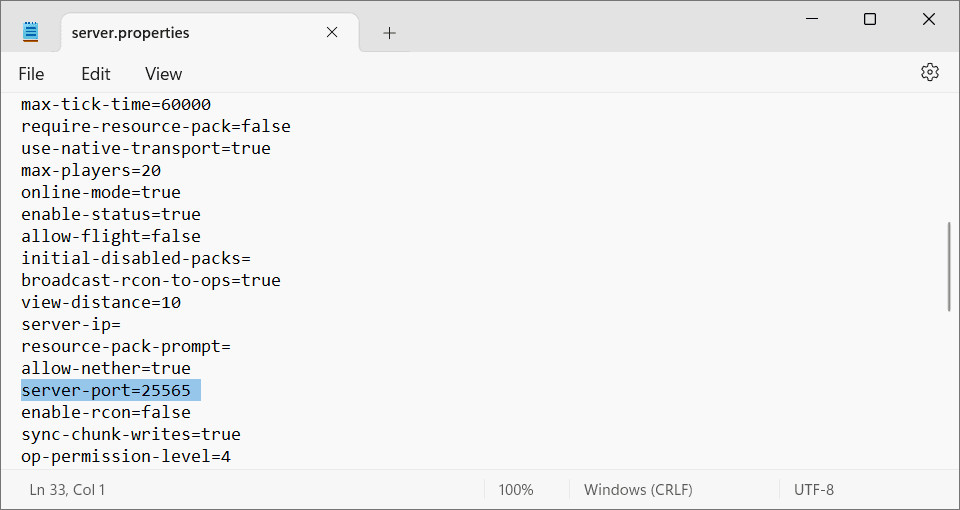 server.properties file with server-port line highlighted
Alt text: Screenshot of the server.properties file open in a text editor, with the line “server-port=25565” highlighted, indicating the server port configuration. -
Modify the
server-portvalue (optional). While the default port 25565 for Java Edition works perfectly well, you can change it to any number between 1 and 65535. However, it’s generally recommended to stick with the default port unless you have a specific reason to use a different one. If you do change it, ensure you remember the new port number as players will need it to connect if it’s not the default. -
Save and close the file. After making your changes (or confirming the default port is set), save the
server.propertiesfile and close the text editor. -
Restart your Minecraft server. For the changes to take effect, restart your Minecraft server.
Step 2: Allowing Minecraft Server Ports Through Your Firewall
Firewalls are essential security systems that protect your computer from unauthorized network access. By default, they might block incoming connections to your Minecraft server port. Therefore, you need to configure your firewall to allow traffic on the chosen Minecraft server port. The process varies slightly depending on your operating system:
Firewall Management on Windows
-
Open “Windows Defender Firewall with Advanced Security”. You can search for this in the Windows search bar.
-
Click on “Inbound Rules” in the left-hand panel, and then select “New Rule…” in the right-hand panel.
-
Choose “Port” as the rule type and click “Next”.
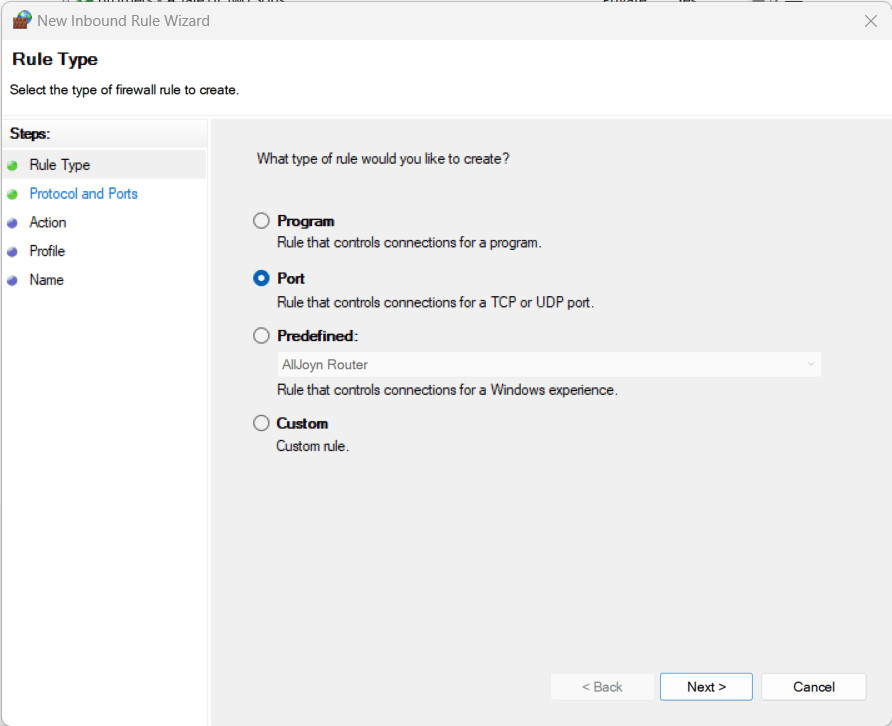 New Inbound Rule selection window with the Port option selected
Alt text: Screenshot of the “New Inbound Rule Wizard” in Windows Defender Firewall, highlighting the “Port” option selected as the rule type. -
Select “TCP”, and enter your Minecraft server port number in the “Specific local ports” field. For Java Edition default, this is 25565. Click “Next”.
-
Select “Allow the connection” and click “Next” through the subsequent screens, leaving the default options selected.
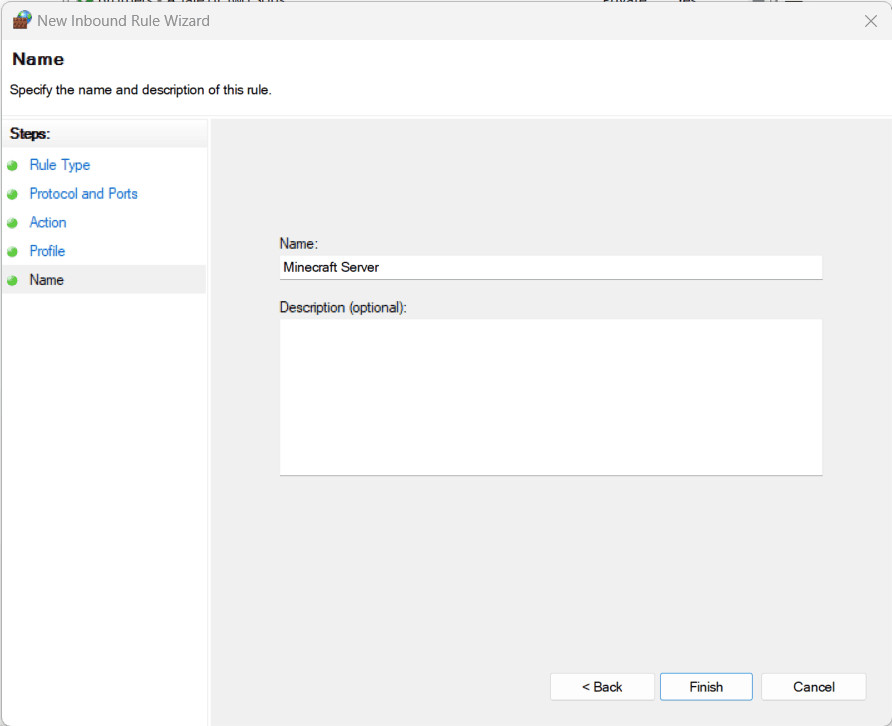 Giving a name to a new firewall rule, finally directing incoming traffic to the user
Alt text: Screenshot of the final step in creating a new inbound rule, where the user is prompted to name the rule. The rule is set to “Allow the connection” for the specified port. -
Give your rule a descriptive name (e.g., “Minecraft Server TCP”) and click “Finish”.
-
Repeat steps 2-6 for UDP. Create a new inbound rule, but this time select “UDP” instead of TCP. Use the same port number. Name this rule something like “Minecraft Server UDP”.
Firewall Management on macOS
-
Go to “System Settings” from the Apple menu and select “Network”.
-
Choose “Firewall” in the left-hand panel and click “Options”.
-
Click the “+” (Add) button to add an application exception. Find and select the “Java” application (which runs your Minecraft server) and click “Add”.
-
Ensure “Allow incoming connections” is selected for Java. Click “OK”.
Firewall Management on Linux
Linux firewalls are often more advanced. A common and user-friendly firewall management tool is UFW (Uncomplicated Firewall). If you are using UFW, you can allow the Minecraft port with the following commands in your terminal:
For TCP (Java Edition):
sudo ufw allow 25565/tcp comment 'Minecraft Server TCP'For UDP (Bedrock Edition or if your server uses UDP):
sudo ufw allow 25565/udp comment 'Minecraft Server UDP'(Replace 25565 with your actual server port if you changed it).
For more comprehensive firewall configuration on Linux, consult your specific distribution’s documentation or search for guides on configuring firewalls like UFW or Firewalld.
Step 3: Port Forwarding Minecraft Server Ports on Your Router
The final crucial step is to configure port forwarding on your router. This directs incoming traffic on the Minecraft server port from the internet to your computer’s local IP address, where your Minecraft server is running.
-
Find your router’s IP address (Default Gateway). This is the IP address you use to access your router’s settings page.
On Windows: Open Command Prompt (search for
cmd) and typeipconfig. Look for the “Default Gateway” address.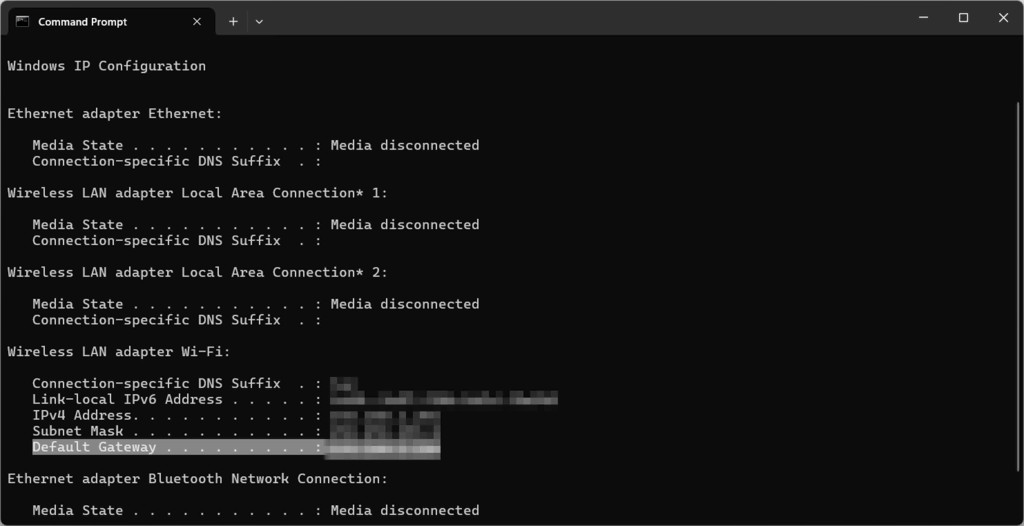 Command Prompt ipconfig command output showing router
Alt text: Screenshot of Command Prompt output after running the “ipconfig” command in Windows, highlighting the “Default Gateway” IP address, which is the router’s IP address.On macOS: Go to System Settings -> Network, select your network connection, click “Details…”, and go to the “TCP/IP” tab. The router’s IP is listed as “Router”. Alternatively, open Terminal and type
netstat -nr | grep default.On Linux: Open Terminal and type
route -n | grep "^0.0.0.0" | cut -d ' ' -f 10. -
Set up a static IP address for your computer. By default, your computer’s IP address on your local network might change occasionally (dynamic IP). Port forwarding works best with a static IP address, ensuring the forwarded port always points to the correct computer.
On Windows: Open “Network Connections” (search for
ncpa.cpl). Right-click your network adapter, select “Properties”, then “Internet Protocol Version 4 (TCP/IPv4)”, and “Properties” again. Choose “Use the following IP address” and enter a static IP address within your network range, subnet mask (usually255.255.255.0), and your router’s IP address as the default gateway.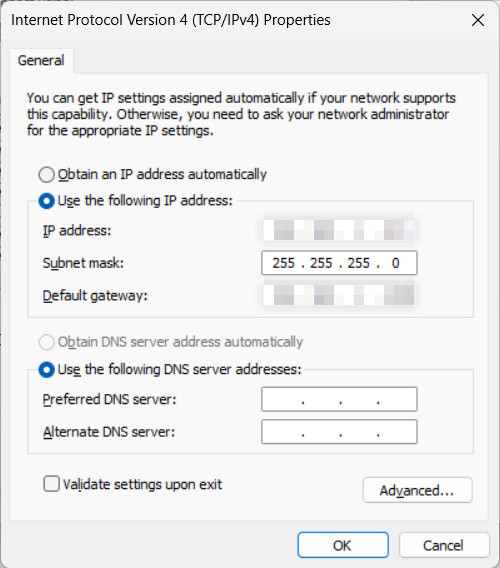 A TCP/IPv4 Properties window with Use the following IP address section highlighted and new IP addresses added
Alt text: Screenshot of the “Internet Protocol Version 4 (TCP/IPv4) Properties” window in Windows, showing the “Use the following IP address” option selected, with example static IP address, subnet mask, and default gateway fields filled in.On macOS: Go to System Settings -> Network, select your network connection, click “Details…”, and go to the “TCP/IP” tab. Configure IPv4 to “Using DHCP with manual address” and enter your desired static IP address.
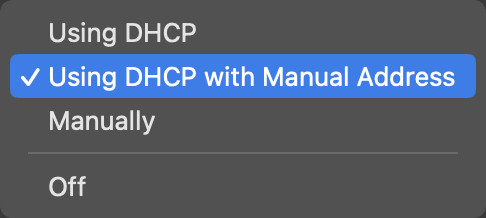 Using DHCP with manual address option selected
Alt text: Screenshot of macOS Network settings, showing the “TCP/IP” tab with “Configure IPv4” set to “Using DHCP with manual address”, indicating the option to set a static IP address.On Linux: The method varies depending on your distribution. For Ubuntu, you can edit the network configuration file (e.g.,
/etc/netplan/01-netcfg.yaml) as shown in the original article, specifying your static IP, gateway, and DNS servers. -
Log in to your router’s settings page. Open a web browser and enter your router’s IP address (the Default Gateway from step 1) in the address bar. Press Enter. You will be prompted to enter your router’s username and password. These are often found on a sticker on the router itself. If you’ve changed them previously, use your custom credentials. If you haven’t, try default credentials (often “admin” for both username and password, but check your router’s manual or search online for “[router model] default login”).
Alt text: Generic example of a router login prompt asking for username and password.
Important Security Tip: If you are still using the default username and password for your router, change them immediately to secure your network from unauthorized access.
-
Find the “Port Forwarding” or “Virtual Server” settings. Router interfaces vary greatly, but look for sections labeled “Port Forwarding,” “Virtual Servers,” “NAT Forwarding,” or similar. Consult your router’s manual if you are unsure where to find this setting.
-
Create a new port forwarding rule.
- Enable the rule.
- Name the rule (e.g., “Minecraft Server”).
- Specify the Port Range: Enter your Minecraft server port (e.g., 25565) for both the external (public) and internal (private) port ranges. If your router requires separate fields for external and internal ports, use the same port number in both. For Bedrock Edition, you might need to forward ports 19132-19133.
- Select the Protocol: Choose TCP and UDP or “Both” if available. If you are setting up a Java Edition server, TCP is primarily used, but it’s often recommended to forward both TCP and UDP for broader compatibility. For Bedrock Edition, ensure you forward both TCP and UDP ports 19132 and 19133.
- Enter your computer’s static IP address (set up in step 2) in the “Internal IP Address,” “Destination IP,” or similar field.
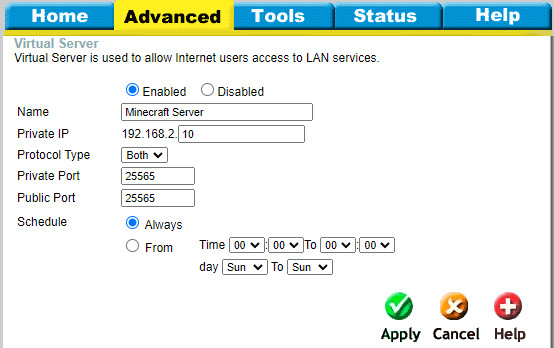 Setting up port forwarding in the internet router/modem configuration panel for D-Link network equipment with the Advanced tab selected
Alt text: Screenshot of a D-Link router’s port forwarding configuration page. Fields for enabling port forwarding, rule name, private IP address, protocol (TCP/UDP), and port ranges are visible, illustrating the typical settings required for port forwarding. -
Save the port forwarding rule. Click “Save,” “Apply,” or a similar button to save your changes. Your router may require a restart for the changes to take effect.
 Setting up port forwarding in the internet router/modem configuration panel for D-Link network equipment with the Advanced tab selected
Pro Tip: If you are struggling to find the port forwarding settings or understand the specific options on your router, search online for “[your router model] port forwarding” or consult your router’s user manual.
Step 4: Testing and Connecting to Your Minecraft Server
After configuring port forwarding, it’s time to test if your server is accessible from the outside world.
-
Restart your Minecraft server. Ensure your Minecraft server is running after making all the port forwarding changes. You can use the
/stopcommand in the server console and then restart the server. -
Find your public IP address. Search “what’s my ip” on Google or use a website like
whatismyip.com. This is the IP address you will share with your friends. -
Share your public IP address (and port if non-default) with your friends. To connect, your friends will need your public IP address. If you used a non-default port for your Minecraft server (other than 25565 for Java Edition), they will also need to include the port number when connecting, using the format
your_public_ip:port_number. If you used the default port 25565, they can just use your public IP address.Security Warning: Be cautious about sharing your public IP address widely on the internet, as it can potentially expose your network to security risks. Share it only with people you trust and want to play on your server.
-
Have your friends connect to your server. In their Minecraft game, they should use the “Direct Connection” option and enter your public IP address (and port, if applicable).
If everything is configured correctly, your friends should now be able to connect to your Minecraft server and join your game!
Conclusion
Port forwarding Minecraft server ports is a fundamental step in opening your server to players beyond your local network. By understanding what ports are, how to configure your firewall, and how to set up port forwarding on your router, you can successfully host a multiplayer Minecraft server and share your gaming experiences with friends and the wider Minecraft community. Follow this guide step-by-step, and you’ll be well on your way to creating your own exciting Minecraft adventures together.