Marvel Rivals, the exciting new free-to-play PvP hero shooter, has quickly gained popularity since its release on PlayStation 5, Windows, and Xbox Series X/S in December 2024. While the game boasts thrilling 6v6 battles and a roster of beloved Marvel characters, some players have unfortunately encountered a frustrating issue: the Marvel Rivals Server Connection Failed error. If you’re facing this problem and eager to jump back into the action, you’ve come to the right place. This guide provides practical solutions to help you resolve the Marvel Rivals server connection failed issue and get you back to battling it out with your favorite heroes.
Before diving into troubleshooting, it’s always wise to quickly check the game’s server status. Official Marvel Rivals channels or community forums are usually the best places to find real-time updates on server outages or maintenance. If the servers are indeed down, you’ll simply need to wait until they are back online. However, if the servers are operational, the problem likely lies on your end, and the following solutions can help.
Way 1: Run Marvel Rivals as Administrator
Granting administrative privileges to Marvel Rivals can often resolve various launch and connection issues. This ensures the game has the necessary permissions to access your system resources and network configurations. Here’s how to run the game as an administrator:
- For Steam Users: Close Steam completely. Right-click the Steam icon on your desktop or in the Start Menu and select “Run as administrator.” Once Steam is running with admin rights, launch Marvel Rivals.
- For Epic Games Launcher Users: Similarly, exit the Epic Games Launcher. Right-click the Epic Games Launcher icon and choose “Run as administrator.” After the launcher restarts with admin rights, launch Marvel Rivals.
- Run the Game Launcher as Administrator: Navigate to the Marvel Rivals installation directory. You can usually find this by right-clicking Marvel Rivals in your Steam library, selecting “Manage,” and then “Browse local files.” Locate the
marvelrivals_launcher.exefile (or similar executable), right-click it, and select “Run as administrator.”
Running both the game launcher and the game client itself as administrator can bypass permission restrictions that might be preventing a stable server connection.
Way 2: Clear Local Configuration Files for Marvel Rivals
Corrupted or outdated local configuration files can sometimes interfere with the game’s ability to connect to servers. Clearing these files forces the game to create fresh configurations, potentially resolving connection problems. Marvel Rivals provides a built-in option to clear these files:
- Launch Marvel Rivals through Steam or the Epic Games Launcher.
- When the Marvel Rivals Launcher window appears, look for the option “Clear Local Configuration Files.” This button is usually visible within the launcher interface.
- Click “Clear Local Configuration Files” and allow the process to complete.
- Restart the game and check if the server connection issue is resolved.
Clearing local configuration files is a safe and simple step that can often address unexpected game behavior, including connection failures.
Way 3: Enable Inbound Rule for Marvel Rivals in Windows Firewall
Windows Defender Firewall controls network traffic to and from your computer. Inbound rules specifically manage incoming connections. If an inbound rule for Marvel Rivals is not enabled, the game might be blocked from receiving necessary data from the game servers, leading to connection failures. Here’s how to enable the inbound rule:
- Open Control Panel: Type “Control Panel” in the Windows search bar and select the Control Panel app.
- Navigate to Windows Defender Firewall: Click on “System and Security” and then “Windows Defender Firewall.”
- Access Advanced settings: In the left-hand menu, click on “Advanced settings.” This will open the “Windows Defender Firewall with Advanced Security” window.
- Go to Inbound Rules: In the left pane, select “Inbound Rules.”
- Locate Marvel Rivals rules: In the middle pane, scroll down to find any rules listed for “Marvel Rivals.” You might see multiple entries.
- Enable the rule(s): For each “Marvel Rivals” rule, right-click on it and select “Enable Rule.” Ensure you repeat this step for every instance of Marvel Rivals listed under Inbound Rules.
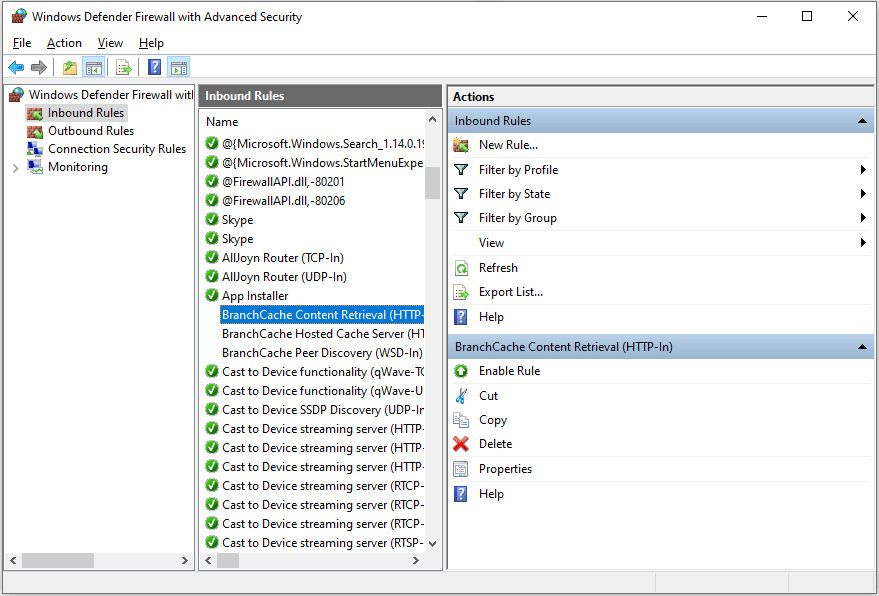 Enable Inbound Rule in Windows Defender Firewall for Marvel Rivals to Fix Server Connection Issues
Enabling the inbound rule for Marvel Rivals ensures that Windows Firewall is not inadvertently blocking the game’s connection to its servers.
Way 4: Troubleshoot Your Network Connection
Often, server connection issues in online games stem from problems with your own network setup. Here are several network troubleshooting steps you can try:
#1. Switch Between WiFi and Ethernet:
Sometimes, simply switching your connection type can resolve temporary network glitches. If you are using WiFi, try switching to a wired Ethernet connection, and vice versa. Log in to the game after switching to see if the issue persists.
#2. Change DNS Servers to Cloudflare (1.1.1.1):
DNS (Domain Name System) servers translate website addresses into IP addresses. Using a reliable and fast DNS server can improve your internet connection stability. Cloudflare’s public DNS servers (1.1.1.1 and 1.0.0.1) are known for their speed and reliability. Here’s how to switch to Cloudflare DNS:
- Open Network & Internet settings: Right-click the network icon in your system tray (bottom right corner) and select “Open Network & Internet settings.”
- Go to Change adapter options: Under “Advanced network settings,” click on “Change adapter options.”
- Open Ethernet/WiFi Properties: In the “Network Connections” window, right-click on your active network adapter (Ethernet or Wi-Fi) and select “Properties.”
- Select IPv4 Properties: Select “Internet Protocol Version 4 (TCP/IPv4)” from the list and click “Properties.”
- Enter Cloudflare DNS servers: Choose “Use the following DNS server addresses.” Enter
1.1.1.1as the “Preferred DNS server” and1.0.0.1as the “Alternate DNS server.” - Save changes: Click “OK” in both Properties windows to save your changes.
#3. Enable IPv6:
IPv6 is the latest version of the Internet Protocol. While IPv4 is still widely used, enabling IPv6 can sometimes improve connection stability and performance, especially with newer online services and games.
- Open Network Connections: Follow steps 1-3 from the DNS server change instructions above to reach the “Network Connections” window and open the “Properties” of your active network adapter.
- Enable IPv6: Check the box next to “Internet Protocol Version 6 (TCP/IPv6)” in the list.
- Save changes: Click “OK” to save the changes.
After making network changes, restart your computer and then launch Marvel Rivals to test the connection.
Way 5: Use a Phone Hotspot or VPN (for Testing)
If none of the above solutions work, you can try using a phone hotspot or a VPN as a temporary measure to diagnose the issue.
- Phone Hotspot: Connect your computer to your phone’s mobile hotspot. This will route your internet connection through your mobile network. If the game connects successfully via hotspot, it suggests the problem might be with your primary network connection or ISP.
- VPN (Virtual Private Network): Using a VPN can sometimes bypass network restrictions or routing issues that might be causing connection problems. Connect to a VPN server and then try launching Marvel Rivals.
If using a hotspot or VPN allows you to connect to the game servers, it indicates a potential issue with your regular network configuration or internet service provider. In such cases, contacting your ISP for assistance might be necessary.
If even these steps fail to resolve the Marvel Rivals server connection failed issue, it is advisable to contact Marvel Rivals support directly. There might be account-specific issues or server-side problems that require their intervention. Additionally, keep an eye on official Marvel Rivals channels for announcements regarding server status or known issues, as developers often release hotfixes to address widespread problems quickly.
Bottom Line
Experiencing the “Marvel Rivals server connection failed” error can be frustrating, but by systematically trying these solutions, you should be able to pinpoint and resolve the problem. From running the game as administrator to troubleshooting your network settings, these steps cover the most common causes of connection issues in Marvel Rivals. Get back in the game and enjoy the Marvel mayhem!