
Migrating your Icarus Prospect from a local game to a dedicated server is a fantastic way to enhance your gameplay, allowing you and your friends to explore, build, and survive in Icarus even when you’re not actively playing on your personal machine. However, moving your game to a server requires careful file management to prevent losing your hard-earned progress. This guide provides a comprehensive, step-by-step walkthrough on how to Icarus Move Game To Server safely and successfully.
The Crucial First Step: Backing Up Your Prospect File
Before you begin any file transfers, creating a backup of your Prospect file is absolutely essential. Think of this as your safety net. Incorrectly handling or renaming files, or even accidentally altering the JSON data within your ProspectName.json file, can lead to irreversible data corruption. A corrupted Prospect can mean losing your saved game data permanently. Therefore, taking a moment to backup your file is a critical precaution that can save you from potential heartache down the road.
Locating Your Icarus Prospect Save File
To initiate the server transfer, you first need to find your Prospect file on your local computer. This file contains all the information about your specific Icarus world – your progress, builds, and discoveries. You can find it by navigating through your file system to the following directory:
%UserProfile%AppDataLocalIcarusSavedPlayerData{yourSteamIDNumber}Prospects{ProspectName.json}Replace {yourSteamIDNumber} with your actual Steam ID number (this is a unique identifier for your Steam account) and {ProspectName.json} with the name of the Prospect you wish to move. This .json file is the key to transferring your game to the server.
Setting Up Your Server for the Prospect File
With your Prospect file located and backed up, the next step is to prepare your dedicated server to receive it. This involves creating the correct folder structure on your server. Here’s how to do it, specifically using the Nodecraft Pro Panel as an example, but the general principles apply to most server hosting providers:
- Access your Server Control Panel: Log in to your Nodecraft Pro Panel (or your server hosting provider’s control panel).
- Navigate to Server Files: Find and click on the “Server Files” or “File Manager” tab.
- Locate the Icarus Directory: Go to the main Icarus game folder. The path you’re looking for within the server files is:
/Icarus/Saved/PlayerData/DedicatedServer/Prospects. - Create Folders if Necessary: Especially on a new server, these folders might not exist yet. You may need to manually create them. Inside the
Savedfolder, create a folder namedPlayerData. InsidePlayerData, createDedicatedServer, and finally, insideDedicatedServer, create theProspectsfolder. This precise folder structure is crucial for the server to recognize your Prospect file.
Uploading Your Prospect File to the Server
Now that your server has the correct folder structure, you can upload your Prospect file.
You can use either an FTP (File Transfer Protocol) client to upload the file, or, more conveniently, use the “Upload” button directly within your Nodecraft Pro Panel (or your hosting provider’s file manager). Upload the prospectname.json file you located earlier into the /Icarus/Saved/PlayerData/DedicatedServer/Prospects folder on your server.
 Uploading the Prospect files for Icarus to Nodecraft Pro
Loading Your Migrated Prospect on the Server
After successfully uploading your Prospect file, the final step is to tell your Icarus server to load this specific Prospect when it starts. The process varies slightly depending on whether you have one or multiple Prospects on your server.
Loading a Single Prospect
If this is the only Prospect you intend to use on your server, the process is simple. Just Start your Icarus server. By default, the server will look for and load the Prospect file located in the designated folder. You should then be able to join your server and continue playing in your familiar Prospect world.
Selecting a Specific Prospect to Load
If you have multiple Prospect files uploaded to your server and want to choose a specific one to play, you need to configure the server to load that particular Prospect. Here’s how to do it within the Nodecraft Pro Panel:
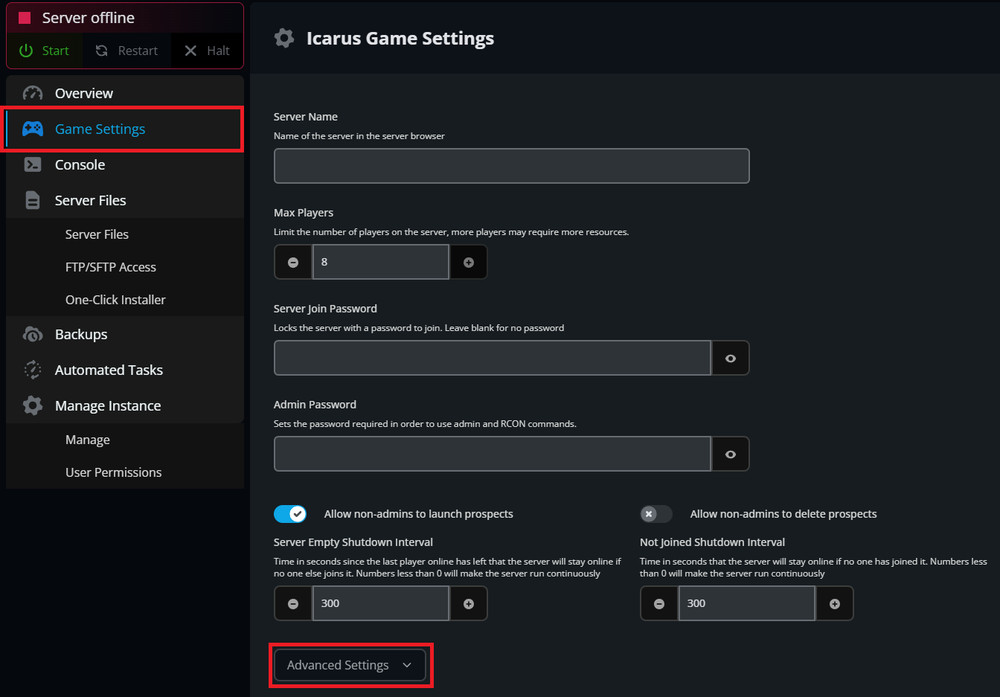
- Access Game Settings: In your Nodecraft Pro Panel, navigate to the “Game Settings” tab.
- Go to Advanced Settings: Click on the “Advanced Settings” option. This will reveal more server configuration options.
Nodecraft Pro Advanced Game Settings for Icarus Server
- Specify the Prospect Name: Look for the “Load Prospect” field. In this field, enter the name of your Prospect file, but without the
.jsonextension. For example, if your file is namedMyAwesomeProspect.json, you should enterMyAwesomeProspect.
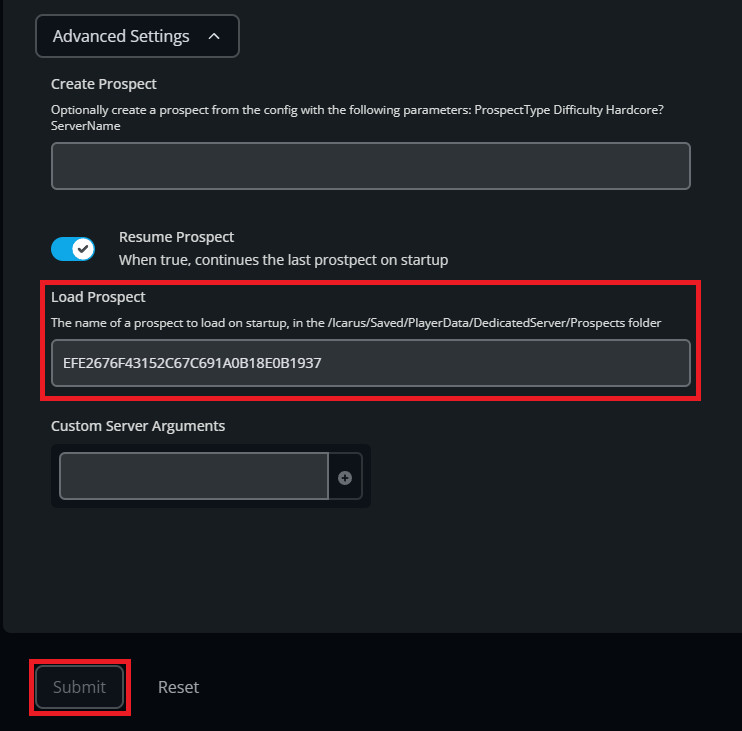 Icarus Dedicated Server Load Prospect Setting in Nodecraft Pro
- Save and Start: Click “Submit” or “Save Changes” to apply the new setting. Then, Start or restart your Icarus server. The server will now load the Prospect you specified in the “Load Prospect” field.
Alternative Method: Manually Editing ServerSettings.ini (Optional)
In situations where you might not have access to a user-friendly control panel like Nodecraft Pro, or if you prefer direct file editing, you can manually configure the Prospect loading by editing the ServerSettings.ini file.
- Locate
ServerSettings.ini: In your Nodecraft Pro Panel (or using FTP), navigate to the directory:/Icarus/Saved/Config/WindowsServer. - Edit the File: Select the
ServerSettings.inifile and choose to “Edit” it. - Find
LoadProspectLine: Look for the line that saysLoadProspect=. If it doesn’t exist, you can add it under the[/Script/Icarus.DedicatedServerSettings]section. - Enter Prospect Name: After the
=sign, enter the name of your Prospect (again, without the.jsonextension). For example:LoadProspect=MyAwesomeProspect. - Save and Restart: Save your changes to the
ServerSettings.inifile and restart your Icarus server.
Important Considerations for a Smooth Transition
- File Integrity is Key: Never rename or modify the contents of your
ProspectName.jsonfile during the migration. Any alteration could lead to corruption and data loss. - Verification is Crucial: After migrating your Prospect, always join your server and verify that your world has loaded correctly. Check for your builds, progress, and ensure everything is as expected.
By meticulously following these steps, you can confidently icarus move game to server, transferring your Icarus Prospect world and continuing your adventure on a dedicated server without losing your valuable progress. Get ready to embark on even grander expeditions with your friends, now hosted on your own dedicated Icarus server!