
Having trouble accessing websites or experiencing slow internet speeds? Changing your DNS server might be the solution. DNS, or Domain Name System, acts like the internet’s phonebook, translating website names (like rental-server.net) into IP addresses computers understand. Sometimes, the default DNS server provided by your internet service provider (ISP) can be slow or unreliable. Switching to a different DNS server can potentially improve your browsing speed and reliability.
This guide will walk you through the steps on how to change your DNS server settings on any Windows computer.
Step-by-Step Guide to Changing DNS Server on Windows
Let’s dive into the process of changing your DNS server on Windows. Follow these straightforward steps:
Step 1: Accessing the Control Panel
Begin by opening the Control Panel. Click on the Windows Start menu (the Windows icon in the bottom-left corner of your screen), type “control panel”, and select the Control Panel application from the search results.
Step 2: Navigating to Network and Sharing Center
In the Control Panel window, find and click on Network and Internet.
Next, click on Network and Sharing Center.
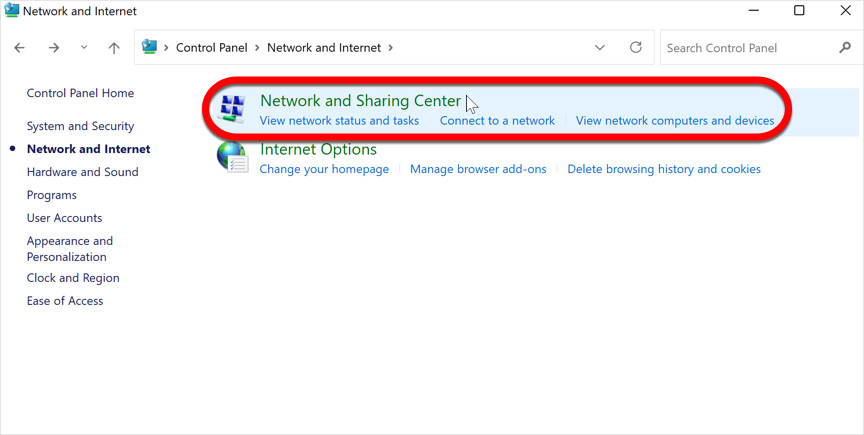 Open Network and Sharing Center in Windows Control Panel
Step 3: Selecting Your Network Connection
Within the Network and Sharing Center, identify your active internet connection. This is usually labeled as either “Wi-Fi” (for wireless connections) or “Ethernet” (for wired connections) and is located on the right side of the window, next to “Connections”. Click on your active connection name.
Step 4: Opening Adapter Properties
A status window for your connection will appear. In this window, click on the Properties button.
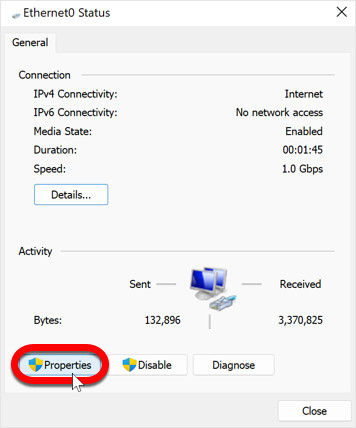 Access Ethernet connection properties to change DNS settings
Step 5: Choosing Internet Protocol Version 4 (TCP/IPv4)
In the connection properties window, you’ll see a list of items. Scroll down and locate Internet Protocol Version 4 (TCP/IPv4). Select it by clicking on it once to highlight it.
Step 6: Accessing IPv4 Properties
With “Internet Protocol Version 4 (TCP/IPv4)” selected, click on the Properties button again. This will open a new window specifically for IPv4 properties.
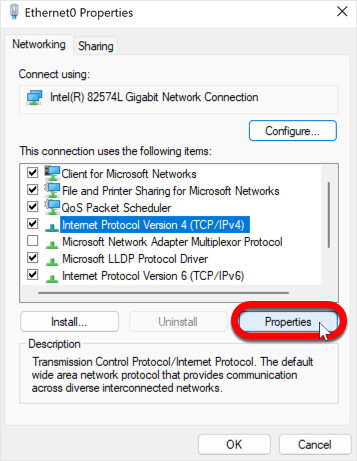 Internet Protocol Version 4 (TCP/IPv4) Properties for DNS configuration
Step 7: Selecting “Use the following DNS server addresses”
In the “Internet Protocol Version 4 (TCP/IPv4) Properties” window, find the section that says “Obtain DNS server address automatically” and “Use the following DNS server addresses”. Click on the radio button next to “Use the following DNS server addresses” to enable manual DNS server configuration.
Step 8: Inputting New DNS Server Addresses
Now you can enter your preferred DNS server addresses. For this example, we will use Google Public DNS, a popular and reliable free DNS service.
In the “Preferred DNS server” field, type: 8.8.8.8
In the “Alternate DNS server” field, type: 8.8.4.4
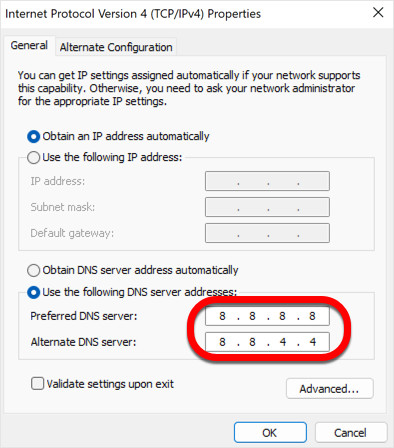 Configure custom DNS server addresses on Windows
You can also use other public DNS servers like Cloudflare (1.1.1.1 and 1.0.0.1) or OpenDNS (208.67.222.222 and 208.67.220.220).
Step 9: Saving Changes
Click the OK button in the “Internet Protocol Version 4 (TCP/IPv4) Properties” window, and then click Close in the connection properties window. This saves your new DNS server settings.
Step 10: Restarting Your Computer
For the DNS changes to take full effect, it’s recommended to restart your computer. Click the Windows Start menu, click the power button, and select Restart.
After your computer restarts, your system will be using the new DNS server you configured.
Why Change Your DNS Server?
Switching your DNS server can offer several benefits:
- Improved Speed: Public DNS servers like Google Public DNS or Cloudflare often have faster response times than default ISP DNS servers, potentially speeding up website loading times.
- Increased Reliability: Using a well-maintained public DNS server can lead to more reliable website access and fewer DNS resolution errors.
- Enhanced Security: Some public DNS servers offer security features like protection against phishing and malware.
- Bypassing Censorship: In some cases, using a public DNS server can help bypass DNS-based internet censorship.
Alternative DNS Server Options
While Google Public DNS is a great option, here are a few other popular and reliable public DNS servers you can consider:
- Cloudflare: Primary:
1.1.1.1, Secondary:1.0.0.1(Known for speed and privacy) - OpenDNS: Primary:
208.67.222.222, Secondary:208.67.220.220(Offers content filtering options)
If you want to revert back to your default ISP DNS server, simply go back to Step 7 and select “Obtain DNS server address automatically”.
Changing your DNS server is a straightforward way to potentially improve your internet experience on Windows. Try it out and see if it makes a difference for you!