
Making a Minecraft LAN server is a fantastic way to enjoy the game with friends and family. This guide from rental-server.net will cover everything you need to know, from setting up the server to troubleshooting common issues. Discover seamless multiplayer Minecraft experiences right here.
1. What is a Minecraft LAN Server and Why Should You Create One?
A Minecraft LAN (Local Area Network) server allows players on the same network to connect and play together without needing an internet connection. This setup is ideal for home networks, parties, or any situation where players are physically close and want a low-latency, private gaming experience.
Creating a Minecraft LAN server offers several benefits:
- Low Latency: Since the server and players are on the same network, latency (ping) is minimal, resulting in a smoother gaming experience.
- Privacy: The server is only accessible to players on your local network, ensuring a private gaming environment.
- Simplicity: Setting up a LAN server is generally simpler than configuring a public server, making it accessible for less tech-savvy users.
- Cost-Effective: No need to pay for hosting services since you’re using your own hardware.
- Control: You have complete control over the server settings, mods, and world configuration.
According to a study by the Entertainment Software Association (ESA), multiplayer gaming is increasingly popular, with a significant portion of gamers preferring to play with friends and family. A LAN server provides an easy and enjoyable way to facilitate this.
2. Understanding the Key Differences: LAN Server vs. Dedicated Server
While both LAN and dedicated servers allow multiplayer Minecraft, they serve different purposes and have distinct characteristics.
| Feature | LAN Server | Dedicated Server |
|---|---|---|
| Accessibility | Local network only | Accessible over the internet |
| Setup | Simpler, uses the in-game “Open to LAN” | More complex, requires server software setup |
| Performance | Limited by host computer’s resources | Scalable, can handle more players and mods |
| Cost | Free (uses existing hardware) | Costs associated with hosting (hardware, fees) |
| Use Case | Small groups, local play | Larger communities, 24/7 availability |
LAN Server: Best for small, private gatherings where players are on the same network. It’s quick to set up and requires no additional cost beyond your existing hardware.
Dedicated Server: Ideal for larger communities that need 24/7 accessibility and can handle more players and mods. This typically involves renting a server from a hosting provider like those listed on rental-server.net, which offers robust performance and scalability.
3. Step-by-Step Guide: How to Set Up a Minecraft LAN Server (Java Edition)
Setting up a Minecraft LAN server in Java Edition is straightforward. Here’s a detailed guide:
3.1. Launch Minecraft and Open Your World
- Start Minecraft: Open the Minecraft Java Edition launcher and launch the game.
- Load Your World: Select “Singleplayer” and load the world you want to share on the LAN server. If you haven’t created a world yet, create a new one.
3.2. Open to LAN Settings
-
Access the Game Menu: Once your world is loaded, press the
Esckey to open the game menu. -
Click “Open to LAN”: In the game menu, you’ll see the “Open to LAN” button. Click it.
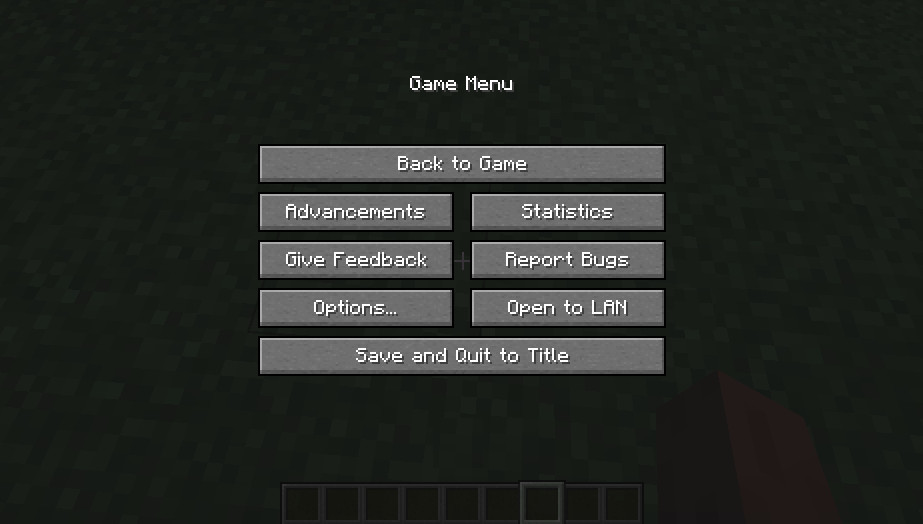 Minecraft Open to LAN Button
3.3. Configure LAN World Settings
-
Game Mode: Choose the game mode for the LAN world. Options include Survival, Creative, Adventure, and Spectator. Select the mode that best suits your group’s preferences.
-
Allow Cheats: Decide whether to enable cheats. If enabled, players can use commands like
/gamemode,/time set, and/give. Enabling cheats can add flexibility and fun but may also disrupt the intended gameplay experience. -
Start LAN World: After configuring the settings, click the “Start LAN World” button.
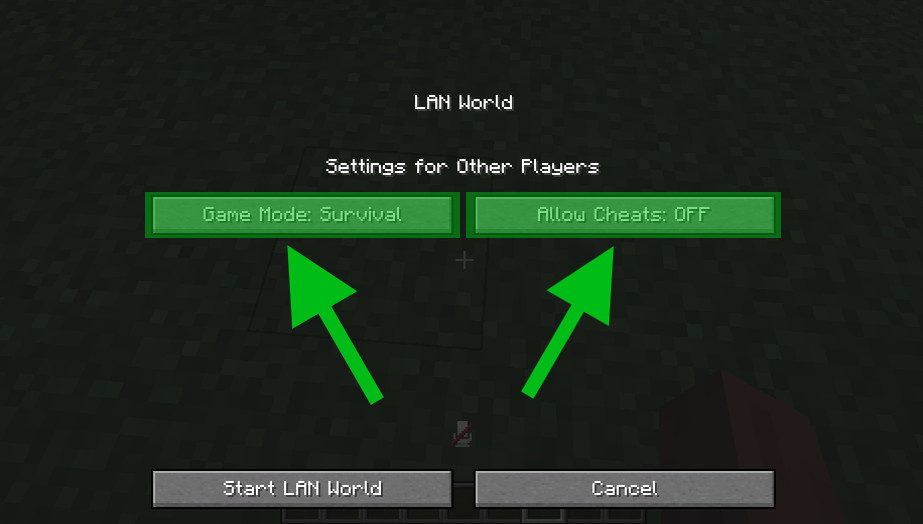 Minecraft LAN World Settings
3.4. Note the Port Number
-
Check the Chat: Once the LAN world is started, a message will appear in the chat, indicating the port number. The message will look something like “Local game hosted on port XXXXX.” Note this port number, as other players will need it to connect.
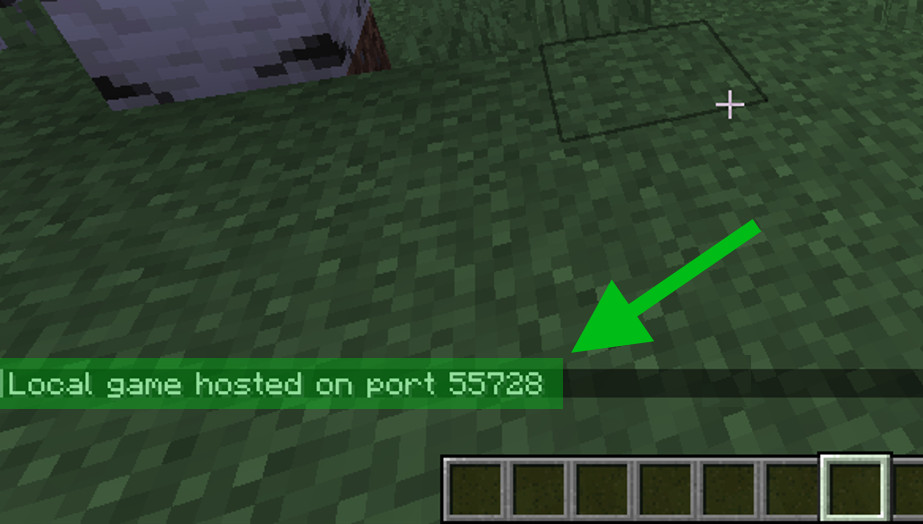 Minecraft LAN World Port Number
Important: The port number changes each time you open the world to LAN, so you’ll need to inform players of the new port each session.
3.5. Finding the Host’s IP Address
-
Open Command Prompt (Windows): On the host computer, press the Windows key, type
cmd, and press Enter to open the Command Prompt. -
Type
ipconfig: In the Command Prompt, typeipconfigand press Enter. -
Find IPv4 Address: Look for the line labeled “IPv4 Address.” The number next to it is the host’s local IP address. It typically looks like
192.168.x.xor10.0.x.x.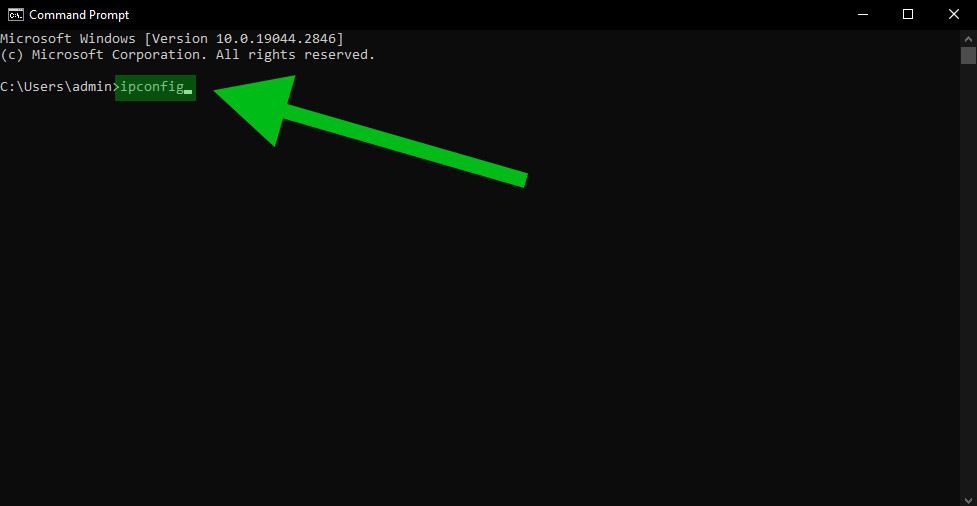 Minecraft LAN World IPv4 Address
3.6. Connecting to the LAN Server
- Launch Minecraft: On each client computer, launch Minecraft Java Edition.
- Go to Multiplayer: Click “Multiplayer” from the main menu.
- Automatic Discovery: If the client is on the same local network as the host, the LAN server should automatically appear in the server list.
- Manual Connection: If the server doesn’t appear, click “Direct Connection” or “Add Server.” Enter the host’s local IP address followed by the port number (e.g.,
192.168.1.100:54321). - Join Server: Click “Join Server” to connect to the LAN world.
4. Step-by-Step Guide: How to Set Up a Minecraft LAN Server (Bedrock Edition)
Setting up a LAN server in Minecraft Bedrock Edition (available on Windows 10, Xbox, PlayStation, Switch, and mobile devices) is slightly different but equally straightforward.
4.1. Ensure LAN Play is Enabled
- Create or Edit World: In the main menu, select “Play.” Create a new world or edit an existing one.
- Multiplayer Settings: In the world settings, scroll down to the “Multiplayer” section.
- LAN Play: Make sure the “Visible to LAN Players” option is enabled. This setting allows other players on your local network to see and join your world.
- Start the World: Once the settings are configured, start the world.
4.2. Connecting to the LAN Server
- Launch Minecraft: On each client device, launch Minecraft Bedrock Edition.
- Go to Play: Click “Play” from the main menu.
- Friends Tab: Navigate to the “Friends” tab.
- LAN Games: Under the “LAN Games” section, you should see the LAN world hosted by the other player.
- Join Game: Click on the LAN world to join the game.
4.3. Troubleshooting Bedrock Edition LAN Connectivity
- Firewall: Ensure that the Windows Firewall or any other firewall on the host computer isn’t blocking Minecraft.
- Microsoft Account: All players must be logged into their Microsoft accounts.
- Same Version: Ensure all players are running the same version of Minecraft Bedrock Edition.
5. Advanced Techniques: Using VPNs for Minecraft LAN Over the Internet
Sometimes, you might want to play Minecraft with friends who aren’t on the same local network. In these cases, you can use a Virtual Private Network (VPN) to simulate a LAN environment over the internet.
5.1. Popular VPN Solutions for Minecraft
- Hamachi: A popular and easy-to-use VPN solution specifically designed for gaming.
- Radmin VPN: Another user-friendly VPN that allows you to create a secure network between computers.
- ZeroTier: A more advanced VPN solution that offers greater flexibility and control.
5.2. Setting Up Hamachi for Minecraft LAN
- Download and Install Hamachi: Download Hamachi from the official website (https://www.vpn.net/) and install it on all computers that will be participating in the LAN game.
- Create a Network: On the host computer, open Hamachi and click “Create a new network.” Give the network a name and set a password.
- Join the Network: On each client computer, open Hamachi and click “Join an existing network.” Enter the network name and password provided by the host.
- Find the Host’s Hamachi IP: In Hamachi, the host computer will have an IP address assigned by Hamachi. This IP address will be used by the other players to connect to the server.
- Connect to the Server: In Minecraft, use the Hamachi IP address of the host computer, followed by the port number, to connect to the LAN server (e.g.,
25.123.45.678:54321).
5.3. Setting Up Radmin VPN for Minecraft LAN
- Download and Install Radmin VPN: Download Radmin VPN from the official website (https://www.radmin-vpn.com/) and install it on all computers.
- Create a Network: On the host computer, open Radmin VPN and click “Create network.” Give the network a name and set a password.
- Join the Network: On each client computer, open Radmin VPN and click “Join network.” Enter the network name and password provided by the host.
- Find the Host’s Radmin VPN IP: In Radmin VPN, the host computer will have an IP address assigned by Radmin VPN.
- Connect to the Server: In Minecraft, use the Radmin VPN IP address of the host computer, followed by the port number, to connect to the LAN server (e.g.,
10.123.45.67:54321).
5.4. Security Considerations When Using VPNs
While VPNs can be useful for playing Minecraft over the internet, it’s important to be aware of the security implications:
- Trust the VPN Provider: Choose a reputable VPN provider with a strong track record of security and privacy.
- Secure Network: Use a strong password for your VPN network to prevent unauthorized access.
- Firewall: Ensure your firewall is properly configured to protect your computer from potential threats.
6. Troubleshooting Common Minecraft LAN Server Issues
Even with careful setup, you might encounter issues when setting up a Minecraft LAN server. Here are some common problems and how to fix them:
6.1. Server Not Showing Up in Multiplayer List
- Solution: Manually add the server using the host’s IP address and port number. Ensure that the IP address and port number are entered correctly.
6.2. Unable to Connect to the Server
- Solution:
- Firewall: Check the host computer’s firewall settings to ensure that Minecraft and Java (for Java Edition) are allowed through the firewall.
- Same Network: Verify that all computers are connected to the same local network.
- IP Address: Double-check the IP address and port number.
- Minecraft Version: Ensure all players are using the same version of Minecraft.
6.3. Lag and Performance Issues
- Solution:
- Host Computer: The host computer’s hardware may be insufficient to run the server and the game simultaneously. Try reducing the graphics settings on the host computer or upgrading the hardware.
- Network Congestion: Other devices on the network may be consuming bandwidth. Close unnecessary applications and devices to reduce network congestion.
- Distance: For VPN connections, distance between players can affect latency.
6.4. Authentication Issues
- Solution:
- Minecraft Account: Ensure all players have a valid Minecraft account and are logged in.
- Offline Mode: If playing in offline mode, ensure that the
online-modesetting in theserver.propertiesfile is set tofalse(only applicable to dedicated servers).
7. Enhancing Your Minecraft LAN Server Experience
To make your Minecraft LAN server even more enjoyable, consider these enhancements:
7.1. Installing Mods
Mods can add new features, items, and gameplay mechanics to Minecraft. To install mods on a LAN server, you’ll typically need to use a mod loader like Forge (for Java Edition).
- Install Forge: Download and install the recommended version of Forge for your Minecraft version from the official Forge website (https://files.minecraftforge.net/).
- Install Mods: Place the mod files (usually
.jarfiles) into themodsfolder in your Minecraft directory. - Launch Minecraft with Forge: Launch Minecraft using the Forge profile.
- Share Mods: Ensure all players have the same mods installed.
7.2. Using Custom Maps
Custom maps can provide unique and exciting adventures for your players.
- Download a Map: Download a custom map from a reputable source.
- Locate the Saves Folder: Find your Minecraft
savesfolder.- Windows:
%appdata%.minecraftsaves - macOS:
~/Library/Application Support/minecraft/saves
- Windows:
- Extract the Map: Extract the downloaded map folder into the
savesfolder. - Select the Map: In Minecraft, select the custom map from the “Singleplayer” menu, then open it to LAN as described earlier.
7.3. Implementing Server Commands
Server commands can help you manage the game and customize the experience. To use server commands, you’ll need to enable cheats when opening the world to LAN. Some useful commands include:
/gamemode <mode> [player]: Changes the game mode for a player./time set <time>: Sets the time of day./give <player> <item> [count]: Gives an item to a player./tp <player> <x> <y> <z>: Teleports a player to specific coordinates.
8. Exploring Minecraft Server Hosting Options on Rental-Server.Net
While LAN servers are great for local play, they may not be suitable for larger communities or 24/7 accessibility. In these cases, consider renting a dedicated Minecraft server from a hosting provider.
rental-server.net offers a variety of Minecraft server hosting options to suit different needs and budgets. Here’s an overview of what you can expect:
8.1. Types of Minecraft Server Hosting
- Dedicated Server: Provides the highest level of performance and control. You have exclusive access to the server’s resources, making it ideal for large communities with heavy mod usage.
- VPS (Virtual Private Server): A more affordable option that still offers good performance and control. You share the server’s resources with other users, but your instance is isolated.
- Shared Hosting: The most budget-friendly option, but it offers the least control and performance. Suitable for small communities with minimal mod usage.
8.2. Key Features to Look For
- Uptime Guarantee: Ensures that your server is available for a specified percentage of the time.
- DDoS Protection: Protects your server from distributed denial-of-service attacks.
- Mod Support: Allows you to easily install and manage mods.
- Customer Support: Provides assistance with any issues you may encounter.
- Scalability: Allows you to easily upgrade your server’s resources as your community grows.
8.3. Why Choose Rental-Server.Net?
rental-server.net stands out as a reliable choice for Minecraft server hosting in the USA, especially in data center-rich states like Virginia. Here’s why:
- Variety of Options: Whether you need a dedicated server for maximum performance or a budget-friendly VPS, rental-server.net has options to fit your needs.
- Competitive Pricing: Get the best value for your money with transparent and competitive pricing plans.
- Excellent Customer Support: Access responsive and knowledgeable customer support to help you with any issues.
- High Uptime: Ensure your server is always available with a high uptime guarantee.
- Easy Scalability: Easily scale your server resources as your player base grows, ensuring smooth performance.
8.4. Real-World Example: Server Performance in Virginia
Virginia is a prime location for data centers due to its robust infrastructure and connectivity. According to data from the Uptime Institute, data centers in Virginia consistently achieve high uptime rates, often exceeding 99.99%. This translates to minimal downtime for your Minecraft server, providing a seamless gaming experience for your players.
Consider a scenario where a gaming community in Virginia chooses a dedicated server from rental-server.net. The server is hosted in a local data center, ensuring low latency and high performance. With features like DDoS protection and mod support, the community can enjoy a lag-free and secure gaming environment.
9. Minecraft LAN Server FAQs
Here are some frequently asked questions about Minecraft LAN servers:
9.1. Can I play Minecraft LAN with different versions of the game?
No, all players must use the same version of Minecraft to connect to a LAN server.
9.2. How many players can join a Minecraft LAN server?
The number of players that can join a LAN server depends on the host computer’s hardware and network capabilities. Generally, a LAN server can comfortably support up to 8 players.
9.3. Can I use mods on a Minecraft LAN server?
Yes, you can use mods on a Minecraft LAN server, but all players must have the same mods installed.
9.4. Do I need an internet connection to play on a Minecraft LAN server?
No, you only need a local network connection. However, if you’re using a VPN to play with friends over the internet, you’ll need an internet connection.
9.5. Why can’t my friends see my LAN server?
Make sure that all computers are connected to the same local network and that the host computer’s firewall isn’t blocking Minecraft.
9.6. How do I find my local IP address?
On Windows, open the Command Prompt and type ipconfig. Look for the line labeled “IPv4 Address.”
9.7. What is the default port for Minecraft LAN?
There is no default port. The port number is randomly assigned each time you open the world to LAN and is displayed in the chat.
9.8. Can I host a LAN server and play the game on the same computer?
Yes, but it may impact performance, especially if your computer’s hardware is limited.
9.9. Is it safe to use VPNs for Minecraft LAN?
Yes, but choose a reputable VPN provider and use a strong password for your VPN network.
9.10. How do I update my Minecraft server?
For LAN servers, simply update your Minecraft client to the latest version. For dedicated servers, follow the instructions provided by your hosting provider.
10. Conclusion: Start Your Minecraft Adventure Today
Creating a Minecraft LAN server is a rewarding experience that allows you to enjoy the game with friends and family in a private, low-latency environment. Whether you’re setting up a quick game night or exploring advanced techniques with VPNs and mods, the possibilities are endless.
Remember, for those looking to expand their Minecraft experience beyond the local network, rental-server.net offers a variety of reliable and scalable server hosting options. From dedicated servers to VPS solutions, they have everything you need to create a thriving Minecraft community.
Ready to take your Minecraft adventure to the next level? Visit rental-server.net today to explore their hosting options and find the perfect solution for your needs. With competitive pricing, excellent customer support, and high uptime guarantees, you can’t go wrong.
Address: 21710 Ashbrook Place, Suite 100, Ashburn, VA 20147, United States
Phone: +1 (703) 435-2000
Website: rental-server.net
Don’t wait, start building your ultimate Minecraft world today!