Minecraft, the ever-popular sandbox game, thrives on creativity and community. One of the most exciting aspects of Minecraft is the ability to explore, build, and adventure with friends in a shared world. To unlock this multiplayer experience, setting up your own Minecraft server is key.
While Minecraft offers official Realms and server hosting services are readily available, you might be surprised to learn that you can create your very own Minecraft server completely for free, right on your own computer. This guide will walk you through the steps to easily set up a free Minecraft server, allowing you and your friends to dive into your personalized Minecraft universe today!
Important Note: Before we begin, please be aware that setting up a server involves some technical steps, and certain aspects, particularly port forwarding, can present security considerations. It’s highly recommended to have a parent or guardian assist you, especially when dealing with network settings, and to avoid downloading any unnecessary software during this process.
Understanding What a Minecraft Server Is
At its core, a Minecraft server is a dedicated platform that hosts a Minecraft world, allowing multiple players to connect and play together simultaneously within that same virtual space. Think of it as your personal digital playground. By running your own server, you gain the power to shape your Minecraft experience from the ground up. You’re in control of everything from game rules and world settings to managing players and implementing server commands.
Is Running a Free Minecraft Server Truly Possible?
Absolutely! You can indeed host a free multiplayer Minecraft server on your own computer, perfect for you and your close circle of friends. The method we’ll explore utilizes Java and your computer’s resources to create this server environment. To enable your friends to join, you’ll need to configure port forwarding on your router and share your IP address with them (it’s crucial to only share this information with people you trust). The fantastic part about this approach is that your only cost is the electricity required to keep your computer running – making it a truly free Minecraft server solution.
Recommended Reading: Explore Free Coding Programs for Kids
 A young gamer immersed in building on a Minecraft server
Step-by-Step Guide: Creating Your Minecraft Server
Let’s get hands-on and build your free Minecraft server. Follow these steps carefully:
Step 1: Installing the Latest Java Version
Our server setup begins with Java.
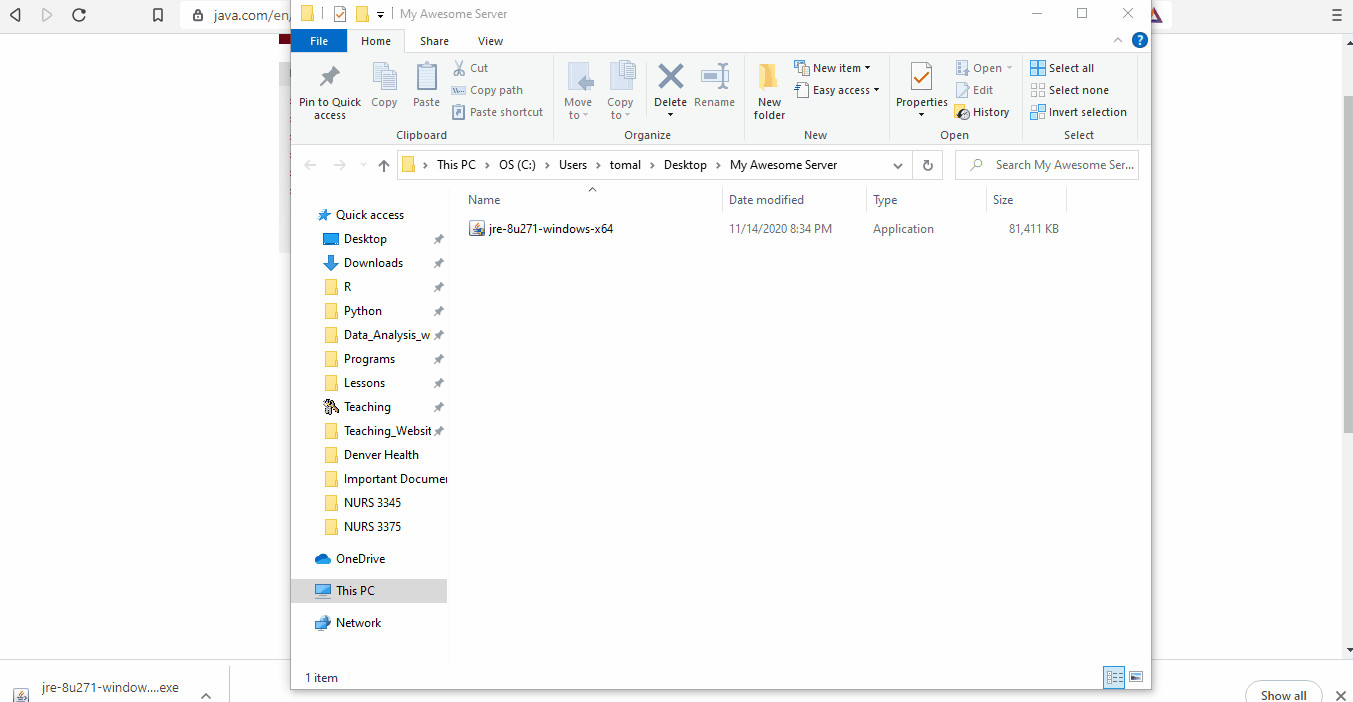
First, organize your server files by creating a dedicated folder. We’ll name ours “Minecraft Server Files” and place it conveniently on the desktop. Here’s how to create a new folder:
- Right-click on an empty area of your desktop.
- Select “New” from the context menu.
- Click “Folder.”
- Name the new folder “Minecraft Server Files”.
 Creating a new folder for Minecraft server files on desktop
Further Learning: Discover Java Classes for Teens
If you don’t have Java installed or need to update to the latest version, head to the official Java download page: https://www.java.com/en/download/. This link intelligently detects your operating system (Windows or Mac) and directs you to the correct download.
- Go to https://www.java.com/en/download/.
- Click the “Download Java” button to initiate the installer download.
- Move the downloaded Java installer file into the “Minecraft Server Files” folder you just created.
- Once the download is complete, double-click the installer file and follow the on-screen instructions to install Java.
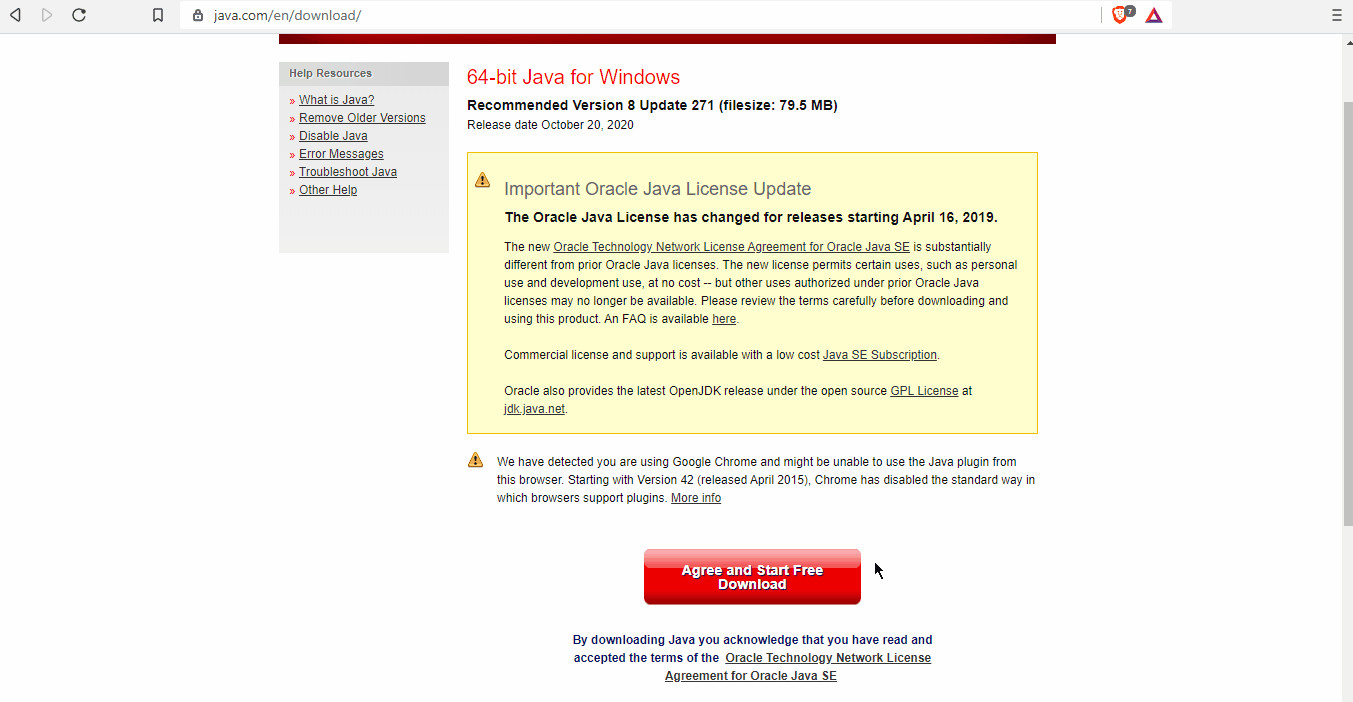 Java download page with download button highlighted
 Running the Java installer
Step 2: Downloading the Server.jar File
With Java ready, the next essential component is the server.jar file, the heart of your Minecraft server.
- Navigate to the official Minecraft server download page: https://www.minecraft.net/en-us/download/server.
- Locate and download the latest version of the Minecraft server software, typically named
minecraft_server.xxxx.jar(where xxxx represents the version number, e.g., 1.20.1). - Save this
server.jarfile directly into your “Minecraft Server Files” folder. - Now, to run the server file, use the following command. You can do this through Command Prompt (Windows) or Terminal (Mac). Open Command Prompt/Terminal, navigate to your “Minecraft Server Files” folder using the
cdcommand (e.g.,cd Desktop/Minecraft Server Files), and then execute:
java -Xmx1024M -Xms1024M -jar minecraft_server.1.20.1.jar noguiNote: The version number in the command should match the version of the server.jar file you downloaded. You might encounter a security warning when downloading or running the .jar file, as it’s an executable archive. Since it’s from the official Minecraft website, it’s safe to proceed.
If prompted to choose a save location, ensure you select the “Minecraft Server Files” folder. If it downloads elsewhere, simply drag and drop or copy and paste the server.jar file into your designated folder.
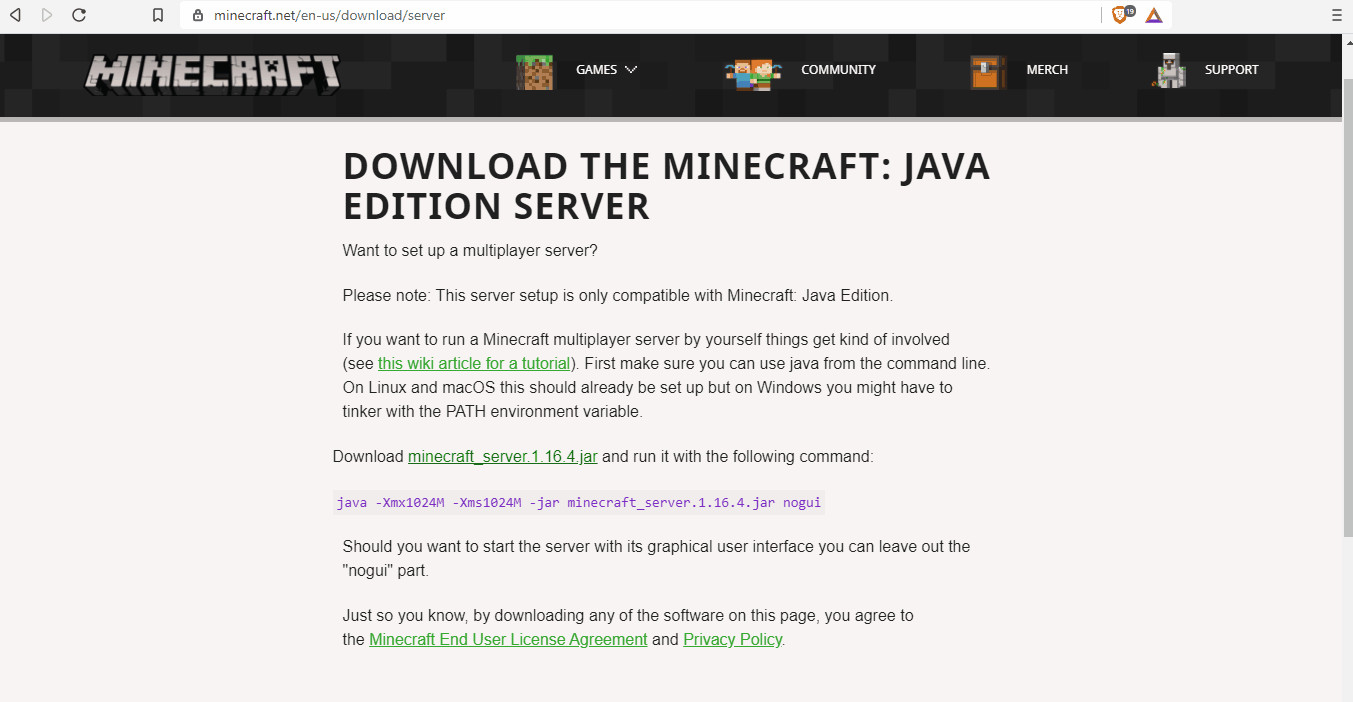 Minecraft server download page with server.jar download link highlighted
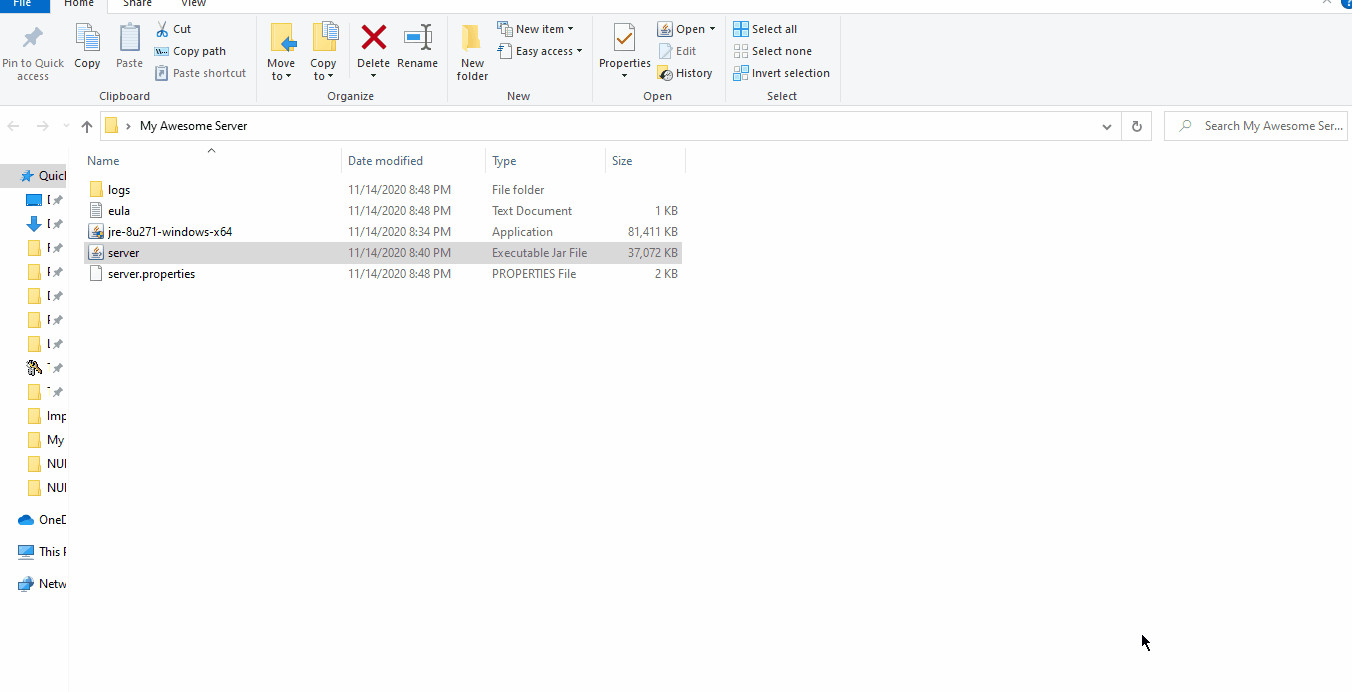
Step 3: Configuring Server Files – EULA Acceptance
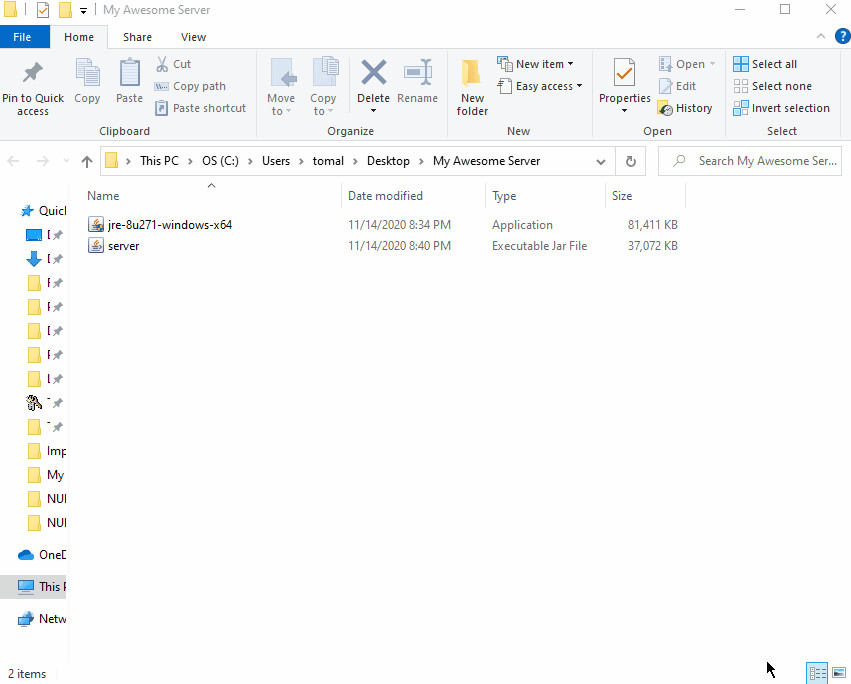
Once you’ve placed the server.jar file in your “Minecraft Server Files” folder, run it by either double-clicking or right-clicking and selecting “Open.” This initial run will automatically generate essential configuration files for your server.
- Open your “Minecraft Server Files” folder.
- Double-click the
server.jarfile (or right-click and select “Open”) to initiate the creation of configuration files. - Locate the
eula.txtfile, which should now be in your folder. Open it with a text editor like Notepad (Windows) or TextEdit (Mac). - Inside
eula.txt, you’ll see a line that readseula=false. Change this toeula=trueto accept the Minecraft End User License Agreement. - Save the modified
eula.txtfile (File > Save or Ctrl+S/Cmd+S).
Accepting the EULA is crucial; otherwise, your server will shut down immediately upon starting.
 Editing the EULA.txt file to accept the Minecraft End User License Agreement
Step 4: Launching Your Minecraft Server
Now, you’re ready to fire up your Minecraft server!
- Double-click the
server.jarfile again.
This time, double-clicking server.jar will launch your Minecraft server. You’ll see a console window appear, displaying server initialization processes and logs. Let it run – this window is your server control panel.
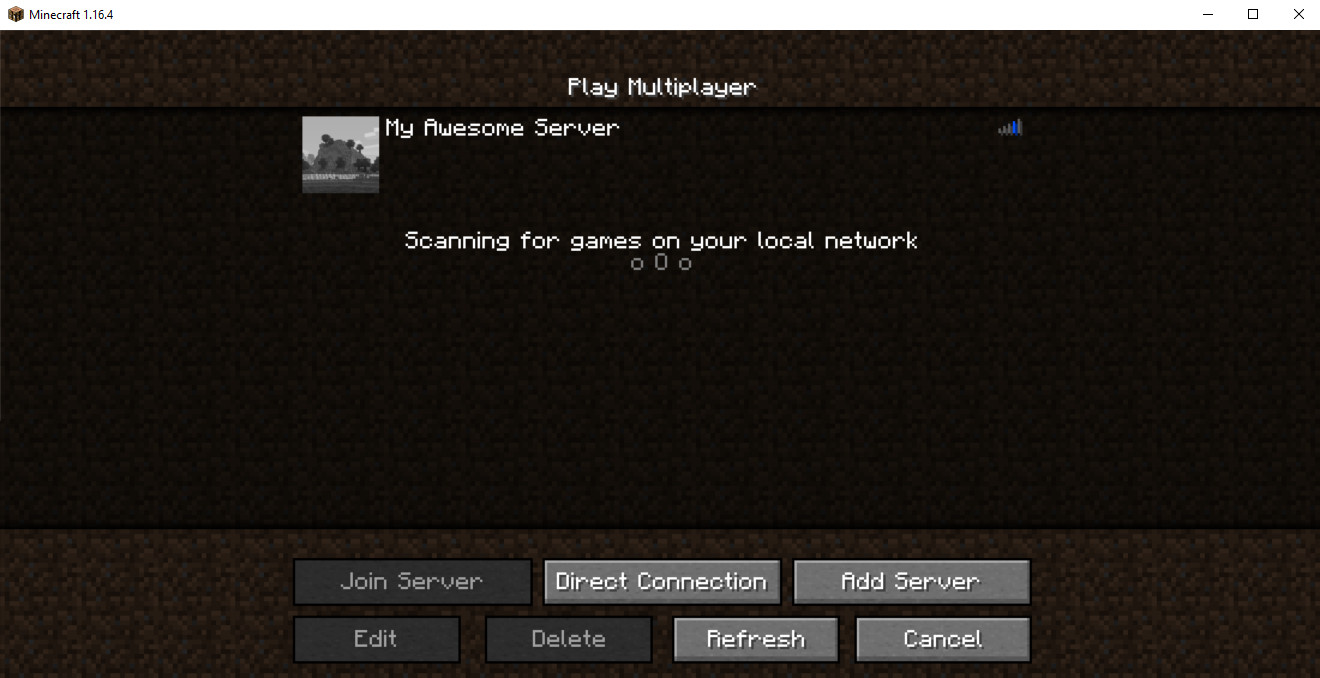
If your goal is simply to play Minecraft with friends on the same home network, you’ve essentially completed the server setup!
For players on the same network: Launch Minecraft, navigate to the “Multiplayer” tab, and your server should automatically appear in the server list. Ensure everyone is using the same Minecraft version (Java Edition or Bedrock Edition) and the same game version.
 Minecraft multiplayer server list showing a local server
Server Console Window Explained:
The server console window provides real-time insights and control over your Minecraft server:
- Stats Panel: Monitors server resource usage, including memory.
- Players Panel: Lists players currently connected to the server.
- Log and Chat Panel: Displays server messages, events, and in-game player chat.
- Command Field: Located at the bottom, allows you to type and execute server commands (e.g.,
/stopto shut down the server,/op [playername]to grant operator privileges).
To enable friends from different internet connections to join, proceed to the next step:
Step 5: Setting Up Port Forwarding on Your Router
Warning: This is the most technically complex step and carries potential security risks. Parental supervision is strongly advised for this section. Do not download any unfamiliar software.
Port forwarding is necessary to allow players outside your home network to connect to your server. This process varies significantly depending on your router model.
Here’s a general outline, using an Xfinity router as an example. You’ll likely need to adapt these steps to your specific router:
- Identify your Router’s Make and Model: Look for this information on the router itself (usually a sticker on the bottom or back).
- Search for Router-Specific Port Forwarding Instructions: Google “How to Port Forward [Your Router Make and Model]”.
- Access Your Router’s Settings: Typically, you access router settings through a web browser by typing its IP address (often
192.168.1.1or192.168.0.1) into the address bar. You may need your router’s username and password (often found on the router itself or in your router documentation). - Locate the Port Forwarding Section: Router interfaces vary, but look for sections labeled “Port Forwarding,” “NAT Forwarding,” “Virtual Servers,” or similar.
- Create a New Port Forwarding Rule:
- Service Name/Description: Minecraft Server (or anything descriptive).
- Port Range:
25565(Minecraft’s default port). Set both external and internal port to25565. - Protocol: TCP/UDP or Both.
- Internal IP Address/Device IP: This is the IP address of the computer running your Minecraft server on your local network. You can find this by opening Command Prompt/Terminal on the server computer and typing
ipconfig(Windows) orifconfig(Mac) and looking for your network adapter’s IPv4 address. - Enable: Make sure the rule is enabled.
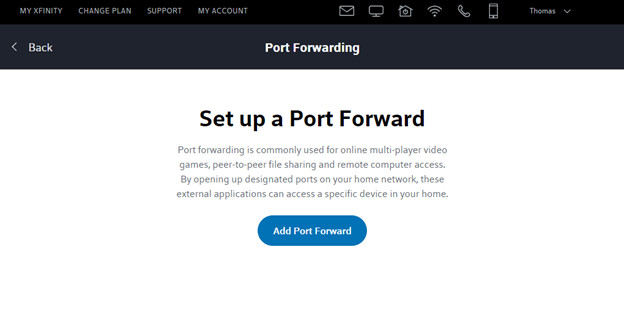 Xfinity router port forwarding configuration page example
Crucially, use port number 25565. Minecraft uses this specific port.
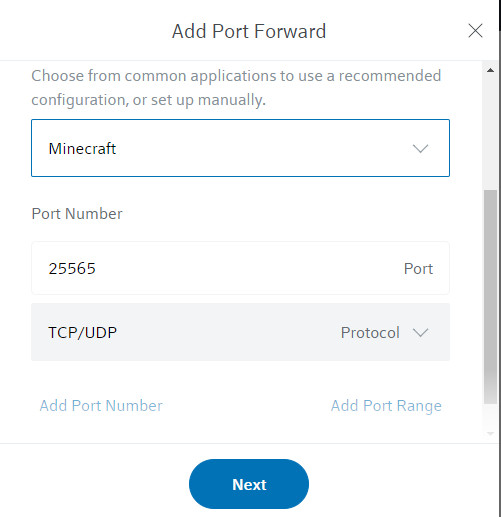 Xfinity router port forwarding settings with Minecraft pre-configured option
Sharing Your Server IP Address:
- Find Your Public IP Address: Google “What’s my IP address” – the result is your public IP address.
- Share Your IP Address with Friends: Provide your public IP address to your trusted friends who want to join your server.
Important Security Reminder: Never share your public IP address with anyone you don’t trust. Treat it as sensitive information.
Your friends can now add your server to their Minecraft game. In Minecraft, they click “Multiplayer,” then “Add Server.” They can name the server anything and enter your public IP address as the server address. They may or may not need to append :25565 to the IP address; advise them to try without it first, and if it fails, try adding :25565 at the end.
Alt text: Screenshot of the Minecraft “Add Server” interface, where players input server details like name and IP address to connect to a remote Minecraft server.
 Minecraft server list showing a newly added server ready to join
Step 6: Customizing Your Minecraft Server with Server Properties
Personalize your Minecraft server by editing the server.properties file.
- Locate the
server.propertiesfile in your “Minecraft Server Files” folder. - Right-click the file, select “Open with,” and choose a text editor like Notepad (Windows) or TextEdit (Mac).
- Edit the properties as desired and save the file (File > Save or Ctrl+S/Cmd+S).
The server.properties file contains numerous settings to customize your server environment. A comprehensive list of server properties and their descriptions is available on the Minecraft Wiki: https://minecraft.gamepedia.com/Server.properties.
Here are some commonly modified properties:
difficulty: Sets the game difficulty. Values:peaceful,easy,normal,hard(or integers0,1,2,3).hardcore: Enables hardcore mode (true/false). In hardcore, death results in spectator mode.level-seed: Specify a world seed for a specific world generation. Leave blank for a random seed.max-players: Sets the maximum player capacity for your server. Adjust based on your computer’s resources.motd: “Message of the Day” – the server description displayed in the server list. Use formatting codes for color and style.pvp: Player versus player combat (true/false).
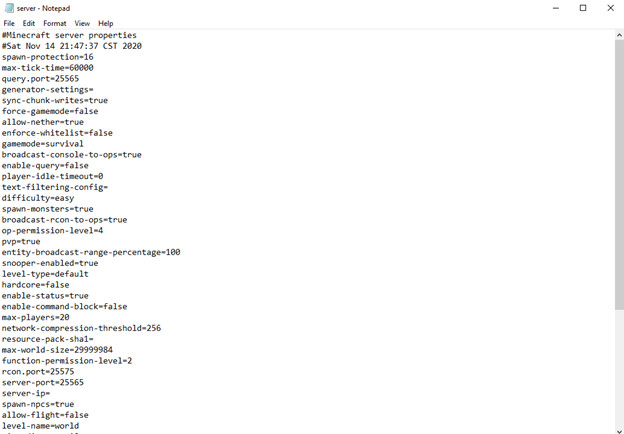 Editing the server.properties file using Notepad
Exploring Minecraft Server Hosting Options
While hosting a free server on your computer is a great option, it’s worth knowing about other Minecraft server options:
1. Minecraft Server Hosting (Paid)
- Renting a Server: Services like Apex Hosting or Hostinger offer dedicated Minecraft server hosting. They handle server setup and maintenance for a monthly fee (starting around $5). This is a hassle-free solution, especially for larger or more complex servers. Learn more about Minecraft server hosting services.
2. Minecraft Realms (Official Paid Service)
- Minecraft Realms: An official subscription service from Minecraft, Realms provides simple, private servers for up to 2-3 players.
- Realms Plus: Expands on Realms, supporting up to 11 players and including access to Minecraft Marketplace content. Realms are always online and easy to manage, ideal for smaller, private groups.
3. Self-Hosted Minecraft Server (Free – This Guide)
- Your Own Server: As detailed in this guide, running the server on your own computer is free (excluding electricity costs) and gives you maximum control. It’s best for smaller groups of friends and those comfortable with some technical setup.
*Further Exploration: Discover Free Coding Programs for Kids*
Key Considerations Before Hosting Your Own Minecraft Server
Before committing to hosting your own server, weigh these benefits and drawbacks:
Advantages of Self-Hosting a Minecraft Server
- Full Control: Complete administrative control over all server aspects, settings, and modifications. You dictate the server’s direction and can make changes instantly.
- Performance Customization: Upgrade your server’s performance by upgrading your computer’s hardware (RAM, processor, graphics card). Self-hosting allows for high-spec servers if you have the hardware.
- Learning Opportunity: Setting up a server is a valuable learning experience in networking, server configuration, and basic command-line operations.
- Cost-Effective: Avoid monthly hosting fees. Your only expense is the electricity to run your computer.
Disadvantages of Self-Hosting a Minecraft Server
- Hardware Requirements: Requires a computer meeting minimum specifications (Windows 7 or macOS 10.4 or higher). Chromebook hosting is possible but more advanced.
- Internet and Router Access: Needs a stable, always-on internet connection and access to your router for port forwarding.
- Performance Limits: Server performance is directly tied to your computer’s capabilities and internet connection. More players and mods demand more resources. Vanilla servers with few players can run on modest hardware. Modded servers or servers with many players need significantly more RAM and processing power.
- Dedicated Computer: Ideally, the server computer should be dedicated to running the server for optimal performance, meaning you can’t heavily use it for other tasks while the server is active.
- Technical Responsibility: You are solely responsible for server maintenance, troubleshooting, security, and player management.
- Setup Complexity: Involves network configuration, port forwarding, and potentially command-line interaction, which can be challenging for beginners.
- Security Risks: Port forwarding can expose your network to security vulnerabilities like DDoS attacks if not handled carefully. Sharing your IP address carries privacy risks. Exercise caution and follow security best practices.
Expanding Your Minecraft Knowledge
To further enhance your Minecraft experience and server management skills, explore these resources:
Enjoy Your Personalized Multiplayer Minecraft Server!
With your own Minecraft server, the possibilities are vast. Customize game settings, create whitelists, install mods, and allocate server memory to optimize performance. Start small, experiment, and let your creativity guide you.
Always remember to protect your privacy: avoid publicly sharing your IP address and only share it with trusted friends.
Interested in learning to code games like Minecraft?
Explore our engaging coding classes and immersive Minecraft coding camps to elevate your gaming and tech skills.
Have fun building, exploring, and creating unforgettable adventures on your new Minecraft server!