
Proxy servers act as intermediaries between your computer and the internet, often used to enhance privacy or bypass geographical restrictions. While proxies can be useful in certain situations, they may sometimes interfere with your internet connection or conflict with VPN services like ExpressVPN. If you’re experiencing connectivity issues or simply want to disable your proxy settings in Google Chrome, this guide will walk you through the process step-by-step on both Windows and Mac operating systems.
If you are using a VPN such as ExpressVPN, running a separate proxy server is generally unnecessary and can sometimes lead to conflicts. In cases where you are troubleshooting internet connectivity, disabling your proxy server is a good first step to ensure it’s not the source of the problem.
Note: Disabling your proxy server using these steps will not resolve issues related to accessing online streaming services that detect VPNs or proxies. If you encounter such problems while using a VPN, it’s best to contact your VPN provider’s support team for specific assistance.
Disabling Proxy Settings in Chrome on Windows
Turning off your proxy server in Chrome on a Windows machine involves adjusting your computer’s system settings through the Chrome browser. Here’s how to do it:
-
Access the Chrome Menu: Locate and click the three vertical dots, known as the Chrome Menu, usually positioned at the top-right corner of your Chrome browser window.
-
Navigate to Settings: From the dropdown menu, select Settings. This action will open the Chrome settings page in a new tab.
-
Open System Settings: On the left-hand sidebar of the Settings page, scroll down and click on System. This section manages your browser’s system-level settings.
-
Access Proxy Settings: Within the System settings, you will find an option labeled Open your computer’s proxy settings. Click this option. It will open the Internet Properties window directly to the Connections tab or the Network & Internet settings in newer Windows versions, where proxy settings are configured.
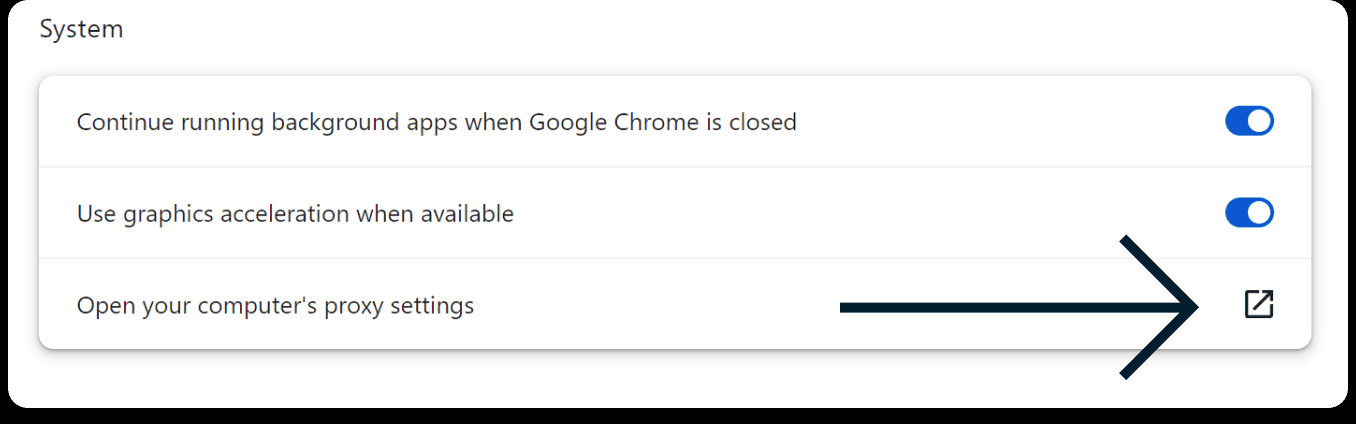 Open Computer Proxy Settings Button: Click to access system proxy configurations in Windows and Mac
 -
Disable Automatic Proxy Setup: In the Proxy settings window, look for the Automatic proxy setup section. If the Automatically detect settings option is toggled On, switch it Off. This setting, if enabled, automatically configures proxy settings, which we want to disable.
-
Disable Manual Proxy Setup: Next, find the Manual proxy setup section. If the Use a proxy server option is toggled On, switch it Off. This is the setting that enables a manual proxy server. By toggling it off, you are disabling the proxy server.
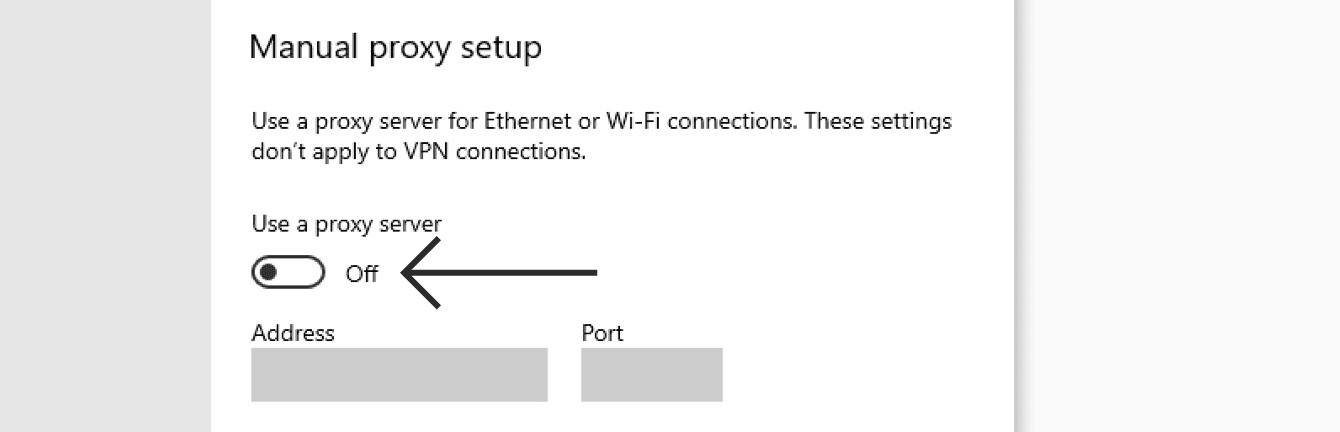 Manual Proxy Setup in Windows: Toggle off 'Use a proxy server' to disable manual proxy settings
 -
Save Changes: Click Save to apply your new settings. You might need to close and restart Chrome for the changes to fully take effect.
After completing these steps, your proxy server should be disabled in Chrome on your Windows system. Try browsing the internet to check if the issue is resolved.
Turning Off Proxy Settings in Chrome on Mac
Disabling a proxy server in Chrome on macOS is also a straightforward process, utilizing your Mac’s network settings. Here’s how to do it:
-
Open Chrome Settings via Menu: Click on the Chrome Menu in the browser toolbar, located at the top-right corner, and select Settings.
-
Access System Settings in Chrome: In the Chrome settings menu, navigate to the System section, usually found on the left sidebar.
-
Open Mac Proxy Settings: Click on Open your computer’s proxy settings within the System settings. This action will directly open the Network settings window of your macOS.
-
Navigate to the Proxies Tab: In the Network settings window, locate and click on the Proxies tab. This tab is specifically dedicated to managing proxy configurations on your Mac.
-
Disable All Proxy Protocols: Within the Proxies tab, you will see a list of proxy protocols such as Web Proxy (HTTP), Secure Web Proxy (HTTPS), SOCKS Proxy, etc. Uncheck all the boxes next to these protocols to disable them. Ensuring all are unchecked effectively turns off any active proxy server.
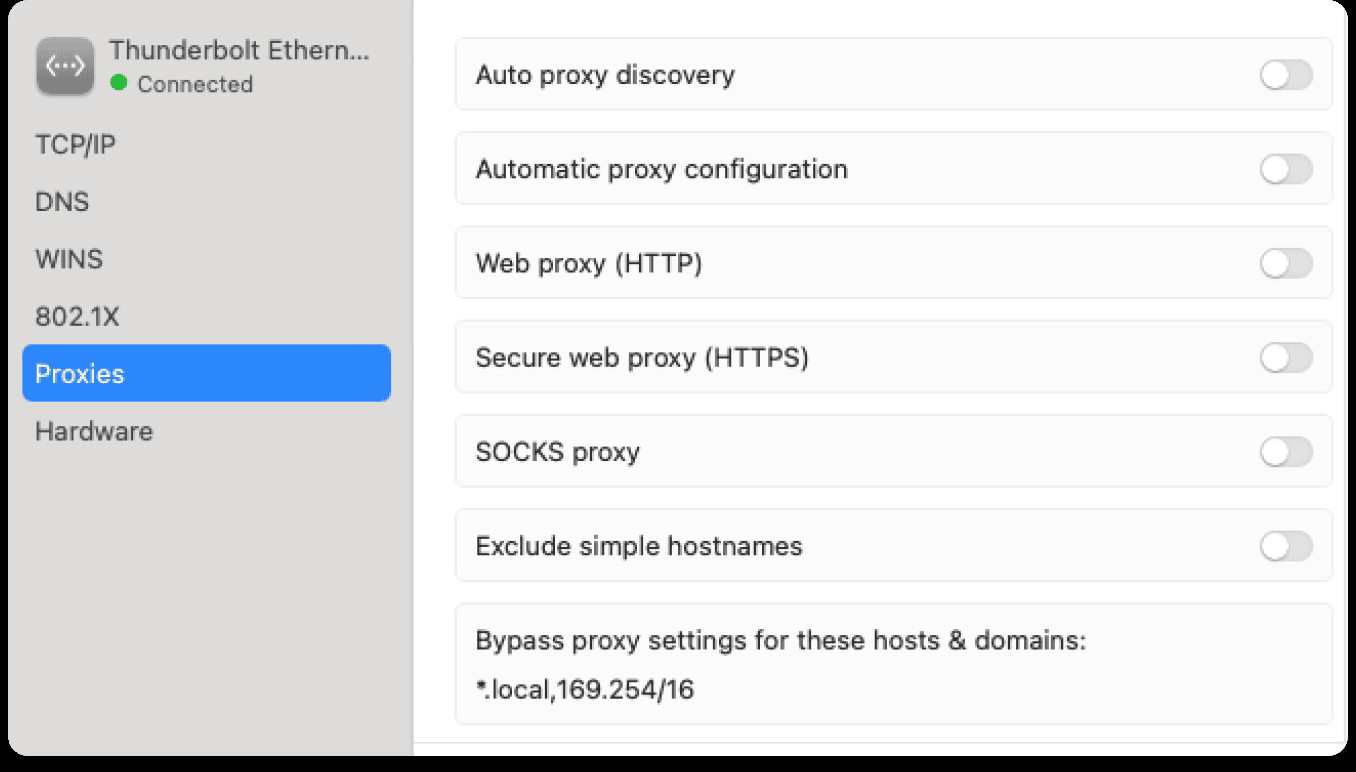 Mac Network Proxy Settings: Disable all proxy protocols in the Network settings Proxies tab
 -
Apply and Close: Click OK to save the changes. You can then close the Network settings window and the Chrome settings tab. Restarting Chrome is advisable to ensure the proxy settings are completely disabled.
By following these steps, you have successfully disabled the proxy server for Chrome on your Mac. Test your internet connection to confirm the proxy is turned off.
Still Having Issues?
If you continue to experience internet connectivity problems or issues accessing specific websites even after disabling your proxy server, the problem might be unrelated to proxy settings. In such cases, consider the following:
- VPN Interference: If you are using a VPN, ensure it is correctly configured or try disconnecting and reconnecting.
- Network Problems: Check your general network connection, router, and modem to rule out any broader internet issues.
- Website Restrictions: Some websites might have geographical or IP-based restrictions that are not related to proxy settings.
For further assistance with VPN related issues, especially with ExpressVPN, it’s recommended to contact the ExpressVPN Support Team directly for expert guidance.