
Are you looking to configure Gmail Smtp Server Settings for your email client, website, or application? You’ve come to the right place. This comprehensive guide will walk you through everything you need to know about setting up Gmail SMTP.
In this article, we’ll cover:
- Understanding Gmail SMTP settings and why you need them.
- Step-by-step instructions on how to configure your Gmail SMTP server.
- Guidance on setting up Gmail POP and IMAP settings for receiving emails.
- Answers to frequently asked questions about SMTP, POP, and IMAP.
Whether you’re a tech novice or a seasoned professional, this guide will provide you with all the information necessary to master Gmail SMTP settings.
Quick Access to Gmail SMTP Settings
For those who are already familiar with SMTP and just need the settings, here they are:
Gmail SMTP Server Settings
SMTP Server Address: smtp.gmail.com
Authentication Required: Yes
Connection Security: TLS/SSL (StartTLS recommended if available)
SMTP Username: Your full Gmail address (e.g., [email protected])
SMTP Password: Your Gmail password (or App Password if 2-Step Verification is enabled)
SMTP Port: 465 (SSL) or 587 (TLS – StartTLS)
For a more detailed explanation and setup instructions, continue reading!
How to Configure Your Gmail SMTP Server Settings
There are several scenarios where you might want to use Gmail’s SMTP server:
- Sending emails from a website or application: Integrate Gmail SMTP to send transactional emails, notifications, or marketing emails directly from your web platform.
- Using a third-party email client: Configure Gmail SMTP in email clients like Outlook, Thunderbird, or Apple Mail to send emails through your Gmail account.
- Setting up SMTP plugins: Utilize Gmail SMTP plugins for platforms like WordPress to improve email deliverability.
The Gmail SMTP server method is widely favored due to its accessibility and cost-effectiveness. Unlike premium SMTP relay services, Gmail SMTP is free to use with your existing Gmail account. It also offers robust security and allows you to send emails to anyone, regardless of their email provider.
Why Use Gmail SMTP Server?
- Cost-Effective: Leverage your existing Gmail account without additional subscription fees.
- Accessibility: Easy to set up and use across various platforms and applications.
- Reliability: Benefit from Google’s robust email infrastructure for improved deliverability.
- Security: Utilize Google’s security measures to protect your email communications.
- Alias Support: Send emails from your Gmail aliases, enhancing privacy and organization.
Gmail Alias Explained:
A Gmail alias is an alternative email address that forwards messages to your primary Gmail inbox. It’s useful for managing different aspects of your life or business while keeping your main email address private. For instance, you could use [email protected] as an alias that directs emails to [email protected].
Let’s dive into the configuration process.
Setting Up Gmail SMTP Server: Step-by-Step
Pre-requisite for 2-Step Verification Users:
If you have 2-Step Verification enabled on your Gmail account and your application doesn’t support verification codes, you’ll need to create an App Password.
What is an App Password?
App Passwords are specifically generated passwords that allow less secure apps or devices to access your Google Account. They bypass the standard 2-Step Verification process for applications that aren’t compatible with it.
If you do not have 2-Step Verification enabled, you can skip to the next section.
a. How to Generate an App Password
Here’s how to create an App Password:
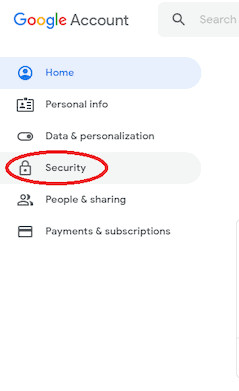
- Go to your Google Account and navigate to Security in the left-hand menu.
 security
-
Under the “Signing in to Google” section, select App Passwords.
If you don’t see “App Passwords,” it could be due to:
- 2-Step Verification is not enabled.
- 2-Step Verification is only using security keys.
- You are using a Google Workspace account managed by an organization.
- Advanced Protection is enabled for your account.
-
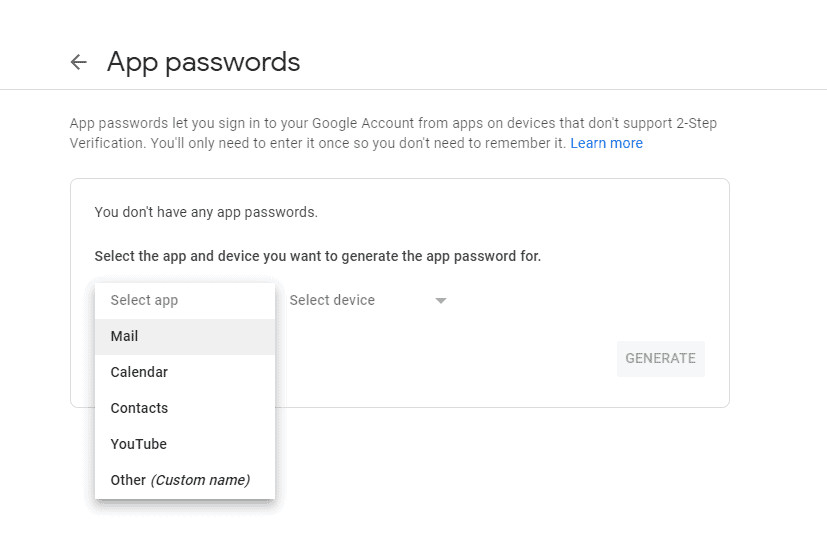
Choose Select app and pick the application you are using (e.g., “Mail,” “Other”).
 app passwords tab
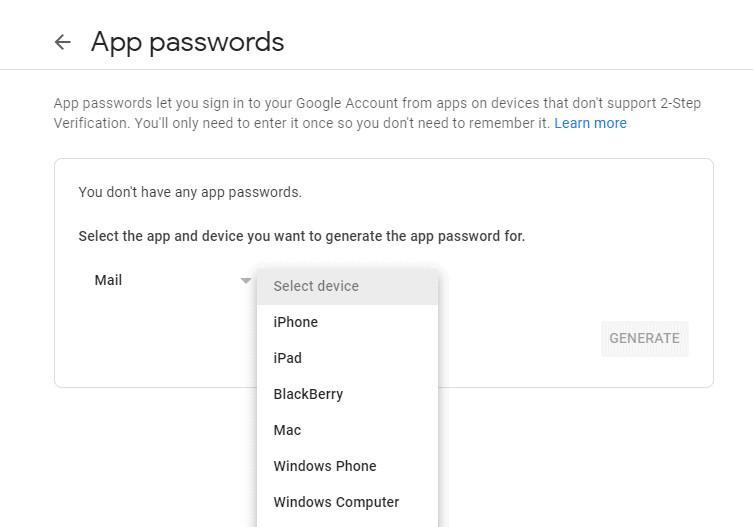
- Select Select device and choose your device (e.g., “Windows Computer,” “iPhone”).
 select device
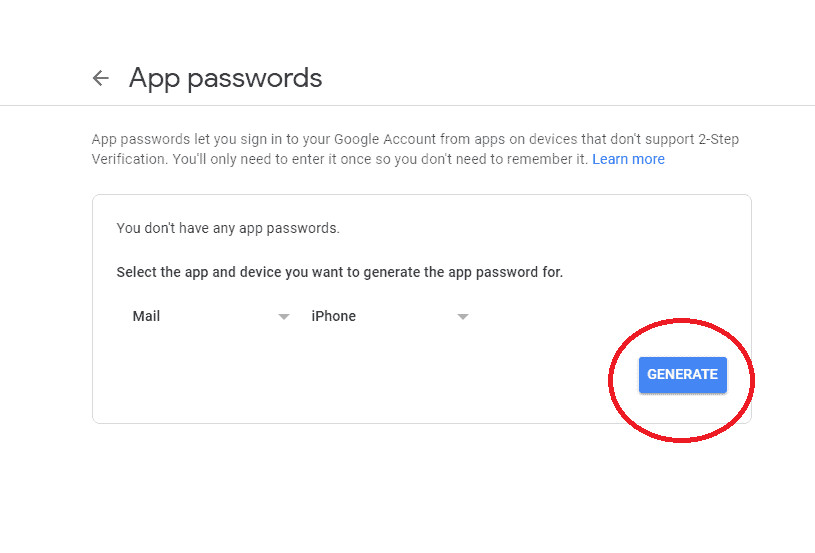
- Click Generate.
 generate button
- Follow the instructions to enter the App Password. The App Password is the 16-character code displayed in the yellow box.
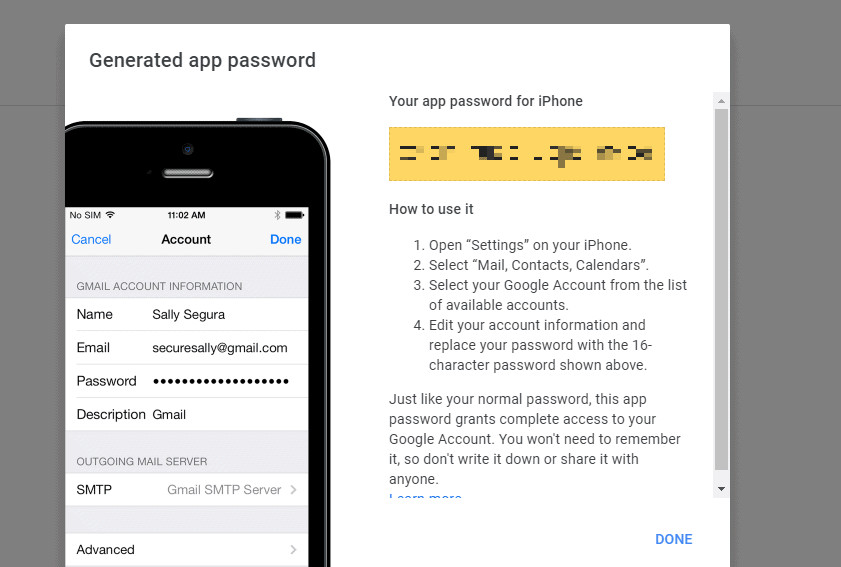 app password bar
- Click Done.
Important Note: You usually only need to use the App Password once when initially connecting your application to your Gmail account.
b. Inputting Gmail SMTP Server Settings
Once you have your App Password (if needed), or if you’re using your regular Gmail password, navigate to the SMTP settings section in your email client, website, or application.
Enter the following Gmail SMTP server settings:
SMTP Server Address: smtp.gmail.com
Authentication: Yes
Secure Connection: TLS/SSL (StartTLS recommended if available)
Gmail SMTP Username: Your full Gmail address (e.g., [email protected])
Gmail SMTP Password: Your Gmail password or the App Password you generated
Gmail SMTP Port: 465 (SSL) or 587 (TLS – StartTLS)
Note: SMTP authentication verifies that your application is authorized to send emails through the Gmail server. In some cases, you might need to verify your domain to enhance email deliverability, especially for bulk emails.
The exact steps to configure SMTP settings will vary depending on the email client or platform you are using. For example, if you are using Microsoft Outlook, you can refer to specific guides on how to configure SMTP settings in Outlook.
SMTP is only for sending outgoing emails. To receive emails in your email client, you need to configure incoming mail server settings using POP or IMAP.
Setting Up Gmail POP and IMAP Settings for Incoming Mail
To receive emails in your email application, you’ll need to set up either POP or IMAP Gmail settings. Here’s how:
A. Configuring IMAP Settings
IMAP (Internet Message Access Protocol) keeps your emails on the server and synchronizes them across multiple devices.
Follow these steps to set up Gmail IMAP:
- Log in to your Gmail account through a web browser and click the Settings gear icon in the top right corner.
![]() settings icon
settings icon
-
Click See all settings and navigate to the Forwarding and POP/IMAP tab.
-
In the “IMAP Access” section, select Enable IMAP and click Save Changes at the bottom.
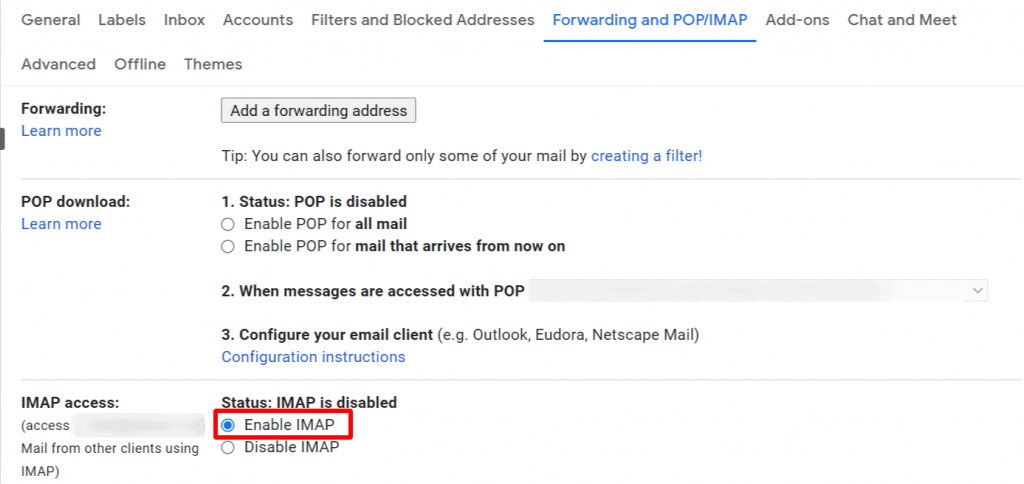 enable imap
- Now, in your email client, enter the following Incoming Mail Server (IMAP) settings:
Incoming Mail Server (IMAP): imap.gmail.com
Security: SSL
Port: 993
Username: Your full Gmail address (e.g., [email protected])
Password: Your Gmail password or App Password
B. Configuring POP Settings
POP (Post Office Protocol) downloads emails from the server to a single device, and by default, often removes them from the server.
Here’s how to set up Gmail POP:
-
Repeat steps 1 and 2 from the IMAP setup above to access the Forwarding and POP/IMAP tab in Gmail settings.
-
In the “POP Download” section, choose either Enable POP for all mail or Enable POP for mail that arrives from now on.
-
Click Save Changes.
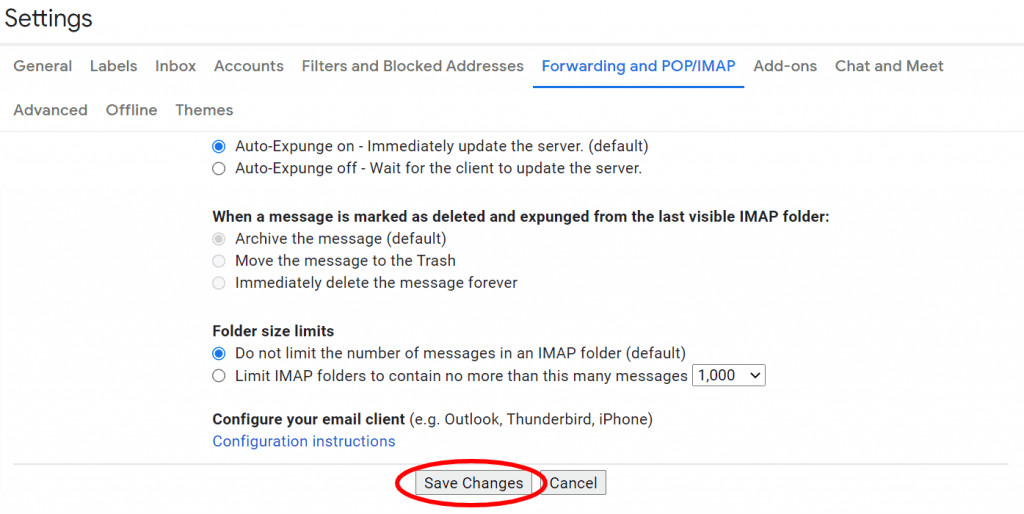 save changes
- In your email client, input these Incoming Mail Server (POP) settings:
Incoming Mail Server (POP): pop.gmail.com
Security: SSL
Port: 995
Server Timeout: Set to more than 1 minute (5 minutes recommended)
Username: Your full Gmail address (e.g., [email protected])
Password: Your Gmail password or App Password
Now that you’ve learned how to set up SMTP, IMAP, and POP, let’s clarify what these email protocols are and their functions.
SMTP, POP, and IMAP: Frequently Asked Questions
This FAQ section will explain SMTP, POP, and IMAP protocols and answer common questions related to them.
1. What is SMTP?
SMTP stands for Simple Mail Transfer Protocol. It is the standard protocol for sending emails across the internet. SMTP facilitates the transfer of emails from your email client or server to the recipient’s email server.
SMTP uses a store and forward process to move emails between servers efficiently. It works with a Mail Transfer Agent (MTA) to route emails to the correct destination. However, SMTP is primarily designed for text-based communication and does not natively support attachments.
To overcome this limitation, the Multipurpose Internet Mail Extension (MIME) protocol is used. MIME encodes non-text data, such as attachments, into text format so they can be transmitted via SMTP.
2. Why Do You Need Gmail SMTP Settings?
Gmail SMTP settings are essential for various scenarios, including:
- Sending Transactional Emails: Dispatching automated emails like order confirmations or password resets directly from your website using Gmail’s server.
- Using SMTP Plugins: Integrating Gmail SMTP with plugins, such as Gmail SMTP plugins for WordPress, to enhance email sending capabilities.
- Configuring Email Clients: Setting up Gmail in third-party email applications like Microsoft Outlook or Thunderbird to send emails through your Gmail account.
SMTP enables your website or email client to interact with Gmail’s servers, ensuring reliable email delivery. For example, utilizing SMTP in WordPress is more dependable than WordPress’s default PHP mail function, which often uses PHPmailer and can have deliverability issues.
What is an API? An API (Application Programming Interface) allows different software applications to communicate and exchange data. In the context of Gmail SMTP, the Gmail API allows your applications to send emails directly through Gmail’s infrastructure.
3. Why Not Use SMTP Relay Service or Restricted Gmail SMTP Server?
There are alternative SMTP methods, but they have limitations:
- SMTP Relay Service (Google Workspace): This service is exclusive to Google Workspace subscribers and requires a paid subscription.
- Restricted Gmail SMTP Server: This method limits email sending to only Google Workspace or Gmail addresses.
These restrictions make the standard Gmail SMTP server method the most versatile and accessible option for most users.
Learn more about SMTP in this detailed guide. (Note: Replace with a relevant link about SMTP if available)
4. What are POP and IMAP?
Since SMTP handles only outgoing emails, POP and IMAP are protocols used for receiving incoming emails. They allow you to access and manage your emails from an email client application.
Here’s a comparison of POP and IMAP:
A. POP (Post Office Protocol)
POP is designed to download emails from the server to your local device. Typically, after downloading, emails are removed from the server (though settings can be adjusted to leave emails on the server). POP is suitable for users who primarily access their email from a single device and want offline access to their emails.
B. IMAP (Internet Message Access Protocol)
IMAP synchronizes emails between the server and multiple devices. Emails remain on the server, allowing you to access them from any device with an internet connection. IMAP is generally preferred for users who use multiple devices to check their email and need consistent access and synchronization across all devices. IMAP is often considered more efficient and versatile than POP3 due to its cloud-based nature.
5. SMTP vs. POP and IMAP: Key Differences
To simplify:
- SMTP: Protocol for sending emails (outgoing mail).
- POP and IMAP: Protocols for receiving emails (incoming mail).
Gmail SMTP Settings: Conclusion
Setting up Gmail SMTP settings is a straightforward process that can significantly enhance your email sending capabilities. By following this guide, you can easily configure Gmail SMTP, POP, and IMAP settings for your various needs.
Whether you’re setting up email for your website, using an email client, or optimizing your email marketing efforts, understanding and utilizing Gmail SMTP settings is a valuable skill.
For those seeking robust and reliable server solutions, consider exploring options at rental-server.net. We offer a range of server solutions tailored to meet your diverse online needs.
Optimize your email communications and ensure seamless email delivery by correctly configuring your Gmail SMTP settings today!
Explore Server Solutions at rental-server.net
Disclaimer: This guide is for informational purposes only. Always ensure you are following security best practices when configuring email settings.