Understanding PACS Servers and OsiriX as a Solution
A PACS, or Picture Archiving and Communication System server, is a crucial component in modern healthcare, acting as a central hub for managing medical images. It’s designed for the secure and efficient storage, retrieval, distribution, and display of medical images, ranging from X-rays to MRIs. Medical imaging equipment automatically transmits images to the PACS server, making them accessible to authorized users via DICOM viewers like OsiriX.
Choosing OsiriX as your PACS server offers significant advantages:
- Powered by OsiriX DICOM Engine: Leverage the robust and reliable OsiriX DICOM engine and SQLite database for efficient image handling and storage.
- Unlimited Client Support: Handle numerous simultaneous client connections without performance bottlenecks.
- Intuitive PACS Management: Manage your entire PACS infrastructure through the user-friendly OsiriX Graphical User Interface (GUI).
- Apple Ecosystem Integration: Benefit from seamless compatibility with macOS hardware and software for optimal performance and stability.
- Comprehensive DICOM Compliance: Fully compliant with the DICOM protocol, supporting essential services like C-Move, C-Store, C-Find, C-Get, WADO, and WADO-RS.
- Universal DICOM Viewer Compatibility: Integrate effortlessly with any DICOM viewer through standard DICOM protocols.
- Built-in Web Access and HTML5 Viewer: Access images via the web using a built-in server and a versatile HTML5 viewer compatible across operating systems.
- Extensibility via Plugins: Expand functionality and integration capabilities with Electronic Medical Records (EMR), Radiology Information Systems (RIS), or Hospital Information Systems (HIS) through custom plugins.
Delving into PACS Architecture
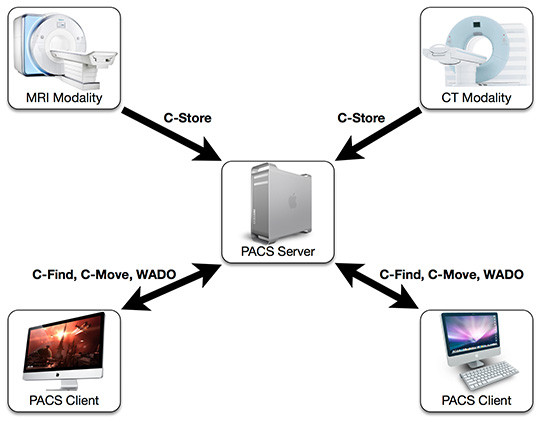
A typical PACS network is structured around a central PACS server, which houses the image database. Multiple client workstations connect to this server to retrieve and display images using medical imaging software. The foundation of this system is the DICOM (Digital Imaging and Communications in Medicine) format, the international standard for medical images and related information.
Modalities like MRI, CT, PET, and Ultrasound machines send images to the PACS server using a DICOM “push” mechanism known as DICOM C-Store. Communication between the server and clients relies on the DICOM protocol, utilizing services such as DICOM C-Store, WADO, or Query & Retrieve. Clients then use DICOM viewer software to access and interpret these images.
Each device within a DICOM network is identified as a DICOM Node, characterized by its network address (IP address), communication port (TCP/IP port), and a name (AETitle). These details are crucial for establishing connections within the DICOM network. You can locate this information within OsiriX in the Preferences > Listener window.
Building a functional PACS necessitates two key components:
- A Robust PACS Server: This requires a computer with substantial storage capacity and reliable PACS server software. The software must ensure 24/7 operation, feature a powerful database engine capable of managing vast quantities of DICOM images, and maintain data integrity.
- PACS Clients with DICOM Viewers: These are workstations equipped with DICOM viewer software, such as OsiriX. These clients utilize DICOM network protocols (DICOM C-Move, C-Store, C-Get, C-Find, WADO, WADO-RS, etc.) to query and retrieve DICOM images from the PACS server.
Key attributes of an effective DICOM viewer include:
- Rapid Transfer Speeds: Image transfer times should be limited only by network bandwidth.
- Fast Loading Times: Ability to quickly load and browse large studies (e.g., 1000 images in seconds).
- Comprehensive DICOM Protocol Support: Compatibility with diverse DICOM image types.
- Advanced 2D Image Analysis Tools: Essential tools for image analysis, such as Regions of Interest (ROIs), window level adjustments, and zooming.
- 3D Post-processing Capabilities: Volume Rendering, Multiplanar Reconstruction (MPR), and Maximum Intensity Projection (MIP) for volumetric data visualization.
- Multi-modality Image Fusion: Support for combining data from modalities like PET-CT, PET-MR, and SPECT-CT.
 PACS Network Architecture
Illustration of a PACS network architecture, highlighting modalities, a central PACS server, and client workstations with DICOM viewers for efficient medical image management.
In this guide, we will leverage OsiriX, in its latest version, as both a high-performance DICOM viewer and a Fully Functional Built-in Dicom Server Ippacs to construct our PACS network.
Setting Up Your OsiriX PACS Environment
Hardware Considerations
- PACS Server Hardware: For a reliable PACS server, we recommend a Mac Pro equipped with a minimum of 4TB of storage to accommodate up to 25 million CT images. Implementing a RAID (Redundant Array of Independent Disks) system is strongly advised for enhanced performance and data security. For example, configuring four identical hard drives in a RAID 5 configuration provides both speed and data redundancy. External RAID systems connected via Thunderbolt or FireWire (like Promise VTrak or LaCie RAID towers) can also be used for optimal performance.
- PACS Client Hardware: Select iMacs or Mac Pros for PACS client workstations, depending on the demands of 3D post-processing. For diagnostic viewing, consider medical-grade monitors from Totoku or Eizo. Solid State Drives (SSDs) are highly recommended for fast image loading. Ensure clients have at least 8GB of RAM for smooth operation.
- Network Infrastructure: Establish your network using Gigabit Ethernet or faster hardware. Employ high-performance active routers to ensure efficient data transfer within your PACS network.
Software Configuration
Configuring OsiriX as a PACS Server
For optimal PACS server performance and unlimited capabilities, utilize OsiriX MD. To ensure continuous and reliable server operation, configure the following macOS settings:
- Automatic Restart After Power Failure: In macOS System Preferences, navigate to Energy Saver (or Battery in newer macOS versions), select the Power Adapter tab, and check “Start up automatically after a power failure” to ensure server uptime.
- Automatic Login: Configure automatic login in macOS System Preferences under Users & Groups > Login Options > Automatic login. This eliminates the need for manual login after a restart.
- Ensure OsiriX Auto-Start: To guarantee OsiriX runs continuously, even after system restarts or crashes, we will create a LaunchAgent file. Applications like Lingon simplify this process. In Lingon, create a new agent set to “At Login” and “Keep running” to automatically launch and maintain OsiriX in server mode.
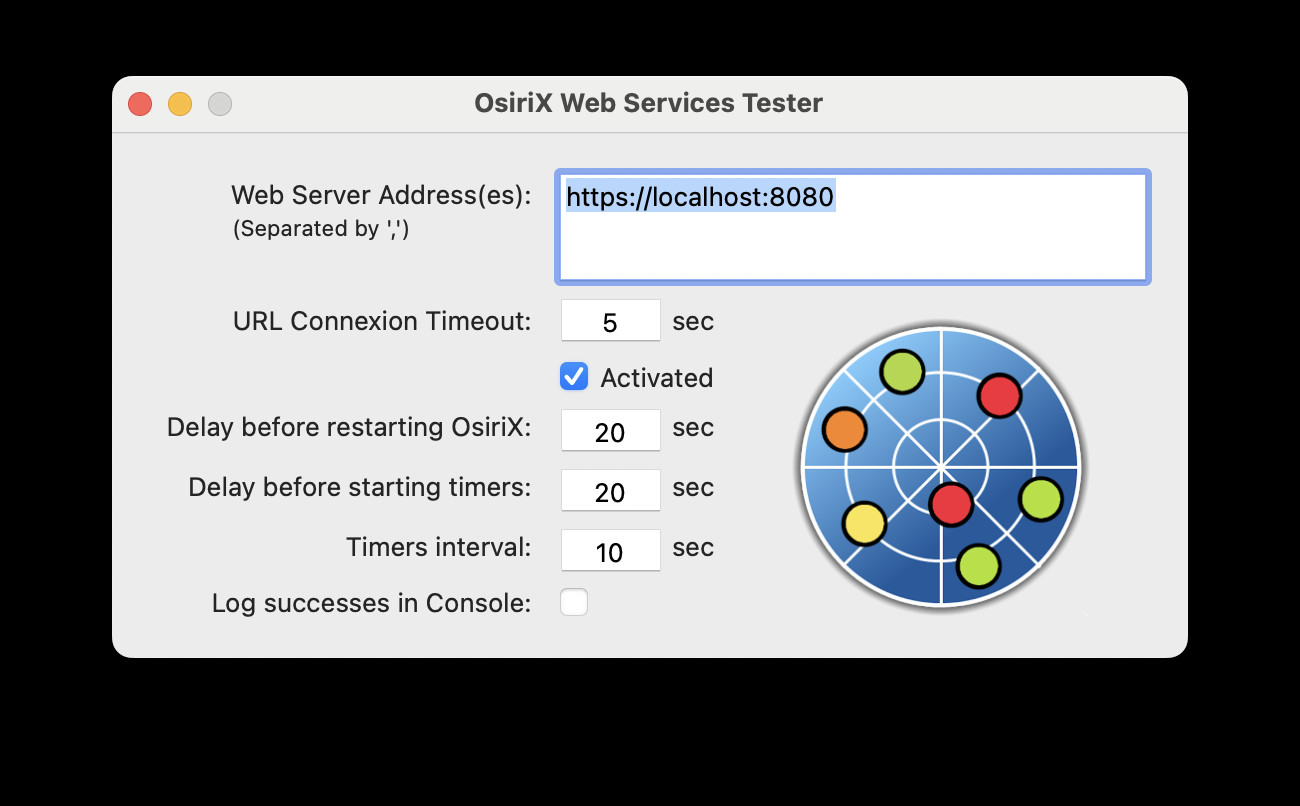
- OsiriX Responsiveness Monitoring: To prevent OsiriX from becoming unresponsive (indicated by the spinning beach ball), install a separate monitoring application. This application tests OsiriX’s responsiveness using its built-in web server and XML-RPC interfaces. Ensure these interfaces are enabled in OsiriX Preferences. The monitor sends periodic requests to these interfaces. If OsiriX fails to respond, the monitor automatically terminates and restarts OsiriX (thanks to the LaunchAgent setup). Configure the web server address to “http(s)://localhost:XXXX/testdbalive” and the XML-RPC interface to “http(s):localhost:XXXX”. Download this monitoring software here. Similarly, ensure this monitoring software is also configured to run continuously using a LaunchAgent.
 Web Server Testing Configuration
Screenshot of the WebServerTesting configuration interface, illustrating settings for monitoring OsiriX server responsiveness.
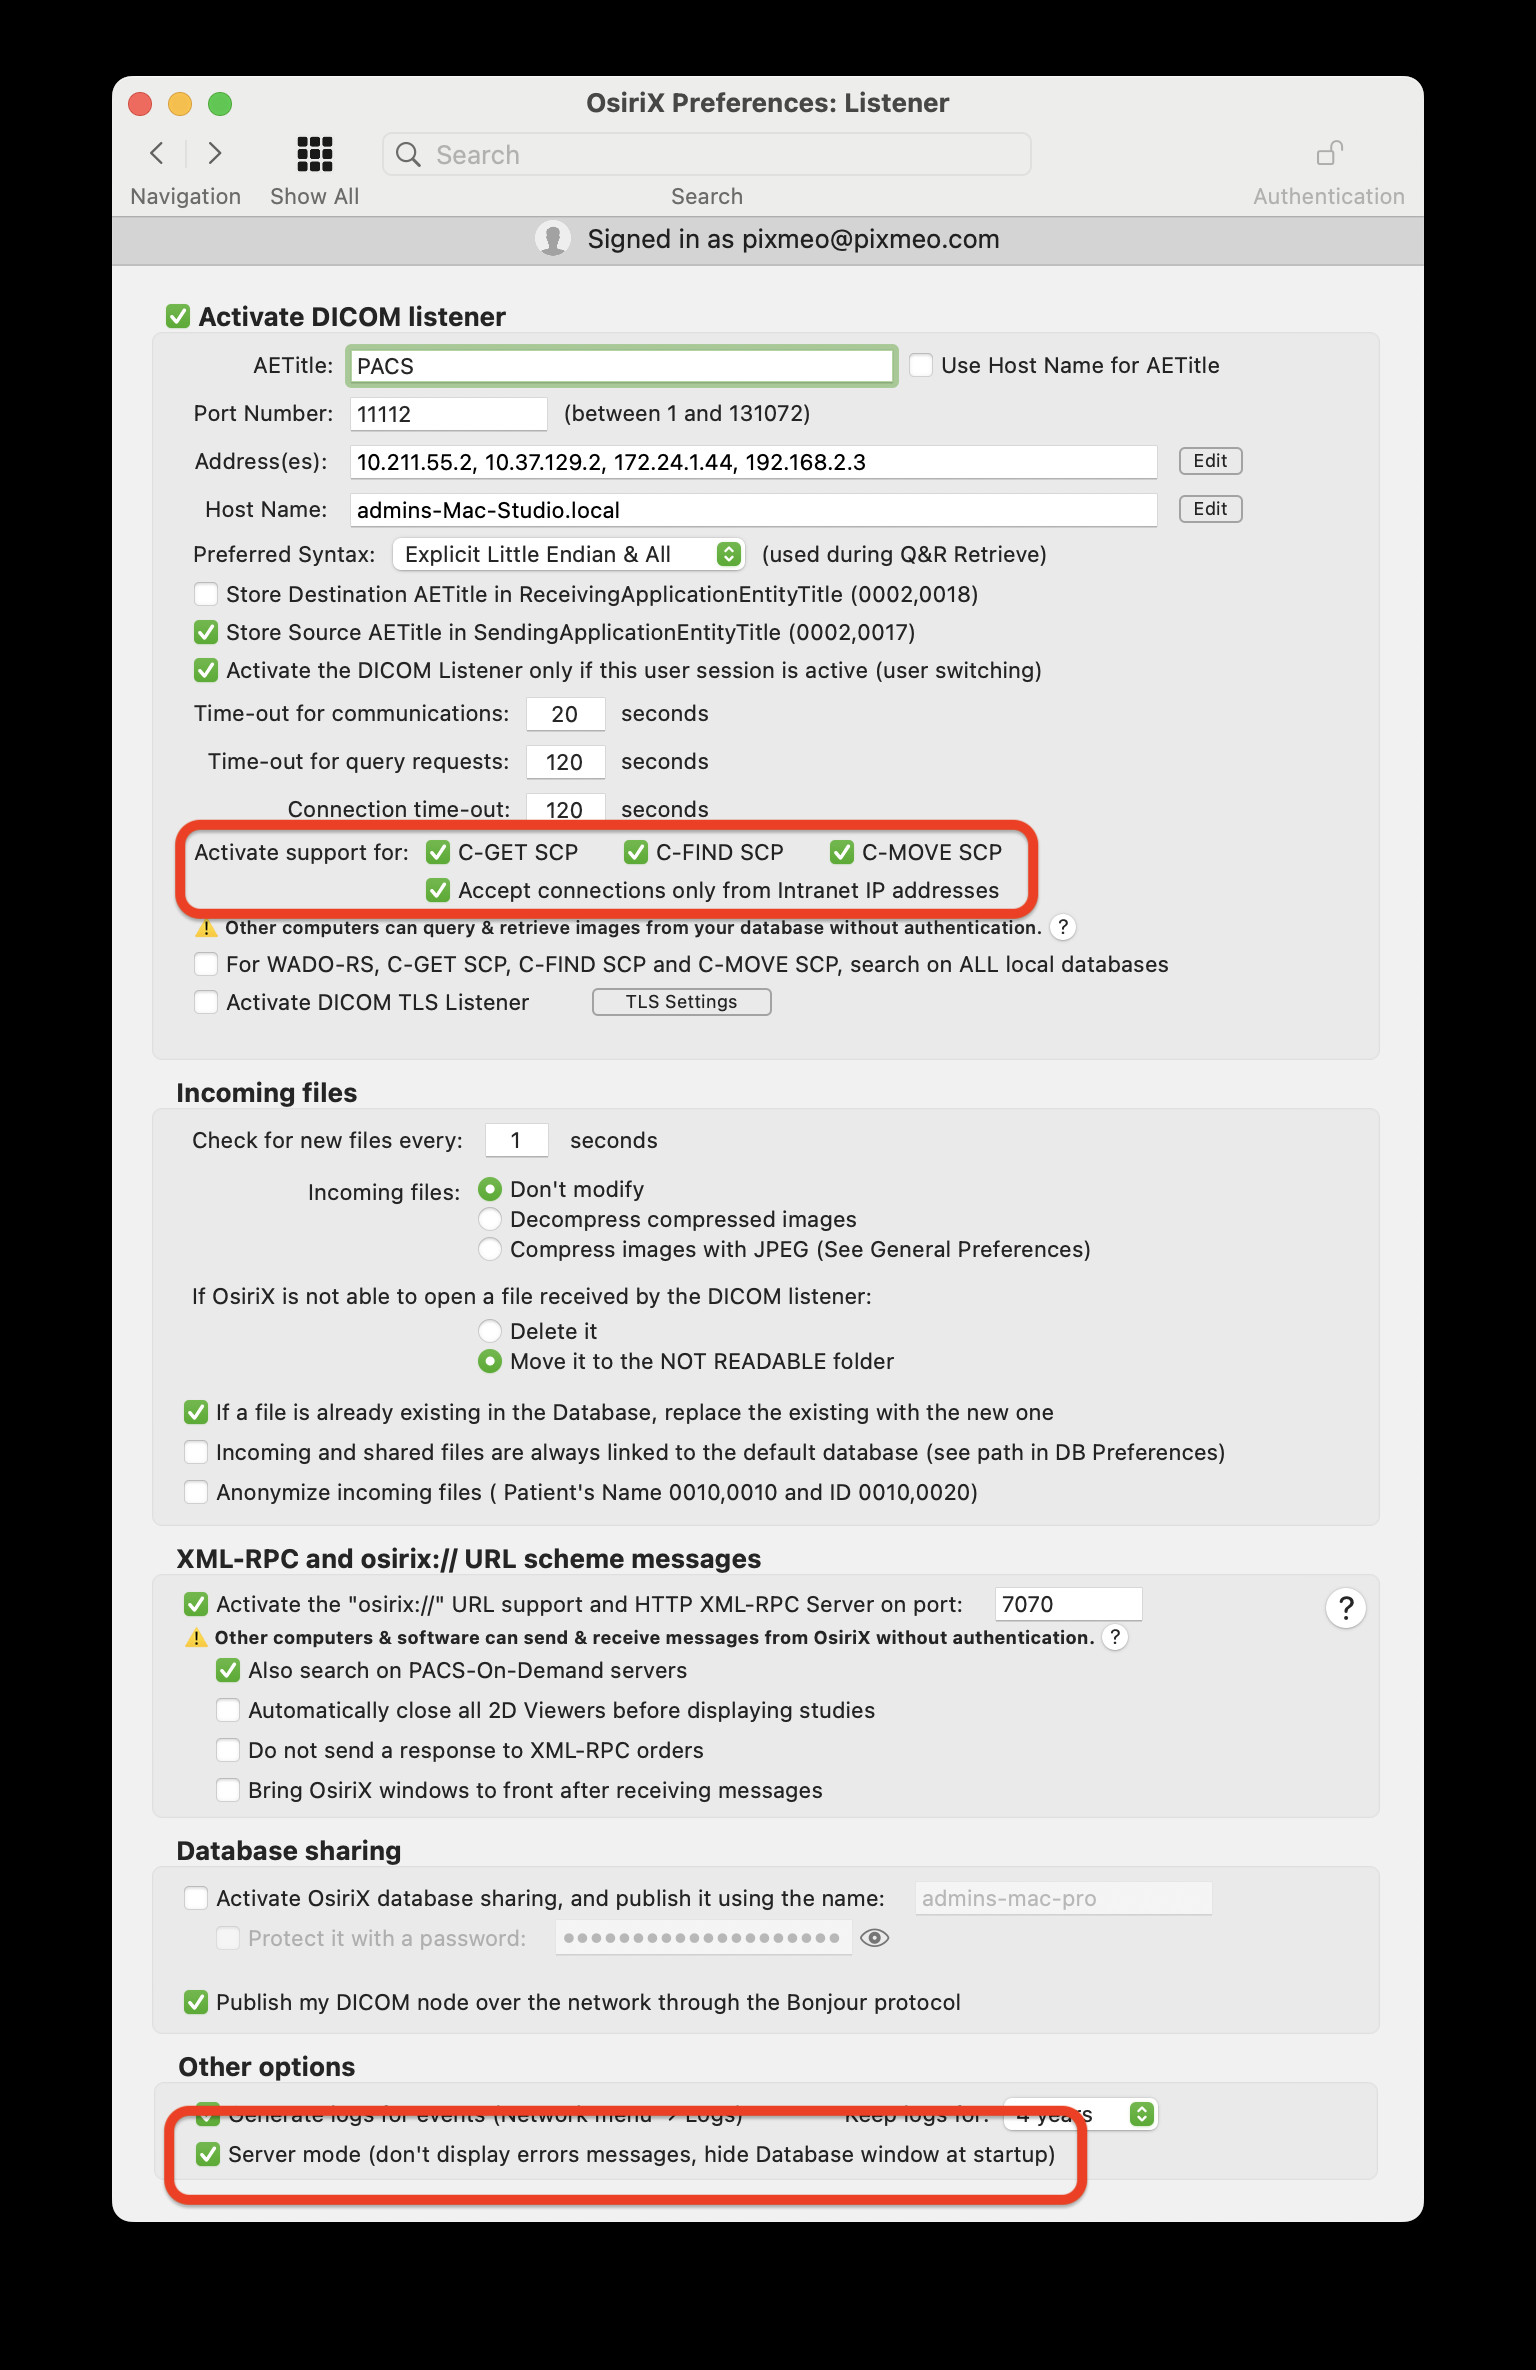
- Enable DICOM SCP Modes: Activate DICOM “SCP modes” (Service Class Provider) in OsiriX Preferences > Listener. This enables OsiriX to function as a server, accepting connections from external DICOM viewers and modalities.
 DICOM Listener Preferences
Screenshot of OsiriX Listener Preferences, highlighting the SCP modes settings that enable server functionality.
- Activate Server Mode: Enable “Server mode” within OsiriX Preferences > Listener. Server mode hides the OsiriX GUI and prevents any blocking dialog boxes from appearing, ensuring uninterrupted server operation without requiring user intervention at the server console.
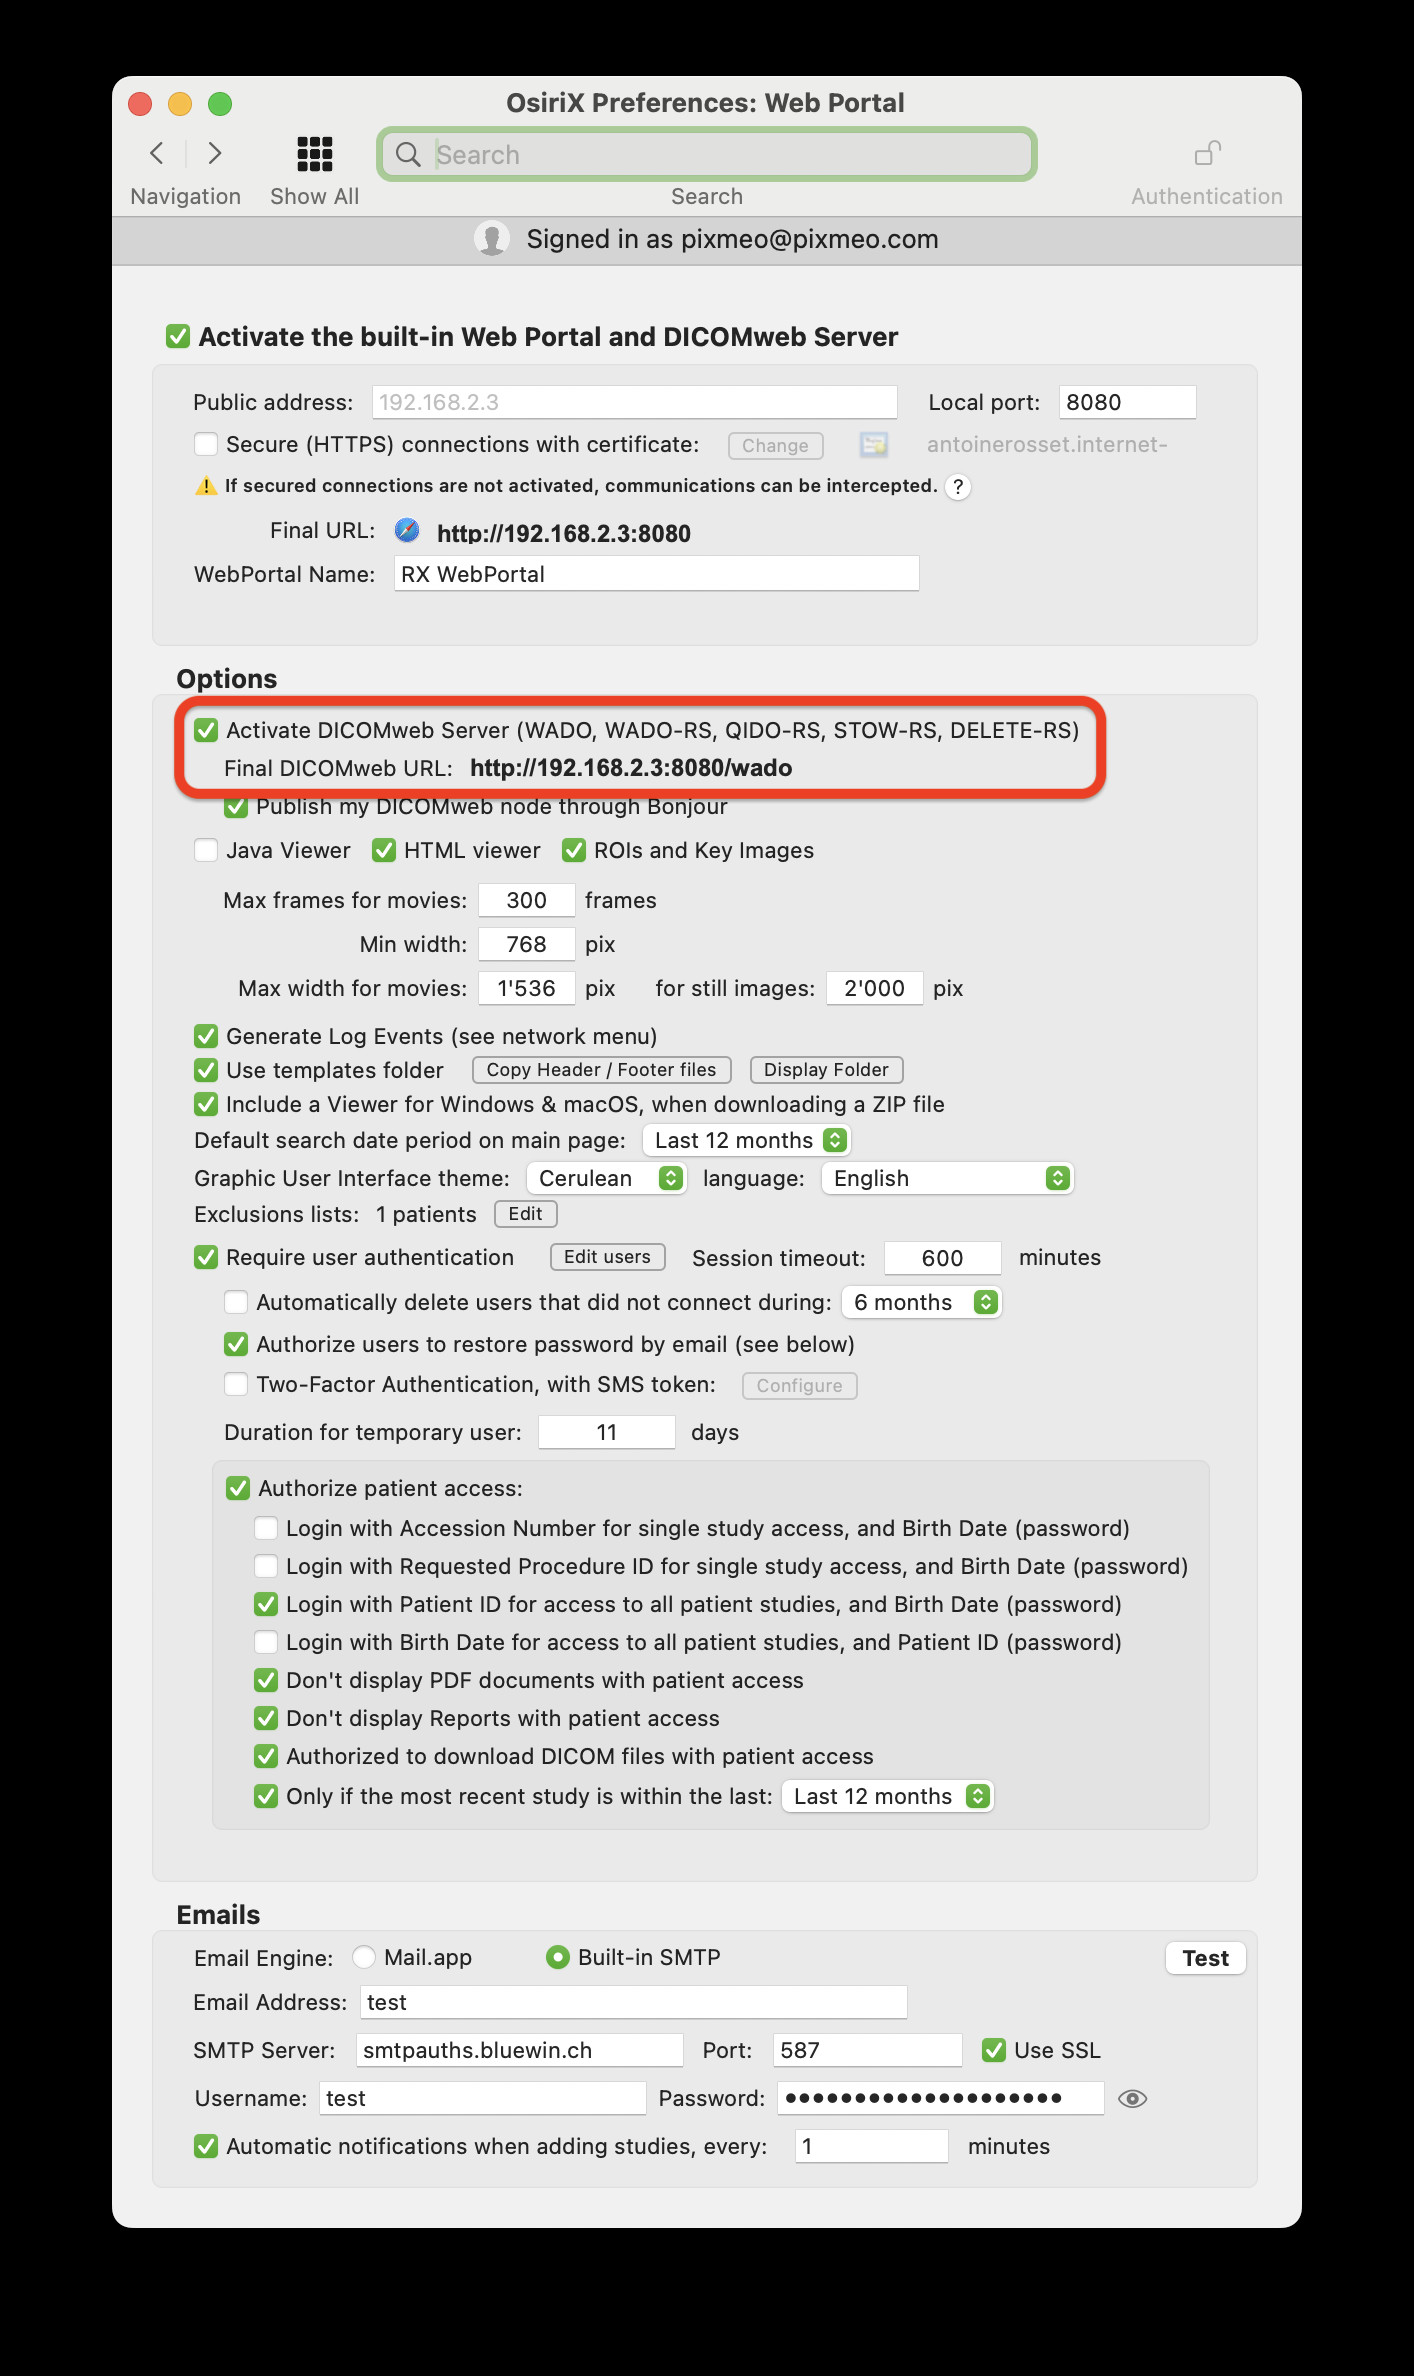
- Enable WADO and WADO-RS (Optional): If web-based access is required, activate the Web Portal in OsiriX Preferences > Web Portal. This enables support for WADO and WADO-RS protocols, allowing image access through web browsers.
 Web Portal Preferences
Screenshot of OsiriX Web Portal Preferences, showing settings to activate web-based DICOM access via WADO and WADO-RS.
Configuring OsiriX as a PACS Client (DICOM Viewer)
To enable PACS clients to send and retrieve studies from your newly established OsiriX PACS server, you must configure the server details on each client. On each OsiriX client workstation, navigate to Preferences > Locations and add your DICOM PACS server information in the upper table.
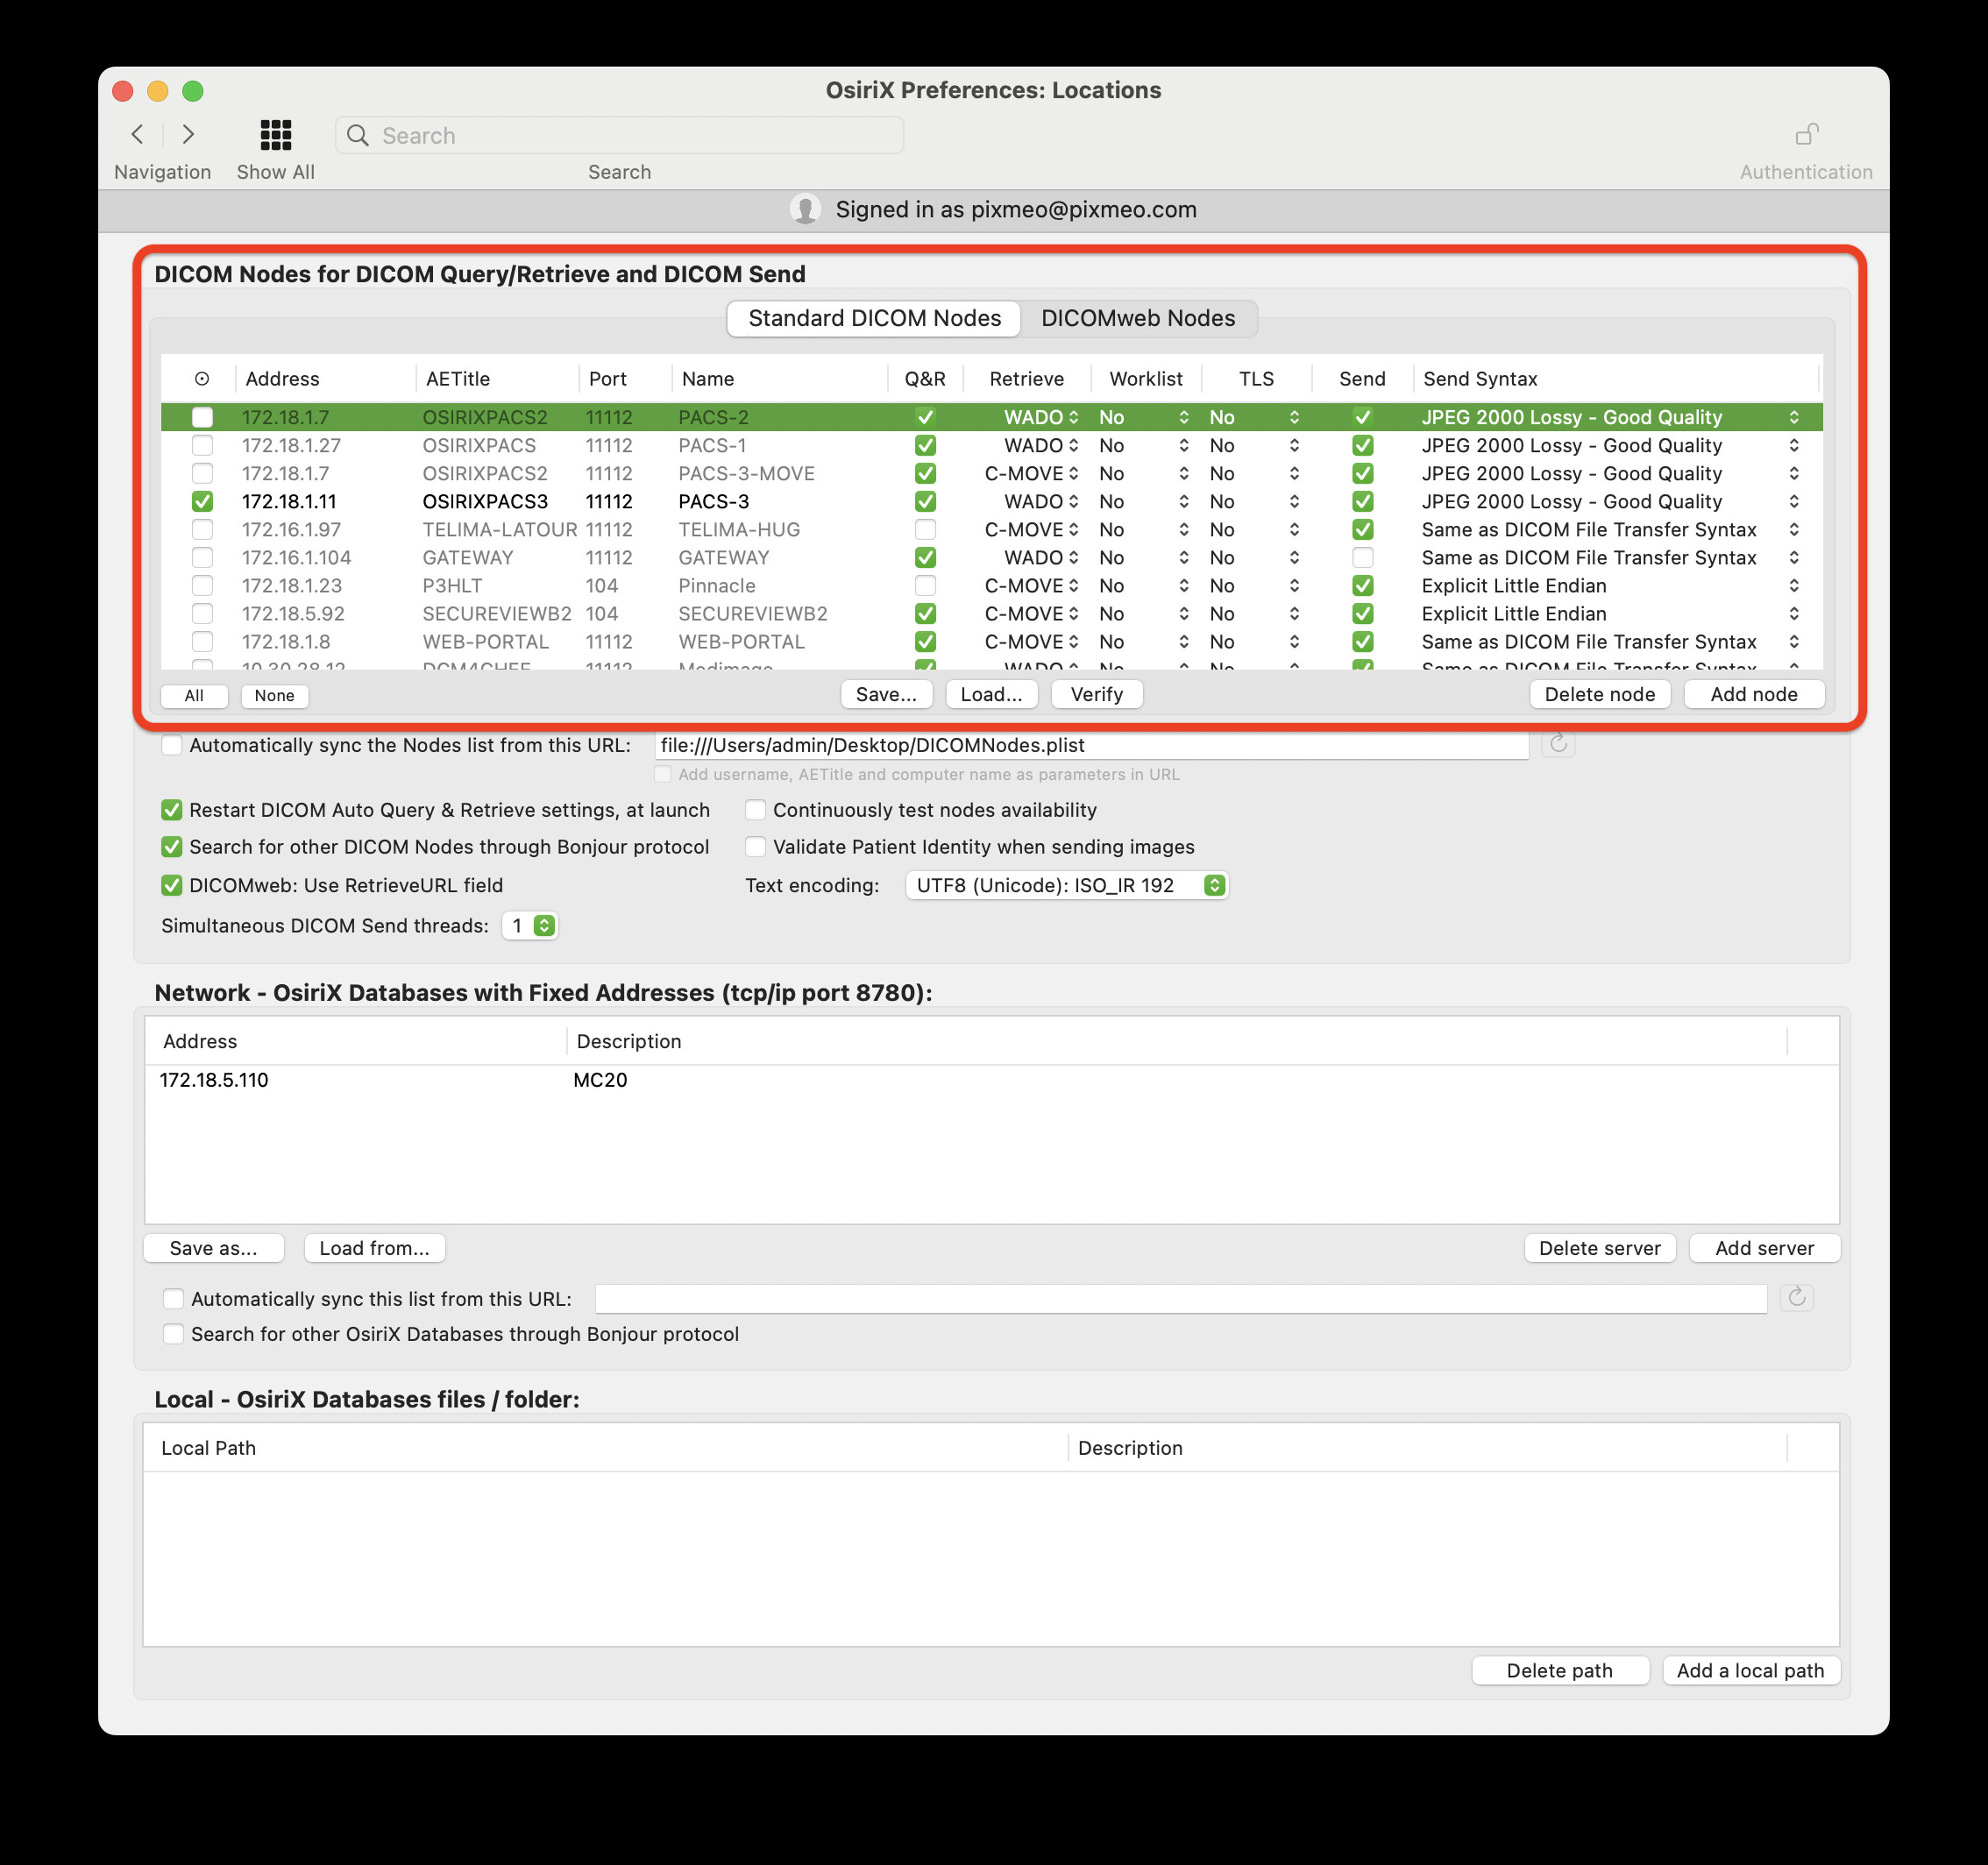 Locations Preferences in OsiriX Client
Screenshot of OsiriX Locations Preferences, showing the interface for adding PACS server details to client workstations.
DICOM viewers utilize various protocols to retrieve images from a PACS server. OsiriX supports the following:
- C-MOVE: This protocol requires that each DICOM viewer is explicitly declared and authorized on the PACS server (configured in Preferences > Locations on the server). C-MOVE is widely supported by DICOM viewers.
- C-GET: C-GET does not require pre-configuration of clients on the server. However, it is less commonly supported by DICOM viewers compared to C-MOVE.
- WADO & WADO-RS: Similar to C-GET, these web-based protocols do not necessitate client declaration on the server. WADO and particularly WADO-RS offer excellent speed when used with OsiriX as both the viewer and server, making them highly recommended for efficient image retrieval.
If you opt for DICOM C-MOVE, remember to declare each client workstation on your OsiriX PACS server in Preferences > Locations. You can find the DICOM Node information for each OsiriX client in its Preferences > Listener window.
Exchanging Images Between OsiriX PACS Server and Clients
To retrieve specific studies from your PACS server, use the Query & Retrieve window in OsiriX. Select your PACS server as the source, enter patient details (e.g., name), and click “Query”.
Screenshot of the OsiriX Query & Retrieve window, demonstrating the interface for searching and retrieving studies from the PACS server.
To send new studies from an OsiriX client to the PACS server, use the DICOM Send function available within OsiriX.
Conclusion: Your Fully Functional PACS Network
Congratulations! You have successfully set up a complete PACS network utilizing OsiriX as a fully functional built-in DICOM server IPPACS and PACS workstations. To further enhance your system, explore the built-in Web server and PACS On-Demand features within OsiriX:
| Feature | Description |
|---|---|
| OsiriX Built-in Web Server | Provides web-based access to DICOM images, enabling viewing and basic manipulation through standard web browsers. |
| PACS On-Demand |  PACS On-Demand Feature Extends PACS capabilities, potentially offering features like secure cloud storage, enhanced sharing, and remote access solutions for more comprehensive image management. PACS On-Demand Feature Extends PACS capabilities, potentially offering features like secure cloud storage, enhanced sharing, and remote access solutions for more comprehensive image management. |
Need Expert Support?
For 24/7 expert support in managing your PACS network and OsiriX workstations, please visit our partners area to find certified professionals who can assist you.