In today’s digital age, online privacy and security are more critical than ever. As we navigate the internet, our data is constantly tracked through cookies, browser fingerprinting, and even by Internet Service Providers (ISPs). For those seeking to regain control over their online footprint, proxy servers offer a powerful solution. This guide will walk you through the process of setting up your personal proxy server using Amazon Web Services (AWS) EC2, empowering you with enhanced anonymity and security.
A proxy server acts as an intermediary between your computer and the internet. When you use a proxy, your internet requests are routed through this server, masking your IP address and location. This makes it harder for websites and trackers to identify you, providing a significant layer of privacy.
While various proxy solutions exist, creating your own proxy server on AWS EC2 offers several advantages:
- Control: You have complete control over your proxy server and its configuration.
- Security: You can tailor security settings to your specific needs.
- Cost-Effectiveness: Leveraging the AWS Free Tier makes this a budget-friendly option for learning and personal use.
- Performance: AWS infrastructure provides reliable and high-speed performance for your proxy server.
Let’s dive into the steps to create your own proxy server on AWS EC2.
Step-by-Step Guide to Create Your Proxy Server on AWS EC2
Step 1: Access the AWS EC2 Console
Navigate to the AWS Management Console and select “EC2” from the services menu. This will take you to the EC2 dashboard, your central hub for managing virtual servers in the cloud.
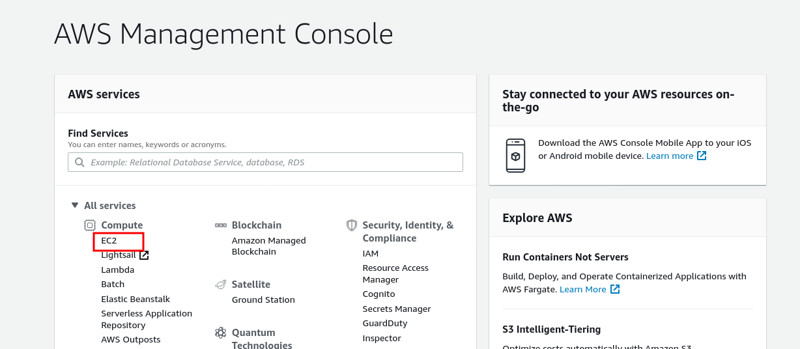 AWS Console
Alt text: AWS EC2 service highlighted on the AWS Management Console, showing the first step to create a proxy server.
Step 2: Launch a New Instance
From the EC2 dashboard, select “Instances” in the left-hand panel and then click the “Launch instances” button. This initiates the process of creating a new virtual server instance.
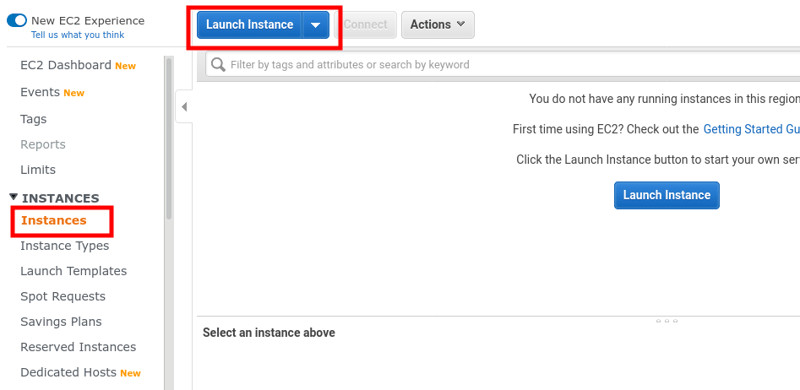 EC2 Dashboard
Alt text: EC2 Dashboard showing the ‘Launch instances’ button, the second step in setting up an AWS proxy server.
Step 3: Choose Ubuntu Server
On the “Choose an Amazon Machine Image (AMI)” page, find and select “Ubuntu Server 18.04 LTS” from the list of Quick Start AMIs. Click “Select” to proceed. Ubuntu Server is a popular and reliable Linux distribution, well-suited for server applications.
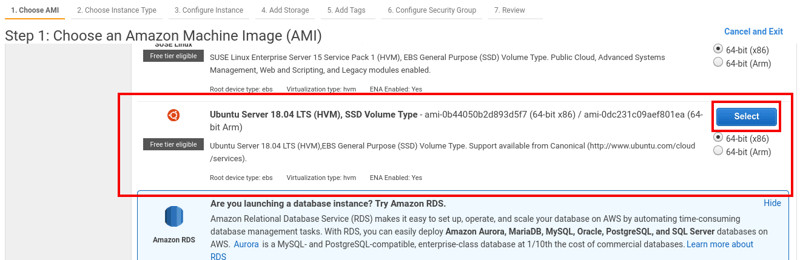 Ubuntu Instance
Alt text: Selecting Ubuntu Server 18.04 LTS as the operating system for the AWS EC2 proxy server instance.
Step 4: Configure Security Group
Continue through the instance configuration steps, accepting the defaults until you reach the “Configure Security Group” page. Create a new security group by clicking “Create new security group”. Provide a descriptive name and description. Then, add a new rule:
- Type: Custom TCP
- Port Range: 8888 (This is the default port for TinyProxy, which we will install later)
- Source: My IP (This restricts proxy access to only your current IP address for security)
Click “Review and Launch” to proceed. You will be prompted to create a new key pair. Crucially, download and securely store this key pair file (.pem file). This key is essential for securely accessing your EC2 instance via SSH.
 Security Group Configuration
Alt text: Security Group configuration in AWS EC2, setting inbound rule for TinyProxy port 8888 and SSH access.
Step 5: Connect to Your EC2 Instance
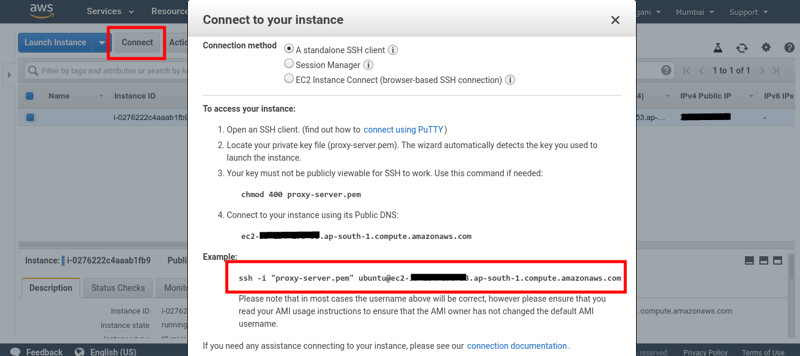
Once your instance is launched, select it from the Instances dashboard and click the “Connect” button. Choose the “SSH client” tab for instructions on connecting via SSH. Copy the provided SSH command example.
Security Group Configuration
Alt text: EC2 Management Console showing the ‘Connect’ button and instructions for SSH access to the AWS proxy server instance.
Step 6: Install and Configure TinyProxy
Open your terminal or command prompt. Navigate to the directory where you saved your downloaded .pem key file. Use the chmod 400 your-key-pair.pem command to ensure the key file has the correct permissions. Then, paste the SSH command you copied from the AWS console and execute it. This will establish a secure SSH connection to your Ubuntu server.
Once connected, run the following commands to update the package lists and install TinyProxy:
sudo apt update && sudo apt upgrade
sudo apt install tinyproxy
TinyProxy is a lightweight and easy-to-configure proxy server. By default, it runs on port 8888. To enhance security, we will configure TinyProxy to only allow connections from your specific IP address.
Step 7: Configure TinyProxy Access
Use a text editor like vim or nano to edit the TinyProxy configuration file:
sudo vim /etc/tinyproxy/tinyproxy.confLocate the Allow 127.0.0.1 line. Below this line, add a new Allow line with your public IP address. You can find your public IP address by running curl ifconfig.co in a separate terminal window on your local machine.
Allow 127.0.0.1
Allow your_public_ip_address
Save the changes and exit the text editor.
 Tiny Proxy Configuration
Alt text: TinyProxy configuration file showing the ‘Allow’ directive with a public IP address added for secure proxy access.
Step 8: Restart TinyProxy and Configure Your Browser
Restart the TinyProxy service to apply the configuration changes:
sudo systemctl restart tinyproxyNow, configure your web browser to use your newly created proxy server. In Firefox, for example, go to “Preferences” (or “Options”), search for “Proxy settings”, and click on “Settings…”. Select “Manual proxy configuration”. Enter the Public IP address of your EC2 instance (found in the EC2 dashboard) in the “HTTP Proxy” field and “8888” in the “Port” field. Check “Also use this proxy for HTTPS” and “FTP”. Click “OK” to save.
 Firefox Configuration
Alt text: Firefox browser proxy settings configuration, highlighting manual proxy setup with EC2 instance IP and port 8888.
To verify your proxy is working, visit a website like “what is my ip” in your browser. It should now display the IP address of your AWS EC2 instance, confirming that your internet traffic is being routed through your personal proxy server.
Congratulations! You have successfully created your own proxy server on AWS EC2. Enjoy browsing with enhanced privacy and security. Remember to terminate your EC2 instance when not in use to avoid unnecessary charges. For more robust and scalable proxy solutions, consider exploring rental-server.net for dedicated server options.