
Are you looking to configure Gmail SMTP server settings? You’ve come to the right place. This detailed guide will walk you through everything you need to know about setting up your Gmail SMTP settings effectively.
In this article, we will cover a step-by-step process on how to configure these essential settings. We’ll also explain what SMTP is and why it’s used in Gmail, ensuring you understand the underlying technology. Furthermore, we’ll guide you on how to set up your Gmail POP and IMAP settings for receiving emails, providing a complete picture of email configuration.
Gmail SMTP Settings: Quick Navigation
(Click on a link below to jump to a specific section)
If you’re just after the Gmail SMTP settings without further ado, here they are:
Gmail SMTP Settings at a Glance
SMTP Server Address: smtp.gmail.com
Authentication Required: Yes
Security Protocol: TLS/SSL (Select based on your email client or website SMTP plugin)
SMTP Username: Your full Gmail address (e.g., [email protected])
SMTP Password: Your Gmail password
Gmail SMTP Port: 465 (SSL) or 587 (TLS)
For those who want a deeper understanding and step-by-step instructions, let’s dive in!
Step-by-Step Guide: How to Configure Gmail SMTP Settings
There are several methods to utilize Google’s SMTP server for sending emails. These include:
- Google Workspace (formerly G Suite) SMTP relay service
- Gmail’s SMTP server (Our focus in this guide)
- Restricted Gmail SMTP server
Important Note: If you’re new to SMTP, we recommend you first understand what SMTP is and its function before proceeding with the configuration.
Why Choose the Gmail SMTP Server Method?
The Gmail SMTP server method stands out as the most accessible and straightforward option among the three, which is why we’re dedicating this guide to it.
Opting for the Gmail SMTP service means you bypass the need for any subscription fees. It’s free to use with your existing Gmail account.
Moreover, unlike some other SMTP methods, the Gmail SMTP server doesn’t limit email sending based on your organization’s IP address. You can send emails to anyone, both inside and outside your organization. The only requirement is setting up SMTP authentication using your Gmail credentials.
This method also ensures robust security, comparable to the Google Workspace method.
Another advantage is the ability to send emails through a Gmail alias, if you have one configured.
Understanding Gmail Alias
A Gmail alias is essentially an email forwarding address that allows you to mask your primary email address.
For instance, [email protected] could be an alias for [email protected]. This is useful for managing different facets of your communication, such as business inquiries. It allows you to send emails appearing to originate from your business email while keeping your personal Gmail address private and organized.
If you’re interested in setting up a Gmail alias to improve email deliverability and manage your online presence, you can find resources online to guide you through the process.
Now, let’s get started with the configuration process.
Setting Up Gmail SMTP Server: The Method
Pre-requisite: If you have two-step verification enabled on your Gmail account, you’ll need to complete the following steps to create an App Password before configuring the Gmail SMTP server settings.
a. Generating App Passwords for Gmail SMTP
If you utilize 2-Step Verification for enhanced security on your Google account and your email client doesn’t support verification codes directly, creating an App Password is necessary before configuring Gmail SMTP.
Why is this needed? Two-step verification, while secure, can block less secure apps from accessing your Gmail account. An App Password acts as a specific password for that application, granting it access without compromising your main account security.
If you do not have two-factor authentication enabled, you can safely skip to the next section.
Here’s a quick guide to generate an app-specific password:
- Navigate to your Google Account and select Security from the left-hand menu.
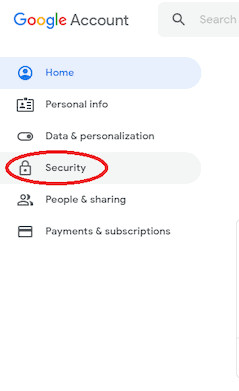 Google Account Security Settings
- Under the Signing in to Google section, click on App Passwords.
If you don’t see the “App Passwords” option, it could be due to these reasons:
-
2-Step Verification is not enabled for your Google account.
-
2-Step Verification is only set up using security keys.
-
You are using a Google account provided by work, school, or another organization.
-
Advanced Protection is enabled for your account.
-
Click on Select app and choose the application you are using to send emails.
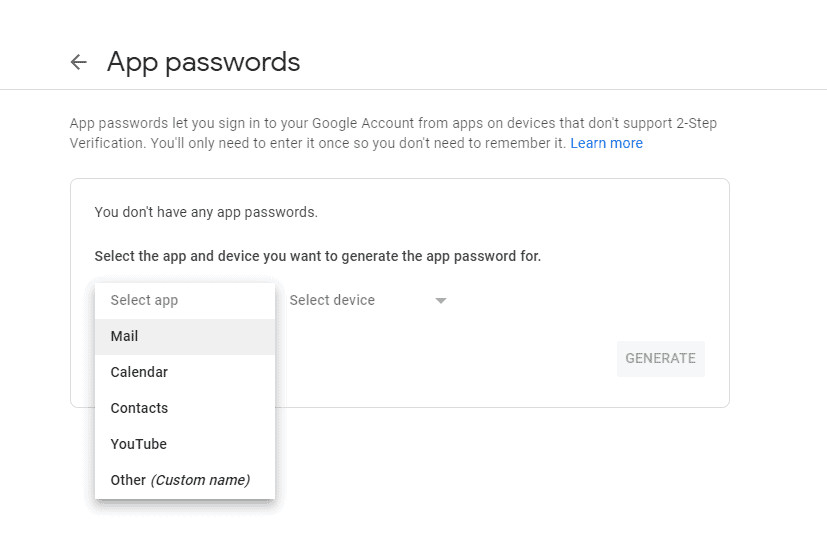 Select App for App Password
- Click Select device and specify the device you are using.
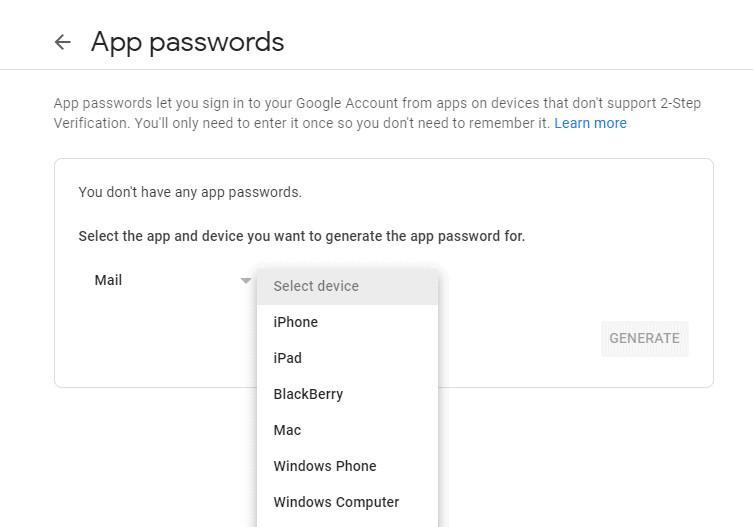 Select Device for App Password
- Click on Generate.
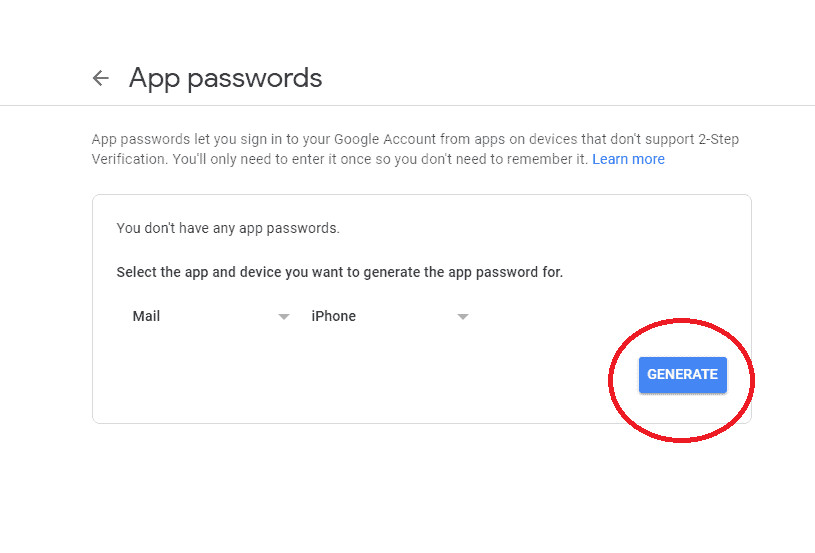 Generate App Password Button
- Follow the on-screen instructions to enter the generated App Password.
The App Password is the 16-character code displayed in the yellow bar.
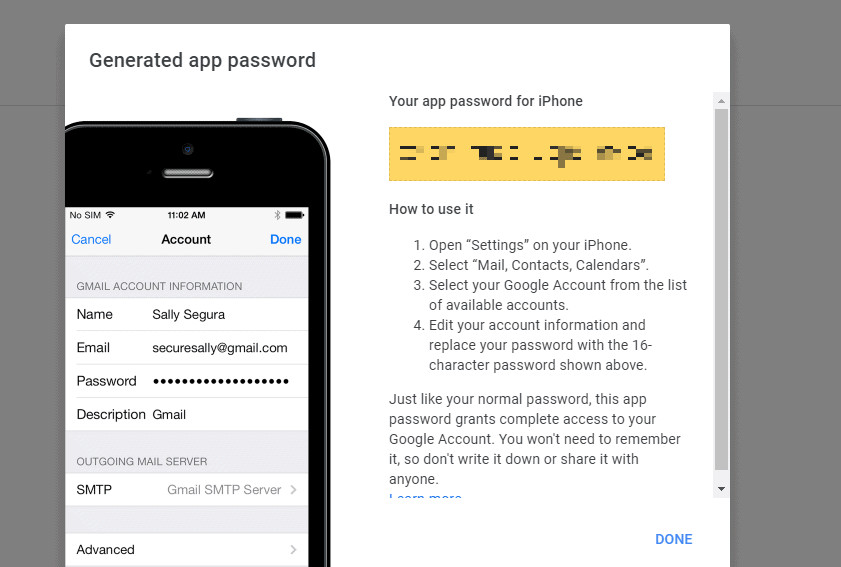 App Password Displayed
- Click Done.
Important Note: App Passwords are typically used only once when initially connecting an application to your Gmail account, so you don’t need to memorize it.
b. How to Add Server Settings in Gmail
Once you have either generated an App Password (if required) or decided to use your regular Gmail password, you need to input the Gmail SMTP server settings into your email client or application. Navigate to the outgoing email message server settings page in your chosen platform and enter the following details:
Gmail SMTP Server Settings:
SMTP Outgoing Mail Server: smtp.gmail.com
Authentication Required: yes
Secure Connection Type: TLS/SSL (Choose based on your email client/website SMTP plugin compatibility)
Gmail SMTP Username: Your complete Gmail address ([email protected])
Gmail SMTP Password: Your Gmail password or the generated App Password
Gmail SMTP Port: 465 (for SSL) or 587 (for TLS)
Note: SMTP authentication verifies that your email client or application has permission to send emails through the Gmail server. In some scenarios, especially for bulk emails, you may need to authenticate your domain name to prevent your emails from being flagged as suspicious.
The exact steps to configure SMTP server settings can vary depending on your email client. For example, if you are using Microsoft Outlook, you can find specific guides online detailing how to configure SMTP settings within Outlook.
SMTP is solely responsible for sending outgoing emails. To receive incoming emails, you need to configure an incoming mail server using either Gmail POP or IMAP protocols. Let’s explore these settings.
Setting Up POP and IMAP Gmail Settings for Incoming Mail
To receive emails in your email application, you need to set up either POP or IMAP Gmail settings. Here’s how to do it:
A. Configuring IMAP Settings
To configure an IMAP incoming mail server, follow these steps:
- First, log in to your Gmail account through a web browser and click the Settings gear icon in the top right corner.
![]() Gmail Settings Icon
Gmail Settings Icon
-
Click Settings in the dropdown menu, and then navigate to the Forwarding and POP/IMAP tab.
-
In the IMAP Access section, select Enable IMAP, and then click Save Changes at the bottom of the page.
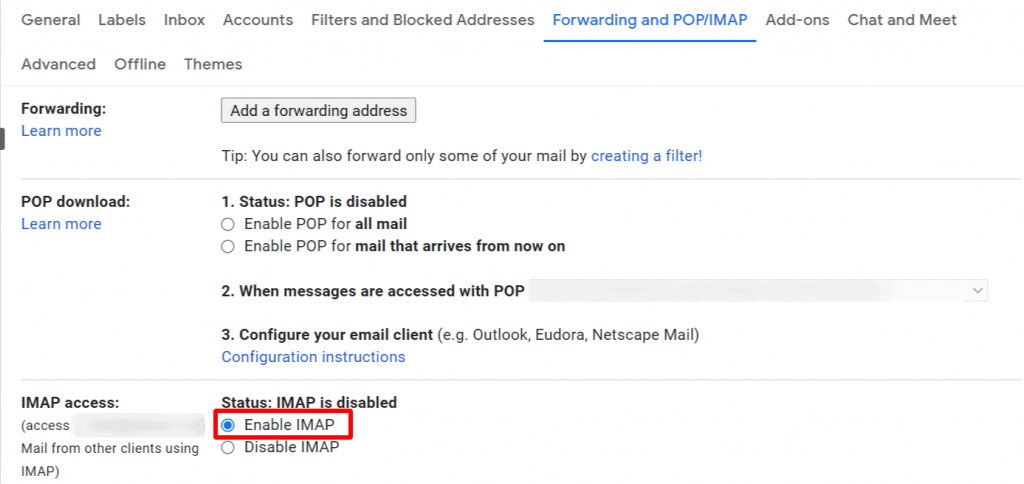 Enable IMAP in Gmail Settings
- Now, open your third-party email client and enter the following settings in the Incoming mail server/IMAP section:
Incoming Mail Server (IMAP): imap.gmail.com
SSL Required: Yes
Port: 993
Display Name: Your Name (as you want it to appear)
Username: Your Gmail address ([email protected])
Password: Your Gmail password or App Password
B. Configuring POP Settings
To set up a POP incoming mail server, follow these steps:
-
Repeat steps 1 and 2 as described in the IMAP setup section above.
-
In the POP Download section, choose either Enable POP for all mail or Enable POP for mail that arrives from now on, based on your preference.
-
Click Save Changes.
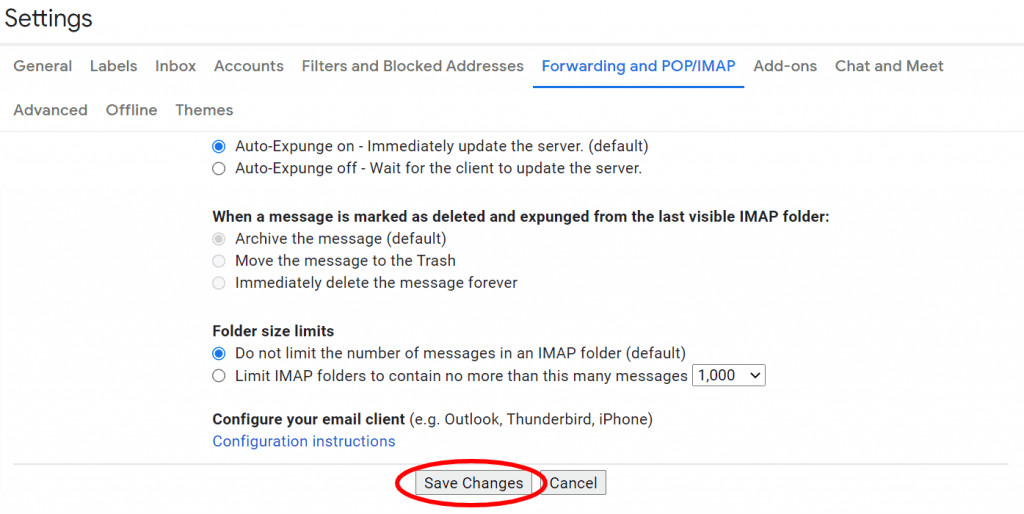 Save Changes in Gmail Settings
- Open your third-party email client and enter these settings in the POP/Incoming mail server section:
Incoming Mail Server (POP): pop.gmail.com
SSL Required: Yes
Port: 995
Server Timeouts: Set to more than 1 minute (5 minutes recommended for reliability)
Display Name: Your Name
Username: Your Gmail address ([email protected])
Password: Your Gmail password or App Password
Now that we’ve covered SMTP, IMAP, and POP setup, let’s delve deeper into understanding these email protocols and their functions through some frequently asked questions.
SMTP, POP, and IMAP: Frequently Asked Questions
In this section, we’ll address common questions about SMTP, POP, and IMAP to clarify their roles and usage.
1. What is SMTP?
SMTP, or Simple Mail Transfer Protocol, is the standard protocol used for sending emails across the internet. It facilitates the transfer of emails from your email client or server to the recipient’s email server.
SMTP operates on a store and forward principle. When you send an email, it’s first sent to an SMTP server, which then forwards it through a network of servers until it reaches the recipient’s incoming mail server.
SMTP works in conjunction with a Mail Transfer Agent (MTA) to ensure emails are routed to the correct recipient’s inbox. Traditionally, SMTP is designed to handle text-based emails and does not natively support attachments.
To overcome this limitation, the Multipurpose Internet Mail Extension (MIME) protocol is used. MIME encodes non-textual data, such as attachments, into a text format that SMTP can transmit. The receiving email client then decodes the MIME content to restore the original attachments.
2. Why is it Necessary to Configure SMTP Settings in Gmail?
Configuring SMTP settings in Gmail is essential in several scenarios:
- Sending Transactional Emails from Your Website: If you want to send automated emails directly from your website, such as order confirmations or password resets, using Gmail’s SMTP server allows you to reliably deliver these transactional emails.
- Using SMTP Plugins for WordPress and Other Platforms: For platforms like WordPress, SMTP plugins, such as Gmail SMTP plugins, allow you to bypass the default PHP mail function. This significantly improves email deliverability, especially for important website notifications.
- Configuring Gmail in External Email Clients: When you use email applications like Microsoft Outlook or Mozilla Thunderbird to manage your Gmail account, you need to configure SMTP settings to send emails from within these clients using your Gmail account.
SMTP acts as the communication bridge between your website or email client and Gmail, ensuring your emails are sent correctly and reliably.
For instance, in WordPress, using SMTP to send emails via the Gmail API offers enhanced reliability compared to the default PHP mailing method, which often uses PHPmailer. The Gmail API provides a more robust and authenticated way to send emails.
What is an API? API stands for Application Programming Interface. It’s a set of rules and specifications that allow different software applications to communicate with each other. In the context of Gmail SMTP, the Gmail API enables your application (like WordPress or an email client) to interact with Gmail’s email sending service.
3. Why Not Use SMTP Relay Service or Restricted Gmail SMTP Server Methods?
The SMTP relay service offered by Google is primarily designed for Google Workspace users. It requires a paid Google Workspace subscription, making it less accessible for general Gmail users.
The Restricted Gmail SMTP server method has limitations as well. It typically only allows sending emails to other Google Workspace or Gmail addresses. This restriction makes it unsuitable for sending emails to recipients outside the Google ecosystem.
[Further Reading: For a more in-depth understanding of SMTP, you can explore comprehensive guides available online.]
4. What are POP and IMAP?
Since SMTP only handles sending emails, POP and IMAP protocols are necessary for receiving emails. They enable you to access and manage your incoming emails within an email client application.
Here’s a comparison of how POP and IMAP work:
A. POP (Post Office Protocol)
Post Office Protocol (POP), specifically POP3, is designed for retrieving incoming emails.
POP downloads emails from the server to your local device. Once emails are downloaded, they are typically (depending on settings) deleted from the server. This makes POP ideal for users who primarily access their email from a single computer and want to have emails stored locally, allowing offline access.
B. IMAP (Internet Message Access Protocol)
Internet Message Access Protocol (IMAP) is another protocol for receiving emails, but it functions differently from POP.
IMAP keeps all emails stored on the server. When you access your emails through an email client, it connects to the server and displays the emails. Any actions you take, such as reading, deleting, or moving emails, are synchronized with the server. This means you can access your emails from multiple devices, and your email data remains consistent across all devices.
IMAP is generally considered more versatile and efficient than POP, especially for users who access their email from multiple devices.
5. Key Differences: SMTP vs. POP and IMAP
To summarize, SMTP, POP, and IMAP serve distinct but complementary roles in email communication.
POP and IMAP are protocols for receiving incoming emails, allowing you to access your inbox in an email client. SMTP is the protocol for sending outgoing emails, enabling you to transmit emails from your client or server to recipients.
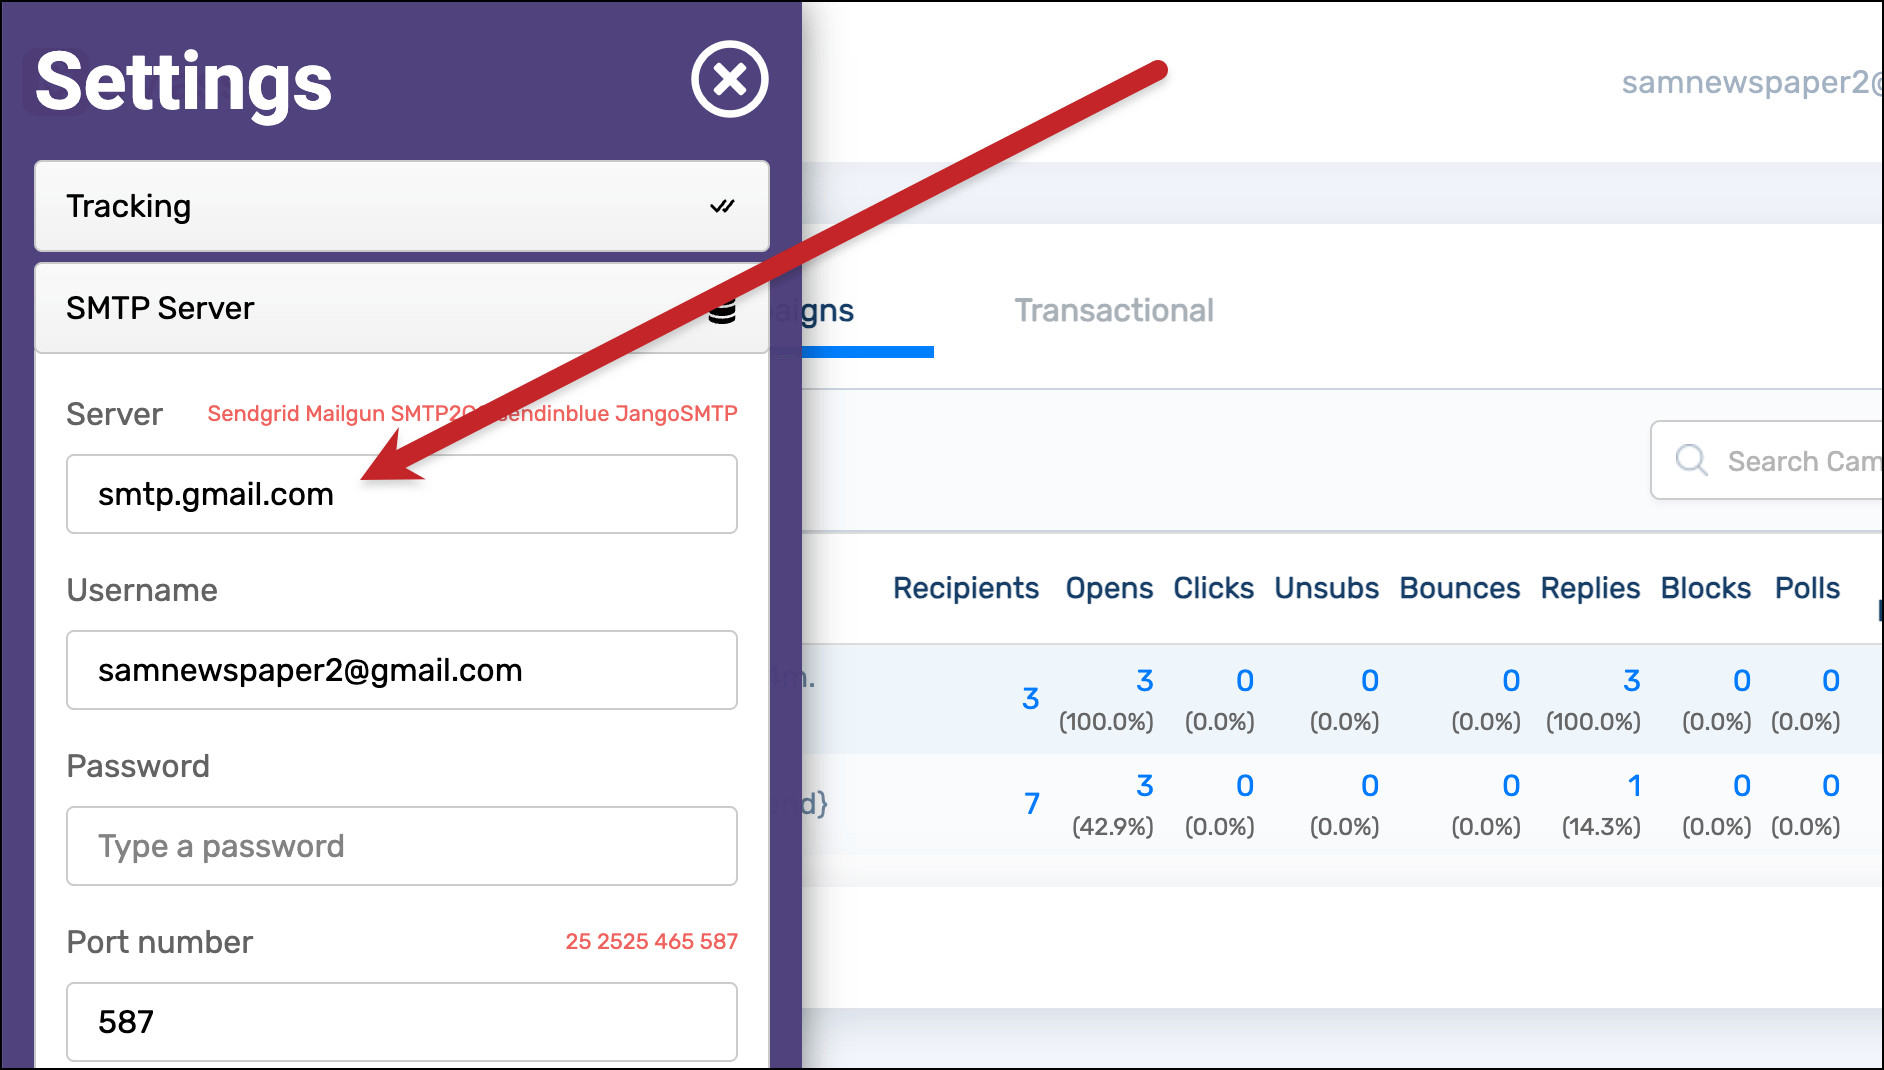
6. Do Gmail SMTP Settings Need to be Configured with GMass?
If you are using GMass, an email marketing platform that works within Gmail, you do not need to manually configure Gmail SMTP settings as a separate SMTP server within GMass.
 GMass SMTP Settings Example
By default, GMass utilizes Gmail’s servers for sending emails. Therefore, adding Gmail SMTP settings in GMass is redundant and unnecessary when you intend to use your Gmail account for sending.
If you are looking to use a third-party SMTP service with GMass, for reasons such as bypassing Gmail’s sending limits, there are various alternative SMTP service options that are compatible with GMass.
Gmail SMTP Settings: Final Thoughts
Configuring SMTP settings in your Gmail account is a straightforward process.
Gmail’s accessibility makes setting up SMTP, POP, and IMAP settings relatively quick and easy. By following the step-by-step instructions provided in this guide, you can effortlessly configure these settings and optimize your email communication.
If you’re interested in sending cold emails, mail merges, or mass emails directly from your Gmail account, consider exploring GMass.
GMass is an email marketing platform integrated within Gmail. It’s used by over 300,000 professionals for running effective email campaigns through Gmail.
You can try GMass for free (with a limit of 50 emails per day during the trial period), and no credit card or signup form is required to get started. Simply download the Chrome extension to begin in minutes.
Discover why 99% of users report improved email deliverability with GMass. It’s an all-in-one tool for email marketing, cold outreach, and mail merge, all seamlessly integrated within Gmail.
TRY GMASS FOR FREE – Download Chrome extension – 30-second install! No credit card required

Ajay is the founder of GMass and an expert in email sending software development with 20 years of experience.
Stay updated with the latest email strategies and tips.