Hosting your own Ark: Survival Evolved server can significantly enhance your gaming experience, offering you and your community complete control over the game environment. Opting for a dedicated Linux server is a robust choice, known for its stability, performance, and efficiency in running game servers. This guide will walk you through the process of setting up an Ark Dedicated Server on a Linux system, ensuring a smooth and optimized gaming experience.
If you’re seeking a reliable and cost-effective solution for hosting your Ark server, consider using a dedicated server or cloud server from providers like ServerMania. These services offer the infrastructure needed to run high-performance game servers with minimal latency and maximum uptime.
Before You Begin: Choosing Your Hosting Option
When it comes to hosting an Ark server, you have primarily two options: setting it up on your personal computer or renting an online server. While self-hosting might seem appealing initially, it comes with limitations like performance constraints due to your home network and computer hardware, and your server being offline when your computer is off.
Opting for an online hosting solution, especially a dedicated or cloud server, provides numerous advantages:
- 24/7 Accessibility: Your server remains online constantly, allowing players to connect anytime.
- High Performance: Hosting providers offer powerful hardware and network infrastructure, ensuring smooth gameplay even with many players.
- Reliability: Professional hosting environments are designed for uptime and stability, minimizing disruptions.
- Scalability: Cloud servers, in particular, offer easy scalability, allowing you to adjust resources as your community grows.
For a seamless and high-quality Ark server experience, especially for a gaming community, a dedicated Linux server from a hosting provider is highly recommended.
What You’ll Need to Get Started
To set up an Ark Dedicated Server on Linux, ensure you have the following prerequisites:
- A Linux Server: A clean installation of a Linux distribution like CentOS, Ubuntu, or Debian is required. This guide is based on CentOS 7, but the steps are adaptable to other distributions.
- Root Access: You’ll need root or administrator privileges to install software and configure the server.
- Sufficient RAM: At least 8GB of RAM is recommended for running an Ark server smoothly. More RAM might be needed depending on the number of players and mods.
- Stable Internet Connection: A reliable and fast internet connection is crucial for hosting a lag-free game server.
Step-by-Step Ark Dedicated Server Installation on Linux
Follow these detailed steps to install and configure your Ark server on a Linux machine.
Step 1: Initial Server Login and System Update
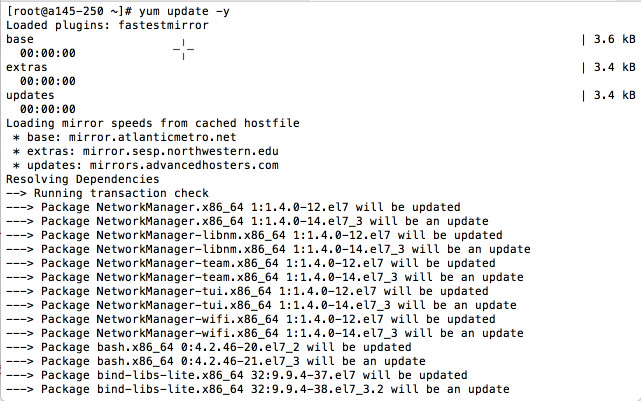 SSH Login and Server Update
Begin by establishing a secure connection to your Linux server using SSH (Secure Shell). Once logged in, it’s essential to update your system’s packages to ensure you have the latest software versions and security patches.
For CentOS:
yum update -yFor Ubuntu or Debian:
apt-get update && apt-get upgrade -yThis process may take some time depending on your server’s current update status. It’s a crucial step for system stability and security.
Step 2: Creating a Dedicated User for the Ark Server
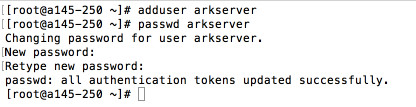 Add Ark Server User
For security and organizational purposes, it’s best practice to create a new user specifically for running the Ark server, rather than using the root user directly.
Add a new user named arkserver:
adduser arkserverSet a strong password for this new user:
passwd arkserverStep 3: Configuring Firewall Ports
To allow players to connect to your Ark server, you need to open specific ports in your server’s firewall. Ark: Survival Evolved uses UDP ports by default.
For CentOS using FirewallD:
firewall-cmd --permanent --zone=public --add-port=27015/udp
firewall-cmd --permanent --zone=public --add-port=7777/udp
firewall-cmd --permanent --zone=public --add-port=32330/udp
firewall-cmd --reload
These commands open the default game port (7777), query port (27015), and RCON port (32330). Adjust these ports if you plan to use different ones in your server configuration.
Step 4: Installing Necessary Libraries
Ark Server requires certain libraries to run correctly on a Linux system. Install these using the package manager.
For CentOS:
yum install nano wget screen glibc.i686 libstdc++.i686 ncurses-libs.i686 -yFor Ubuntu/Debian:
apt-get install nano wget screen lib32gcc1 libstdc++6These libraries include screen for managing server sessions, wget for downloading files, nano for text editing, and essential 32-bit compatibility libraries required by SteamCMD.
Step 5: Adjusting System Settings for SteamCMD
SteamCMD, the command-line Steam client used to download and update game servers, benefits from a higher file descriptor limit. Modify the sysctl.conf file to increase the maximum number of open files.
echo "fs.file-max=100000" >> /etc/sysctl.conf
sysctl -p /etc/sysctl.conf
This command appends the setting to the configuration file and then applies it immediately.
Step 6: Updating Security Limits
Similarly, update the limits.conf file to set higher soft and hard limits for the number of open files for all users.
echo -e "* soft nofile 1000000n* hard nofile 1000000" >> /etc/security/limits.confThese adjustments are important for SteamCMD and the Ark server to handle a large number of connections and files efficiently.
Step 7: Switching to the Ark Server User
Now, switch to the arkserver user you created earlier to proceed with the installation under this user’s context.
su - arkserver
cd ~
This command changes the current user to arkserver and navigates to the user’s home directory.
Step 8: Downloading and Installing Ark Server Files
 Download and Install Ark Server Files
Download and install SteamCMD, then use it to download the Ark Dedicated Server files.
First, create directories and download SteamCMD:
mkdir -p ~/SteamCMD
cd ~/SteamCMD
curl -sqL "https://steamcdn-a.akamaihd.net/client/installer/steamcmd_linux.tar.gz" | tar xzf -
Now, run SteamCMD and install the Ark server files. The Ark Dedicated Server application ID is 376030.
./steamcmd.sh +login anonymous +force_install_dir ~/ark +app_update 376030 validate +quitThis command initializes SteamCMD, logs in anonymously, sets the installation directory to ~/ark, downloads and validates the Ark Dedicated Server files, and then quits SteamCMD. This process will take a while depending on your internet speed.
Step 9: Creating an Update Script for Your Ark Server
To easily update your Ark server in the future, create a script that automates the update process using SteamCMD.
Create a file named updatearkserver.sh in the arkserver user’s home directory:
nano ~/updatearkserver.shAdd the following content to the script:
#!/bin/bash
cd ~/SteamCMD
./steamcmd.sh +login anonymous +force_install_dir ~/ark +app_update 376030 validate +quit
Save and exit the nano editor (Ctrl+X, Y, Enter). Make the script executable:
chmod +x ~/updatearkserver.shNow you can update your server by simply running:
~/updatearkserver.shStep 10: Creating a Start Script for Your Ark Server
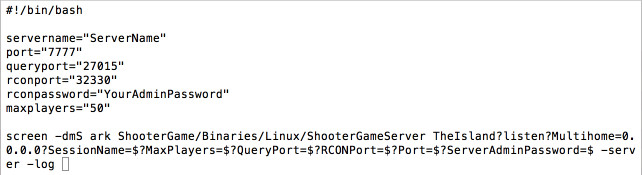 Create Ark Server Start Script
Create a script to easily start your Ark server with your desired settings.
Create a file named startarkserver.sh inside the ~/ark directory:
nano ~/ark/startarkserver.shAdd the following basic start script content. Remember to customize these parameters to your liking:
#!/bin/bash

SessionName="Your Server Name"
port="7777"
queryport="27015"
rconport="32330"
ServerAdminPassword="YourAdminPassword"
maxplayers="50"

screen -dmS arkserver ./ShooterGameServer TheIsland?listen?Multihome=0.0.0.0?SessionName="$SessionName"?MaxPlayers="$maxplayers"?QueryPort="$queryport"?RCONPort="$rconport"?Port="$port"?ServerAdminPassword="$ServerAdminPassword" -server -log
Important Parameters to Customize:
SessionName: The name of your server as it will appear in the server list.ServerAdminPassword: Set a strong admin password to manage your server in-game.maxplayers: The maximum number of players allowed on your server.TheIsland: The default Ark map. You can change this to other maps likeScorchedEarth_P,Aberration_P,Extinction_P,Genesis_P,Genesis2_P, etc., if you have them installed.
Save and exit the nano editor. Make the script executable:
chmod +x ~/ark/startarkserver.shNow you can start your Ark server by running:
~/ark/startarkserver.shTo stop the server gracefully, use the screen command to send a quit signal to the server session:
screen -S arkserver -X quitStep 11: Connecting to Your Ark Server
Create Ark Server Start Script
Your Ark Dedicated Linux Server should now be up and running! To connect:
- Open Steam: Launch the Steam application.
- Navigate to Server Browser: Click on “View” in the top menu, then select “Servers”.
- Add Server to Favorites: In the server browser window, click on “Favorites”, then “Add a Server”. Enter the IP address of your Linux server and the query port (default is 27015). Click “Add this address to favorites”.
- Launch Ark: Survival Evolved: Start the game.
- Join Ark: In the game menu, select “Join Ark”.
- Filter to Favorites: In the server list, filter by “Favorites” in the bottom left. Your server should appear in the list. If not, refresh the list.
- Join and Play: Select your server and click “Join”. You may be prompted for the server password if you have set one.
Congratulations! You have successfully set up your own Ark Dedicated Linux Server. You can now invite your friends and start exploring the world of Ark: Survival Evolved together on your private server. Remember to regularly update your server using the update script and explore the extensive server configuration options to further customize your game environment.