
Minecraft, the globally acclaimed sandbox game, empowers players to unleash their creativity in expansive, procedurally generated 3D worlds. With over 238 million copies sold, it stands as the best-selling PC game of all time, captivating a massive audience of builders, adventurers, and explorers.
To truly experience Minecraft with friends, setting up a dedicated Minecraft server is essential. A server acts as a central hub, a computer hosting the game software, allowing multiple players to connect and play together in a shared virtual space. This guide will walk you through the process of setting up your own Minecraft server on a Windows machine, enabling you to create your personalized multiplayer world.
Minecraft Server Prerequisites
Before you begin the server installation, ensure your system meets these basic requirements to guarantee a smooth Minecraft server experience:
- Operating System: A computer running Windows 10 or a later version of Windows Server.
- RAM: A minimum of 4GB of RAM is highly recommended. For larger servers with more players or mods, consider 8GB or more for optimal performance.
- Network Connection: A stable wired network connection is preferable for reduced latency and consistent server uptime.
- Internet Bandwidth: Minecraft server hosting can consume considerable bandwidth, especially with multiple players. An internet plan with generous or unlimited bandwidth is crucial. Expect approximately 100MB of data usage per player per hour.
For enhanced server performance, particularly for larger communities or modded servers, upgrading your hardware with more RAM and a faster CPU is advisable. For robust and scalable gaming server solutions, explore Dedicated Gaming Server options.
Explore Further: Affordable Cloud Hosting for Minecraft Servers
Step-by-Step Minecraft Server Installation on Windows
Follow these detailed steps to download and install your Minecraft server on Windows:
Step 1: Install Java on Windows
 Install Java for Minecraft Server on Windows
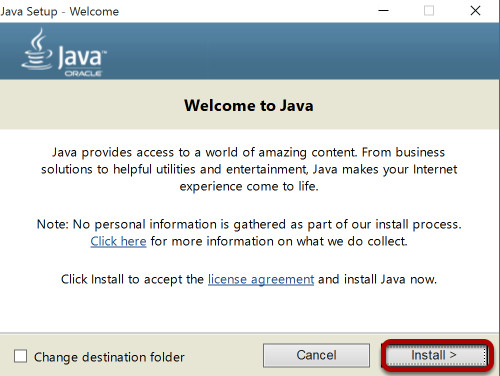
Java is a fundamental requirement for running a Minecraft server. If you don’t have Java installed or need to update it, follow these steps:
- Navigate to the Java Download Website: Open your web browser and go to the official Java download page.
- Download Java for Windows: Locate and download the latest Java version compatible with Windows.
- Install Java: Run the downloaded
.EXEfile and follow the on-screen installation prompts. Click Install to proceed. - Restart Your Computer: After the Java installation is complete, restart your Windows computer. This ensures that the Java installation is fully integrated into your system. Keeping Java updated is crucial for server stability and performance.
Step 2: Download the Minecraft Server Software
 Download Minecraft Server JAR file from official website
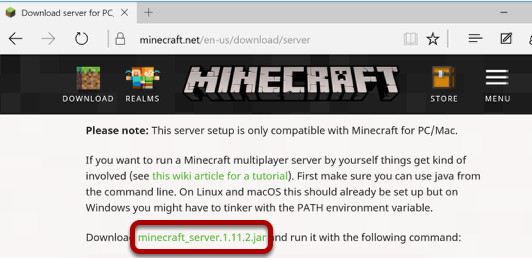
Next, you need to download the Minecraft server software from the official Minecraft website:
- Visit the Minecraft Server Download Page: Go to the official Minecraft server download page.
- Download the Minecraft Server JAR File: Locate the “Minecraft server version” section and download the
minecraft_server.jarfile. This is the official Vanilla Minecraft server software. The file will typically be saved to your browser’s default Downloads folder. - Consider Alternative Server Software (Optional): While this guide focuses on the Vanilla server, you can also download server software from projects like Forge or Bukkit if you plan to use mods or plugins. However, the setup steps for these may vary.
Step 3: Create a Dedicated Minecraft Server Folder
 Move Minecraft Server JAR to a new folder
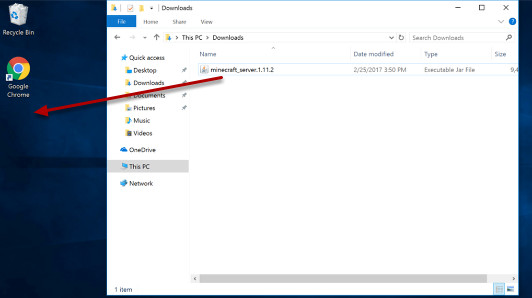
Organize your server files by creating a dedicated folder:
- Open your Downloads Folder: Navigate to your Downloads folder where the
minecraft_server.jarfile was downloaded. - Create a New Folder: Create a new folder in your desired location. For easy access, the Desktop is a convenient option, but a dedicated folder in your Documents or a separate drive is recommended for better organization. Name the folder something descriptive, like “MinecraftServer”.
- Move the JAR File: Drag and drop the
minecraft_server.jarfile from your Downloads folder into the newly created “MinecraftServer” folder.
Step 4: Run the Minecraft Server JAR File for the First Time
 Run Minecraft Server JAR to generate initial files
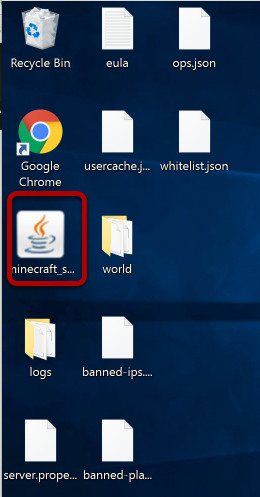
Initialize your server by running the JAR file:
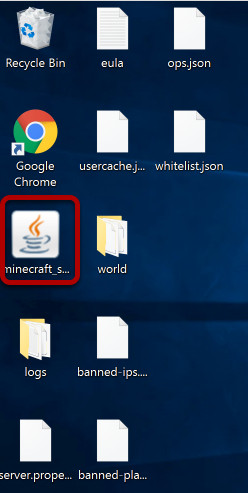
- Double-Click the JAR File: Locate the
minecraft_server.jarfile within your “MinecraftServer” folder and double-click it. - File Generation: Running the JAR file for the first time will not start the server fully. Instead, it will generate essential server files, including the
eula.txtandserver.propertiesfiles, which are necessary for configuring your server.
Step 5: Accept the Minecraft EULA and Configure Server Properties
 Edit EULA and Server Properties files for Minecraft Server
Configure your server settings:
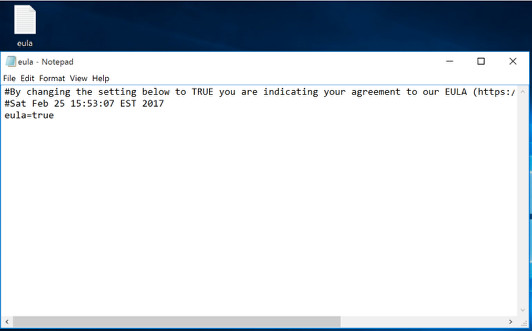
- Open
eula.txt: Locate theeula.txtfile in your “MinecraftServer” folder and open it with a text editor like Notepad. - Accept the EULA: Read the Minecraft End User License Agreement (EULA). To accept it, change the line
eula=falsetoeula=trueand save the file. You must agree to the EULA to run a Minecraft server. - Open
server.properties: Open theserver.propertiesfile with a text editor. This file contains numerous settings to customize your server. - Configure Server Settings: Modify settings in
server.propertiesto your preferences. Key settings include:server-port=25565: The default port for Minecraft servers. You can change this if needed.max-players=20: The maximum number of players allowed on your server. Adjust this based on your server’s resources and desired player capacity.server-ip=: Leave this blank for a home server. If using a hosted server, enter the server IP address.online-mode=true: Keep this set totruefor official Minecraft account verification. Set tofalsefor offline mode (not recommended for public servers).gamemode=0: Sets the default game mode (0 for Survival, 1 for Creative, 2 for Adventure, 3 for Spectator).difficulty=1: Sets the game difficulty (0 for Peaceful, 1 for Easy, 2 for Normal, 3 for Hard).
Refer to the Minecraft Wiki for a complete list of server properties and their descriptions. Save theserver.propertiesfile after making your desired changes.
Step 6: Run the Minecraft Server Again
 Start Minecraft Server by running JAR file again
Start your Minecraft server:
- Double-Click
minecraft_server.jar: Double-click theminecraft_server.jarfile again. This time, with the EULA accepted and properties configured, the server will start running. - Server Loading: A console window will appear, displaying the server startup process. Wait for the “Done” message in the console, indicating that the server has successfully started.
Step 7: Allow Minecraft Server Through Windows Firewall
 Allow Minecraft Server Access through Firewall
Ensure your firewall allows connections to your Minecraft server:
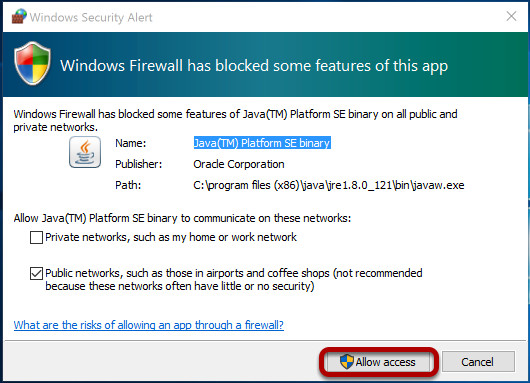
- Windows Security Alert: When the server starts for the first time, Windows Firewall may display a security alert asking to allow Java access.
- Click “Allow access”: Ensure both “Private networks” and “Public networks” are checked and click Allow access. This allows players on your local network and potentially the internet to connect to your server. If you missed the prompt, you may need to manually configure Windows Firewall to allow inbound and outbound connections for Java or port 25565 (or your custom server port).
Step 8: Monitor Minecraft Server Stats
 Minecraft Server console showing server statistics
Observe your server’s performance:
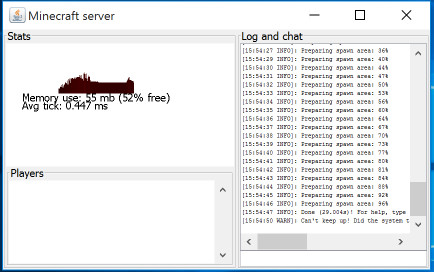
- Server Console: The console window provides real-time server statistics, including CPU and memory usage, player connections, and server logs. Monitor this console for any errors or performance issues.
- Resource Usage: If you notice high CPU or RAM usage, especially with multiple players, consider upgrading your server hardware or reducing the number of players to maintain smooth gameplay. As indicated in the image, a local PC might struggle to host a larger multiplayer server effectively. For optimal performance and scalability, consider using a cloud server from a provider like ServerMania.
Step 9: Connect to Your Minecraft Server
Now that your server is running, connect to it from your Minecraft game client:
- Launch Minecraft: Start your Minecraft game client.
- Select “Multiplayer”: From the main menu, click on Multiplayer.
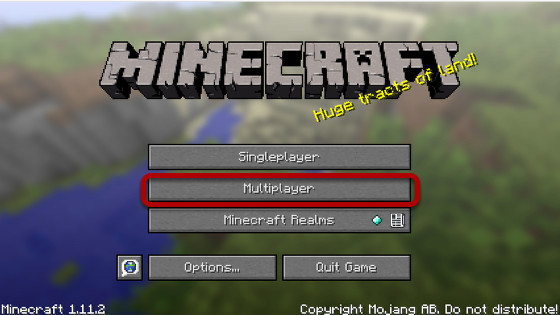 Minecraft Multiplayer Menu
- Click “Add Server”: Click the Add Server button.
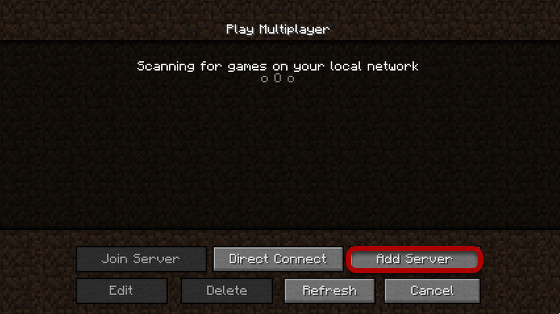 Add Server Button in Minecraft
- Enter Server Details:
- Server Name: Enter a name for your server (e.g., “My Minecraft Server”).
- Server Address: Enter
localhostor127.0.0.1to connect to the server running on your own computer. To allow friends to connect over the internet, you’ll need to provide them with your public IP address and configure port forwarding (see next section). You can find your public IP address by searching “what’s my IP” on Google.
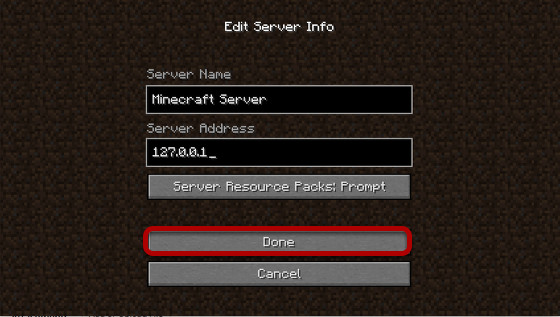 Enter Server Address Details in Minecraft
- Click “Done”: Click Done to save the server details.
- Select and Join Server: Your server will now appear in the server list. Select it and click Play to join your Minecraft world!
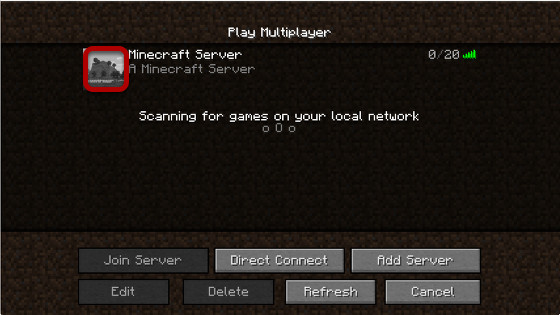 Play Button to Join Minecraft Server
Setting Up Port Forwarding for External Connections
If you want friends outside your local network to join your Minecraft server, you need to configure port forwarding on your router. Port forwarding directs incoming traffic on a specific port (default 25565) to your server computer.
Port Forwarding Steps (General):
- Access Router Settings: Open your web browser and enter your router’s IP address (usually
192.168.1.1or192.168.0.1) in the address bar. Log in to your router’s administration panel using your router’s username and password (check your router documentation for default credentials). - Find Port Forwarding Settings: Locate the port forwarding, NAT, or similar settings section in your router’s configuration. The exact location varies depending on your router model.
- Create a New Port Forwarding Rule:
- Service Name/Description: Enter a descriptive name (e.g., “Minecraft Server”).
- Port Range/External Port/Internal Port: Enter
25565for both external and internal ports (or your custom server port if you changed it inserver.properties). - Protocol: Select
TCP/UDPorBoth. - Internal IP Address/Destination IP: Enter the local IP address of the computer running your Minecraft server. You can find your computer’s local IP address by running
ipconfigin Command Prompt on Windows. - Enable Rule: Enable the port forwarding rule.
- Apply/Save Settings: Save the port forwarding settings on your router. Your router may need to restart for the changes to take effect.
Important Note: Port forwarding instructions are highly router-specific. Consult your router’s manual or search online for “[your router model] port forwarding Minecraft” for detailed instructions tailored to your router. Websites like PortForward.com offer guides for various router models.
After setting up port forwarding, provide your friends with your public IP address (the one you found by searching “what’s my IP”) so they can connect to your server using your public IP and port 25565. Keep in mind that dynamic public IPs may change occasionally, requiring you to update your friends with the new IP when this happens. A static IP or a dynamic DNS service can address this issue. Cloud servers typically provide a static IP address, simplifying server access.
Conclusion
Congratulations! You have successfully downloaded and set up your own Minecraft server on Windows. You and your friends can now embark on exciting adventures together in your customized Minecraft world.
By following these steps, you’ve gained the foundation to create a Vanilla Minecraft server. You can further customize your server experience by exploring server modifications and plugins using server software like Forge, Spigot, or Feed The Beast, allowing you to add mods, plugins, and unique gameplay features.
Further Resources: (Live Webinar) Meet ServerMania: Transform Your Server Hosting Experience
ServerMania provides comprehensive support for businesses, offering technical tutorials alongside enterprise-grade solutions like colocation and server cluster configurations. For advanced partnership inquiries, schedule a free consultation with our account executives today.
Was this guide helpful?
About the Author
Luc Ayotte
IT Networking/Infrastructure Guru
Luc Ayotte brings extensive experience and profound expertise to the realm of server management. His passion for optimizing digital infrastructure and ensuring exceptional online experiences makes Luc an invaluable asset to the ServerMania team.