Kiwi CatTools has long been recognized as an essential tool for network configuration backup. If you’re like many users, you might find your current installation residing on an older system that’s due for an upgrade. Migrating Kiwi CatTools to a newer server is a necessary step to ensure continued efficiency and compatibility.
Fortunately, the migration process for Kiwi CatTools is straightforward. This guide will provide you with a detailed, step-by-step walkthrough to move your Kiwi CatTools installation from an older server, such as Windows Server 2008, to a modern platform like Windows Server 2016.
Related Resource: Explore integrating Kiwi Syslog Web Access with Active Directory for enhanced network management.
Preparing for Your Kiwi CatTools Migration
Before initiating the installation on your new server, it’s crucial to perform essential backup and preparation tasks on your existing server. Pay close attention to the sequence of these steps to avoid potential licensing complications with Solarwinds.
Backing Up Your Kiwi CatTools Configuration
The first critical step is to backup your CatTools database and the Variations folder. Here’s how to do it:
-
Launch Kiwi CatTools on your old server.
-
Export Device Database: Navigate to
File -> Database -> Export. Select “Export devices to tab delimited file.” -
Save Device Export: Choose a location to save the
.txtfile. This file contains your device configurations. -
Export Activities Database: Go back to
File -> Database -> Export. This time, select “Export activities to tab delimited file.” -
Save Activities Export: Save this
.txtfile to your chosen location as well. This file contains your scheduled activities and logs. Screenshot showing kiwi cattols database export activities migration
Alt text: Exporting activities database from Kiwi CatTools for migration, highlighting the ‘Export activities to tab delimited file’ option in the Database menu.
-
Backup Current Database (Optional but Recommended): Navigate to
File -> Database -> Backup current database. This creates a.kdbbackup file, offering an additional layer of safety.- This file is saved in
CatTools3 -> KDB Backups -> System Backups. While the.txtfiles contain the same core data, this backup serves as an extra precaution.
- This file is saved in
-
Copy the Variations Folder: Open Windows Explorer and locate your CatTools installation directory. Copy the “Variations” folder. In a standard installation, this is typically found at
C:Program Files (x86)CatTools3Variations. Screenshot showing kiwi cattols variations backup migration
Alt text: Locating and copying the Variations folder from the Kiwi CatTools installation directory to backup configuration settings for server migration.
-
Transfer Backup Files: Move the
.txtfiles, the optional.kdbfile, and the “Variations” folder to a temporary, accessible location on your new server.
Deactivating Your Kiwi CatTools License
Before proceeding with the new server installation, it’s essential to deactivate your Kiwi CatTools license on the old server. This step is critical to avoid licensing issues and is mandatory before uninstalling CatTools or decommissioning the old server.
-
Open SolarWinds License Manager: Launch the SolarWinds License Manager. If it’s your first time, you might find a shortcut in your Start Menu for “SolarWinds License Manager Setup.” Run this to open the License Manager. Alternatively, download it from HERE.
-
Deactivate License: In the License Manager, find “Kiwi CatTools” in the list, check the box next to it, and click “Deactivate.”
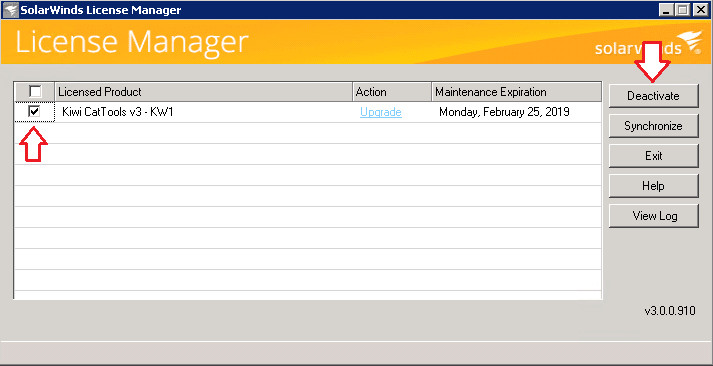 Screenshot showing kiwi cattols license manager deactivate
Alt text: Deactivating the Kiwi CatTools license using SolarWinds License Manager before migrating to a new server, highlighting the ‘Deactivate’ button.
-
Proceed with Deactivation: In the “Deactivate Licenses” window, click “Next.”
-
Internet Connectivity Options: Select the option that matches your server’s internet connectivity. If using a proxy, enter the proxy details and click “Next.”
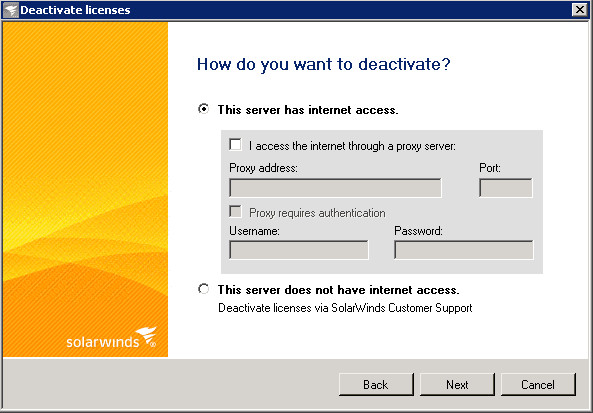 Screenshot showing kiwi cattols license manager deactivate internet access
Alt text: Configuring internet access settings within SolarWinds License Manager during Kiwi CatTools license deactivation process for server migration.
-
Confirm Deactivation: Check the box to confirm license deactivation and click “Deactivate.”
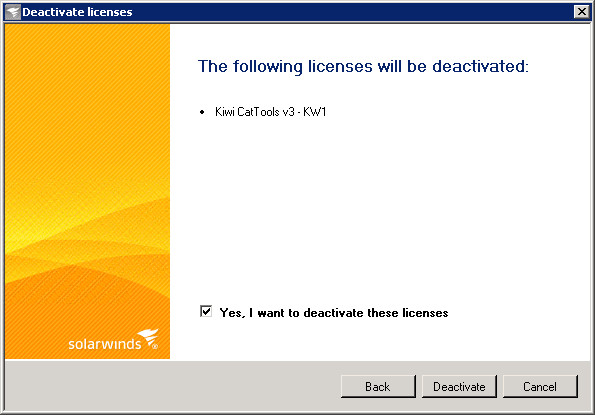 Screenshot showing kiwi cattols license manager deactivate confirm
Alt text: Confirming the deactivation of the Kiwi CatTools license in SolarWinds License Manager to finalize the license transfer for server migration.
-
Complete Deactivation: Wait for the deactivation process to complete. Once done, click “Finish” and exit the License Manager.
Installing Kiwi CatTools on Your New Windows Server 2016
With your data backed up and license deactivated, you can now install Kiwi CatTools on your new Windows Server 2016.
-
Enable .Net 3.5: Ensure that .Net 3.5 is enabled on your new server. If your server lacks internet access, mount your Windows Server 2016 ISO and run the following command in Command Prompt (Admin):
Dism /online /enable-feature /featurename:NetFX3 /All /Source:D:sourcessxs /LimitAccess(Replace
D:sourcessxswith the correct path to your mounted ISO source directory.) -
Run the Installer: Execute the Kiwi CatTools installer on your new server (e.g.,
Kiwi_CatTools_3.11.3.setup). -
Run as Service: When prompted during installation, choose to run Kiwi CatTools as a service.
-
Enter Registration Details: Once installed, open Kiwi CatTools and navigate to
Help -> Enter registration details. -
Activate License: Enter your license activation key in the window that appears. Provide proxy information if needed and click “Next.”
-
Contact Information: Enter your valid contact details, click “Next,” and then “Finish.”
-
Restart CatTools: You’ll be prompted to restart CatTools. Click “Restart.”
-
Close Setup Wizard: After restart, the setup wizard will launch. Close the wizard and click “No” when asked if you want it to start at login. We will be importing your previous configuration, so the wizard is not needed.
Importing Data to Your New Kiwi CatTools Server
With Kiwi CatTools installed and running on your new server, the final step is to import your backed-up configuration and data.
-
Review Exported Activity File: Open the
Export_Activity.txtfile that you saved earlier on your new server. -
Adjust File Paths (If Necessary): Verify and adjust any file or folder paths in the
.txtfiles to match the new server’s environment. For example, update paths fromProgram FilestoProgram Files (x86)if you’re migrating between different architecture servers (32-bit to 64-bit). -
Import Device Database: Navigate to
File -> Database -> Import -> Import devices from tab delimited filein Kiwi CatTools. Screenshot showing kiwi cattols database import devices
Alt text: Importing device configurations into the new Kiwi CatTools server from a tab-delimited file using the Database Import menu.
-
Select Device File: Browse to and select the
Export_Device.txtfile and click “Open.” -
Handle Duplicates: A dialog box will appear asking how to handle duplicate devices. Select “Update” since your new installation database is currently empty.
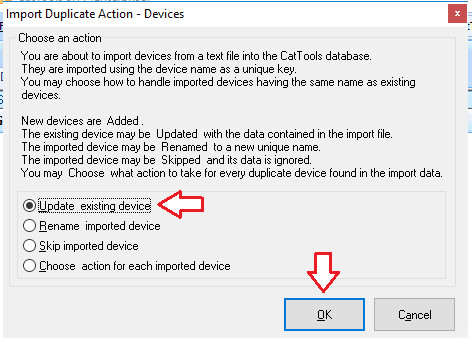 Screenshot showing kiwi cattols database import devices update
Alt text: Selecting the ‘Update’ option for handling duplicate devices during the database import process in Kiwi CatTools, as no devices currently exist.
-
Import Activities Database: Go to
File -> Database -> Import -> Import activities from tab delimited file. -
Select Activity File: Repeat steps 4 and 5 for the
Export_Activity.txtfile. -
Copy Variations Folder: Copy the “Variations” folder that you backed up earlier into your new CatTools installation directory, overwriting the default “Variations” folder.
-
Restart CatTools Service: Open
services.msc, find the “CatTools” service, and restart it.
Your Kiwi CatTools installation on the new server should now be fully functional, with all your previous configurations and data successfully migrated. You can now start your timers and resume using CatTools as before.
For historical backups and change logs, you can copy the respective folders from your old server to the new one. Be mindful of the data volume, especially if you have a long history of backups, and assess if this historical data is essential for your needs.
Enhanced Network Monitoring: Consider ManageEngine OpManager
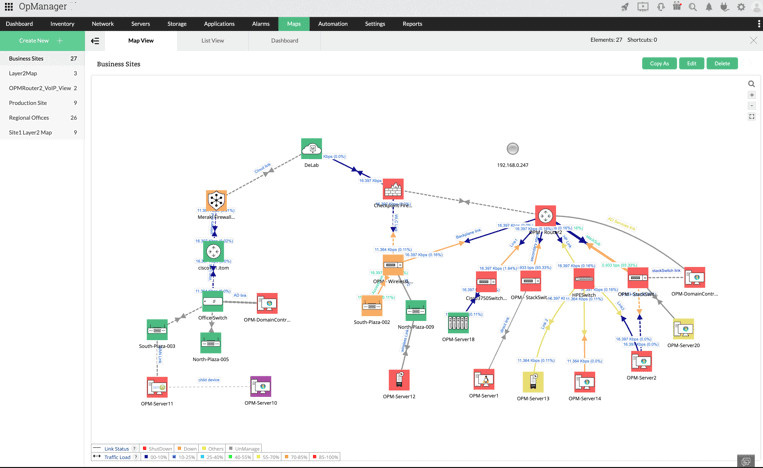 – Multi-vendor Network Monitoring: Comprehensive support for diverse network devices.
- Simple Installation & Setup: User-friendly deployment and configuration.
- Intuitive UI: Easy-to-navigate interface for efficient monitoring.
- Complete Visibility: Gain full insight into your network infrastructure.
- Intelligent Detections: Proactive issue identification and alerting.
- Easy Resolutions: Streamlined troubleshooting and remediation processes.
