
Crème brûlée, with its elegant presentation and delightful contrast between a brittle caramelized sugar crust and a smooth, creamy custard, is a dessert that often graces restaurant menus and special occasions. Making this classic French dessert at home is surprisingly straightforward, requiring just a few simple ingredients: egg yolks, heavy cream, vanilla, salt, and sugar. You don’t even need a specialized torch to achieve that signature caramelized topping – your oven broiler will work perfectly. This guide will not only provide you with a foolproof crème brûlée recipe, complete with step-by-step instructions and helpful tips, but also delve into a frequently asked question: is crème brûlée served cold? Understanding the ideal serving temperature is key to fully appreciating this exquisite dessert.
If you’re a fan of decadent desserts, be sure to also explore recipes like Crème Brulee French Toast, Chocolate Éclair Cake, Chocolate Mousse Cake, Chocolate Lava Cake, and Red Velvet Cheesecake.
What Exactly is Crème Brûlée?
Crème brûlée, French for “burnt cream,” is a rich and creamy custard dessert traditionally served in individual ramekins. Its base is a velvety custard made from egg yolks, sugar, heavy cream, and vanilla, creating a luxurious texture and flavor. The defining characteristic of crème brûlée is its hard, brittle topping of caramelized sugar. This glassy shell is achieved by torching a thin layer of granulated sugar sprinkled over the custard, providing a satisfying crack when tapped with a spoon, contrasting beautifully with the smooth custard beneath.
There are two main methods for preparing the custard: the “hot” and “cold” methods. The hot method involves whisking egg yolks and sugar over a double boiler before incorporating warmed cream and vanilla. The cold method, which we utilize in our easy recipe, simplifies the process by whisking the egg yolks and sugar together off the heat and then gently whisking in warmed cream. Both methods yield a delicious result, but the cold method is particularly accessible for home cooks.
The Taste and Origins of Crème Brûlée
Crème brûlée offers a flavor profile that is both comforting and sophisticated. The custard itself is subtly sweet and intensely creamy, infused with the delicate aroma of vanilla. The caramelized sugar topping adds a layer of toasty sweetness with hints of butterscotch and caramel, creating a complex and delightful taste experience. The textural contrast between the crisp sugar and smooth custard is just as important as the flavor, contributing to the overall indulgence of the dessert.
While widely considered a French dessert, crème brûlée’s origins are debated, with England and Spain also laying claim. However, the earliest known recipe appeared in French chef François Massialot’s cookbook in 1691. Interestingly, early versions involved placing a pre-made caramelized sugar disk on top of the custard, rather than torching the sugar directly on the dessert. The now-iconic method of torching the sugar directly on the custard is rumored to have originated at Trinity College in Cambridge, England, in 1879.
Crème brûlée gained significant popularity in America in the 1980s, becoming a staple in upscale restaurants before eventually reaching mainstream appeal. Today, its influence extends beyond the classic custard, inspiring variations like crème brûlée French toast, ice cream, and even coffee creamers. However, for purists, the traditional custard form remains the ultimate expression of this beloved dessert.
Key Ingredients for Homemade Crème Brûlée
One of the appeals of crème brûlée is its simplicity. The ingredient list is short and sweet, relying on high-quality basics to deliver exceptional flavor and texture.
Here’s what you’ll need to make a truly outstanding crème brûlée:
- Heavy Cream: Essential for the rich, velvety texture. Opt for full-fat heavy cream, also labeled as heavy whipping cream, for the best results. Lower-fat alternatives will compromise the creamy consistency.
- Egg Yolks: The heart of the custard, providing richness, smoothness, and that characteristic golden hue. Save the egg whites for other culinary adventures.
- Granulated Sugar: Used both to sweeten the custard and to create the caramelized topping. While some recipes suggest superfine sugar, standard granulated sugar works perfectly well.
- Salt: A pinch of salt is crucial to balance the sweetness and enhance the vanilla flavor. Don’t skip it!
- Vanilla Extract: Pure vanilla extract is a must. Given the short ingredient list, using high-quality vanilla is key to achieving the best flavor.
Choosing the Right Ramekins
The type of ramekin you use can impact both the presentation and the cooking of your crème brûlée. Restaurant-style crème brûlée is typically served in wide, shallow ramekins. This shape maximizes the surface area for the coveted brittle sugar crust, ensuring a satisfying topping-to-custard ratio in every bite.
For this recipe, 5-ounce ramekins are ideal. They offer a good balance, providing ample caramelized sugar without making the custard layer too thin. While 5-ounce ramekins are recommended, you can use other sizes you might already own. 4-ounce or 6-ounce ramekins will also work; just ensure you have enough to hold approximately 30 ounces of custard in total.
Step-by-Step Guide: Making Crème Brûlée
Making crème brûlée at home is easier than you might think. Follow these steps for perfect results:
Step 1: Warm the Heavy Cream
- In a saucepan, combine heavy cream and salt. Heat over medium heat until just simmering. Remove from heat and stir in vanilla extract.
- Tip: Allow the cream to cool for about 10 minutes. This prevents the hot cream from scrambling the egg yolks in the next step.
Step 2: Combine Egg Yolks and Sugar
- In a mixing bowl, whisk together egg yolks and ½ cup granulated sugar for about 2 minutes, until pale and slightly thickened. An electric mixer can be used, but hand whisking works just as well.
- Tip: Don’t discard the egg whites! Store them in a sealed container in the refrigerator for up to 4 days, or freeze for longer storage. They can be used for omelets, meringues, and other recipes.
 showing how to make creme brulee by beating egg yolks and sugar
Step 3: Temper the Egg Yolks
- Tempering the egg yolks is crucial to prevent scrambling. Gradually whisk a small amount of the warm cream into the egg yolk mixture, whisking constantly. Repeat this process, adding a little more cream each time, until the egg yolk mixture is warmed. Then, slowly pour in the remaining warm cream, whisking continuously until fully combined.
- Tip: Skim off any foam that forms on the surface of the custard mixture. This will ensure a smoother, more refined final texture.
Step 4: Prepare for Baking
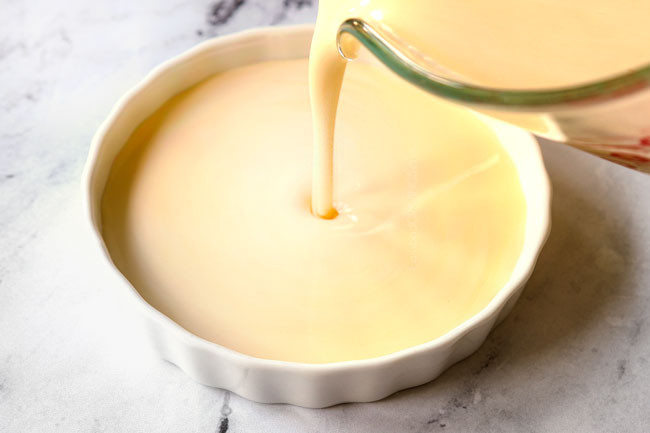
- Pour the custard mixture into a liquid measuring cup or pitcher for easier pouring. Divide the custard evenly among the ramekins.
- Place the ramekins in a roasting pan with high sides. Carefully pour boiling water into the roasting pan until it reaches about ¾ of the way up the sides of the ramekins, creating a water bath.
 preparing creme brulee for baking in a water bath
Tips for Adding the Water Bath:
- Place the roasting pan with ramekins in the oven before adding the water to avoid splashing.
- Use a pitcher or liquid measuring cup for controlled pouring.
- Pour slowly, directing the spout towards the corner of the roasting pan.
Why Use a Water Bath?
A water bath creates a gentle, humid cooking environment in the oven. This is essential for custards because it helps them cook evenly, preventing curdling and cracking. The water bath regulates the temperature, ensuring the delicate egg proteins cook gently and remain smooth and creamy.
Step 5: Bake the Crème Brûlée
- Baking time will vary depending on the depth and size of your ramekins. Shallow ramekins (5-6 ounces, less than 1 inch deep) will typically bake for 25-30 minutes. Deeper ramekins (around 2 inches deep) may require 40-50 minutes.
Determining Doneness:
- Temperature: The internal temperature should reach 170°F (77°C) when measured with an instant-read thermometer.
- Jiggle Test: The custard should be set around the edges but still jiggle slightly in the center when gently shaken. It will continue to firm up as it cools.
- Touch Test: Lightly touch the center of a custard; it should spring back slightly and leave your finger mostly clean.
- Appearance: The surface should be evenly colored and glossy, without any wet spots.
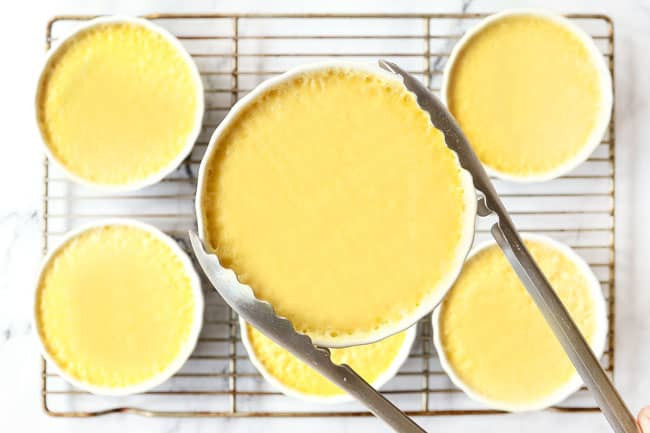 showing how to make creme brulee by cooling custard on a wire rack
Signs of Over-Baking:
- Custard is firm with minimal to no jiggle. It will still be tasty but less creamy.
- Custard has puffed up in the middle, indicating the eggs are overcooked and cannot be salvaged.
Step 6: Cool and Chill
- Remove ramekins from the oven and carefully take them out of the water bath. Let them cool at room temperature for about an hour, then refrigerate for at least 4 hours, or preferably overnight. Thorough chilling is crucial for the custard to fully set.
Step 7: Caramelize the Sugar Topping (Brûlée)
- Just before serving, it’s time to create the signature caramelized crust. Sprinkle a thin, even layer of granulated sugar over the top of each custard, ensuring the entire surface is covered.
- Use a kitchen torch to caramelize the sugar. Hold the torch a few inches away from the surface and move it in a slow, even, side-to-side motion. The sugar will first melt, then caramelize to a golden brown, brittle crust.
Tips for Perfect Caramelized Topping:
- Ensure the custard surface is dry by dabbing with a paper towel to remove any condensation before adding sugar.
- Use enough sugar to completely cover the custard top, about 1-2 teaspoons depending on ramekin size.
- Distribute the sugar evenly by swirling the ramekin and gently shaking it side to side.
- Torch evenly, using a medium flame, and stop torching just before the desired level of caramelization is reached, as the sugar will continue to cook for a few seconds after removing the flame.
 showing how to make creme brulee by caramelizing the top of the sugar topping with a creme brulee torch
Torch vs. Broiler for Caramelizing:
- Torch: A kitchen torch provides direct, high heat, offering precise control for a uniformly caramelized topping. It’s the preferred method for achieving professional-looking results.
- Broiler: If you don’t have a torch, you can use your oven broiler. Place the chilled custards on a baking sheet on the highest oven rack. Broil on low, watching very closely and rotating frequently, until the sugar is caramelized. Broiling can be less even and requires careful monitoring to prevent burning, but it’s a viable alternative.
Serving Temperature: Is Crème Brûlée Served Cold?
Now, let’s address the key question: Is crème brûlée served cold? The answer is nuanced, and the ideal serving temperature often comes down to personal preference, but there are some general guidelines.
Traditionally, and arguably at its best, crème brûlée is served slightly chilled, not ice cold. The caramelization process itself warms the very top layer of the custard. Ideally, the custard base should be cool and creamy, providing a refreshing contrast to the warm, brittle sugar crust. Serving it too cold can dull the flavors and make the custard feel less luxurious.
Many restaurants serve crème brûlée somewhat chilled, finding a balance that highlights both the cool custard and the freshly caramelized topping. However, some may serve it colder, depending on their preparation and serving style.
Here’s a breakdown of serving temperature considerations:
- Freshly Torched: Serving crème brûlée immediately after torching results in a slightly chilled custard with a warm, crisp topping. This is often considered the optimal serving method, offering the most pronounced textural contrast.
- Slightly Chilled (After Torch): Allowing the torched crème brûlée to sit at room temperature for a short period (around 15-30 minutes) or refrigerating it for a very brief time (no more than 30 minutes) after torching maintains the crispness of the topping while allowing the custard to be pleasantly cool but not frigid. This is a good compromise for those who prefer a slightly cooler dessert.
- Cold (Chilled Throughout): While less traditional, crème brûlée can be served cold directly from the refrigerator. However, chilling it for too long after torching will cause the caramelized sugar to absorb moisture and soften, losing its signature crispness. If you prefer it cold, it’s best to torch the topping just before serving from the refrigerator and consume it relatively quickly.
Personal Preference: Ultimately, the best serving temperature for crème brûlée is the one you enjoy most. Experiment to find your ideal balance. If you prefer a colder dessert, you can chill it slightly longer after torching, understanding that the topping may soften somewhat over time. If you prioritize the textural contrast and a slightly warmer sugar crust, serve it soon after torching.
Tips for Perfect Crème Brûlée
- Use Full-Fat Ingredients: Don’t skimp on the heavy cream and egg yolks. The fat content is crucial for the rich, velvety texture of crème brûlée.
- Invest in Ramekins: While not essential, ramekins are ideal for individual servings and proper cooking. 5-ounce shallow ramekins are recommended.
- Don’t Forget Butane (if using a torch): If you opt for a kitchen torch, ensure you have butane fuel on hand.
- Use Real Vanilla Extract: Pure vanilla extract provides the best flavor.
- Room Temperature Eggs: Room temperature eggs combine more smoothly with sugar, resulting in a creamier custard. To quickly warm eggs, submerge them in warm (not hot) water for 10-15 minutes.
- Cool Completely: Allow the baked custards to cool to room temperature and then chill thoroughly in the refrigerator. This cooling process is essential for the custard to set properly.
- Strain Custard (if needed): If your custard mixture isn’t perfectly smooth, strain it through a fine-mesh sieve before pouring into ramekins to remove any lumps or air bubbles.
- Don’t Overbake: Overbaked crème brûlée will be less creamy and may have an eggy taste. Bake until just set with a slight jiggle in the center.
- Chill Overnight: Chilling overnight allows the flavors to meld and deepen.
- Avoid Burning the Sugar Topping: Caramelize the sugar to a deep golden brown, not black, to prevent a bitter, burnt flavor.
- Brûlée Just Before Serving: For the crispiest topping, brûlée the sugar right before serving. Avoid chilling for extended periods after torching, as the topping will soften.
Make-Ahead Options for Crème Brûlée
Crème brûlée is an excellent make-ahead dessert, perfect for entertaining.
- Unbaked Custard: The custard mixture can be prepared up to 3 days in advance and stored, covered, in the refrigerator. You can store it in a single container or divide it among ramekins.
- Baked Custards (Un-torched): Baked custards, without the sugar topping caramelized, can be refrigerated for up to 4 days. Caramelize the topping just before serving.
- Brûléed Crème Brûlée (Limited): If you need to brûlée ahead, you can do so up to 30 minutes before serving and refrigerate briefly. However, for the best texture, torching just before serving is ideal.
Serving Suggestions for Crème Brûlée
While delicious on its own, crème brûlée can be enhanced with simple garnishes:
- Fresh Berries (raspberries, strawberries, blueberries)
- Whipped Cream
- Citrus Zest (lemon, orange)
- Cinnamon
- Caramel Sauce
- Chocolate Sauce
- Chopped Nuts
Storage Guidelines for Crème Brûlée
- Baked Custard: Un-torched baked custards will keep in the refrigerator for up to 3 days.
- Brûléed Crème Brûlée: Best enjoyed immediately after torching. If needed, it can be refrigerated for up to 30 minutes without significant loss of topping crispness.
Crème Brûlée FAQs
What if I burn the sugar topping? Don’t worry, it’s easily fixed. If the topping is slightly burnt, you can often scrape off the top layer, re-sprinkle with sugar, and brûlée again.
Is crème brûlée just a custard? Yes, crème brûlée is a type of custard, but it’s distinguished by its caramelized sugar topping. This crust provides a unique textural and flavor contrast that sets it apart from other custards.
Explore More Easy Dessert Recipes
Ready to Make Crème Brûlée?
Pin for Later!
Find More Recipes on Pinterest!
©Carlsbad Cravings by CarlsbadCravings.com
Tools Used in This Recipe
- Ramekin Set (5 Ounce Shallow/Creme Brulee)
- Kitchen Torch
- Butane Refill Bottles
- Nonstick Roaster/Roasting Pan
- Stainless Steel Mixing Bowl Set
- Sauce Pan 2.25 qt.
- Small Whisk
- Liquid measuring cup (8 cups)
- Fine Mesh Strainer
- Cooling Racks
See Favorite Tools
Easy Creme Brulee Recipe
This crème brûlée recipe is surprisingly easy to make at home – but it can be our little secret. Crème brûlée radiates elegance, indulgence and luxury, characterized by the crisp caramelized sugar shell giving way to the lusciously creamy custard. All you need are egg yolks, heavy cream, vanilla, salt and sugar to make this recipe. And don’t worry, you do NOT need a crème brûlée torch – I’ll show you how to make the solid caramelized sugar topping in your oven! This foolproof crème brûlée recipe includes step-by-step photos and tips for success so you can make the best crème brûlée recipe of your life. You will also love that this crème brûlée recipe is make ahead friendly!
Servings: 6 -8 servings
Total Time: 55 minutes mins
Prep Time: 20 minutes mins
Cook Time: 30 minutes mins
Save This Recipe To Your Recipe Box
You can now create an account on our site and save your favorite recipes all in one place!
Print Recipe
Pin Recipe
Save Recipe
Saved!
Ingredients
Custard
- 2 1/2 cups heavy whipping cream
- 1/4 teaspoon salt
- 5 large egg yolks at room temperature
- 1/2 cup granulated sugar
- 1 1/2 teaspoons pure vanilla extract
ADD LATER FOR TOPPING:
- 1/4 cup granulated sugar
Instructions
CUSTARD
- Preheat the oven to 325 degrees F.
- Add the heavy cream and salt to a medium saucepan and heat over medium heat just until simmering. As soon as it begins to simmer (don’t let it boil!), remove from heat and stir in the vanilla extract. Set aside to cool for 10 minutes.
- Meanwhile, bring about 5 cups of water to a boil on the stovetop to use later in the water bath (I use a large saucepan so it boils more quickly). Place either (8) 4-ounce ramekins, (6) 5-ounce ramekins (my fav), or (5) 6-ounce ramekins in a roasting pan or two smaller baking pans; set aside.
- Add the egg yolks and ½ cup granulated sugar to a mixing bowl. Beat on medium speed for 2 minutes.
- Using a hand whisk and whisking constantly, slowly drizzle ¼ cup (eyeball it) warmed heavy cream into the egg mixture; whisk until completely incorporated. Repeat with another ¼ cup warmed cream. Once combined, slowly whisk in the remaining warmed cream until combined, whisking constantly.
- Pour the custard into a large liquid measuring cup (or pitcher)— this makes filling the ramekins much easier. Evenly divide the custard between the ramekins. Transfer boiling water to a separate (or cleaned) liquid measuring cup or pitcher.
- Transfer the roasting pan with custard to the middle oven rack then immediately pour the hot water into the pan around the custard until it reaches about ¾ up the sides of the ramekins. (Place the spout on the corner of the roasting pan and pour slowly so water doesn’t splatter onto the custard.)
- Bake at 325 degrees F for 25-45 minutes or until the center registers 170 degrees F on an instant read thermometer. The custard should be barely set, not liquid, but still jiggly all over. The baking time will depend on the depth of the ramekins; shallow 1-inch ramekins (5-6 ounces) will take closer to 25 minutes, deep 2-inch ramekins (4 ounces) will take closer to 45 minutes).
- Remove the custards using tongs to a cooling rack and let cool to room temperature, 1-2 hours. Cover custards with plastic wrap and refrigerate for 4 hours up to 3 days before adding the sugar topping.
SUGAR TOPPING PREP
- For lukewarm crème brûlée (my preference) that is being TORCHED, remove the custard from the refrigerator 20 minutes prior to caramelizing the sugar on top OR wait 20 minutes after caramelizing to serve. Do not remove custard from the fridge earlier if oven broiling (the oven will sufficiently heat the custard up).
- Dab the tops of the custards with paper towels to remove any condensation. Create the sugar crust by sprinkling 1-2 teaspoons over the tops of each custard. Use less sugar for narrow ramekins and 2 teaspoons for wide ramekins. Swirl the sugar then shake the ramekin from side to side until the sugar is evenly distributed.
TO TORCH BRULEE
- Hold the torch about 4 to 5 inches from the sugar, and use a medium power flame. Maintain a constant, slow, side to side motion until the sugar melts and then becomes golden. Serve crème brûlée immediately for best results (crunchiest topping) or store in the refrigerator for up to 30 minutes before serving.
TO OVEN BRULEE
- I suggest only broiling half of the custards at once so they are easier to rotate for more even caramelization. Arrange a rack in the oven in the highest position. Place the ramekins on a baking sheet then place on the rack and turn on the broiler (DO NOT PRE-HEAT BROILER).
- Broil for 5 to 10 minutes, rotating the ramekins frequently with tongs so that they broil evenly. Watch closely towards the end so they don’t burn. Remove from the oven when the tops are golden brown and bubbling. Serve crème brûlée immediately for best results (crunchiest topping) or store in the refrigerator for up to 30 minutes before serving.
Notes
Tips for Success
- Ramekins: I personally prefer 5-ounce ramekins (shown in this recipe). I find the ratio of topping to custard the most satisfying. The wide surface area means more caramelized sugar without the custard being too thin. I suggest these 5 ounce ramekins if you are purchasing them anyway. They are an investment, but less expensive than purchasing multiple crème brûlée orders at a restaurant and you can use them again and again! That being said, if you already have 4 ounce or 6 ounce ramekins, those will also work! You will need enough ramekins to hold 30 ounces of liquid.
- Crème Brulee Torch: I highly recommend a professional kitchen torch (I use this one) because you can control the heat source, which means you deliver perfectly uniform, golden sugar shells every time, plus it’s awesome for my s’mores molten lava pies, and s’mores Nutella pie! A kitchen torch is an investment but it pays for itself if you make the crème brûlée more than once this year! If you don’t have one, don’t worry, you can still oven broil, your crème brûlée will just look a little more rustic with spatters and clusters of dark sugar – but you will still be rewarded with that coveted hard candy shell!
- Don’t forget the butane: If you invest in a kitchen torch, then it will also need butane which you can order online or pick up at Home Depot. I don’t want you to be excited to unwrap and use your shiny new toy only to find it doesn’t have fuel!
- How to bring eggs to room temperature: Room temperature eggs combine easier with the sugar for a creamier filling. To quickly bring eggs to room temperature, fill a large bowl with warm water (not hot) and carefully add eggs. Let sit for 10-15 minutes.
- Keep those leftover egg whites: Leftover egg whites can be stored in a sealed container and refrigerated for up to 4 days OR they can be frozen for several months. (Use an ice cube tray if you want to keep them in individual, easy-to-measure portions.) Use them for omelets, soufflé, angel food cake, pavlova, royal icing or candied nuts.
- For smooth crème brûlée, skim the foam of: This doesn’t affect the flavor, just appearance, so it’s not crucial. After whisking the cream and eggs together, your custard will be foamy on top. Skim off the foam or these bubbles will rise to the top of the crème brûlée once baked and create a bumpy texture.
- Strain custard if needed: If you slowly whisk in the cream to the eggs, you shouldn’t need to strain the custard. If you notice that your custard isn’t luxuriously smooth after adding all of the cream, however, then you will want to strain it. To do this, simply place a fine mesh sieve over a liquid measuring cup or pitcher – whatever you are going to use to pour the custard into the ramekins.
- Cover custard completely with sugar: You want to cover the top of each custard completely with a thin layer of sugar, because any exposed custard will curdle when you torch it.
- Remove torch before desired doneness: Take care to stop torching just before the desired degree of doneness is reached because the sugar will continue to cook for a few seconds after the flame has been removed. If you remove the flame and still want deeper caramelization, then just go back over the surface again.
- What if I burn my sugar topping? This is SO easy to fix. A little burnt is passable and even pleasurable to some, but if your top is scorched, then you can fix it by scraping off the top layer, adding the top sugar layer again and repeating the brûlée process.
MAKE AHEAD TIPS
Crème brûlée is a fabulous make ahead dessert because it can be prepared almost entirely ahead of time, or you can prepare it in stages. Here are options for making ahead:- Uncooked custard: can be covered and stored in the refrigerator for 3 days before baking. You can either store it in one container or go one step further and divide it between ramekins (make sure to cover all of the ramekins with plastic wrap as well).
- Baked custards WITHOUT brûléed sugar topping: can be covered and stored in the refrigerator for up to 4 days.
- Crème brûlée (baked custards WITH brûléed sugar topping): If prefer more lukewarm crème brûlée, then let custards sit for 30 minutes at room temperature before serving. Alternatively, if you prefer chilled crème brûlée, store the them in the refrigerator for up to 30 minutes before serving. Do not refrigerate any longer after brûléeing the tops or you risk the sugar absorbing moisture and the brittle top softening. Unfortunately, it doesn’t work well to torch the top again to try crisping it back up.
Storage
The baked custard will last up to three days in the fridge. Once torched, the crème brûlée is best enjoyed right away as the topping becomes less crisp over time, but it may be refrigerated for 30 minutes without losing the crunchy topping.
Want To Make This Recipe?
Never Miss a Craving
Did You Make This Recipe?
Tag @CarlsbadCravings and Use #CarlsbadCravngs
Leave a Review, I Always Love Hearing From You!
*Carlsbad Cravings© Original*