
The Mobile Serve Dashboard is your central hub for managing and understanding your organization’s service activities. This guide provides a step-by-step walkthrough of each section, ensuring you can effectively utilize all its features.
Dashboard Home: Organization Overview
Upon logging in, the Dashboard Home presents the Organization Overview, delivering an immediate snapshot of your organization’s key metrics. For organizations with sub-organizations, these will be conveniently listed at the bottom of the page for easy navigation.
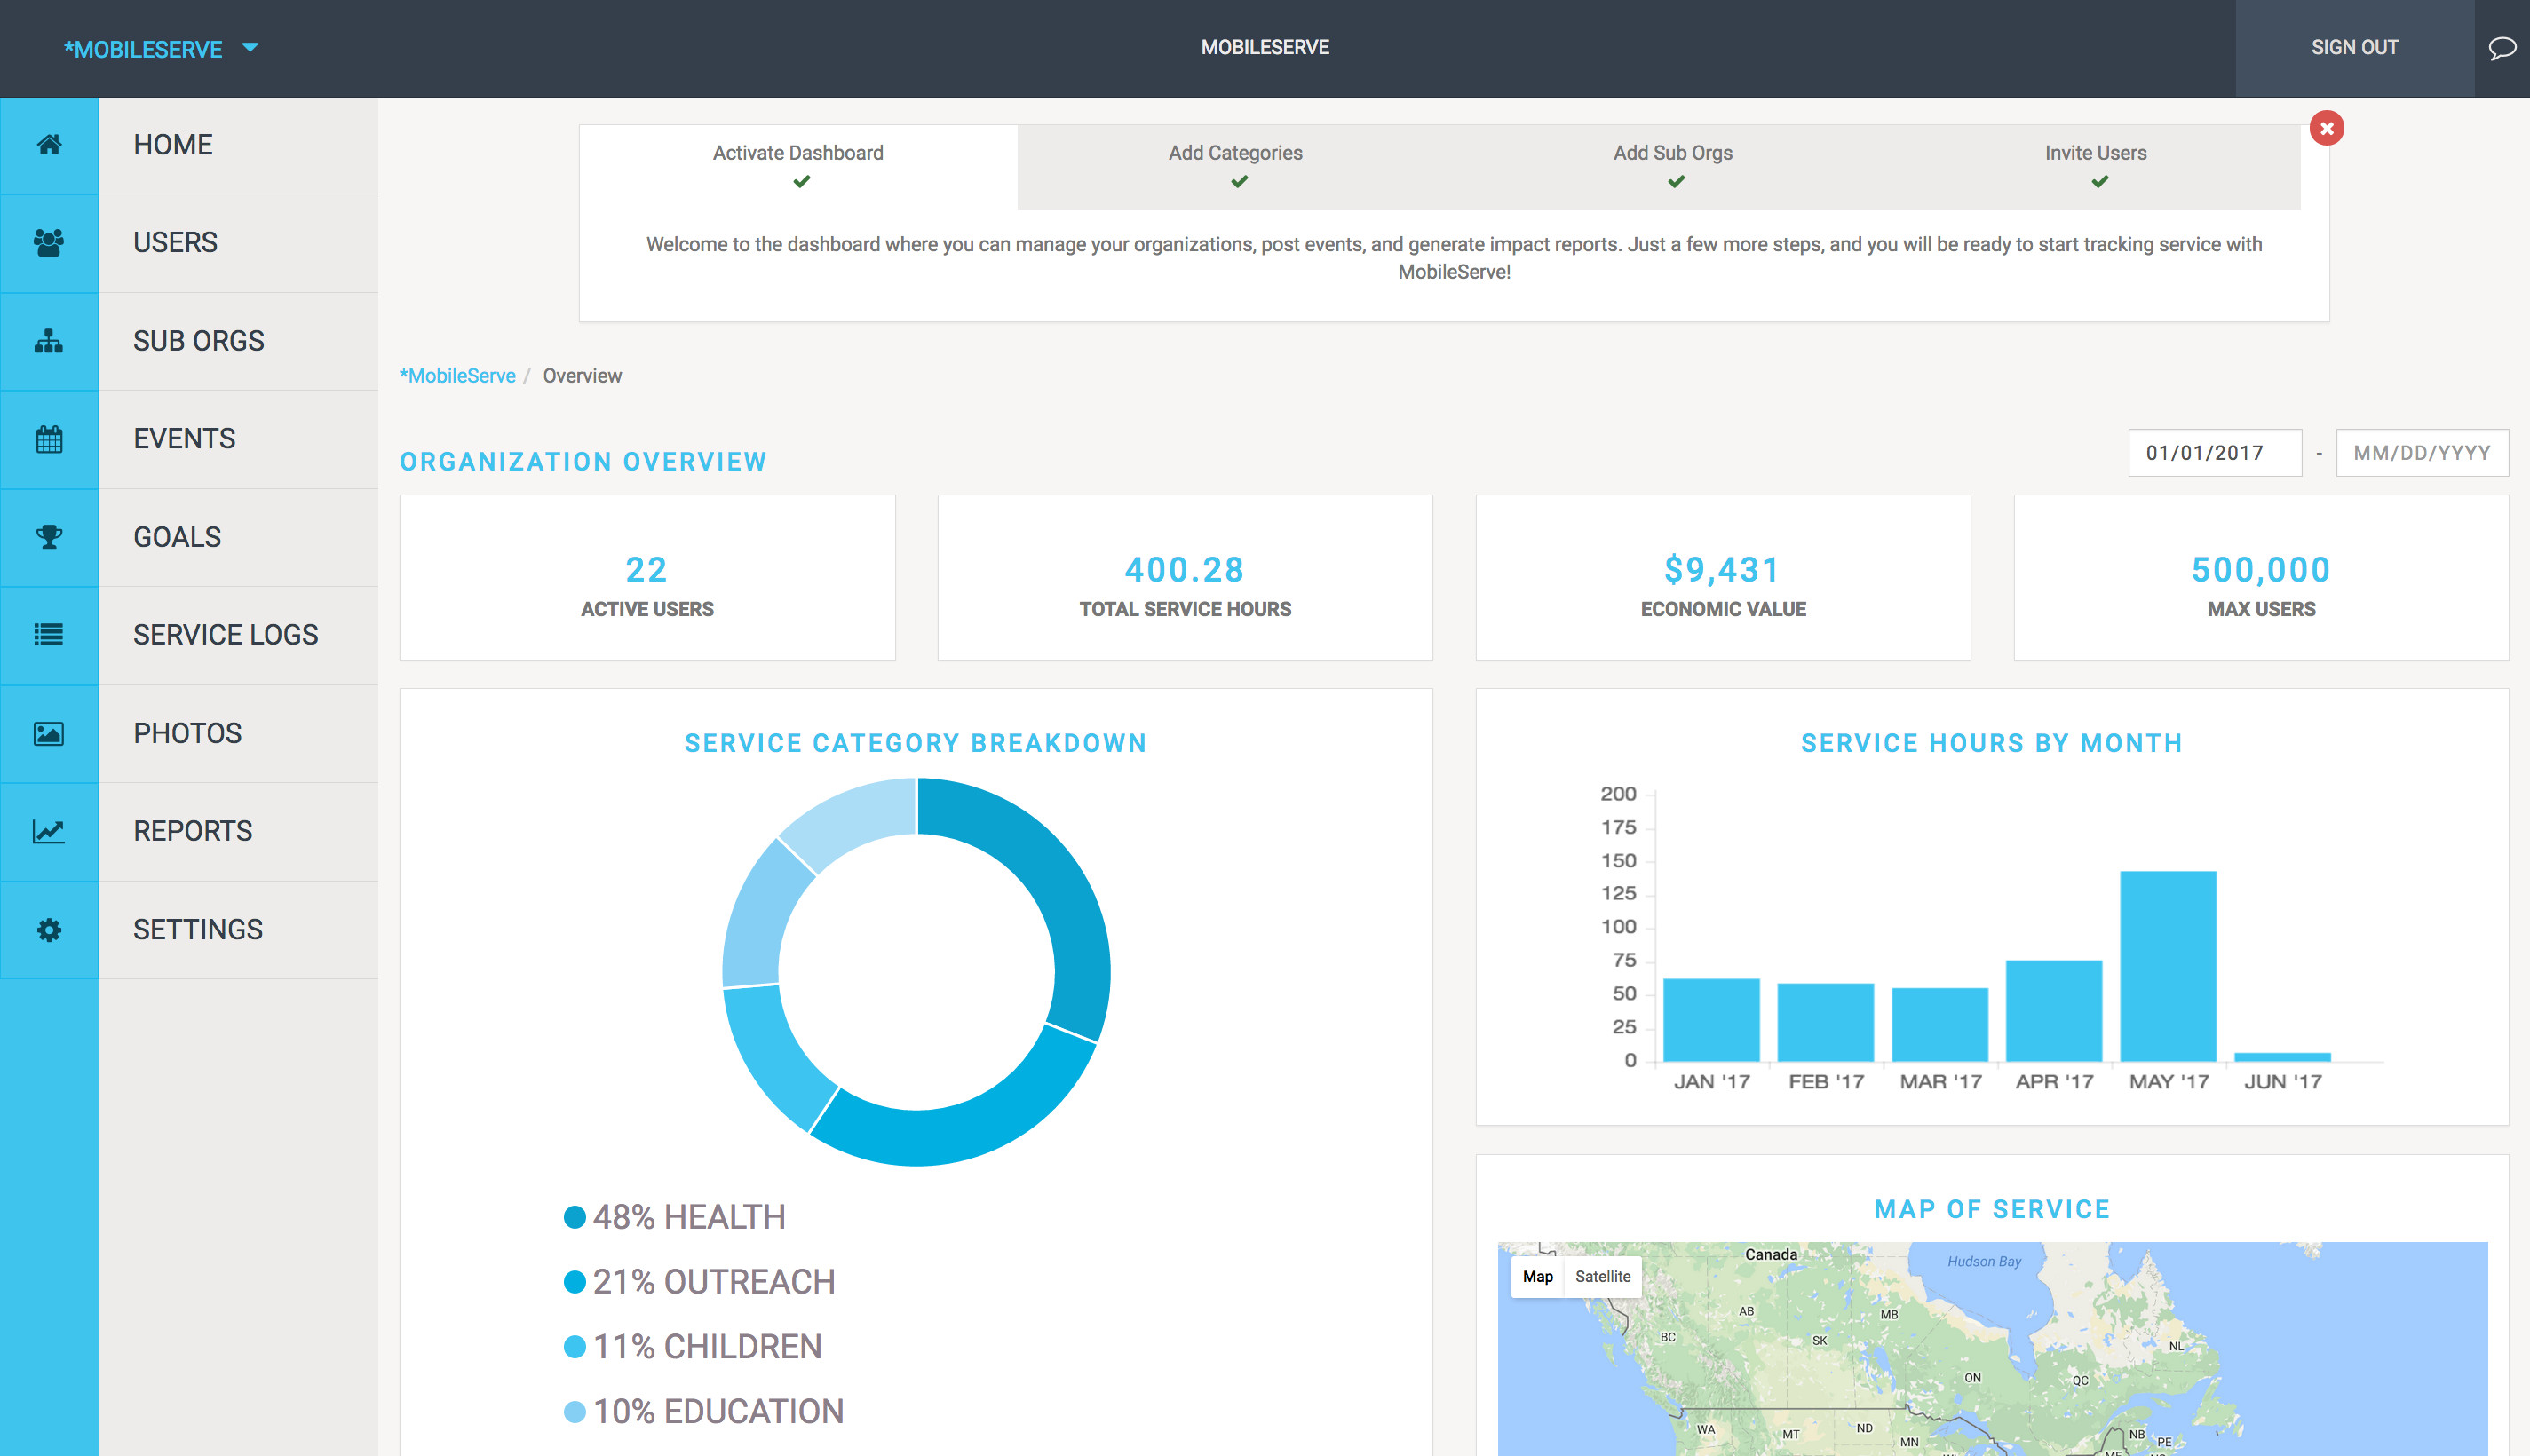 Dashboard Overview Picture
Alt text: Mobile serve dashboard overview showing key metrics like total hours, service categories breakdown, and date filters.
Key Features and Tips:
- Date Filtering: Located in the top right corner, the date filter allows you to customize the data displayed to analyze specific periods. This is crucial for tracking progress over time or focusing on recent activities.
- Service Category Insights: Hovering your cursor over a Service Category in the overview will reveal the total number of hours logged under that category. This provides a quick understanding of where your organization’s service efforts are concentrated.
Users: Managing Your Members
The Users section is dedicated to user management, enabling you to invite new members and oversee existing ones. The User Management page displays essential contact information alongside the total approved service hours each user has contributed within your selected date range. This feature is vital for tracking individual contributions and overall engagement.
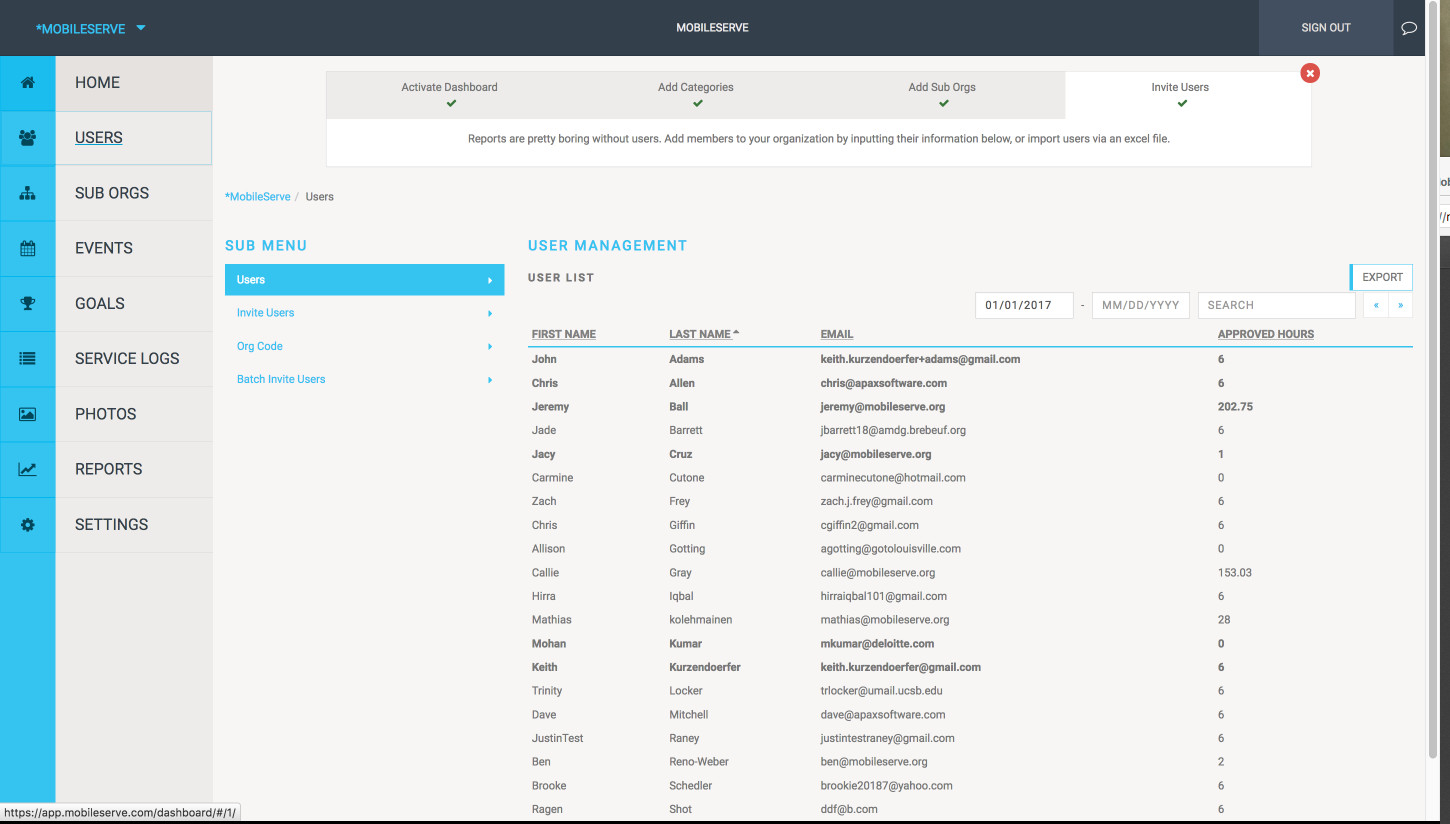 User Example
Alt text: Mobile serve user management page displaying user names, contact details, and total approved service hours.
Inviting Members: Expanding Your Reach
Mobile Serve offers three flexible options to invite users to your organization, catering to different needs and scenarios:
1. Invite by Entering Email Addresses:
- Ideal for inviting a small number of users or for individual invitations.
- Navigate to Users and select Invite Users.
- Enter the user’s email address. For multiple addresses, separate them with commas.
- Designate user roles by checking the Admin box if administrative privileges are required.
- Click Send Invites. Invited users will receive an email with a link to create an account and automatically connect to your organization.
2. Invite via List Upload:
- Best suited for inviting a large group of users efficiently.
- Prepare a spreadsheet containing user email addresses and their corresponding sub-organization (if applicable).
- Email the spreadsheet to [email protected]. The Mobile Serve support team will handle the upload process.
- Users will receive direct email invitations from MobileServe, streamlining the onboarding process.
3. Direct Invitation with Organization Code:
- Offers a personalized approach, allowing you to customize your invitation message.
- Provide your organization code directly to potential users. This code can be found in your organization settings.
- Users can create Mobile Serve accounts and enter the organization code during signup or later in their settings.
- Download a “Getting Started Guide” from your Sub Orgs page. This PDF includes signup instructions and organization codes for each sub-organization, simplifying user onboarding.
View Member Details: In-depth User Profiles
To delve deeper into an individual member’s service history and contributions:
- On the Users page, click on a user’s name to access their profile.
- The profile page displays a comprehensive list of all service logs submitted by the user.
- Click “View” on a specific log to see detailed information about that service activity.
- For reporting and analysis, you can export a list of all users and their service hours. Click “Export” and choose your desired file type. The export includes a breakdown of pending, approved, and total hours per service category, within the selected date range.
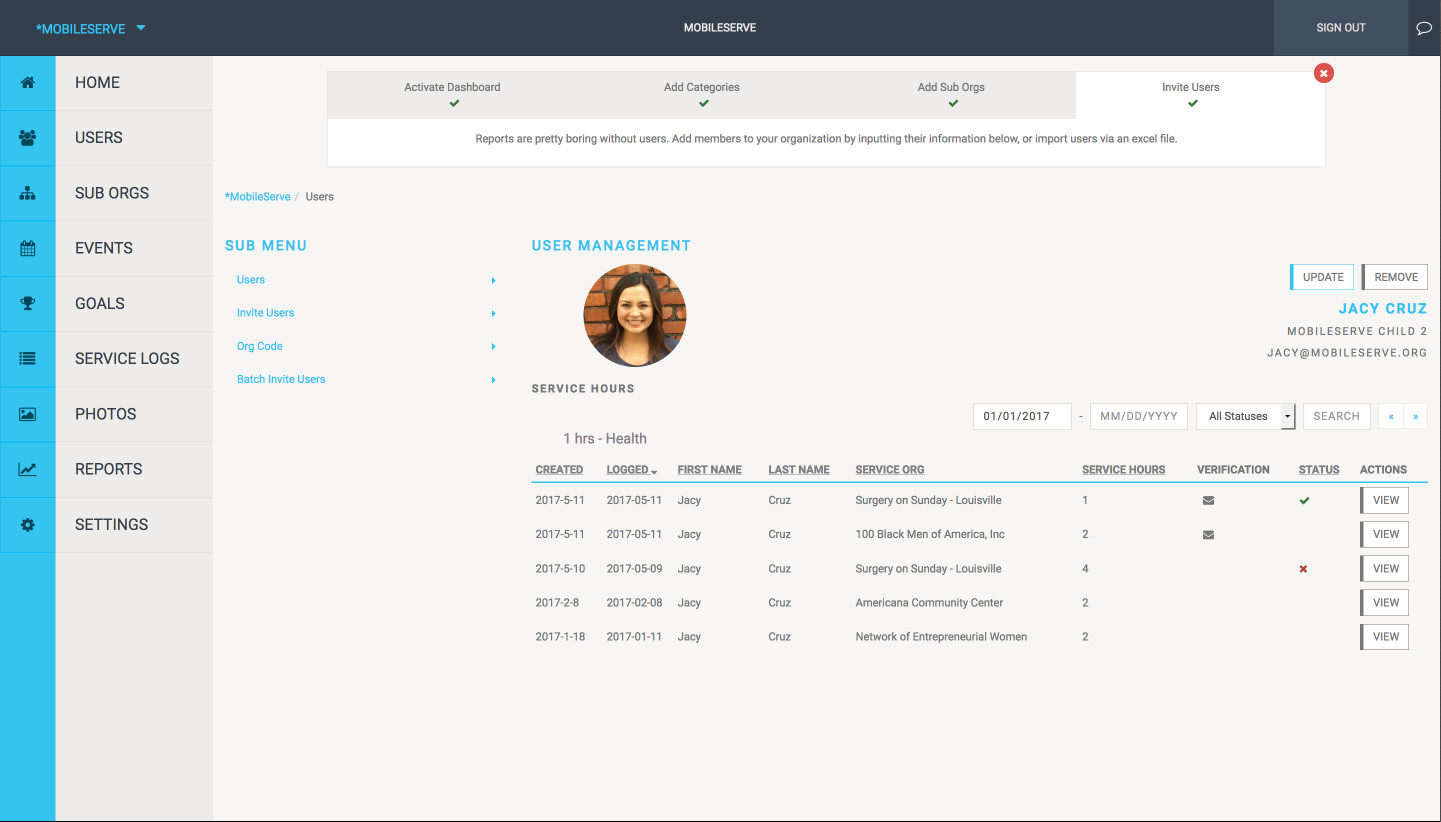 View Member Example
Alt text: Mobile serve user profile example showing service logs, details of individual logs, and export options.
Sub Orgs: Structuring Your Organization
The Sub Orgs section is essential for organizations with multiple departments, teams, or chapters. It allows you to create and manage sub-organizations within your main organization.
- The main Sub Orgs page provides a list of existing sub-organizations and their total service hours.
- Click “Go To” next to a sub-organization’s name to access its dedicated Dashboard, providing a focused view of its activities.
- View and download organization codes for each sub-organization from this page, facilitating user sign-up within specific groups.
- Deactivate sub-organizations as needed. Deactivation removes sub-organization users from your user count and seats, but their service logs remain accessible via the Service Logs page.
Creating a New Sub Org: Expanding Your Structure
To create a new sub-organization:
- Navigate to the Sub Orgs page and click “Create Sub Org“.
- Enter the desired name for the sub-organization. Remember that sub-organization names must be unique across the entire Mobile Serve platform. Using a prefix related to your main organization can help ensure uniqueness.
- Once created, the new sub-organization will appear on the main Sub Orgs page. Click “Go To” to manage its settings, invite users, and access its specific dashboard.
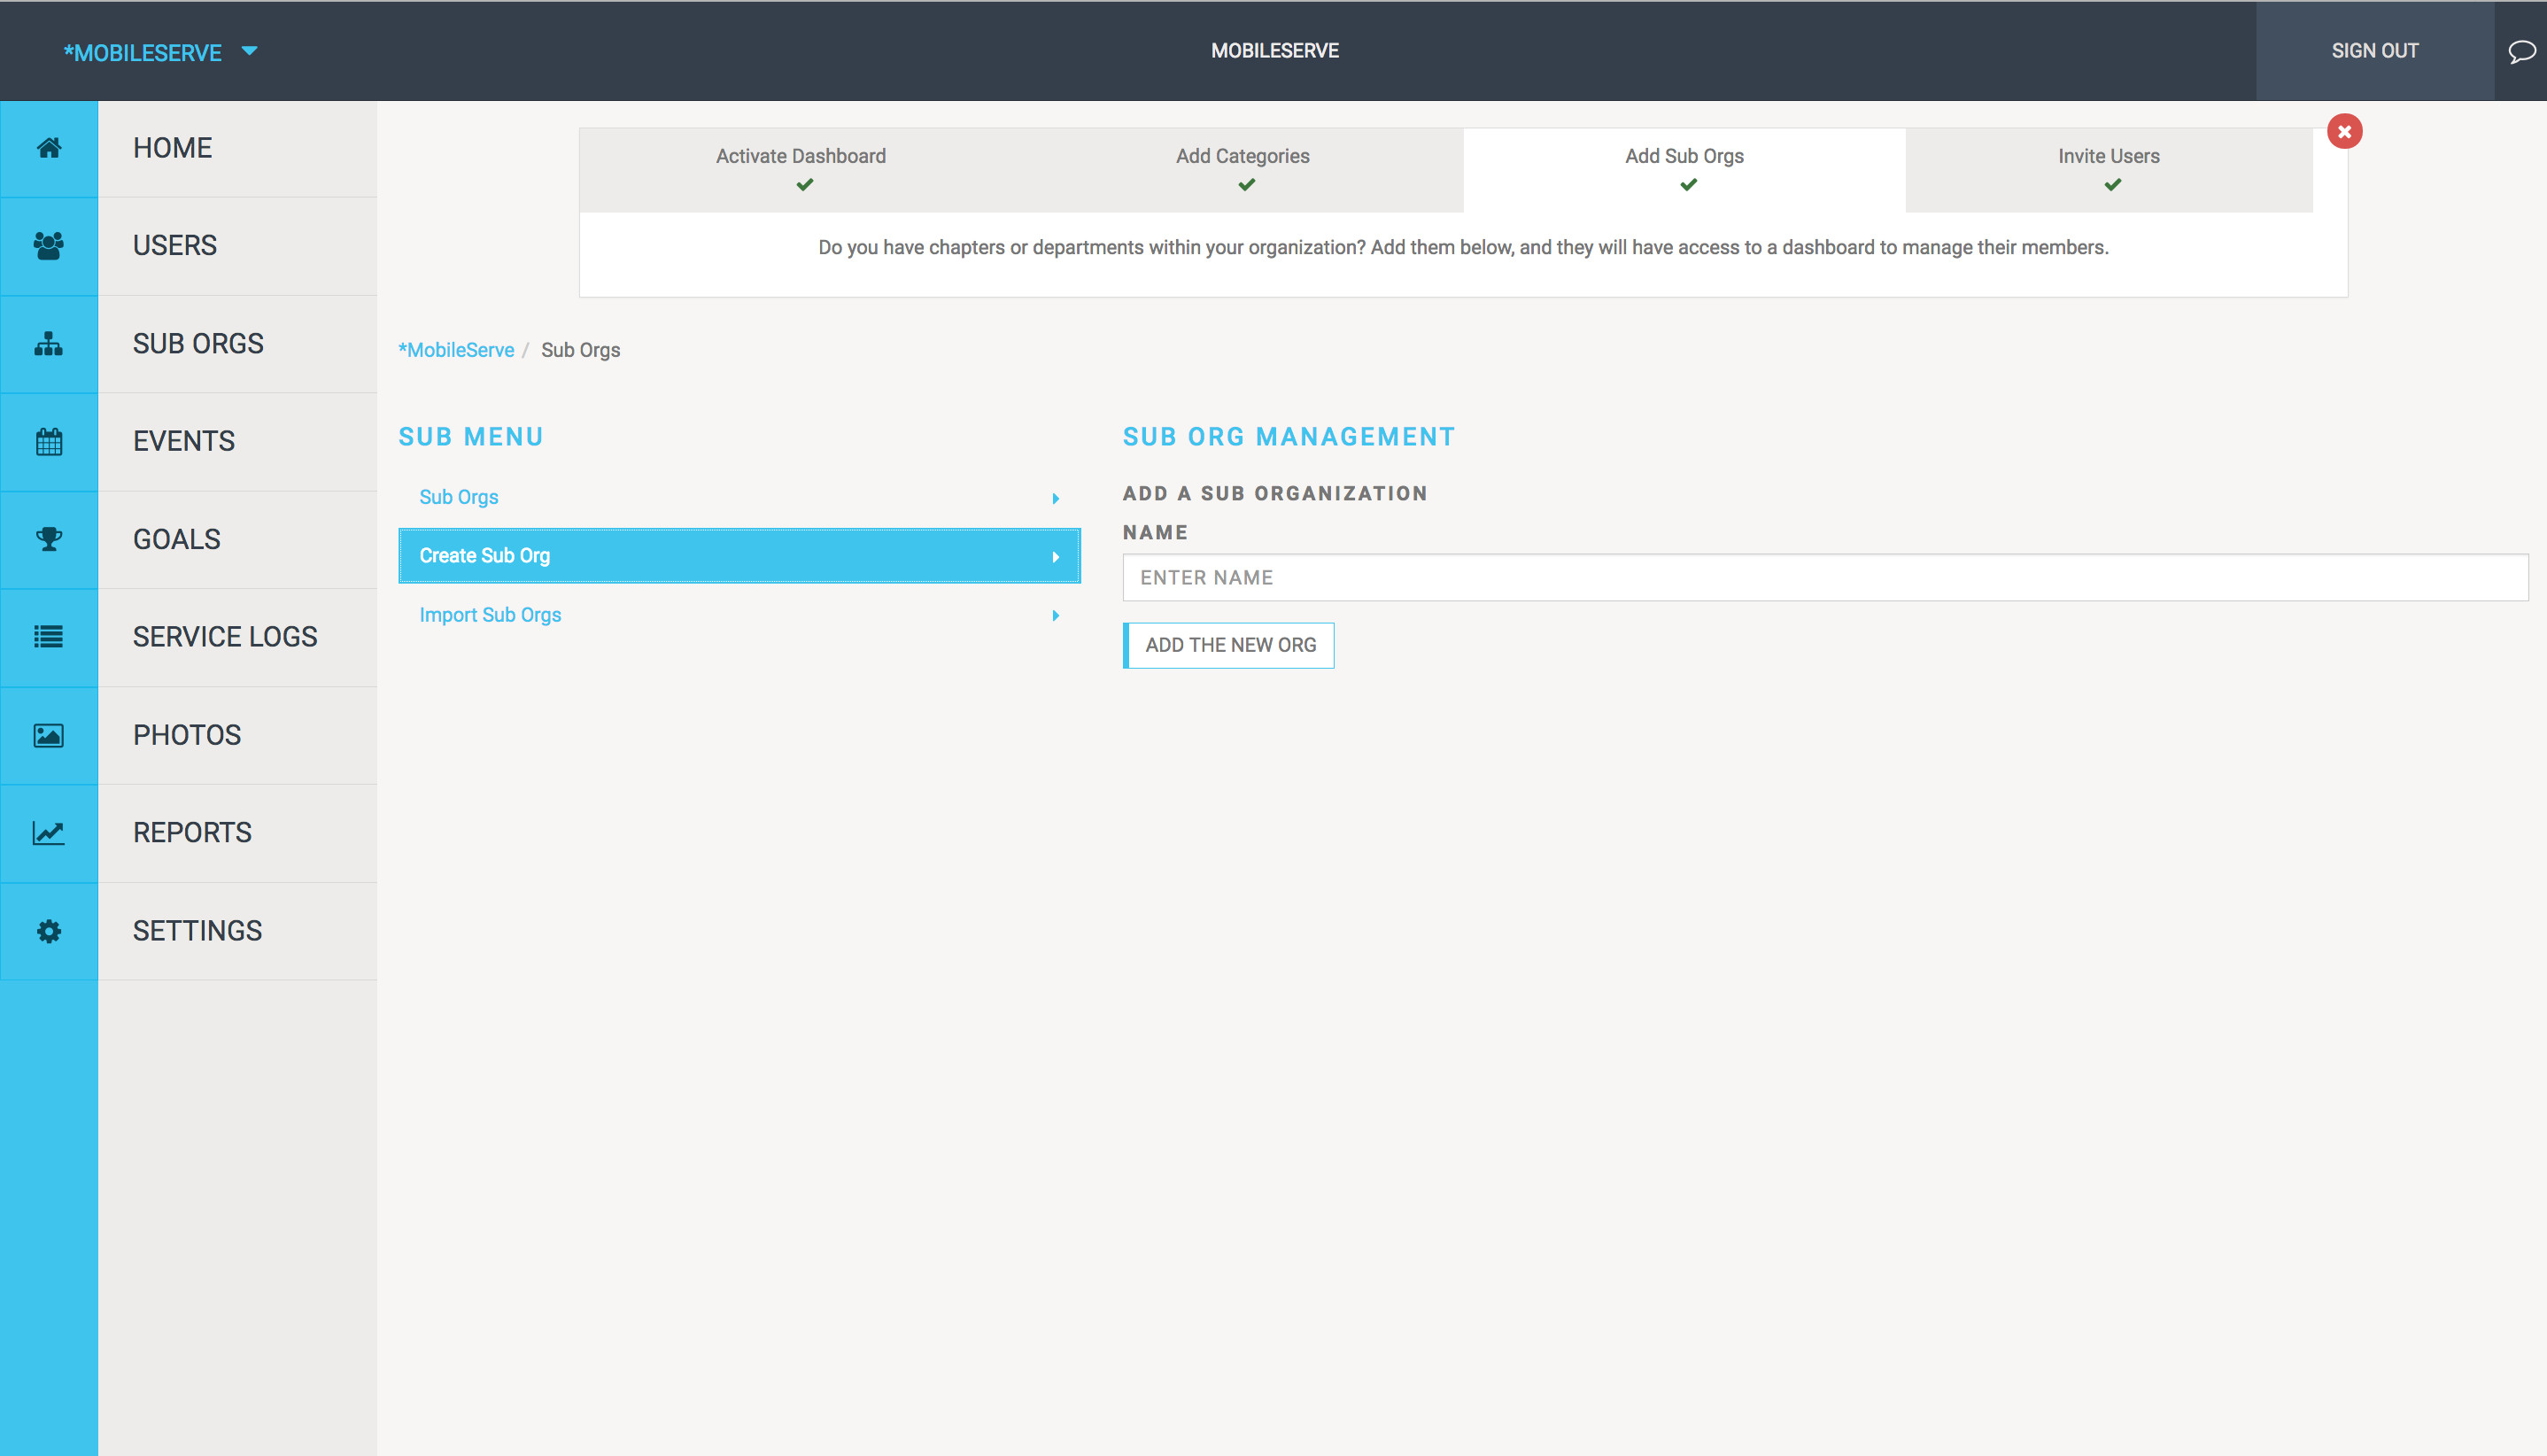 Creating Sub-Org Example
Alt text: Mobile serve create sub-organization interface with fields for sub-organization name and creation button.
Events: Organizing Service Opportunities
The Events tab empowers your organization and sub-organizations to create and manage service events, inviting users to participate in projects and opportunities throughout the year.
- Access the Events tab from the left-hand menu.
- Click “Create Event” to begin setting up a new event.
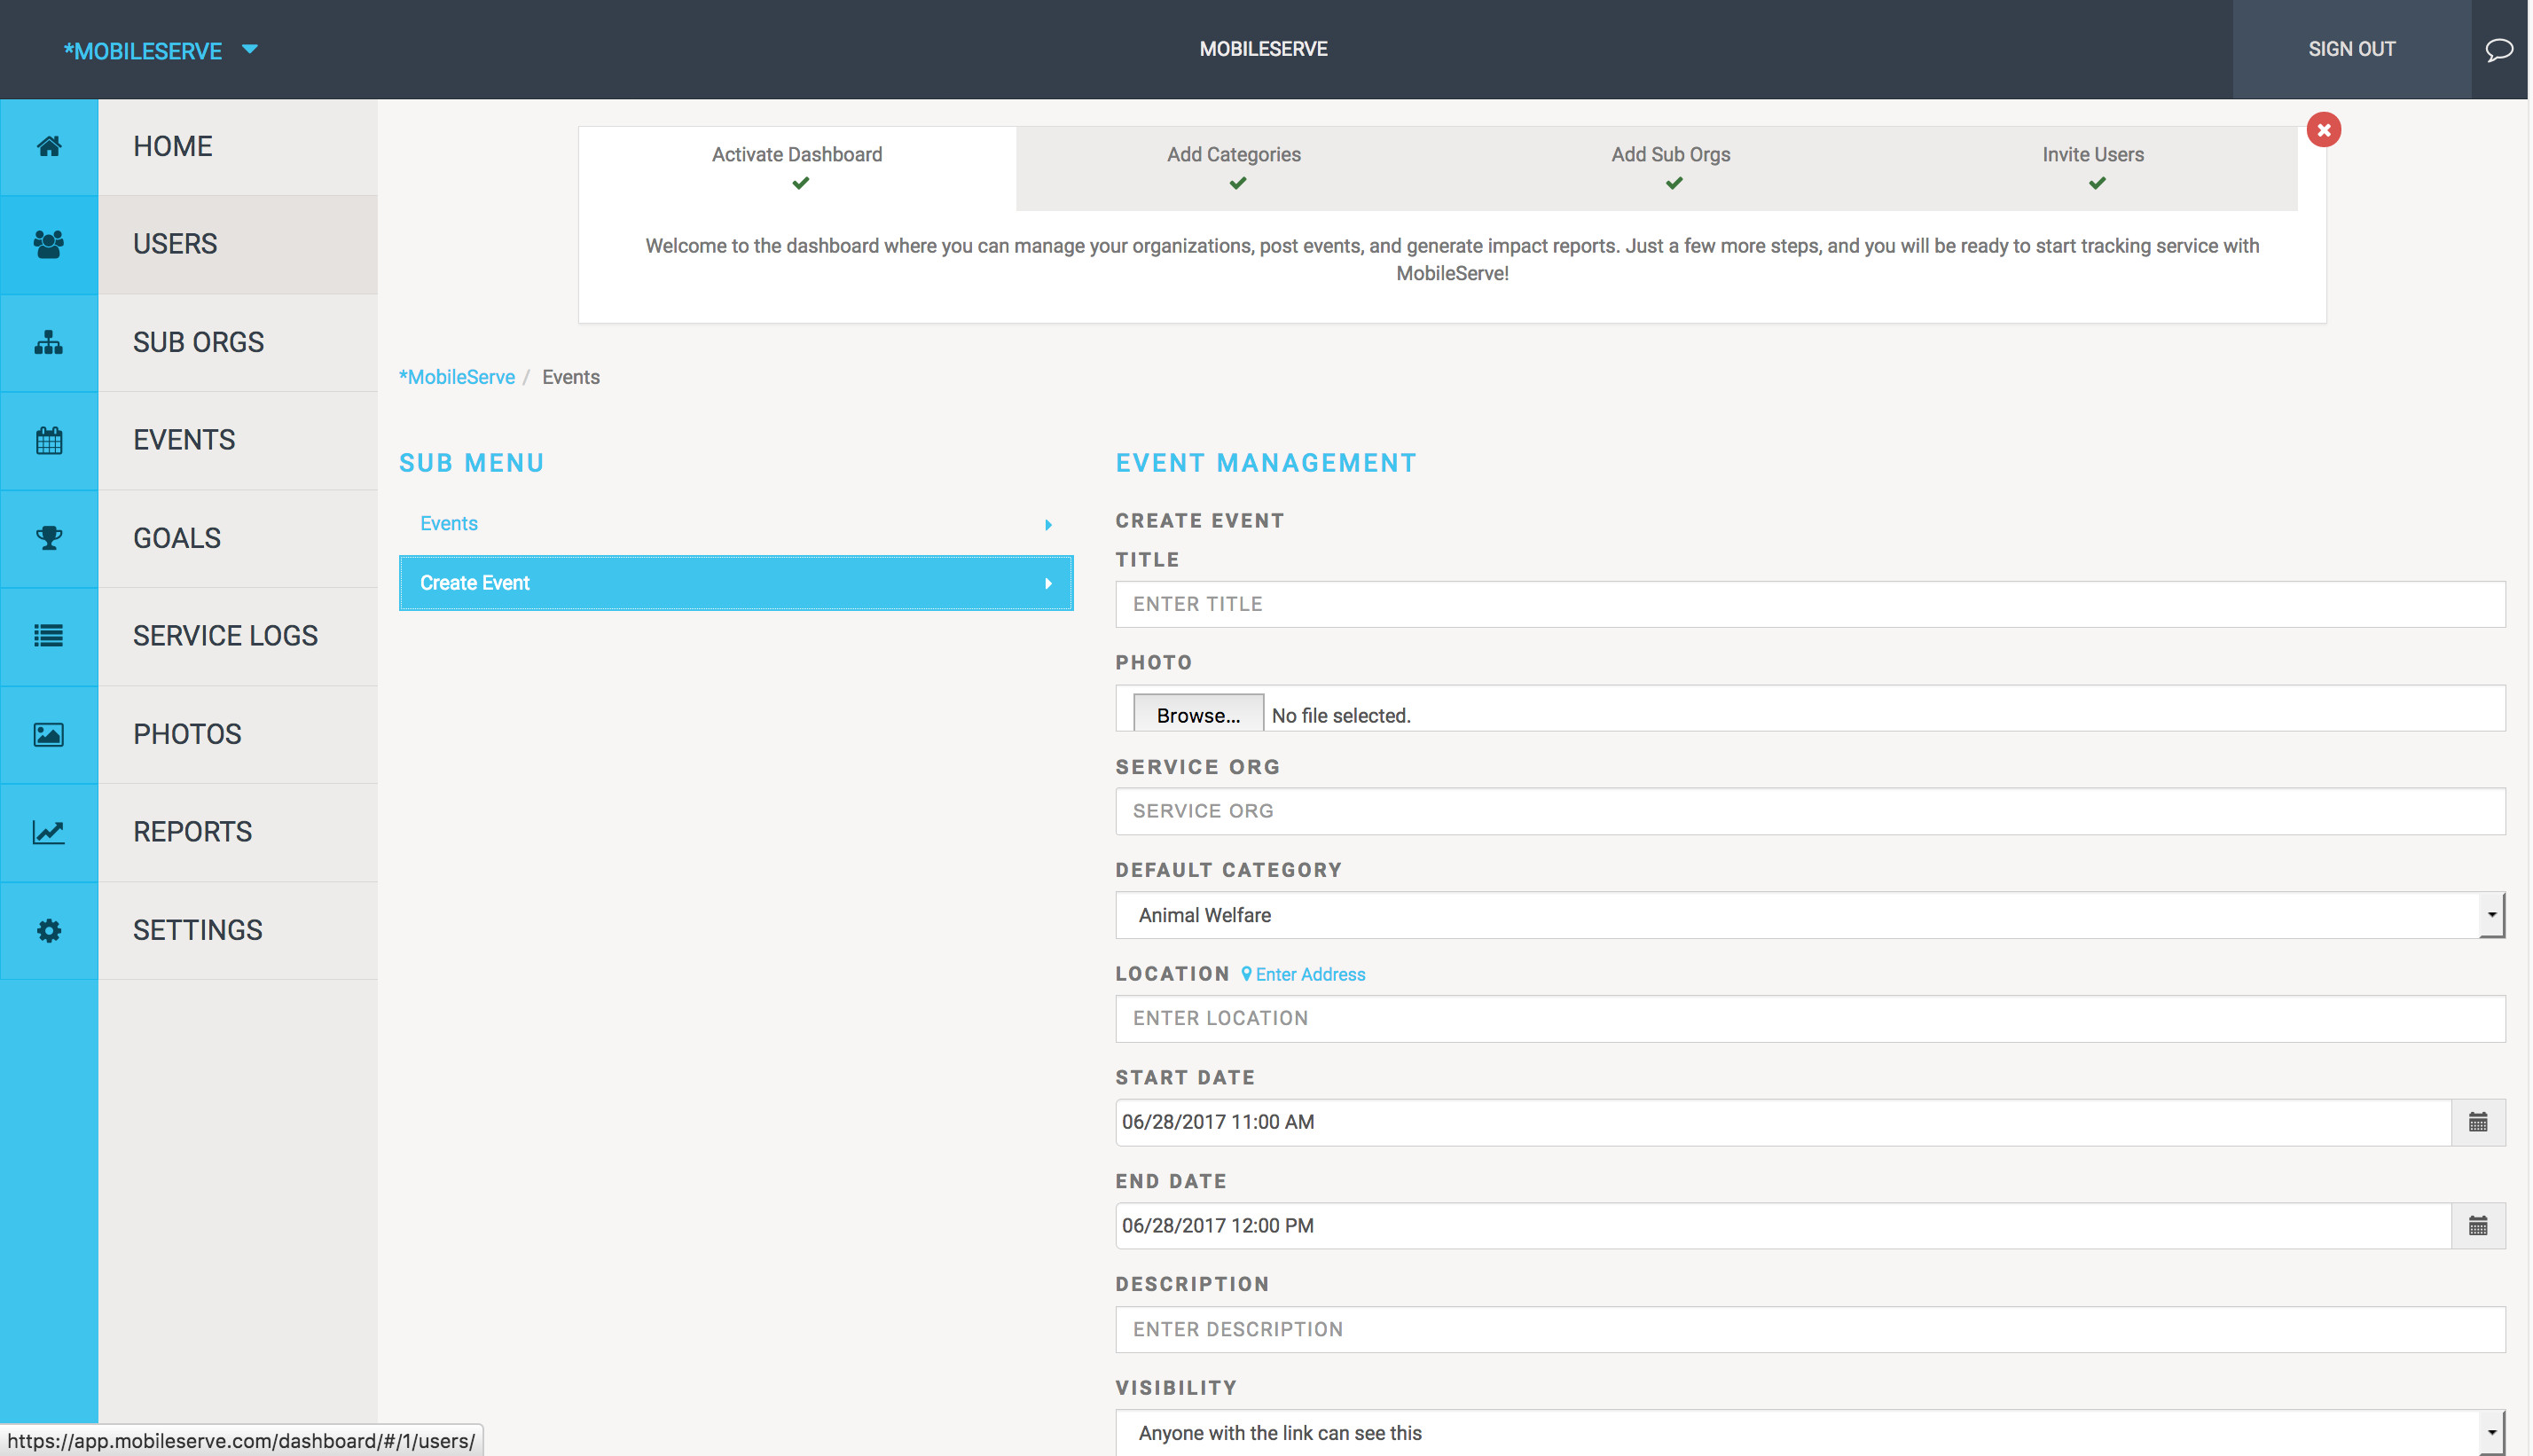
- Fill in the event details:
- Title: A clear and concise name for your event.
- Photo: (Optional) Add a visually appealing photo to enhance event invitations.
- Service Organization: (Optional) Specify a partner service organization.
- Default Service Category: Categorize event hours for reporting and tracking.
- Address: (Optional) Include the event location.
- Date & Time: Set the event schedule.
- Description: (Optional) Provide additional event details and context.
- Visibility: Control event visibility settings.
- Click “Continue” to proceed to timeslot creation and invitation settings.
 Create Event Example
Alt text: Mobile serve create event form with fields for event title, date, time, description, and category.
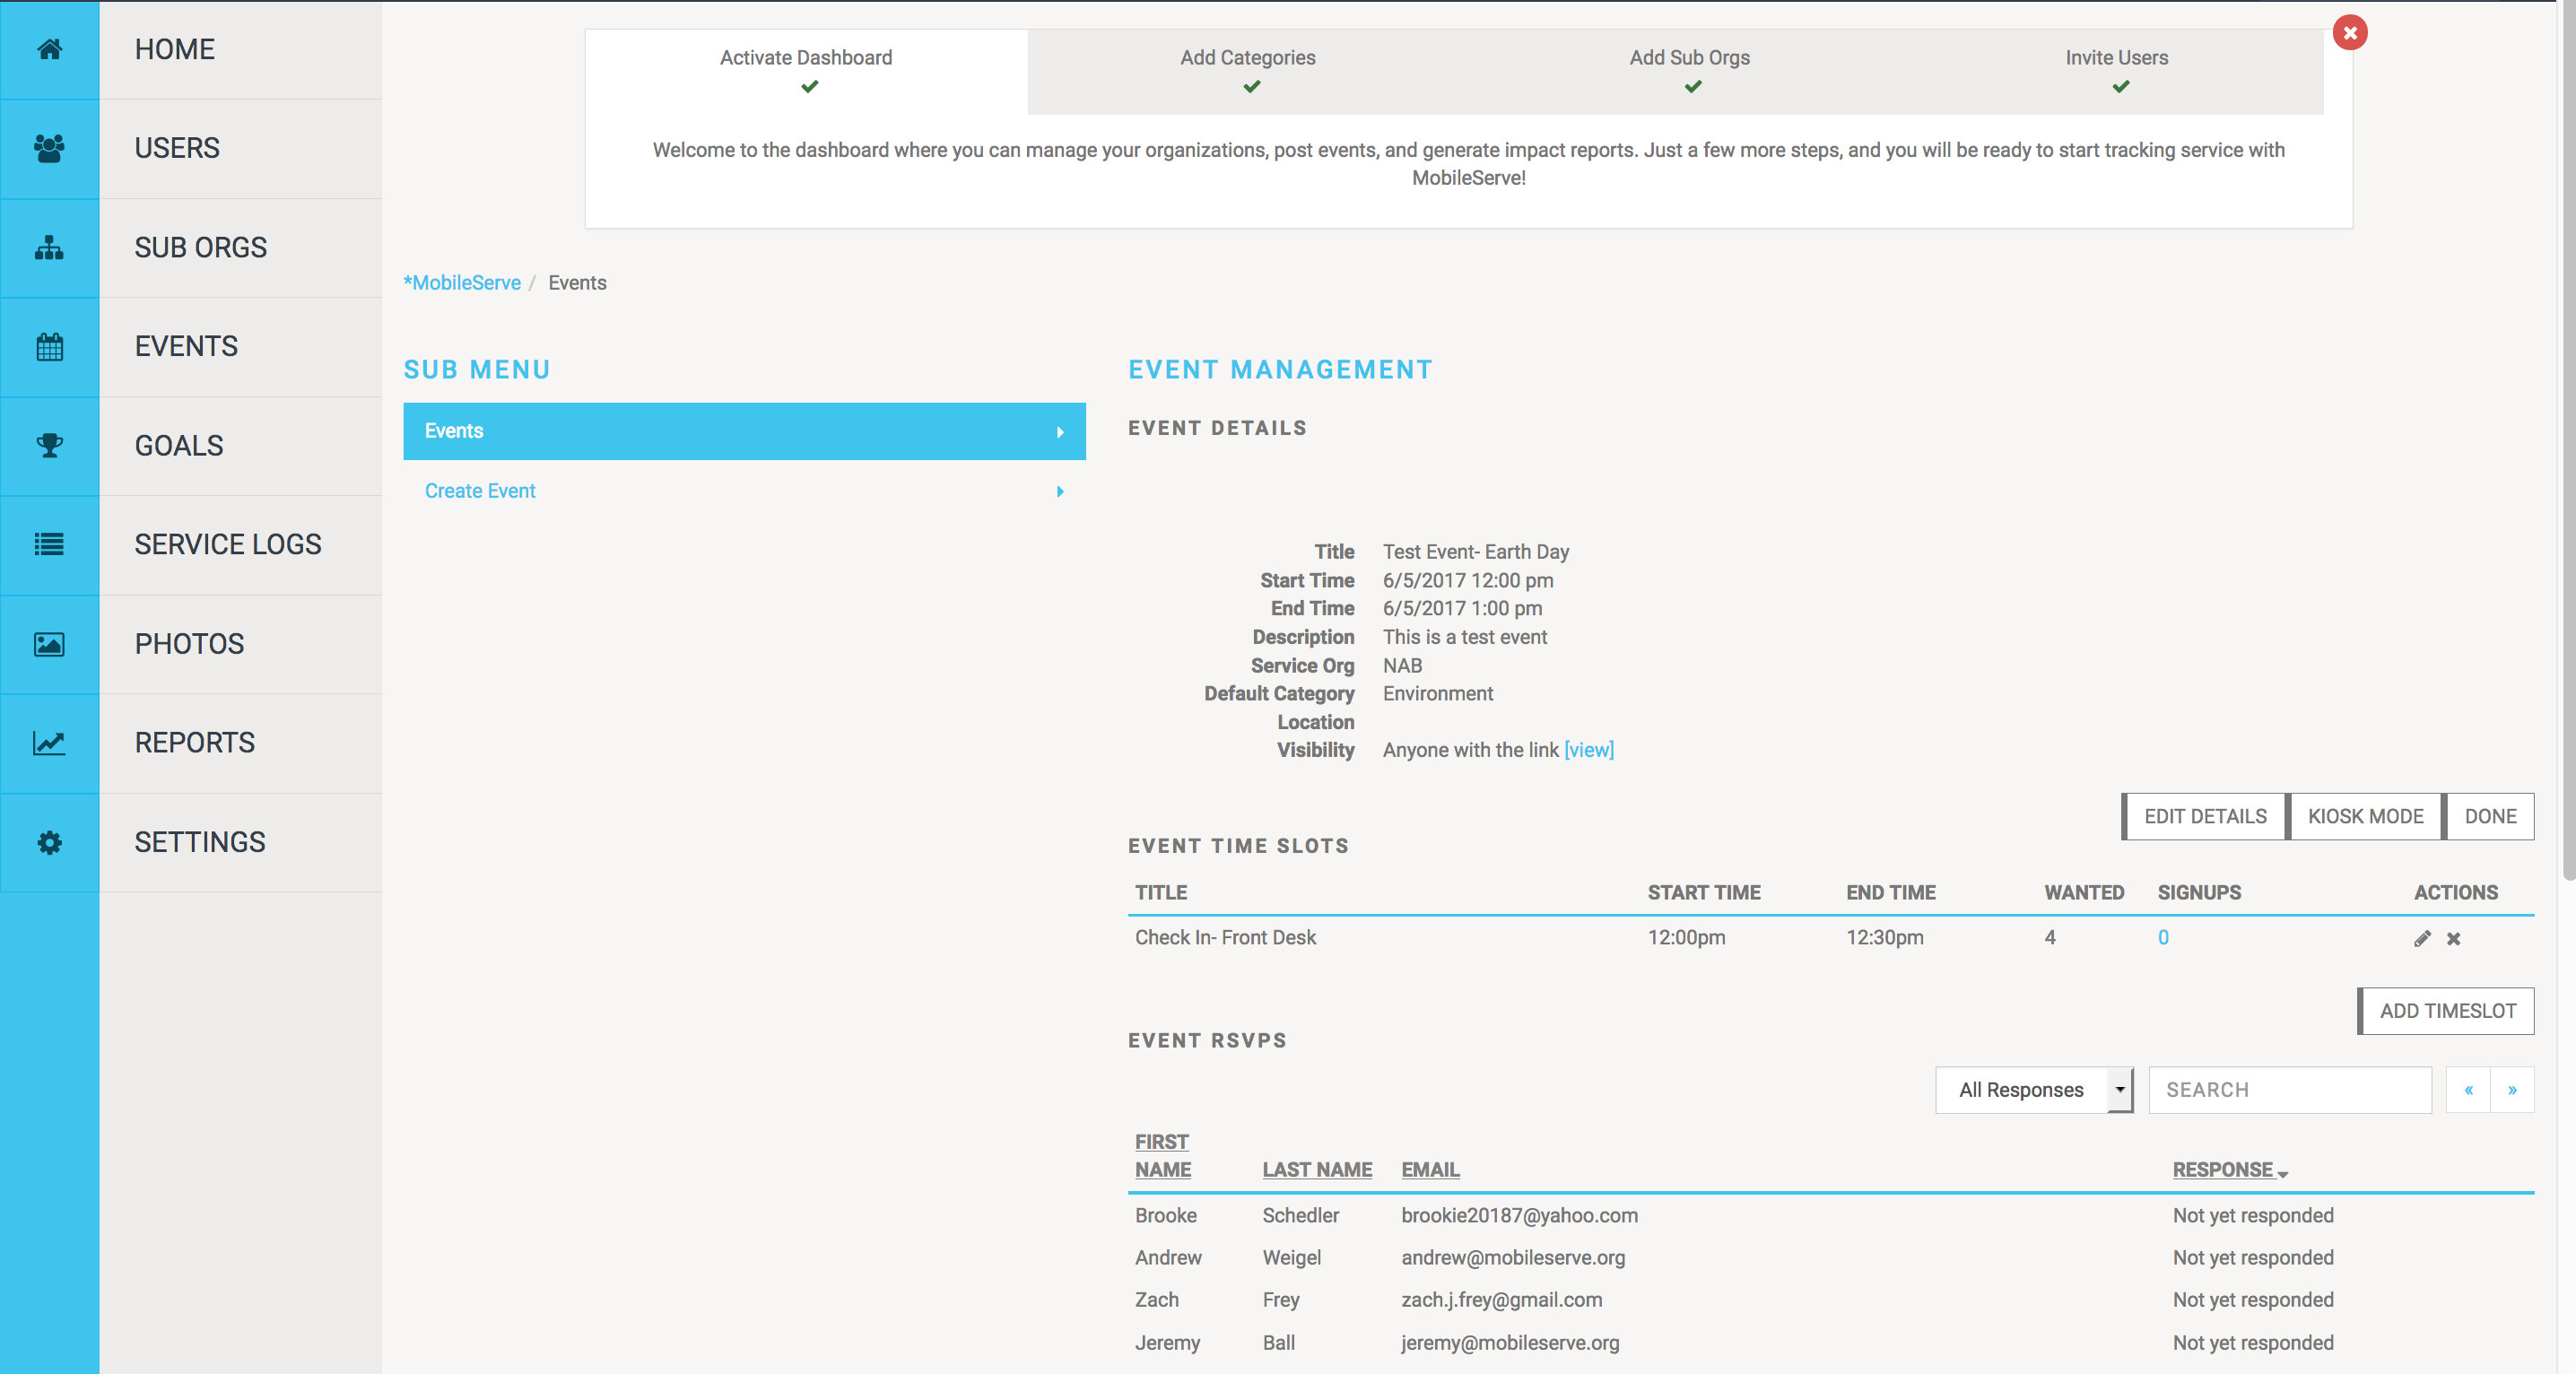
Creating Timeslots for Events:
Timeslots allow you to structure volunteer sign-ups within your event, managing capacity and roles effectively.
- Within the event creation flow, click “Add Timeslot“.
- Name: Give the timeslot a descriptive name (e.g., “Check-in,” “Setup,” “Cleanup”).
- Start and End Times: Define the duration of the timeslot. These times are specific to the timeslot and not necessarily the entire event duration.
- Volunteer Capacity: Set the number of volunteers needed for this timeslot.
- Click the checkmark to save the timeslot.
- Repeat this process to create multiple timeslots as needed. Timeslots can overlap to accommodate different roles or shifts within the event.
- Edit or delete timeslots using the pencil or “x” icons.
- Track sign-ups under the “Signups” column. Click the number to see who has signed up for each timeslot.
Inviting Volunteers to Events:
Inviting users is crucial to ensure they can see and RSVP to your event.
- At the bottom of the Event page, click “Invite“.
- Invite Everyone: Invite all members within your organization or sub-organization (if creating the event within a sub-org).
- Invite Specific Users or Sub-Orgs: Search and select specific sub-organizations or users to invite.
- Click “Invite” to send email invitations. Uncheck the “Email Invited Users” box if you prefer not to send email notifications. Even without email invitations, invited users can view the event in their “Events > Invitations” section.
Managing RSVPs and Messaging Users:
The Event RSVPs section provides tools to manage attendee responses and communicate with invitees.
- View a list of invited users and their RSVP status.
- Filter the list by response type using the “Responses” dropdown.
- Send messages to filtered groups of users by clicking “Send Message” at the bottom of the RSVP list. This allows for targeted communication with attendees based on their RSVP status.
View or Update Events: Keeping Information Current
Event details can be easily edited and updated at any time.
- Go to the Events section in the Dashboard.
- Click on the event you wish to modify.
- Click the “Edit Details” button in the top right corner.
- Make necessary changes and click “Save” to apply them.
 Update Event Example
Alt text: Mobile serve edit event details interface with options to change event information and save button.
Goals: Setting and Tracking Progress
The Goals feature allows you to set and monitor service goals for your organization and members.
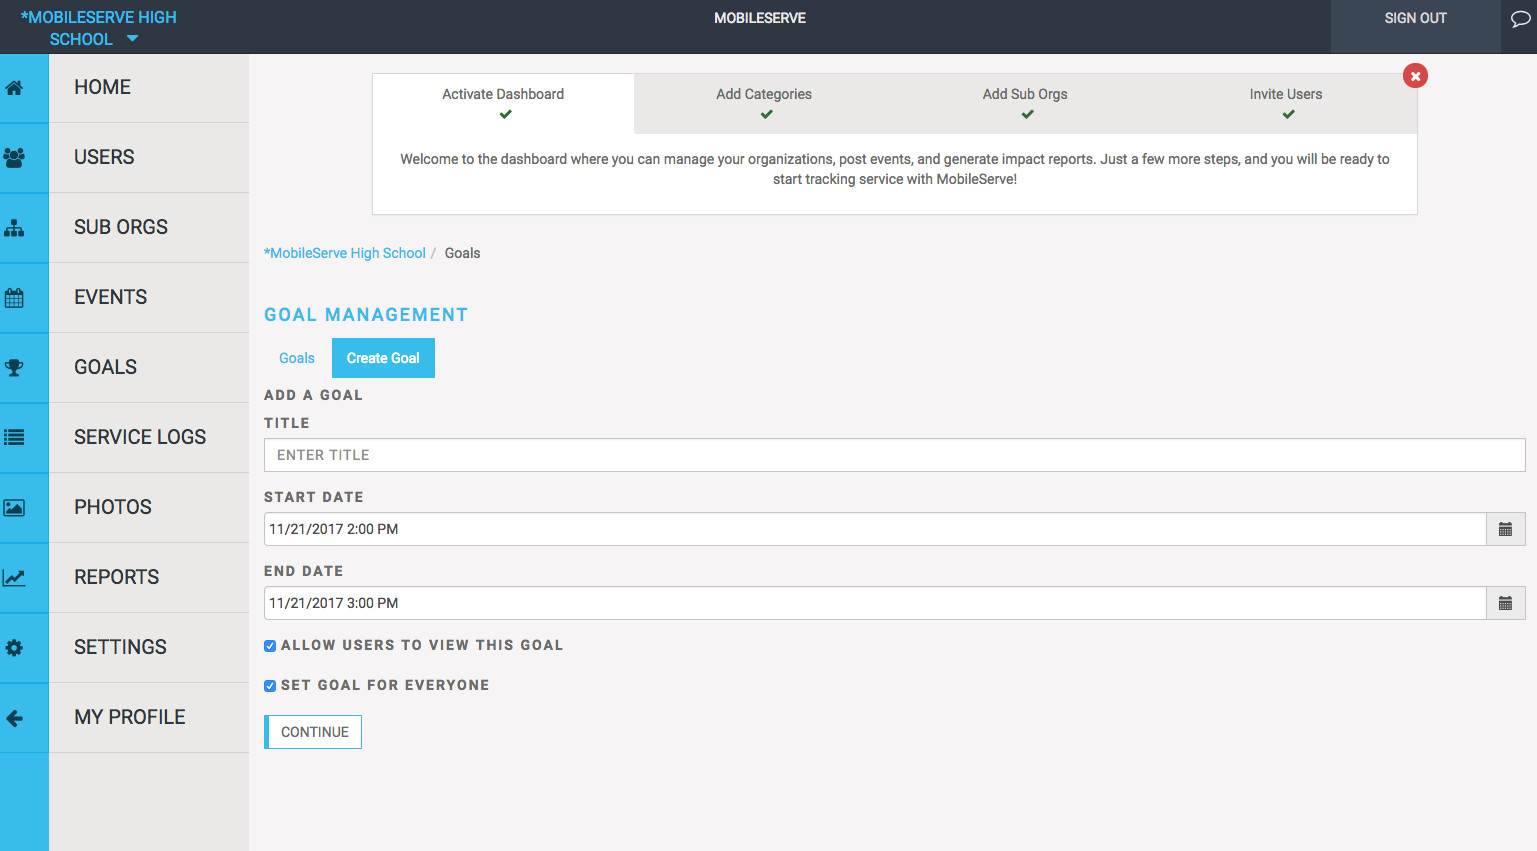
- From the admin dashboard, click GOALS.
- Under GOAL MANAGEMENT, click “Create Goal“.
- Enter goal details:
- Title: A descriptive name for the goal.
- Start Date & End Date: Define the goal timeframe.
- Visibility: Choose whether to make the goal visible to members. Check “ALLOW USERS TO VIEW THIS GOAL” to display progress in user profiles.
- Determine goal applicability:
- Everyone: Apply the goal to all members.
- Specific Users or Sub-Orgs: Target the goal to specific groups or individuals.
- Click “CONTINUE“.
- Define goal metrics:
- Service Category Specific Goal: Tie the goal to a particular service category.
- Total Hours Goal: Set a goal for total service hours across all categories.
- Enter the goal target and click the “+” sign to save.
- Use the Override function to create exceptions for specific users or sub-organizations if needed.
- Click “Save” to finalize goal creation.
- View and manage all created goals on the “goal management” page.
- Click “Goal Overview” to see a leaderboard of user progress and export goal data to a spreadsheet.
 MobileServe Goals.png
Alt text: Mobile serve goals dashboard showing goal progress, leaderboard, and goal management options.
Service Logs: Reviewing and Managing Service Records
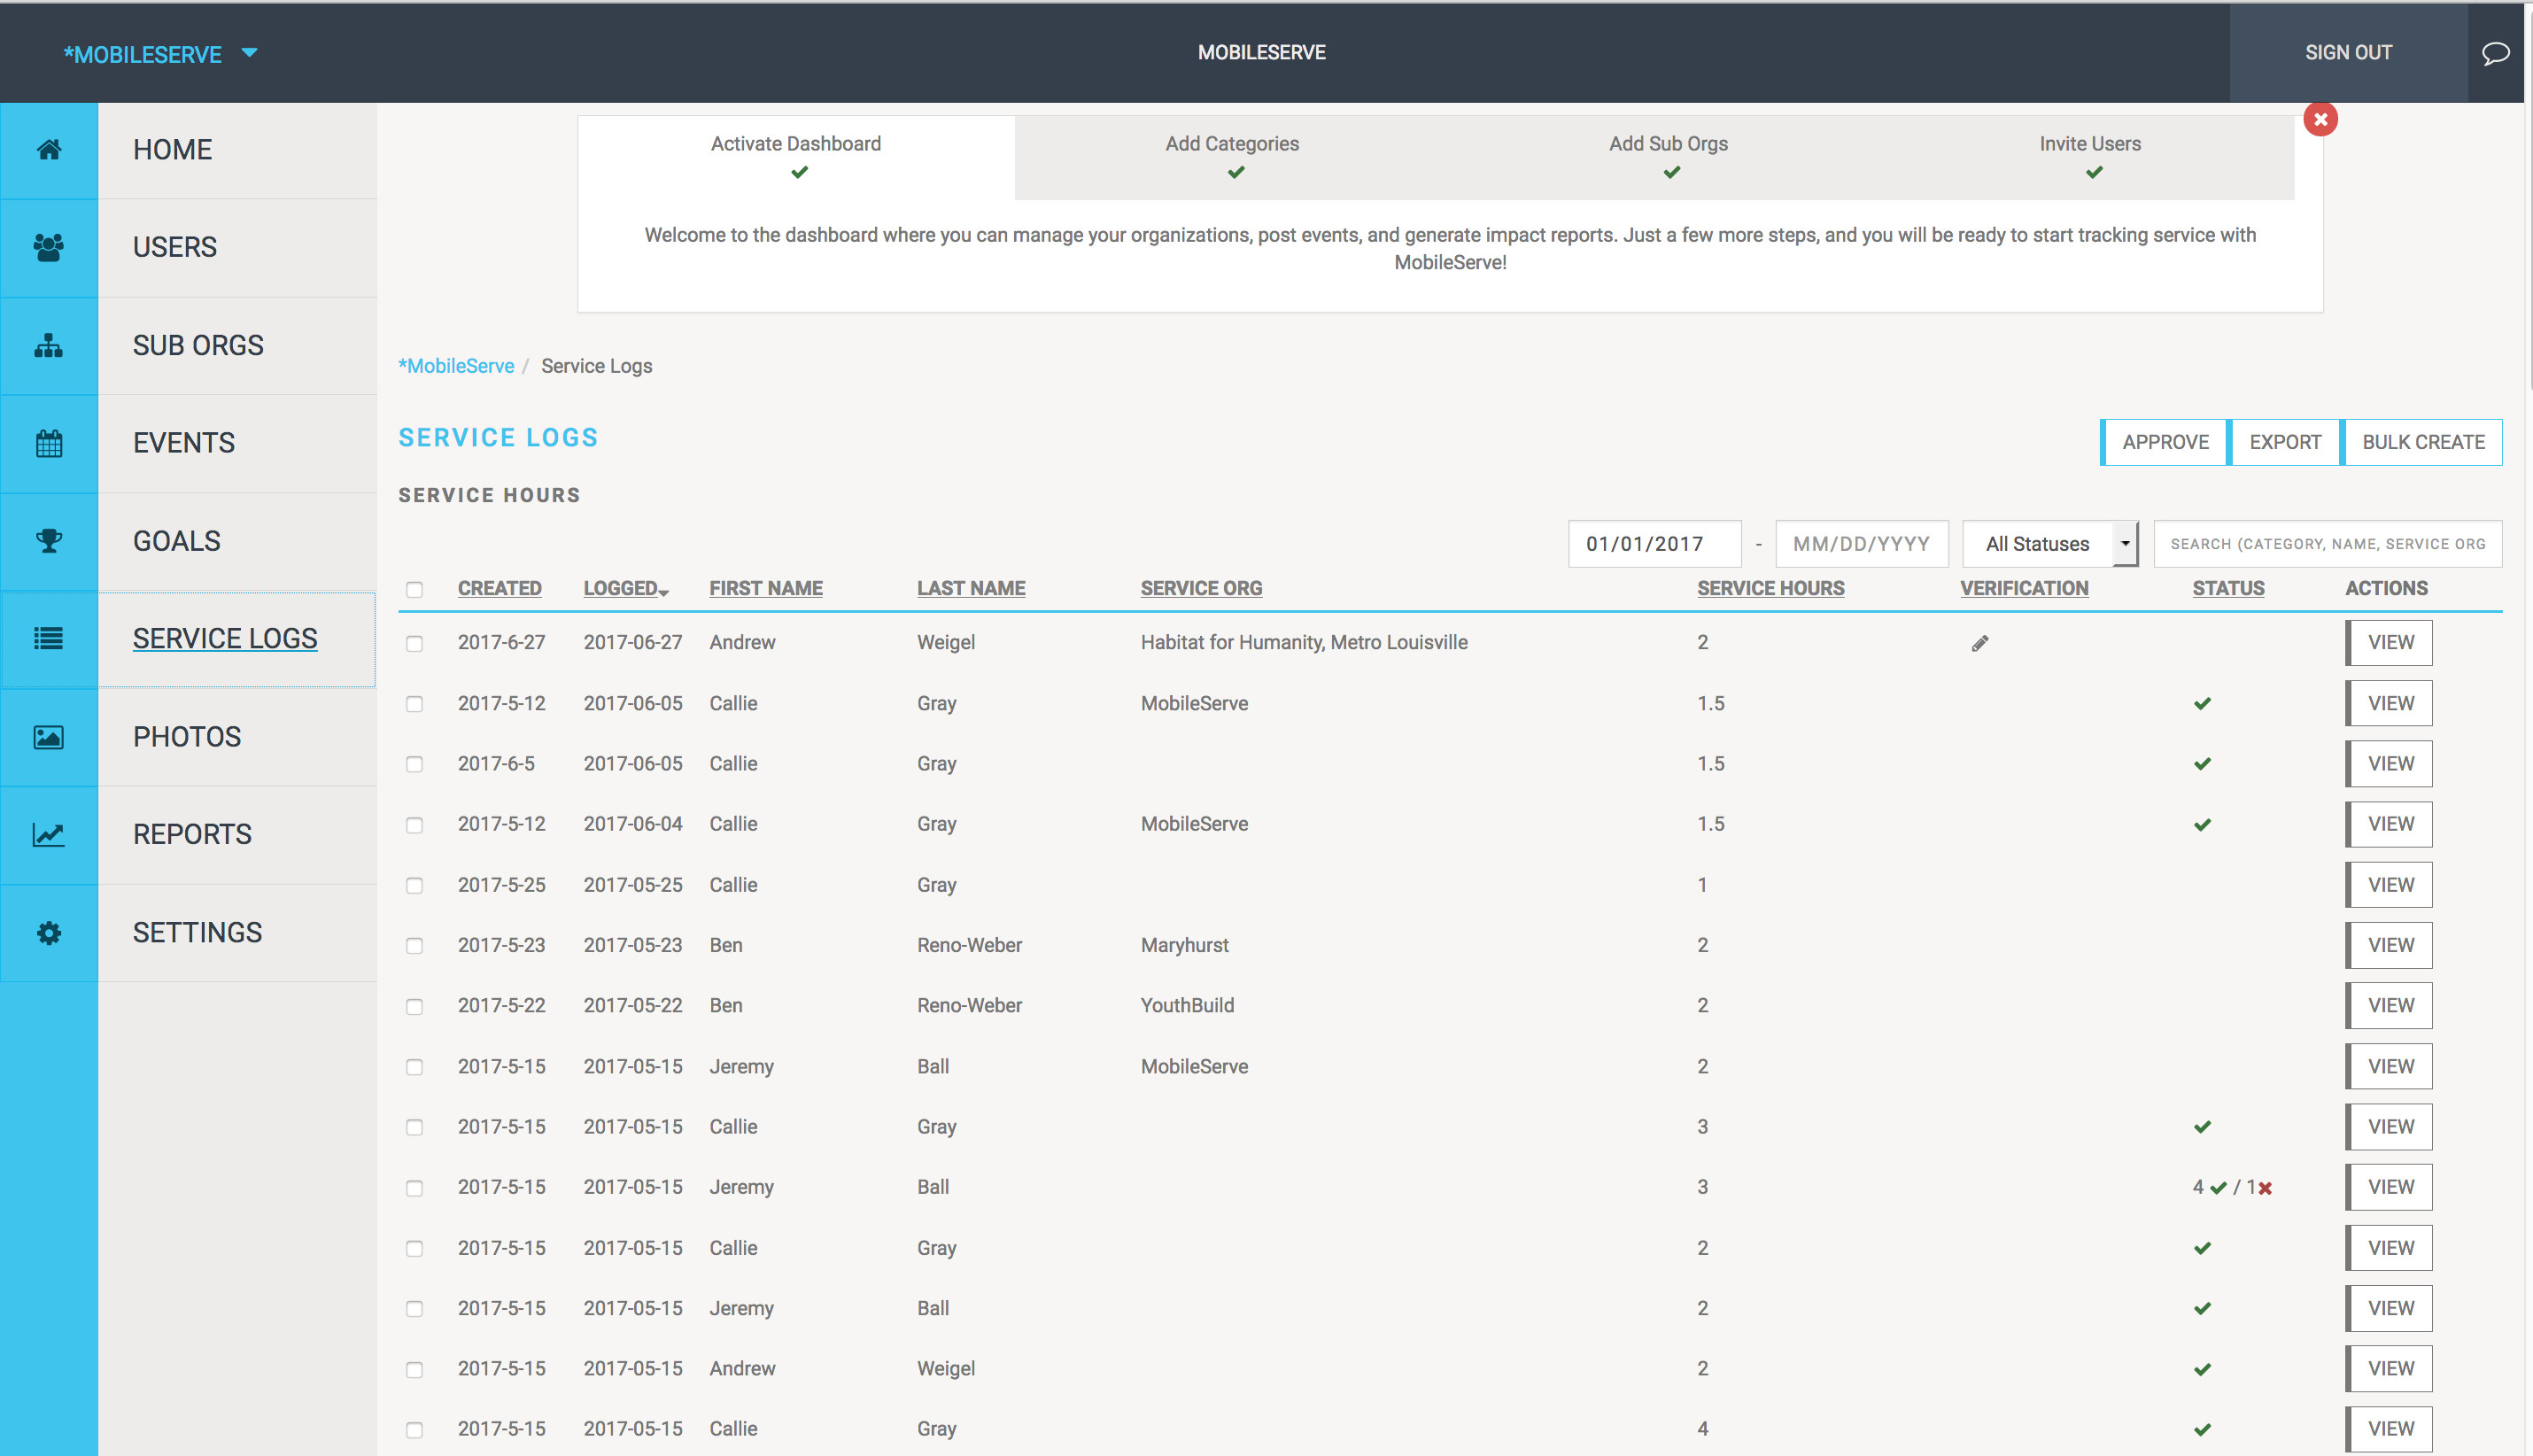
The Service Logs section provides a comprehensive view of all submitted service logs, including verification status and approval status.
Viewing Service Log Details:
- Click anywhere on a service log row to open a side panel with detailed log information.
Filtering and Sorting Service Logs:
- Date Filter: Limit logs displayed to a specific timeframe.
- Search Function: Search by user, category, or service organization to find specific logs.
- Status Sorting: Sort logs by approval status (Approved, Rejected, Pending) for efficient review.
 Service Log Example
Alt text: Mobile serve service logs page showing log details, filters for date and status, and search bar.
Approve or Reject Service Logs: Ensuring Data Accuracy
The Service Logs section is where you manage log approvals.
- Click on a log row to preview its details.
- Check the box next to the category being reviewed.
- Click the “Actions” button and select “Approve” or “Reject” from the dropdown.
- Approve: A checkmark indicates log approval.
- Reject: A comment box appears, allowing you to provide a reason for rejection (optional). The user receives an email notification with a link to the log and your feedback. Users can edit and resubmit rejected logs for approval.
Add Logs on Behalf of Members (Bulk Create): Streamlining Log Entry
The Bulk Create feature allows administrators to add service logs for individuals, groups, or the entire organization, simplifying record-keeping for events or past service hours.
- From the Service Logs page, click the “Bulk Create” button.
- Enter service details:
- Service Date
- Duration
- Service Category
- Service Organization (Optional)
- Description (Optional)
- Supervisor Information (Optional)
- Choose recipients:
- Create for Everyone: Apply the log to all organization members. Confirm your selection in the pop-up message.
- Select Specific Users or Sub-Orgs: Search for users or sub-organizations and add them to the recipient list. Remove recipients by clicking the “X” on their name box.
- Click “Bulk Create” to finalize. Confirm your selection in the pop-up message.
- Logs created via Bulk Create are automatically Admin Approved.
Export Service Logs: Data Extraction for Reporting
Administrators can export service log data to a CSV file for external analysis and reporting. The file is emailed to the administrator’s Mobile Serve account email address.
- Export Selected Logs: Check the boxes next to specific logs and click the “Export” button.
- Export All Logs: Check the top checkbox to select all logs, then click “Export” and confirm your choice.
Photos: Visualizing Service Impact
The Photos section aggregates all photos uploaded by members when logging service hours, regardless of social media sharing. This section provides a visual representation of your organization’s service activities.
- Clicking on a photo directs you to the associated service log, providing context and stories behind the images.
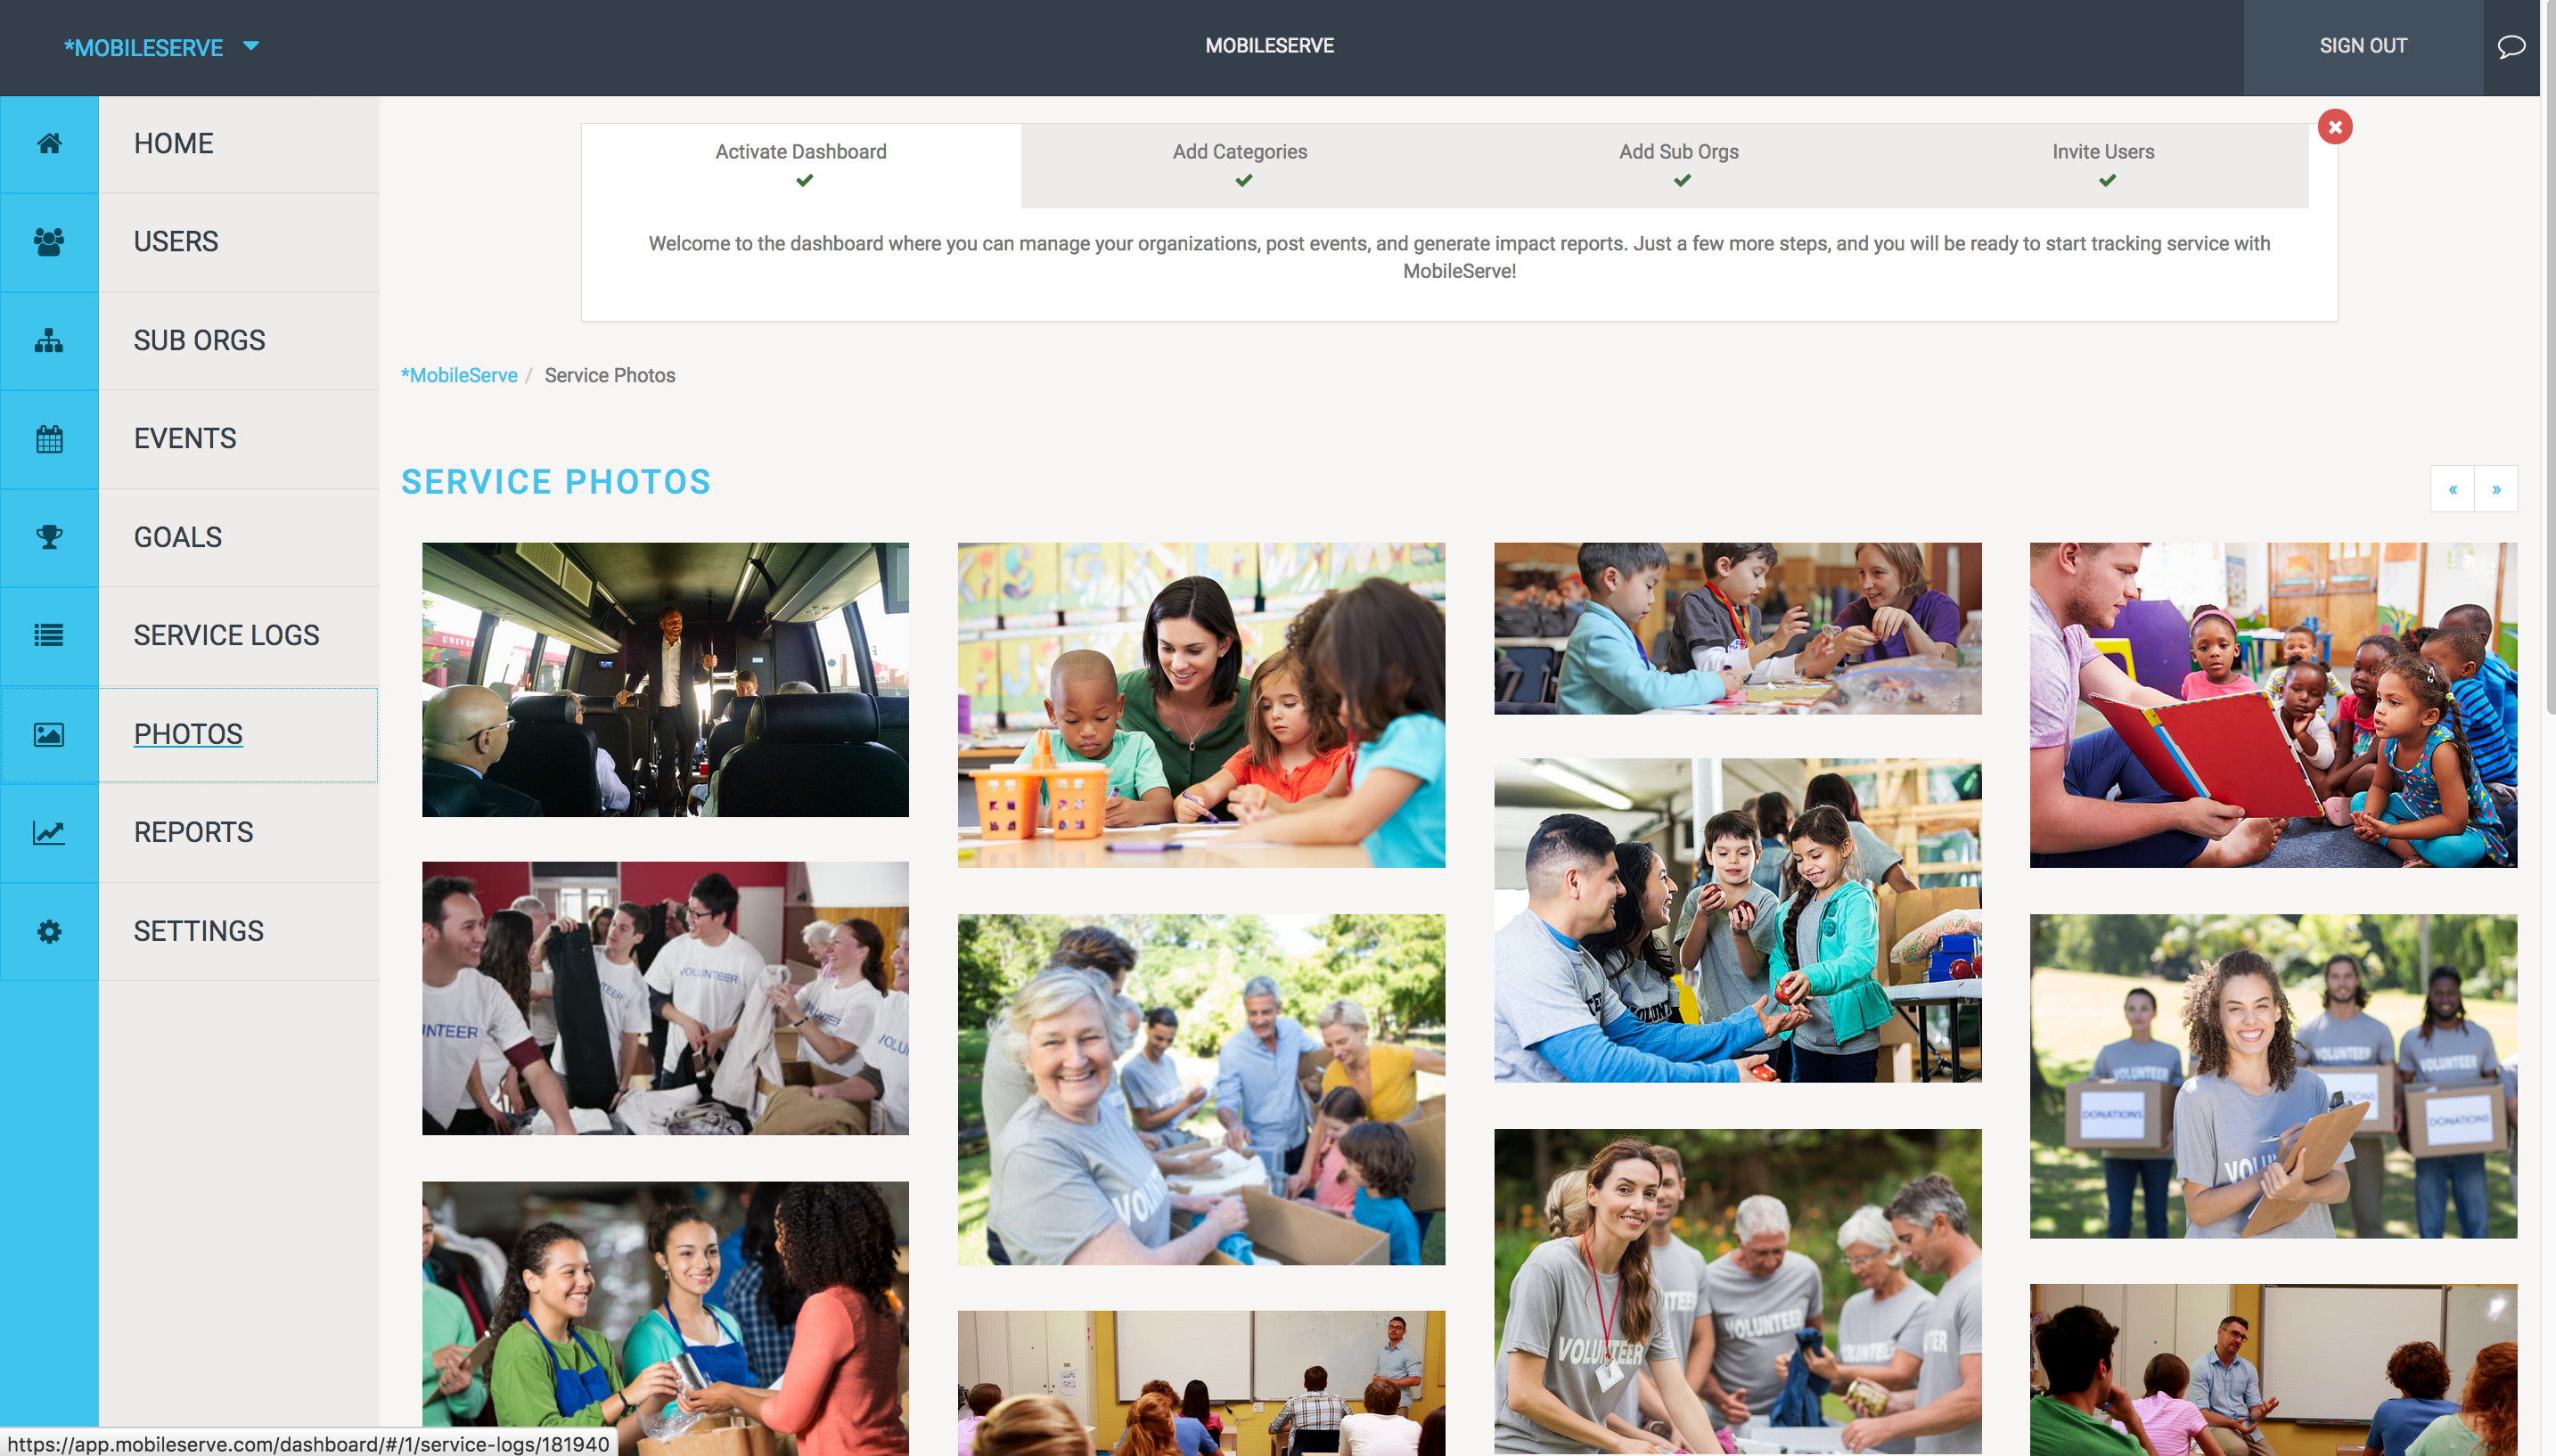 Photo Example
Alt text: Mobile serve photos section displaying user-uploaded service photos with links to service logs.
Reports: Data Visualization and Analysis
The Reports section offers downloadable infographics and data sets for visualizing and analyzing your organization’s service data.
Downloading Individual Infographics or Data Sets:
- Under Full Report, click on an infographic option.
- Click “Download” and select the desired file type (.png for infographic, .csv for data).
- Click the option header again to deselect.
Downloading Multiple Infographics or Data Sets:
- Under Full Report, select all desired data points. The report preview updates in real-time.
- Click “Download” and choose the file type.
- For detailed raw data, consider exporting user summaries or service logs from their respective pages.
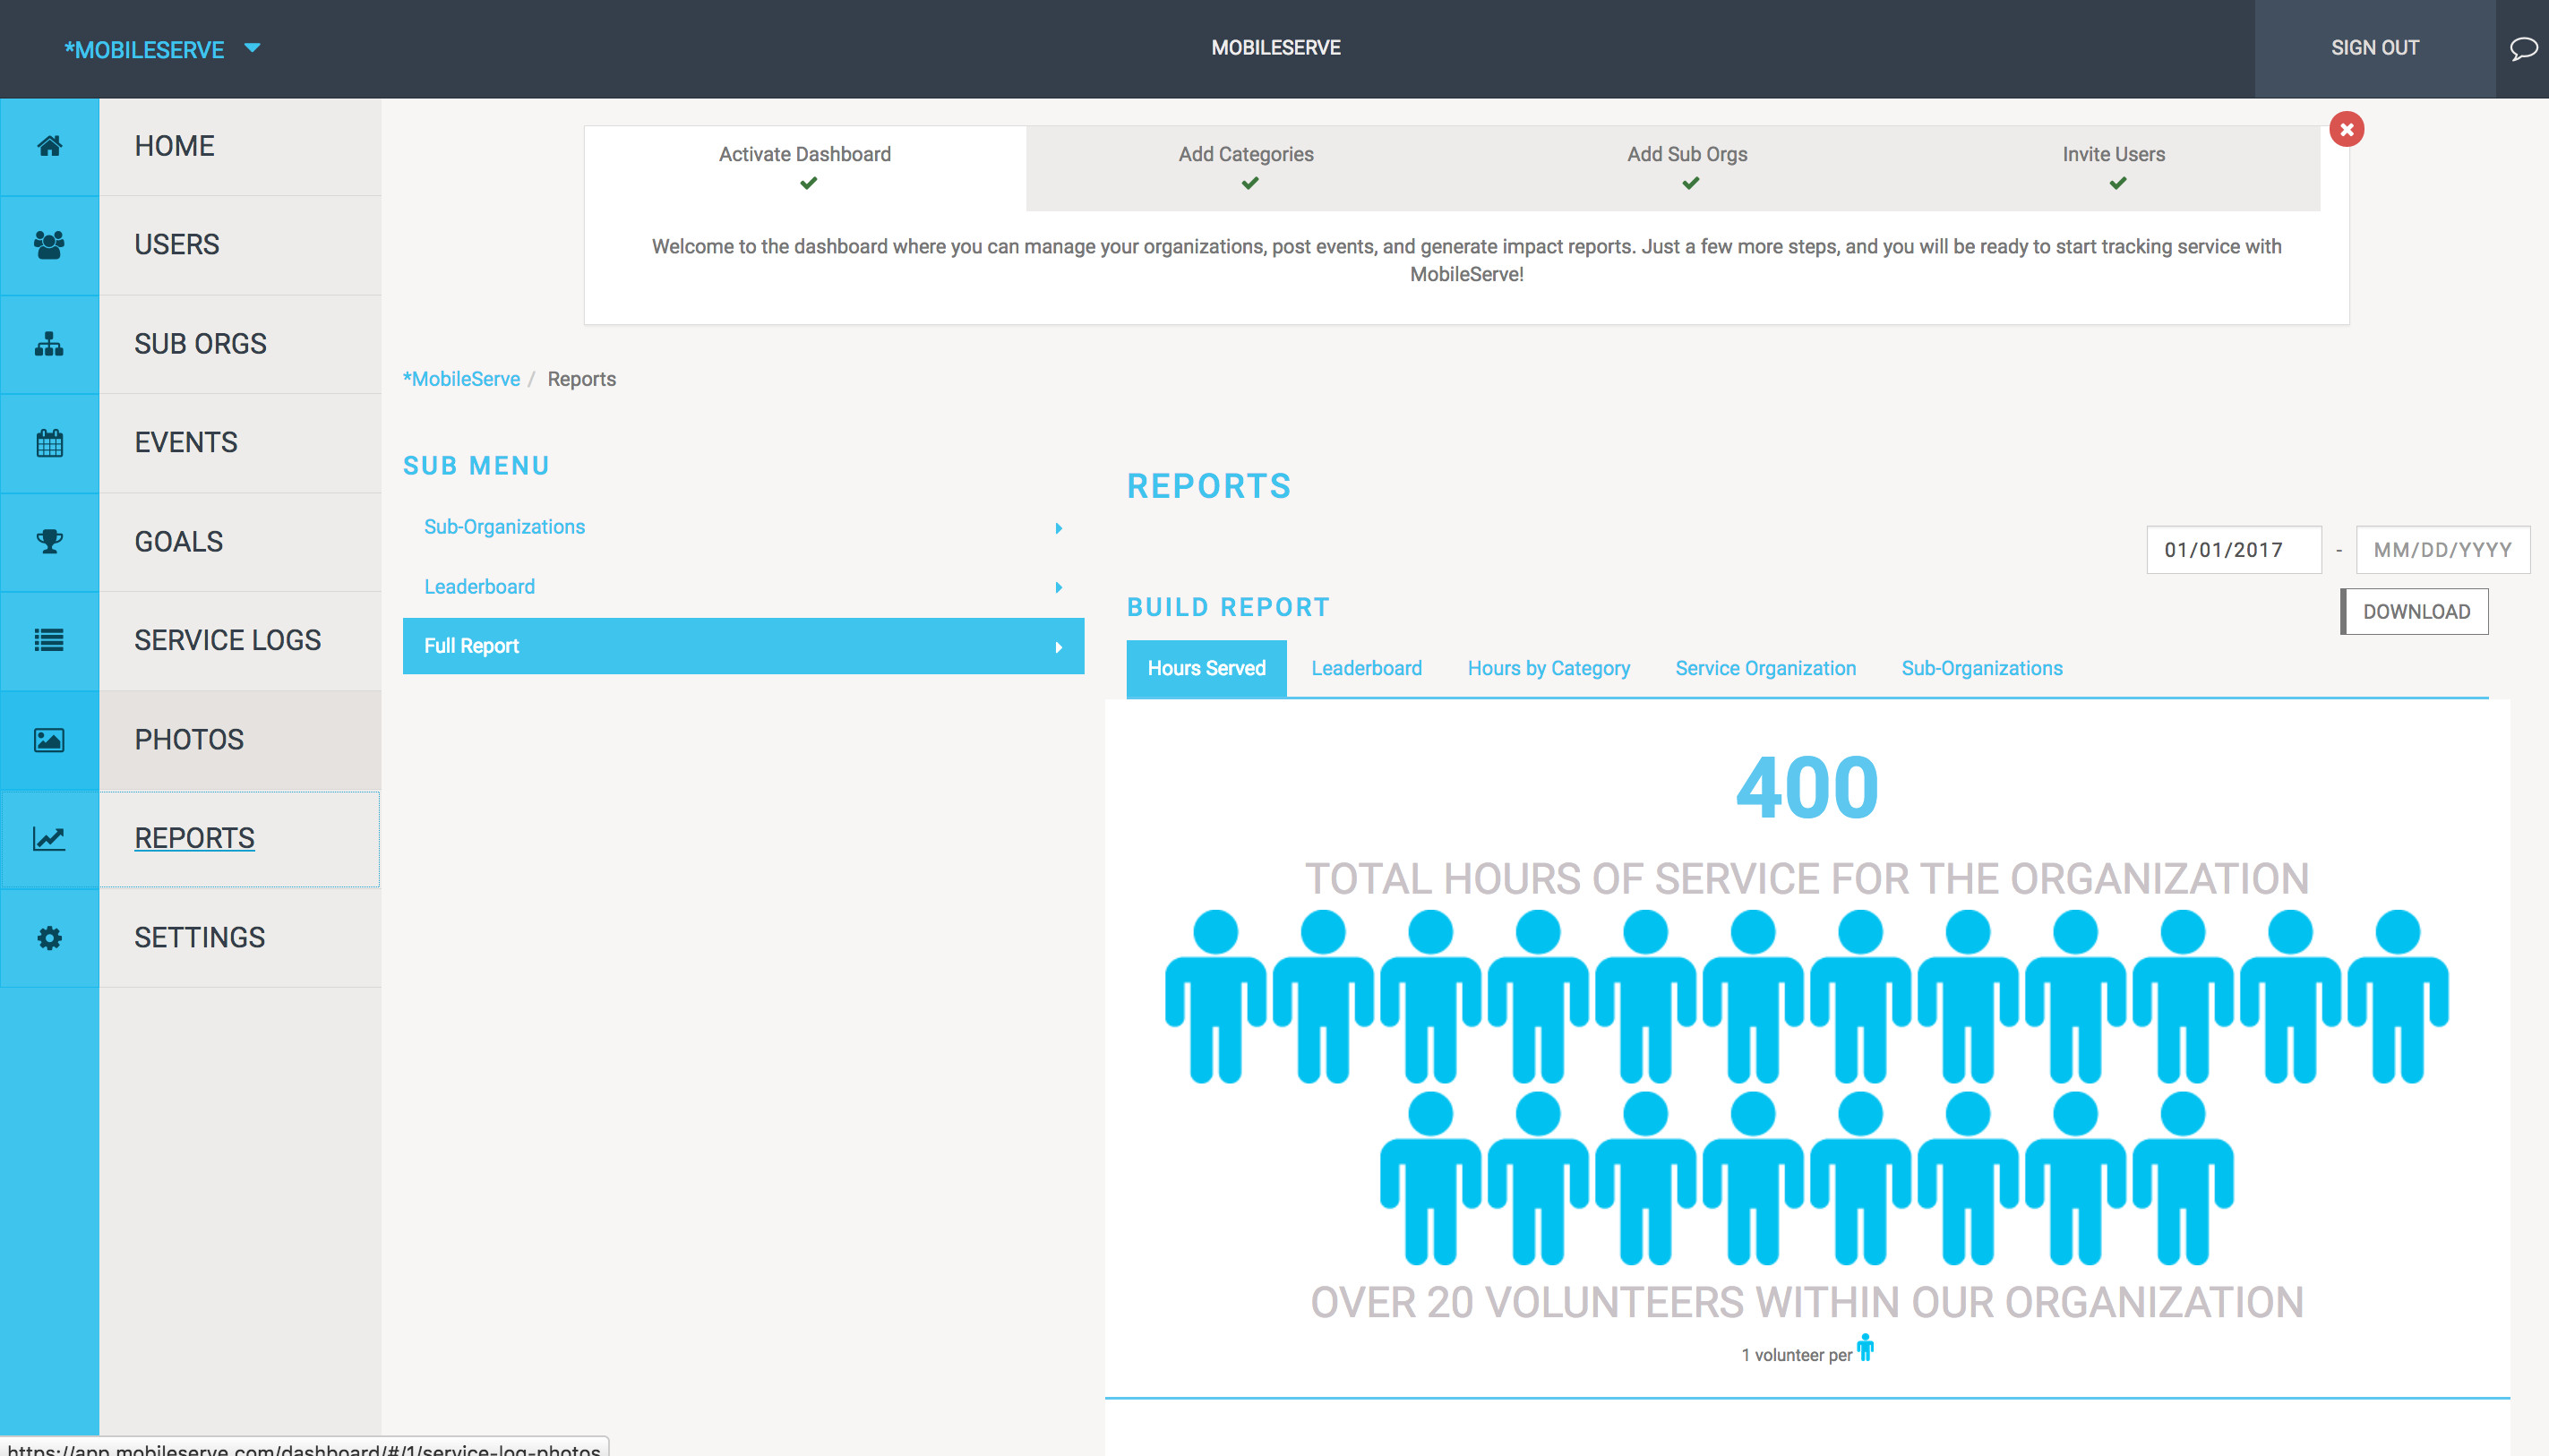 Build Report Example
Alt text: Mobile serve report building interface allowing selection of data points for custom reports and download options.
Settings: Customizing Your Mobile Serve Experience
The Settings page allows you to customize various aspects of your Mobile Serve organization, including service log settings and user attributes.
Service Logs Settings: Tailoring the Logging Process
This section lets you customize the service log creation process for your users.
Set Field Visibility:
- Choose visibility settings (Hidden, Visible, Required) for service log fields to control the level of detail users provide.
- Hidden: Field is not visible to users.
- Visible: Field is optional for users. (Default)
- Required: User must complete the field to submit the log. Note: “Signature” as required is only enforced on mobile devices.
Set up a Prompt:
- Enter custom prompt text in the “Prompt” field to guide users when logging hours. This can replace or supplement the default “Description” field. Set “Description” to “Hidden” to avoid redundancy.
Auto Approval:
- Configure auto-approval settings to streamline the approval process based on verification methods.
- Never: (Default) Manual admin approval is required for all logs.
- Immediately: All logs are automatically approved upon submission, regardless of verification.
- Any: Logs with at least one selected verification method are auto-approved.
- All: Logs with all selected verification methods are auto-approved.
Add / Modify Service Categories: Managing Service Types
Customize service categories to accurately reflect your organization’s service areas.
- Add Category: Type the new category name in the blank box and click the “+” icon.
- Modify Category Name: Click the pencil icon next to the category name, enter the new name, and press Enter.
- Change Category Visibility: Check or uncheck the “Visible” box to control category availability for future logs. Invisible categories remain in past reports.
- Delete Category: Click the trash icon. Reassign hours from deleted categories to another category when prompted. Deleted categories are removed from reports.
User Attributes: Managing User Data
User attributes allow you to manage the data collected from your users.
- Mobile Serve provides 5 global attributes and allows custom attributes specific to your organization.
- Attribute Settings:
- Visible: Users can see the attribute and their response on their profile.
- Editable: Users can modify the attribute value after initial setting.
- Required: Users must provide a value for this attribute to join the organization. Required attributes are displayed during organization code entry.
- Searchable: Adds the attribute as a column on the Users page and makes values searchable.
- Edit attribute settings at any time. Deleting an attribute removes all associated data.
- Bulk import attribute values using “Bulk Import User Attributes” in settings.
This comprehensive guide equips you with the knowledge to effectively navigate and utilize your Mobile Serve dashboard, maximizing your organization’s service management and impact tracking capabilities.