
In the digital age, accessing devices on a network, whether it’s the vast internet or your own local network (LAN), relies on machines communicating with each other using IP addresses. However, remembering and typing numerical IP addresses can be cumbersome. This is where hostname resolution comes into play, allowing us to use easily recognizable names instead of complex numbers to access our devices, including your Lan Server Host.
This guide delves into the essential methods for setting up hostname resolution, specifically tailored for your lan server host within a local network. We will explore various approaches, from simple file modifications to more sophisticated server-based solutions, ensuring your lan server host is easily accessible by name across your network.
Method 1: The Hosts File Approach for Your LAN Server Host
The hosts file method is a straightforward, operating system-level technique for hostname resolution. It’s particularly useful for small, static networks where IP addresses rarely change. For a lan server host, this method offers a quick way to assign a name without requiring any additional software or network services.
The primary advantage of using a hosts file is its simplicity and independence from network infrastructure. It works without any special network services. However, it becomes less practical as your network grows, especially if your lan server host or other devices have dynamically assigned IP addresses. Updating multiple machines every time a hostname or IP changes can become tedious and error-prone.
A hosts file is essentially a text file containing lines that map IP addresses to hostnames. Here’s a typical example:
127.0.0.1 localhost localhost.localdomain
192.168.1.10  lan-server-host lan-server
The first line is a standard entry for the local machine. The second line is where you would define your lan server host. 192.168.1.10 would be the IP address of your lan server host, and lan-server-host and lan-server are the hostnames you can use to access it.
Hosts files are located in different directories depending on your operating system. On Unix-like systems (Linux, macOS), it’s typically found at /etc/hosts. On Windows, the path is c:windowssystem32driversetchosts. Wikipedia provides a comprehensive list of hosts file locations for various operating systems.
To configure a hostname for your lan server host using the hosts file method, follow these steps:
-
Determine the IP Address of Your LAN Server Host: On your lan server host, open a terminal or command prompt and use the command
ifconfig(or/sbin/ifconfigififconfigis not found). Look for theinet addrentry associated with your network interface. It will resemble something likeinet addr:192.168.1.10. Ensure you select the IP address corresponding to your network connection and not loopback or virtual interfaces.eth0 Link encap:Ethernet HWaddr 00:11:22:33:44:55 inet addr:192.168.1.10 Bcast:192.168.1.255 Mask:255.255.255.0 ... -
Edit the Hosts File on Client Machines: On each machine from which you want to access your lan server host by name, you need to edit the hosts file. You’ll require administrator or root privileges to modify this file.
- Unix-like systems: Use a text editor like
nanoorvimwithsudoto edit/etc/hosts. For example:sudo nano /etc/hosts. - Windows: Open Notepad as Administrator and navigate to
c:windowssystem32driversetchosts.
- Unix-like systems: Use a text editor like
-
Add an Entry for Your LAN Server Host: In the hosts file, add a new line with the IP address of your lan server host followed by the desired hostname(s). For example, to map the IP address
192.168.1.10to the hostnamelan-server-host, add the line:192.168.1.10 lan-server-host -
Save the File: Save the changes to the hosts file.
After saving, your client machines should be able to access your lan server host using the hostname you defined in the hosts file.
Method 2: DHCP and DNS on Home/Small Office Networks for LAN Server Hosts
For home or small office networks, leveraging your router’s DHCP (Dynamic Host Configuration Protocol) and DNS (Domain Name System) capabilities is often the simplest and most efficient method for hostname resolution for your lan server host and other devices. This approach centralizes hostname management on your router, automatically distributing hostname information to all connected devices.
This method is particularly convenient if your network devices, including your lan server host, obtain their IP addresses automatically via DHCP. Most home routers integrate DHCP and DNS server functionalities, simplifying network management.
To utilize this method, you’ll need to configure your router to associate a hostname with the MAC address of your lan server host. Here’s how:
-
Find the MAC Address of Your LAN Server Host: On your lan server host, use the command
ifconfig -a(or/sbin/ifconfig -aif needed). Look for theHWaddrentry corresponding to your network interface connected to the router (either wired or Wi-Fi). The MAC address will be in the format00:11:22:33:44:55.eth0 Link encap:Ethernet HWaddr 00:11:22:33:44:55 ... -
Access Your Router’s Web Interface: Open a web browser and enter your router’s IP address. This is usually something like
192.168.1.1or192.168.0.1. Refer to your router’s documentation if you are unsure. -
Locate DHCP Settings: Navigate to the DHCP settings section in your router’s interface. The exact location and terminology vary depending on your router model, but common labels include “DHCP,” “LAN Settings,” or “Static DHCP.” Look for options related to “DHCP Reservations,” “Static Leases,” or similar terms.
-
Add a DHCP Reservation for Your LAN Server Host: In the DHCP settings, you’ll typically find options to add a new reservation or static lease. You’ll need to enter the following information:
- MAC Address: The MAC address of your lan server host you found in step 1.
- IP Address: Choose a static IP address for your lan server host within your network’s IP range. Ensure this IP address is outside the DHCP range assigned by your router to avoid conflicts. You can often find your network’s IP range in the router’s “Network” or “LAN” settings. For example, if your router IP is
192.168.1.1and subnet mask is255.255.255.0, addresses in the192.168.1.2to192.168.1.254range are likely valid. - Hostname: Enter the desired hostname for your lan server host, such as
lan-server-host.
Here’s an example of a DHCP reservation setting interface (similar to Tomato firmware):
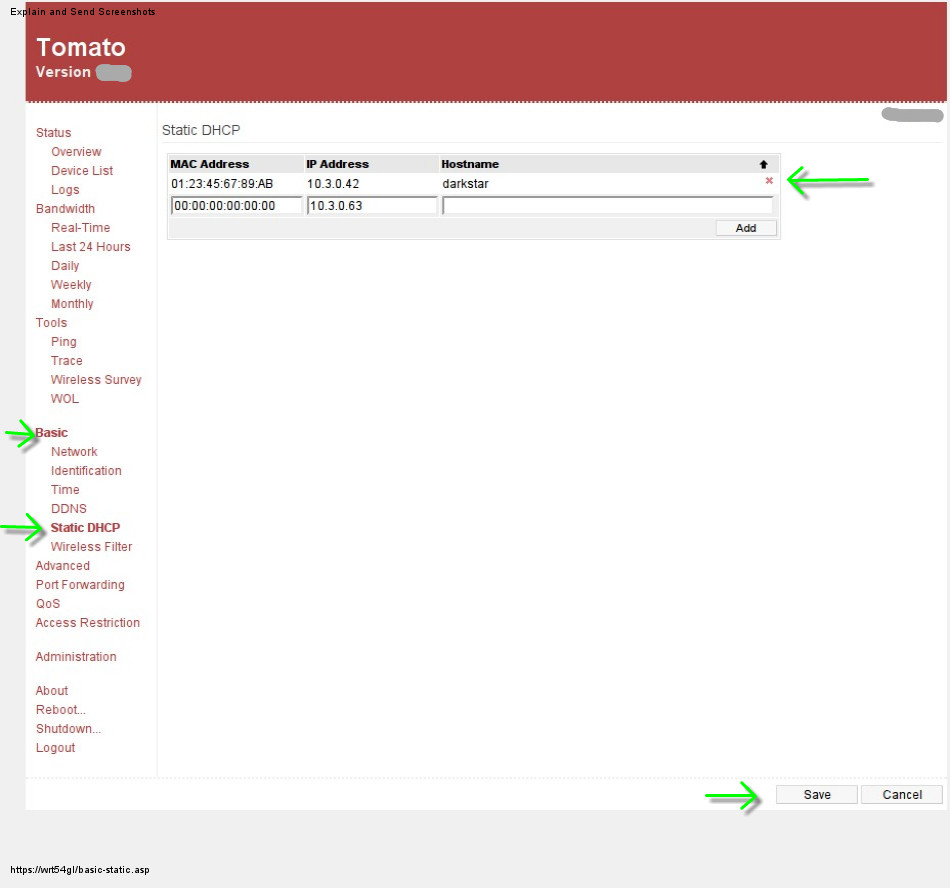 tomato screenshot
 -
Save Router Settings: Save the DHCP reservation settings on your router. You may need to reboot your router for the changes to take effect.
Once configured, your lan server host will always receive the specified IP address from the router, and the hostname will be automatically registered with the router’s DNS server. All devices on your network that use the router for DNS resolution will now be able to access your lan server host by its hostname.
Method 3: Setting Up a Dedicated DNS Server with Dnsmasq for Advanced LAN Server Host Management
For users seeking more control and customization, or those with routers lacking advanced DHCP/DNS features, setting up a dedicated DNS server like Dnsmasq on a Linux machine provides a robust solution for managing hostnames within your LAN, including your lan server host. Dnsmasq is a lightweight, easy-to-configure DNS and DHCP server often used in embedded systems and small networks.
This method is suitable if you have a Linux machine that can act as a server (always on and with a static IP address). This server will handle DNS requests for your local network, allowing you to define hostnames for your lan server host and other devices centrally.
Here’s a guide to setting up Dnsmasq for hostname resolution for your lan server host:
-
Choose a Server Machine (S): Select a Linux machine on your network to act as the DNS server (S). Ensure this machine has a static IP address and is always running.
-
Install Dnsmasq: On machine S, install the
dnsmasqpackage using your distribution’s package manager. For example, on Debian/Ubuntu:sudo apt-get update sudo apt-get install dnsmasq -
Configure Dnsmasq: The main configuration file for Dnsmasq is typically
/etc/dnsmasq.conf. You may need to edit this file to customize Dnsmasq’s behavior.-
Enable Hosts File Reading: Ensure Dnsmasq reads the
/etc/hostsfile (or another specified hosts file) for local hostname definitions. By default, Dnsmasq reads/etc/hosts. Make sure theno-hostsdirective is commented out (starts with#) in/etc/dnsmasq.conf. Alternatively, you can specify a different hosts file with theaddn-hosts=/path/to/hosts/filedirective. -
Configure Upstream DNS Servers: Dnsmasq needs to know how to resolve internet hostnames. You can either configure it to use your ISP’s DNS servers or public DNS servers like Google Public DNS (8.8.8.8 and 8.8.4.4). Add
server=lines to/etc/dnsmasq.conffor each upstream DNS server:server=8.8.8.8 server=8.8.4.4If you are using
resolvconf(common on Debian/Ubuntu), it might automatically configure upstream DNS servers.
-
-
Restart Dnsmasq: After making configuration changes, restart the Dnsmasq service for the changes to take effect. The command to restart Dnsmasq varies by distribution, but common commands include:
sudo systemctl restart dnsmasq # For systemd-based systems sudo service dnsmasq restart # For SysVinit-based systems -
Configure Server Machine (S) to Use Dnsmasq: Machine S needs to use itself as its DNS server. Edit the
/etc/resolv.conffile on machine S (as root). Replace any existingnameserverlines with:nameserver 127.0.0.1If you are using
resolvconf, ensure that files in/etc/resolvconf/resolv.conf.d/base,head, andtaildo not containnameserverentries and then runsudo resolvconf -u. -
Configure Client Machines to Use Server (S) as DNS Server: On each client machine in your LAN, configure them to use the IP address of machine S as their DNS server. This is typically done in network settings. For example, in
/etc/resolv.confon Linux clients, replace existingnameserverlines with:nameserver <IP_address_of_S> # Replace with the static IP of machine SOn Windows, you would configure the DNS server address in the network adapter settings.
-
Add Hostname for Your LAN Server Host to
/etc/hostson Server (S): On machine S, edit the/etc/hostsfile and add an entry mapping the desired hostname for your lan server host to its IP address, similar to Method 1.<IP_address_of_lan_server_host> lan-server-host
With Dnsmasq set up, your LAN will now use machine S as its DNS server. Any hostname entries in /etc/hosts on machine S, including the one for your lan server host, will be resolvable by all clients using S as their DNS server.
Beyond the LAN: Global Internet Names for Servers
While the above methods focus on hostname resolution within your local network, if you need to access your server or services from the public internet, you’ll need to consider using global domain names and potentially dynamic DNS if your public IP address is not static. These topics extend beyond the scope of setting up a lan server host but are important considerations for broader server accessibility.
Domain Names
Registering a domain name provides a globally unique and memorable name for your server or website. You can then configure DNS records to point your domain name or subdomains to the public IP address of your server.
Dynamic DNS
If your server’s public IP address is assigned dynamically by your ISP and changes periodically, dynamic DNS (DDNS) services automatically update the DNS records associated with your domain name to reflect your current IP address.
Conclusion
Setting up hostname resolution for your lan server host is crucial for convenient access and management within your local network. Whether you choose the simplicity of the hosts file, the convenience of router-based DHCP/DNS, or the flexibility of a dedicated DNS server like Dnsmasq, understanding these methods empowers you to create a more user-friendly and efficient network environment for your lan server host and all connected devices. The best method depends on the size and complexity of your network, your router’s capabilities, and your technical expertise. Remember to prioritize user experience and choose the method that best balances simplicity and control for your specific needs.