The MobileServe Dashboard is your central hub for managing and understanding your organization’s service activities. This guide provides a detailed walkthrough of each section, empowering you to effectively utilize your Mobile Serve App and optimize your volunteer programs. For visual learners, video tutorials are also available here.
Dashboard Home: Organization Overview
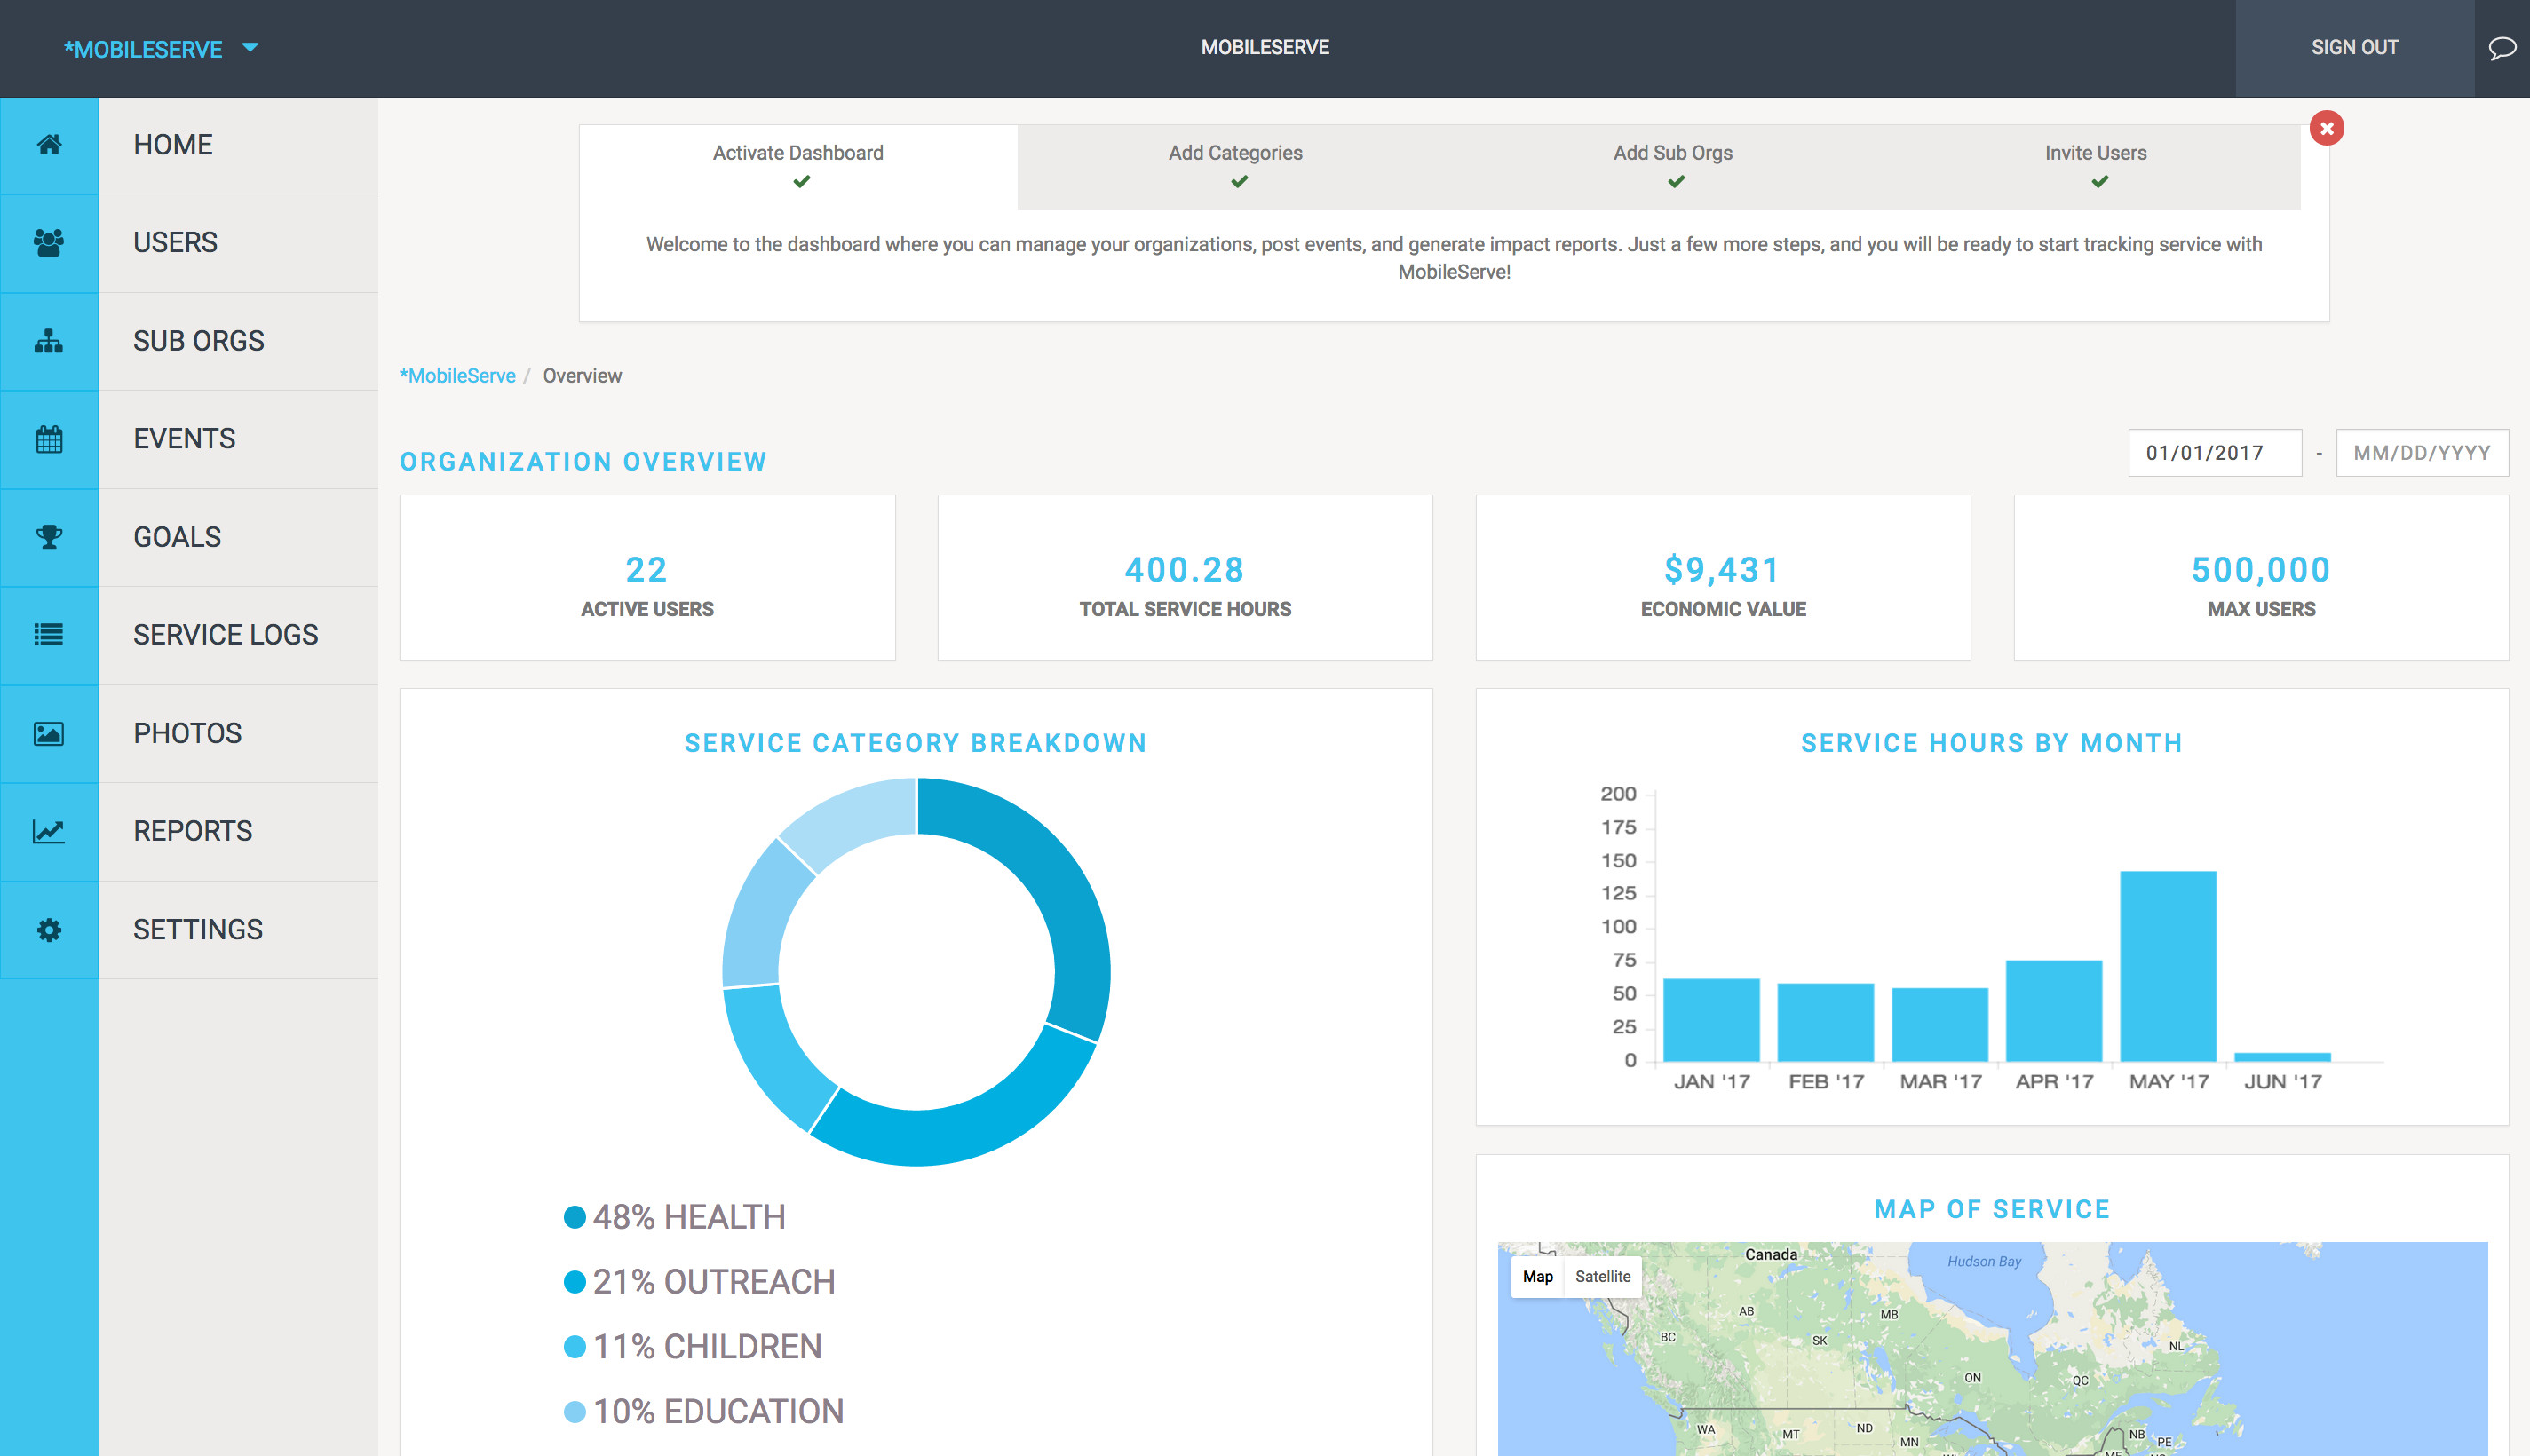
Upon logging in, you’ll land on the Dashboard Home, providing an immediate snapshot of your organization’s performance. This Organization Overview is designed for quick insights. If you manage multiple sub-organizations, they will be conveniently listed at the bottom of this page for easy access.
 Dashboard Overview Picture
Quick Tips for the Dashboard Home:
- Date Filtering: Refine your data view by selecting a specific date range using the filter located in the top right corner. This allows you to analyze trends and track progress over time.
- Service Category Insights: Hover your mouse over any Service Category displayed in the charts to instantly see the total number of service hours logged under that specific category. This provides a quick breakdown of where your volunteers are contributing their time.
Users: Member Management
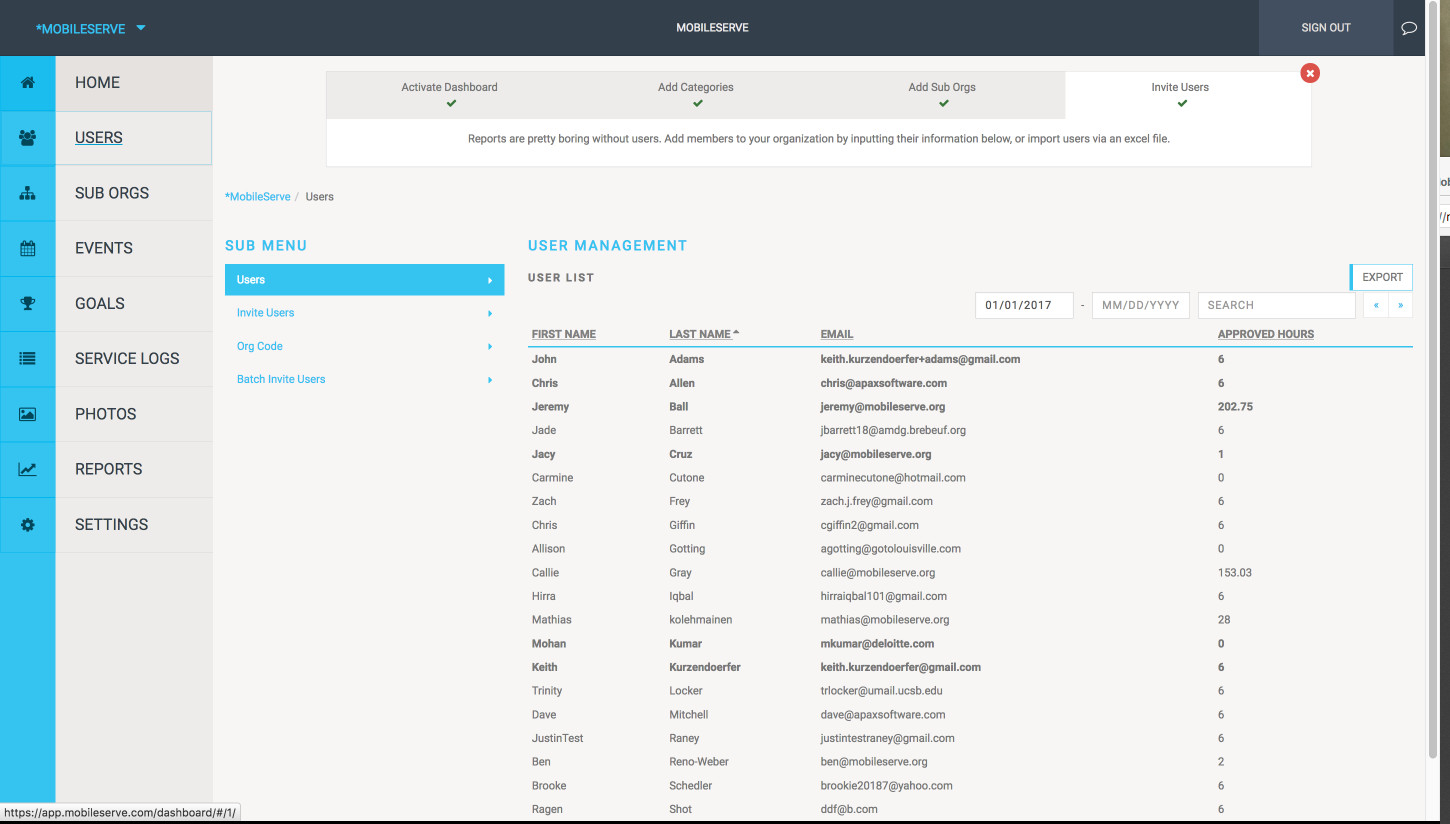
The Users section is your command center for managing your mobile serve app user base. Here, you can invite new members, manage existing user accounts, and gain insights into individual contributions. The User Management page displays essential contact information and a summary of each user’s approved service hours within your chosen date range. This makes it easy to track participation and recognize top contributors.
 User Example
Inviting Members to Your Mobile Serve App
MobileServe offers flexible options to invite users to your organization’s mobile serve app:
1. Invite Users By Entering Email Addresses:
- Ideal for small groups or individual invitations.
- Navigate to Users and select Invite Users.
- Enter the user’s email address. For multiple invites, separate addresses with commas.
- Grant administrative privileges by checking the Admin box if necessary.
- Click Send Invites. Invited users will receive an email with a link to create an account and automatically join your organization.
2. Invite Users via List Upload:
- Best suited for inviting a large number of users efficiently.
- Prepare a spreadsheet containing user email addresses and, optionally, the sub-organization they should belong to.
- Email the spreadsheet to [email protected].
- MobileServe will send email invitations directly to users. Upon account creation via the invitation link, users will be automatically linked to your organization.
3. Invite Users Directly (Share Org Code):
- Provides a personalized invitation approach, bypassing in-app emails.
- Share your organization code directly with users. Find this code in your Sub Orgs page by downloading the “Getting Started Guide.”
- Users can create MobileServe accounts and enter the organization code during signup or later in their Settings. This is helpful if you want to personalize your invitation message or believe users might miss automated emails.
Viewing Member Details and Exporting User Data
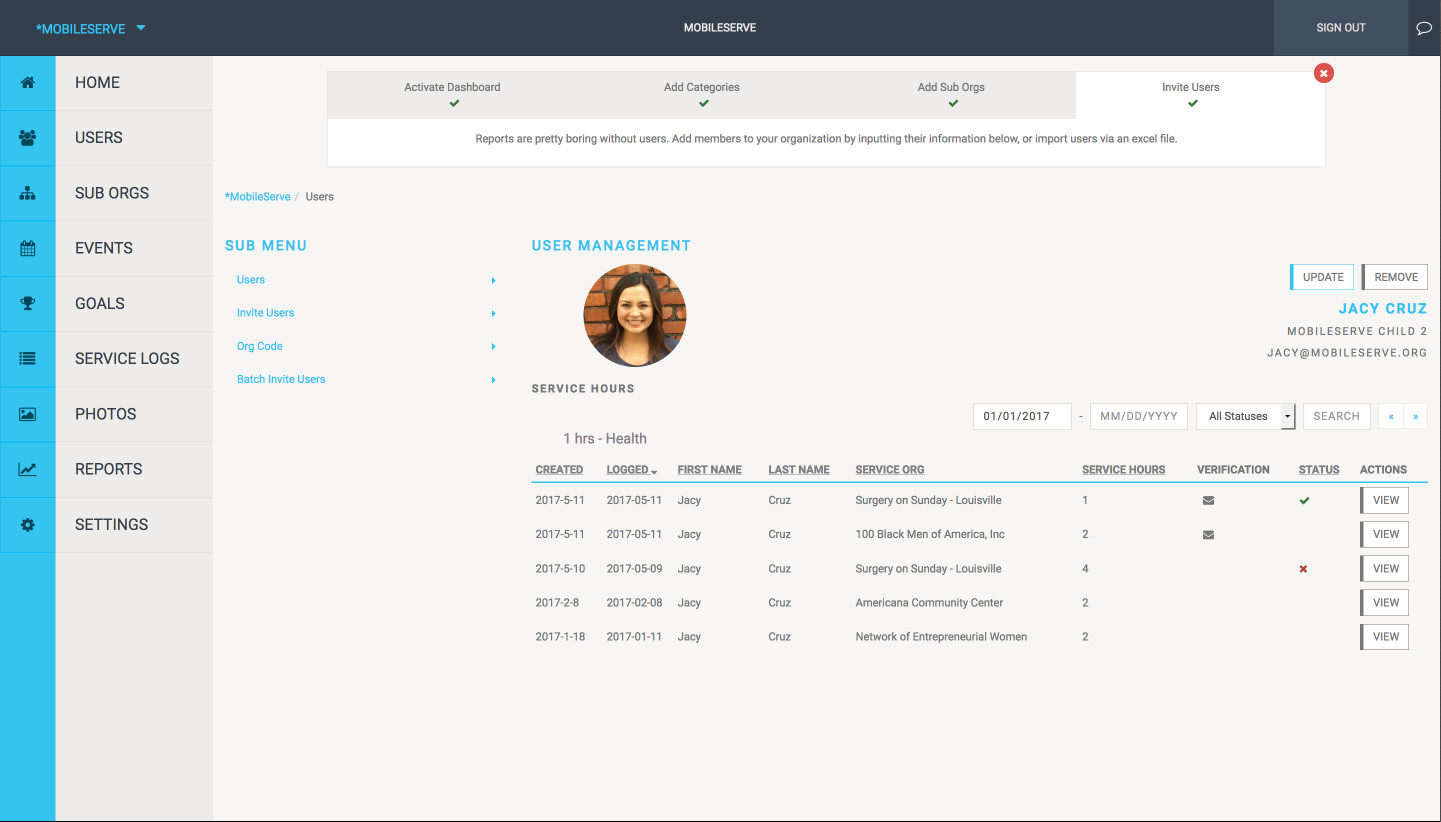
To delve deeper into individual user activity:
- On the Users page, click on a user’s name to access their profile. This profile page lists all their service logs.
- Click “View” on a specific service log within the profile to see detailed information about that entry.
For comprehensive data analysis and reporting:
- Export a list of all users and their service hours. This export includes a breakdown of pending, approved, and total hours categorized by service type.
- Click “Export” and choose your desired file type (e.g., CSV). The exported data will reflect the date range currently selected in your dashboard.
 View Member Example
Sub Orgs: Structuring Your Organization
The Sub Orgs section within your mobile serve app dashboard allows you to create and manage sub-organizations. This feature is invaluable for larger entities with distinct departments, chapters, or teams. The main Sub Orgs page provides an overview of existing sub-organizations and their total service hours.
- Clicking “Go To” next to a sub-organization name navigates you directly to that sub-org’s dedicated dashboard, enabling focused management.
- Access organization codes and download “Getting Started Guides” for each sub-organization from this page, simplifying onboarding for new sub-org members.
Deactivating Sub-Organizations:
- You can deactivate sub-organizations from the Sub Orgs page.
- Deactivation removes all users associated with the sub-org from your active MobileServe user count, freeing up licenses.
- Deactivated users retain access to their MobileServe accounts, and their service logs remain accessible via the Service Logs page (though not directly through the Users page).
Creating a New Sub Org
Expanding your organizational structure within the mobile serve app is straightforward:
- From the Sub Orgs page, select “Create Sub Org“.
- Enter the desired name for the new sub-organization.
- Click “Create“. The new sub-org will appear on the main Sub Org page.
- Manage the sub-org (invite users, access its code, etc.) by navigating to its dashboard using the “Go To” button.
- Important Naming Convention: Sub-org names must be unique across the entire MobileServe platform. If a desired name is already taken, prepend a unique prefix related to your organization to ensure uniqueness.
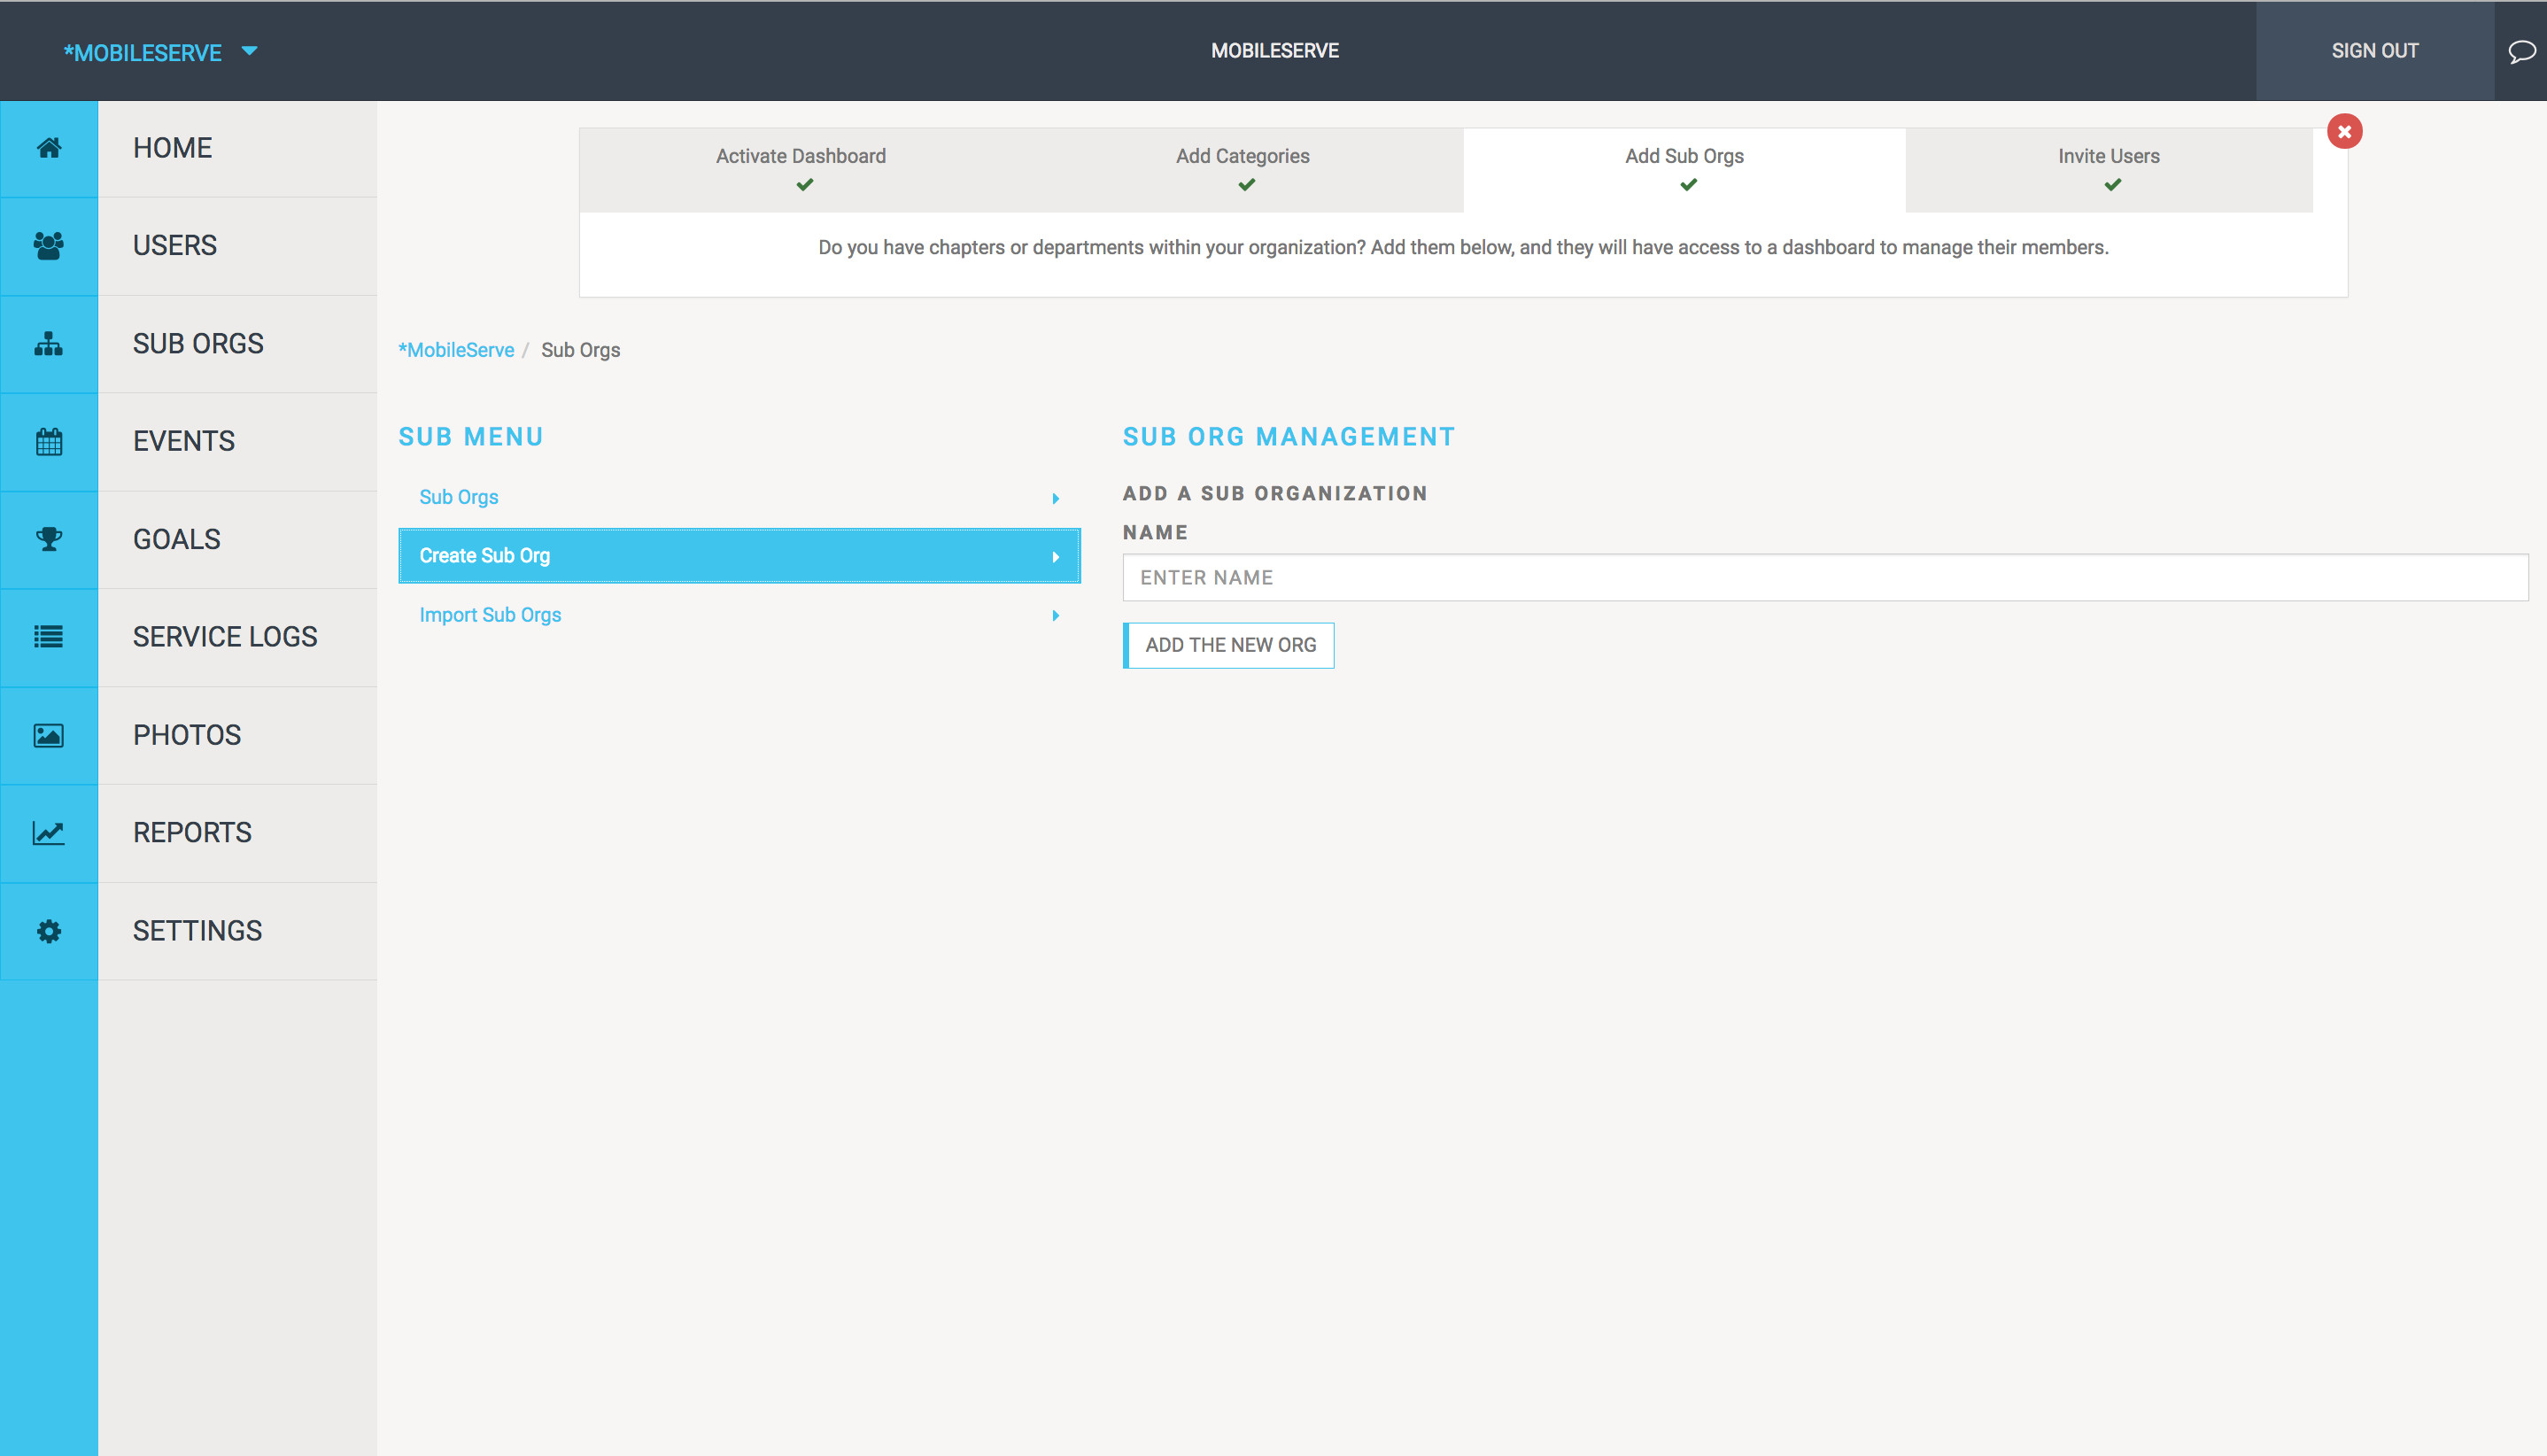 Creating Sub-Org Example
Events: Organizing Service Opportunities
The Events tab is a powerful tool within your mobile serve app dashboard for coordinating service projects and volunteer opportunities. Both your main organization and individual sub-organizations can utilize Events to invite users to participate in specific service initiatives.
Creating a New Event:
- Navigate to the Events tab in the left-hand menu.
- Select “Create Event“.
- Fill in the event details:
- Title: A clear and concise name for your event.
- Photo (Optional): Add an image to enhance email invitations and event visibility.
- Service Organization (Optional): Specify a partner service organization, if applicable.
- Default Service Category: Categorizes all service logs from event attendees automatically.
- Address of the Event (Optional): Location details for the event.
- Date & Time: Start and end times for the event.
- Description (Optional): Provide additional details about the event.
- Visibility: Control who can see and RSVP to the event.
- Click “Continue” to proceed to timeslot creation.
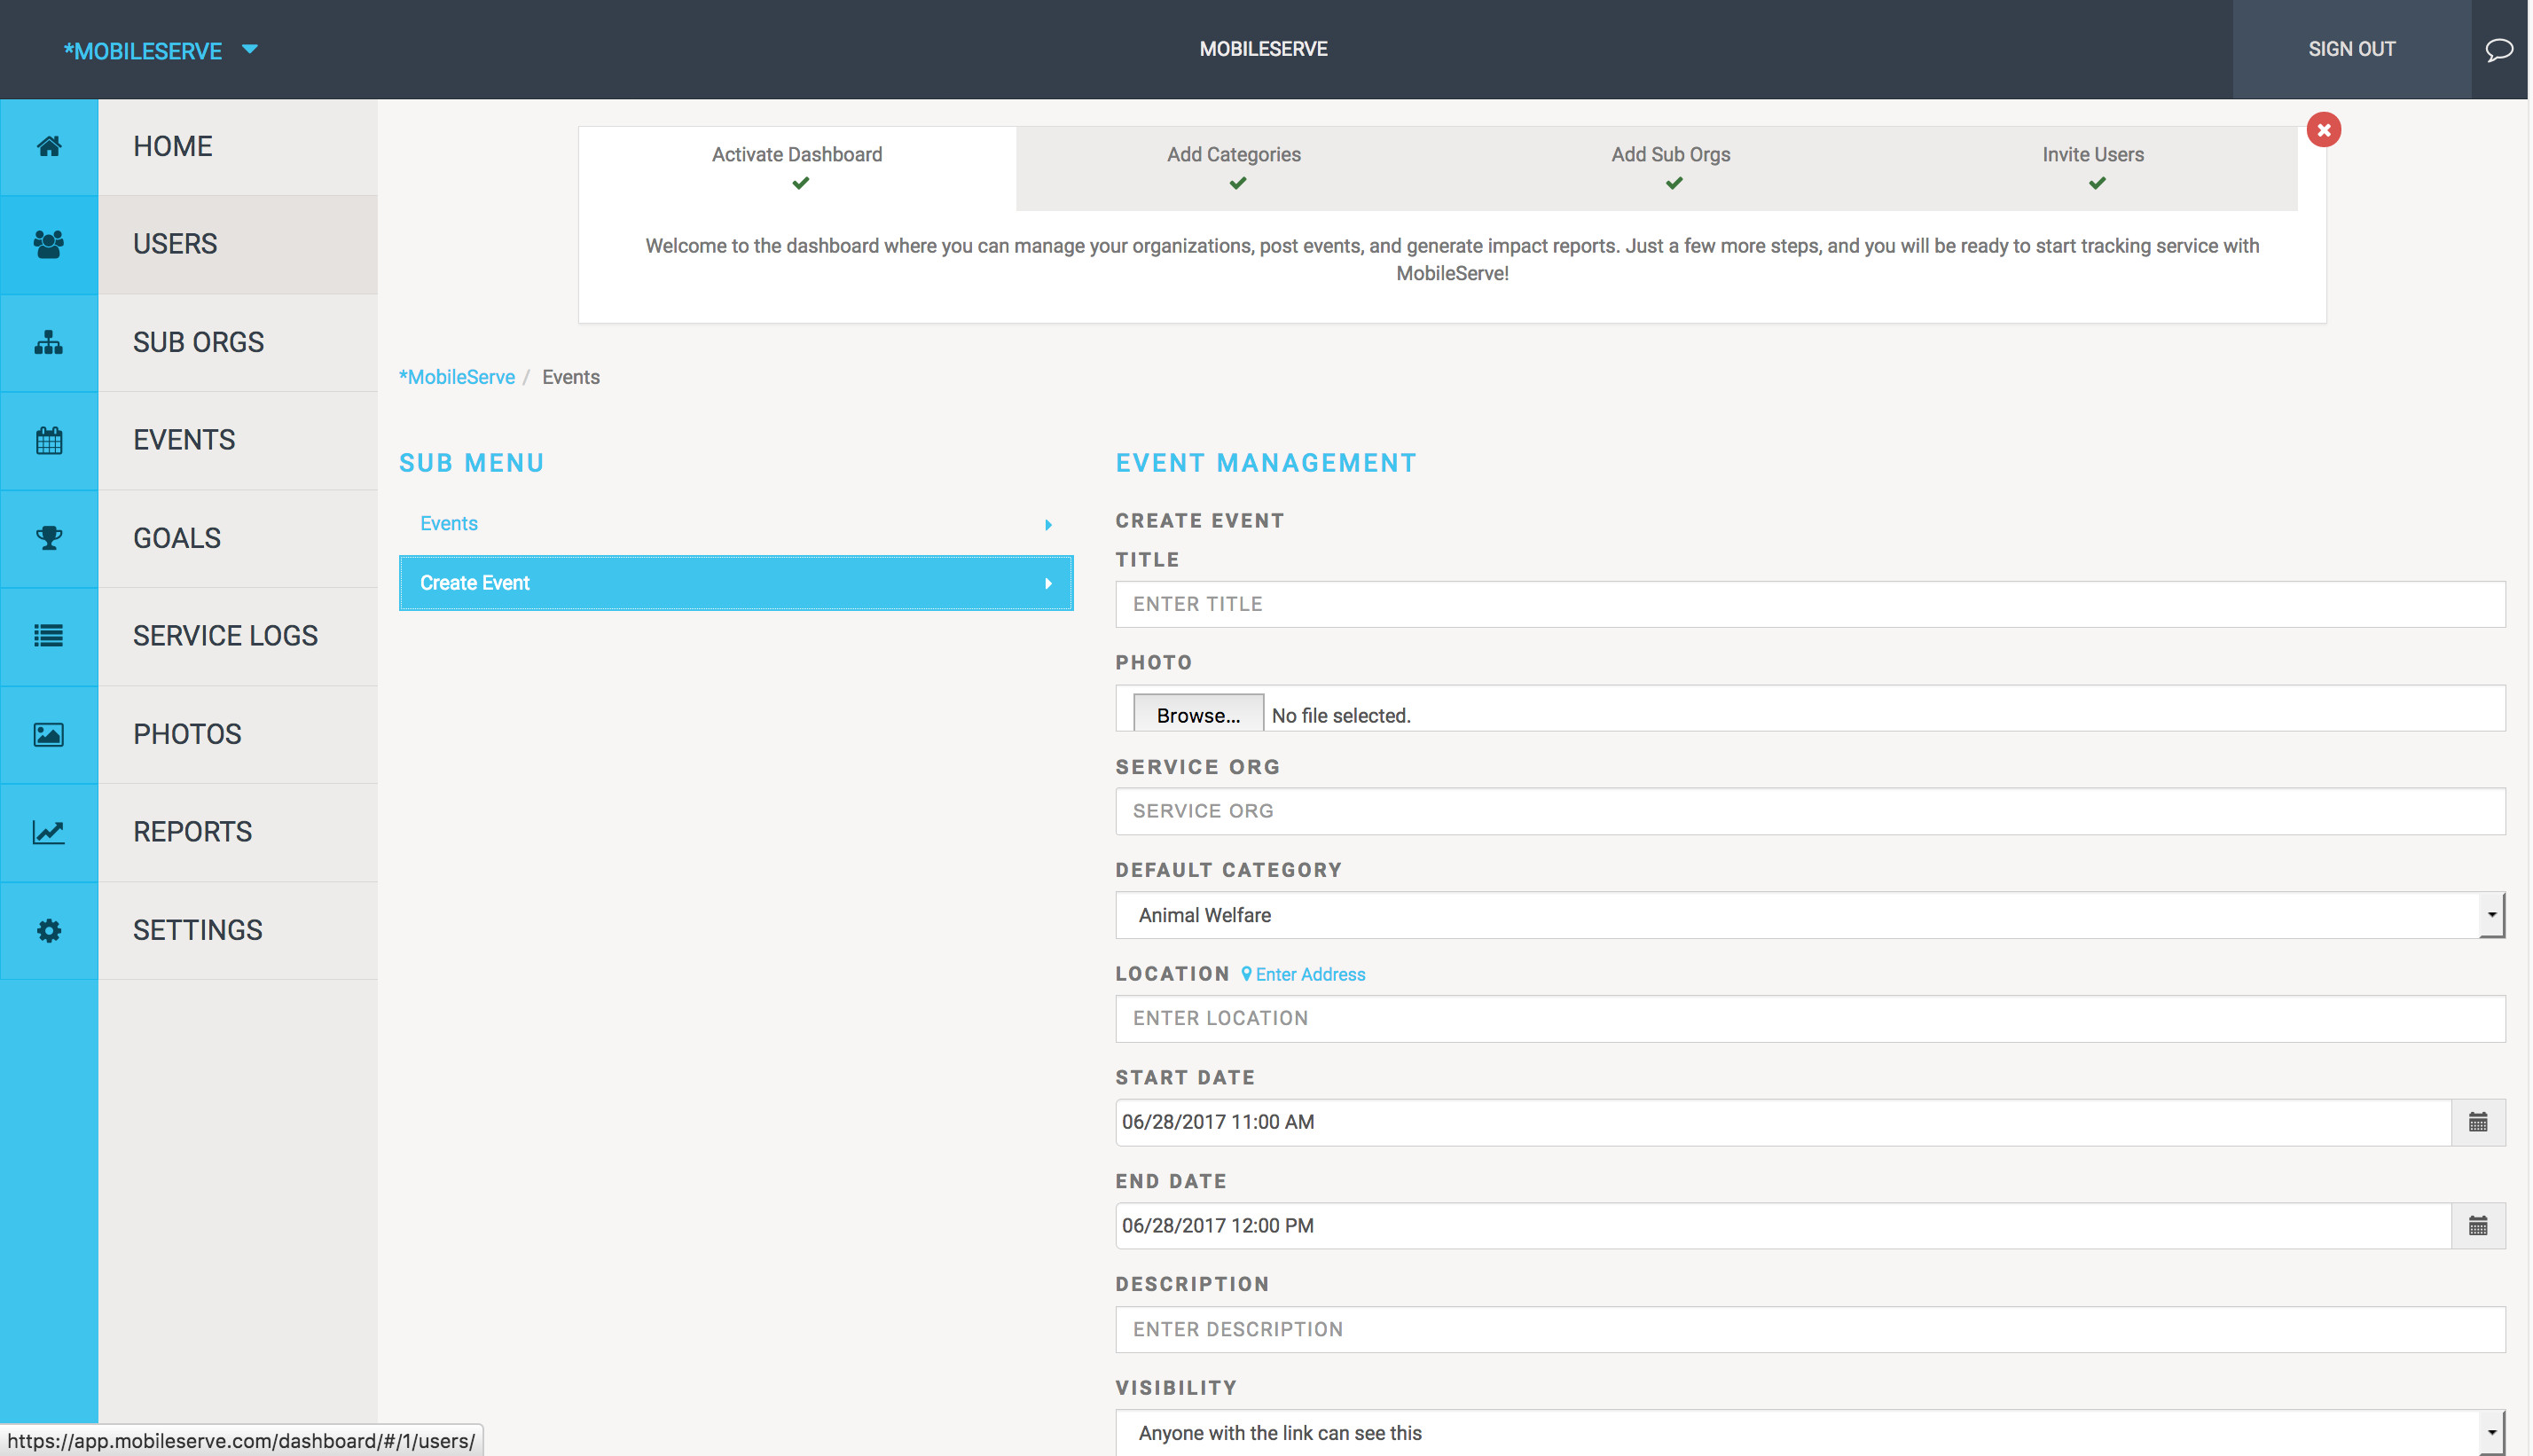 Create Event Example
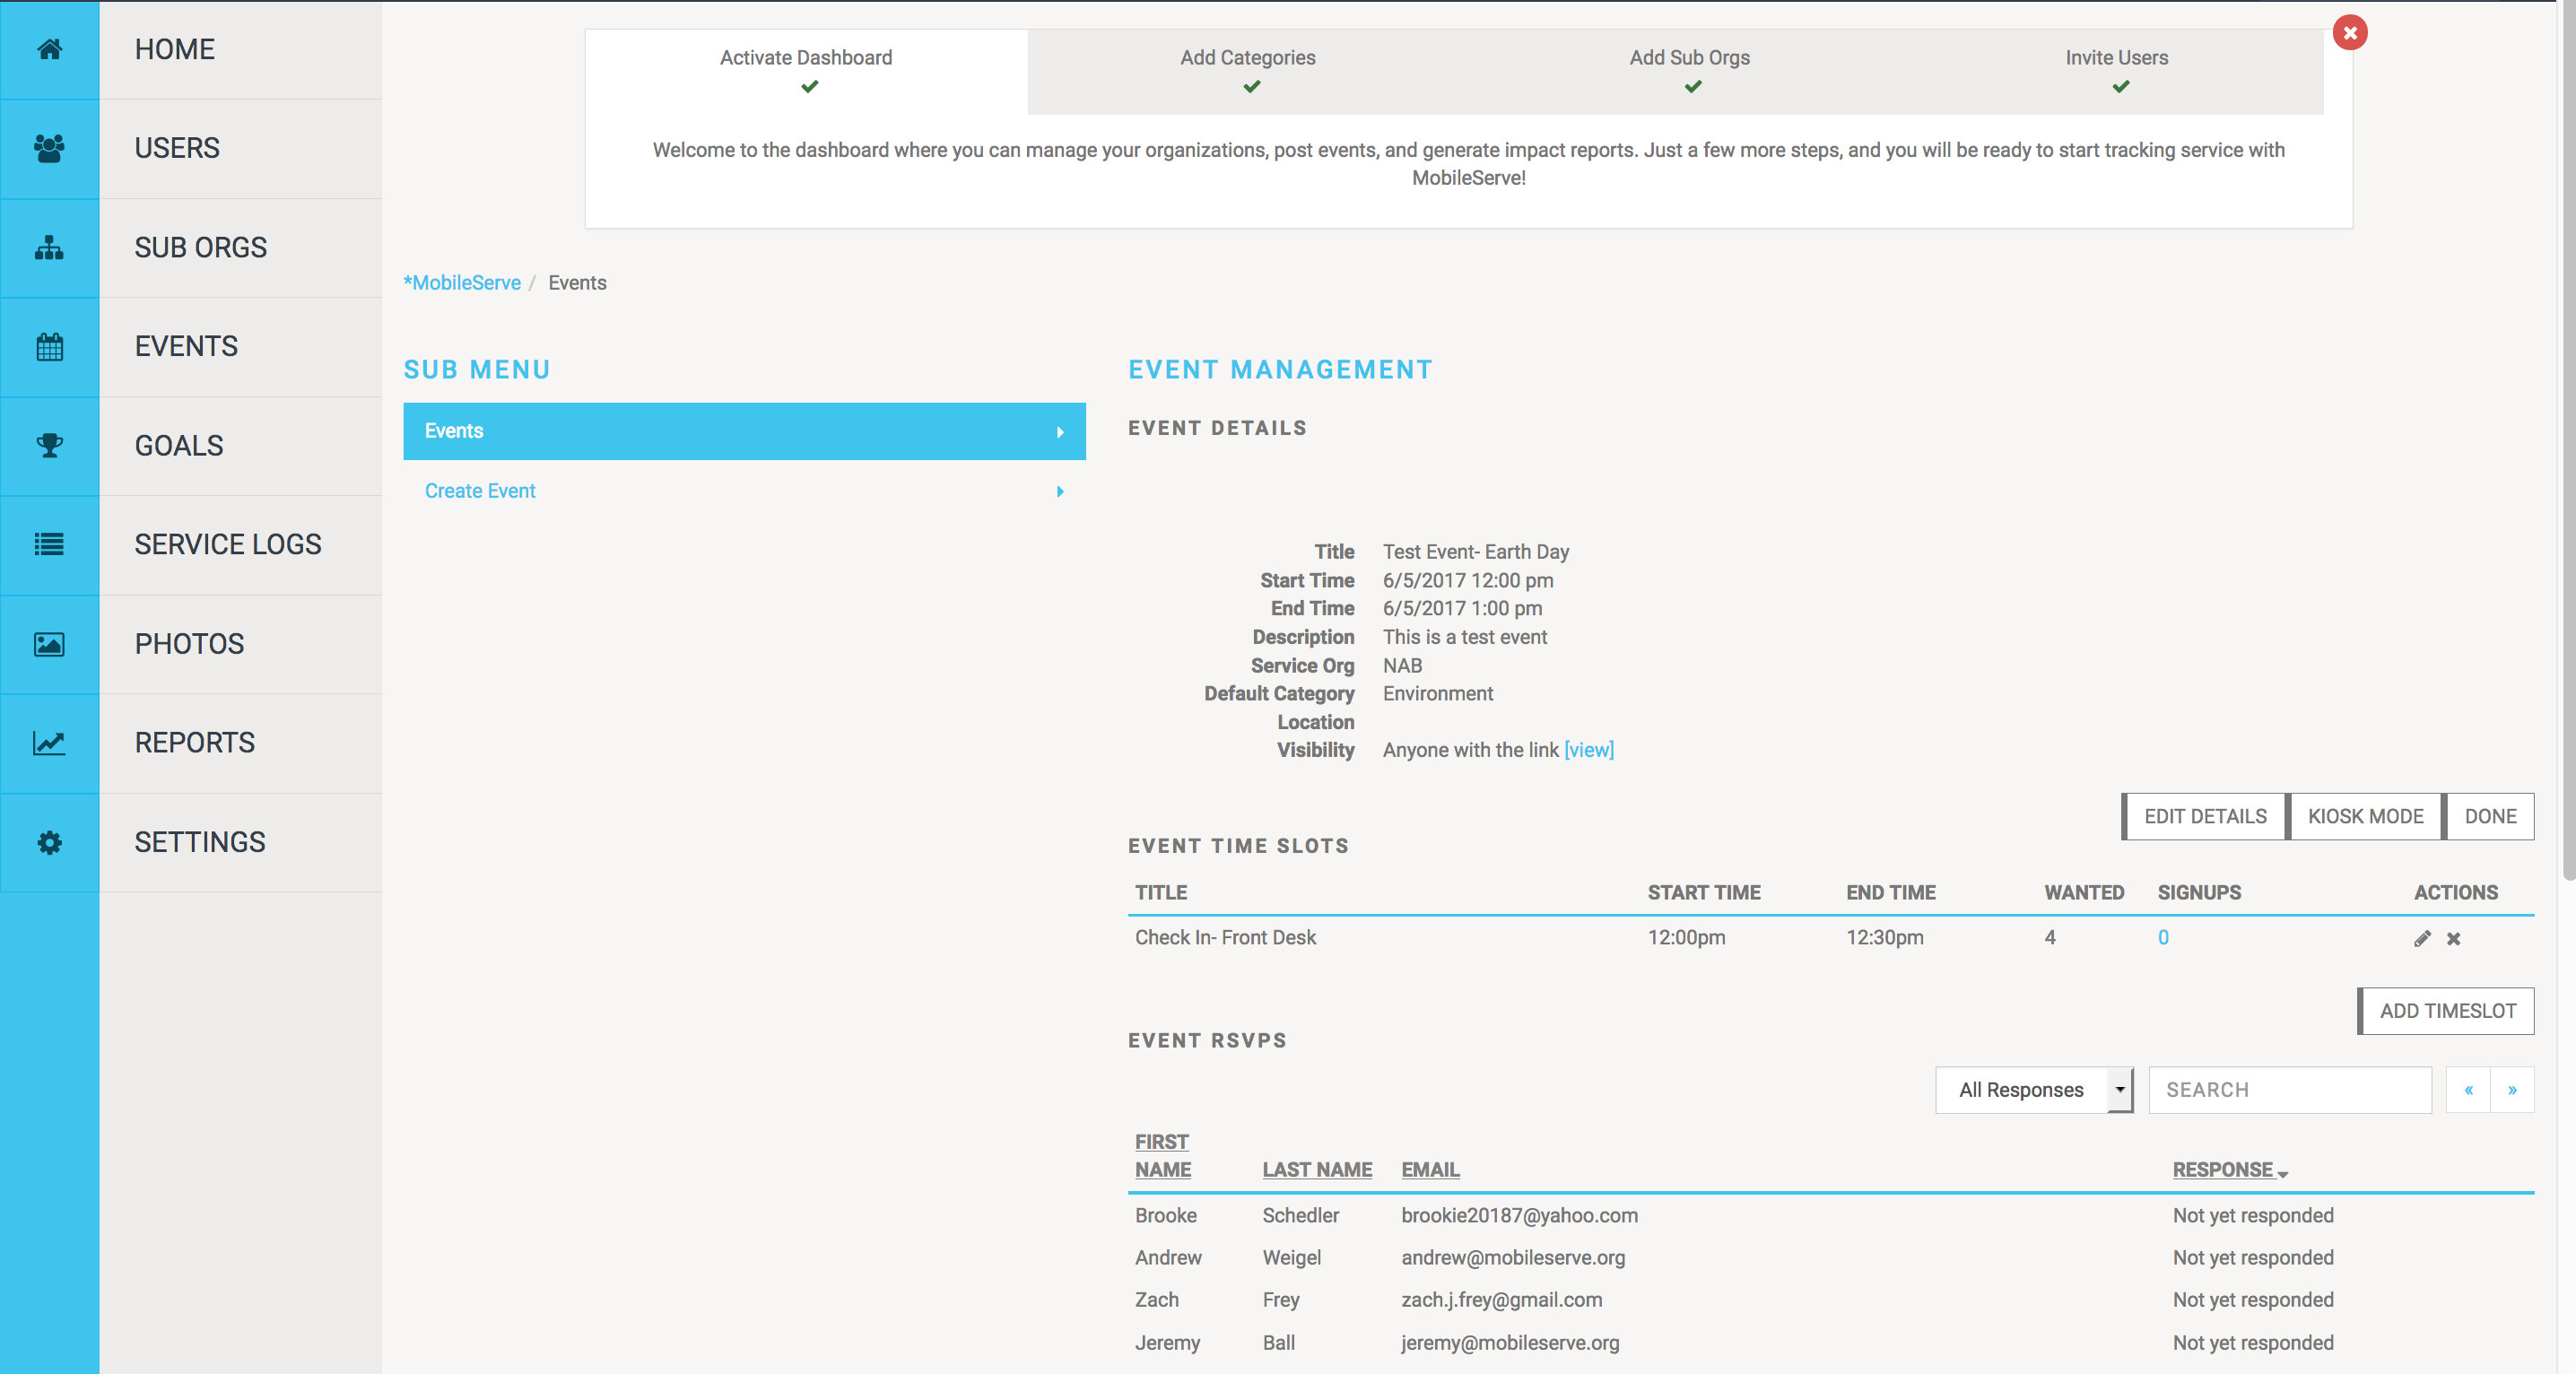
Creating Timeslots for Events:
- For events requiring segmented volunteer shifts or specific roles, utilize timeslots.
- Click “Add Timeslot” within the event creation flow.
- Timeslot Name: Clearly label each timeslot (e.g., “Check-in Volunteers,” “Setup Crew”).
- Start and End Times: Define the duration of each timeslot (these are timeslot-specific, not the entire event duration).
- Number of Volunteers: Set the required volunteer capacity for each timeslot.
- Click the checkmark to save each timeslot.
- Repeat to create multiple timeslots as needed. Timeslots can overlap to accommodate different roles or shifts within the event.
- Edit or delete timeslots using the pencil or “x” icons.
- Track sign-ups under the “Signups” column, clicking the number reveals the list of volunteers signed up for that timeslot.
Inviting Volunteers to Events:
- Crucially, invitations are required for users to view and RSVP to events.
- At the bottom of the Event page, click “Invite“.
- Invite Everyone: Invite all members within your organization (or sub-org if creating the event within a sub-org).
- Invite Specific Users or Sub-Orgs: Search and select specific sub-organizations or individual users to invite.
- Click “Invite” to send email invitations (uncheck “Email Invited Users” to skip email notifications, useful for large event batches. Invited users will still see the event in their “Events > Invitations” section).
Managing RSVPs and Messaging Event Attendees:
- The “Event RSVPs” section displays a list of invited individuals and their RSVP status.
- Filter the RSVP list using the “Responses” dropdown to view specific response types (e.g., “Attending,” “Declined”).
- Message filtered RSVP lists directly by clicking “Send Message” at the bottom of the RSVP list. Messages are only sent to users within the current RSVP filter.
Viewing and Updating Events
Event details can be modified at any time:
- Go to the Events section in the Dashboard.
- Click on the event you wish to edit.
- Click the “Edit Details” button in the top right corner.
- Make your changes and click “Save” before exiting.
 Update Event Example
Goals: Setting and Tracking Service Targets
If enabled for your organization, the Goals feature in your mobile serve app dashboard allows you to establish and monitor service hour targets.
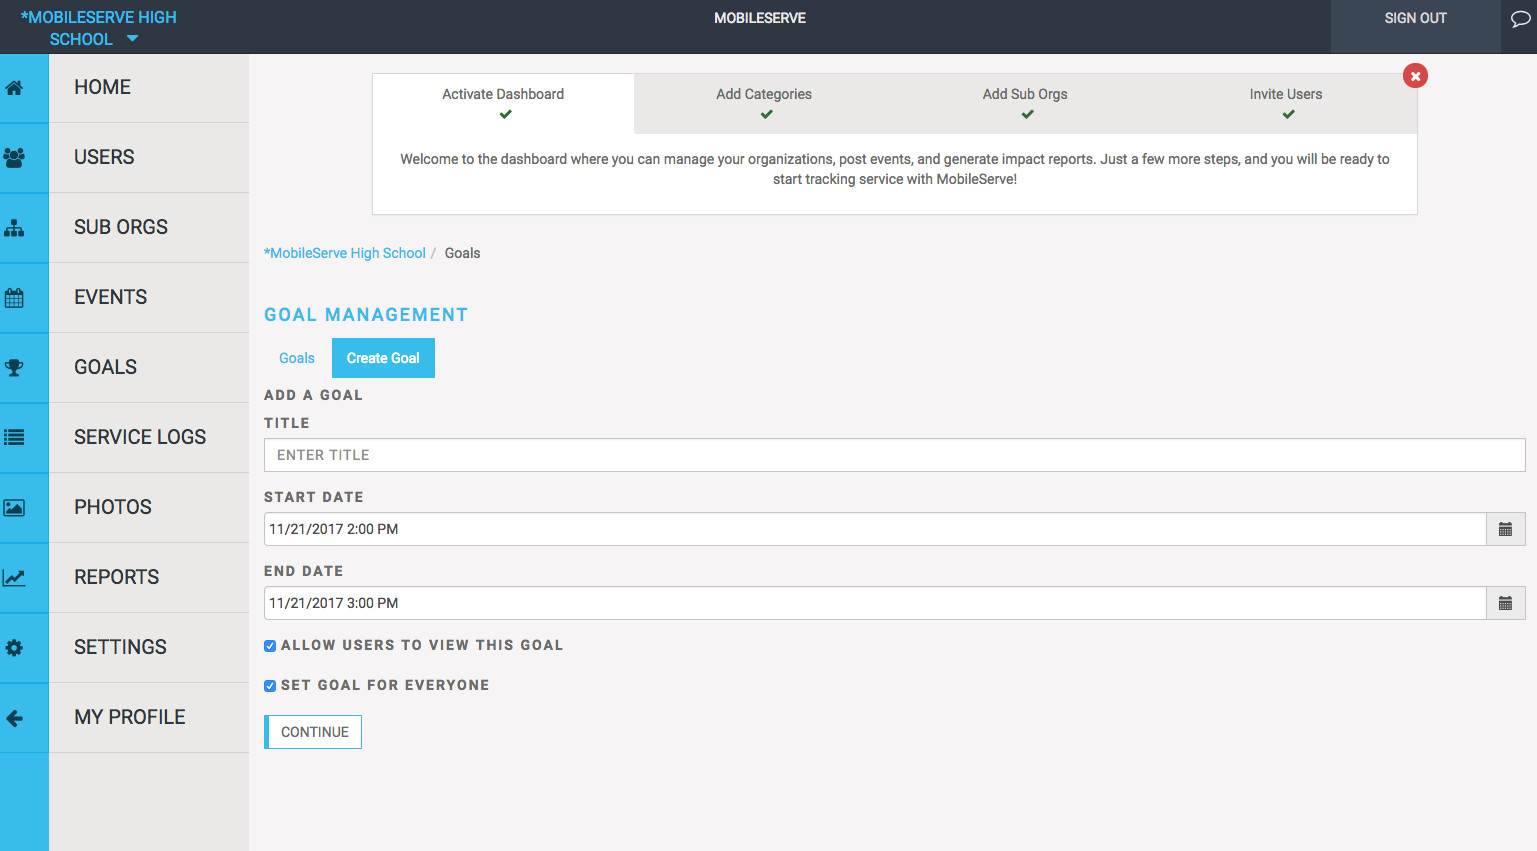
Creating a Goal:
- From the admin dashboard, click GOALS.
- Under GOAL MANAGEMENT, click “Create Goal“.
- Enter goal details:
- Title: A descriptive name for the goal.
- Start Date & End Date: Define the goal timeframe.
- Visibility to Members: Choose whether to make the goal visible to users in their profiles (“ALLOW USERS TO VIEW THIS GOAL”).
- Target Audience:
- Everyone: Apply the goal to all members.
- Specific Users or Sub-Orgs: Search and select specific users or sub-organizations.
- Click “CONTINUE“.
- Goal Metric:
- Specific Service Category: Tie the goal to hours within a particular service category.
- Total Hours: Set a goal for total service hours across all categories.
- Enter the target Goal Total and click the “+” icon to save.
- Overrides (Exceptions): Use the “Override” function to exclude specific users or sub-organizations from a general goal. Create new overrides as needed.
- Click “Save” to finalize the goal. The new goal will appear in the “goal management” page.
Goal Overview and Reporting:
- Click “Goal Overview” to access a leaderboard view for each goal, showing user progress and allowing data export to spreadsheets.
 MobileServe Goals.png
Service Logs: Managing and Reviewing Volunteer Hours
The Service Logs section is where you manage and review all submitted volunteer hours within your mobile serve app. It provides a comprehensive view of every log, including verification status, verification method, and approval status.
Viewing Service Log Details:
- Click anywhere on a service log row to open a side panel with detailed log information.
Filtering and Sorting Service Logs:
- Date Filter: Narrow down logs by date range.
- Search: Find specific logs by user, category, or service organization.
- Sort by Status: Easily identify logs awaiting approval, approved logs, or rejected logs.
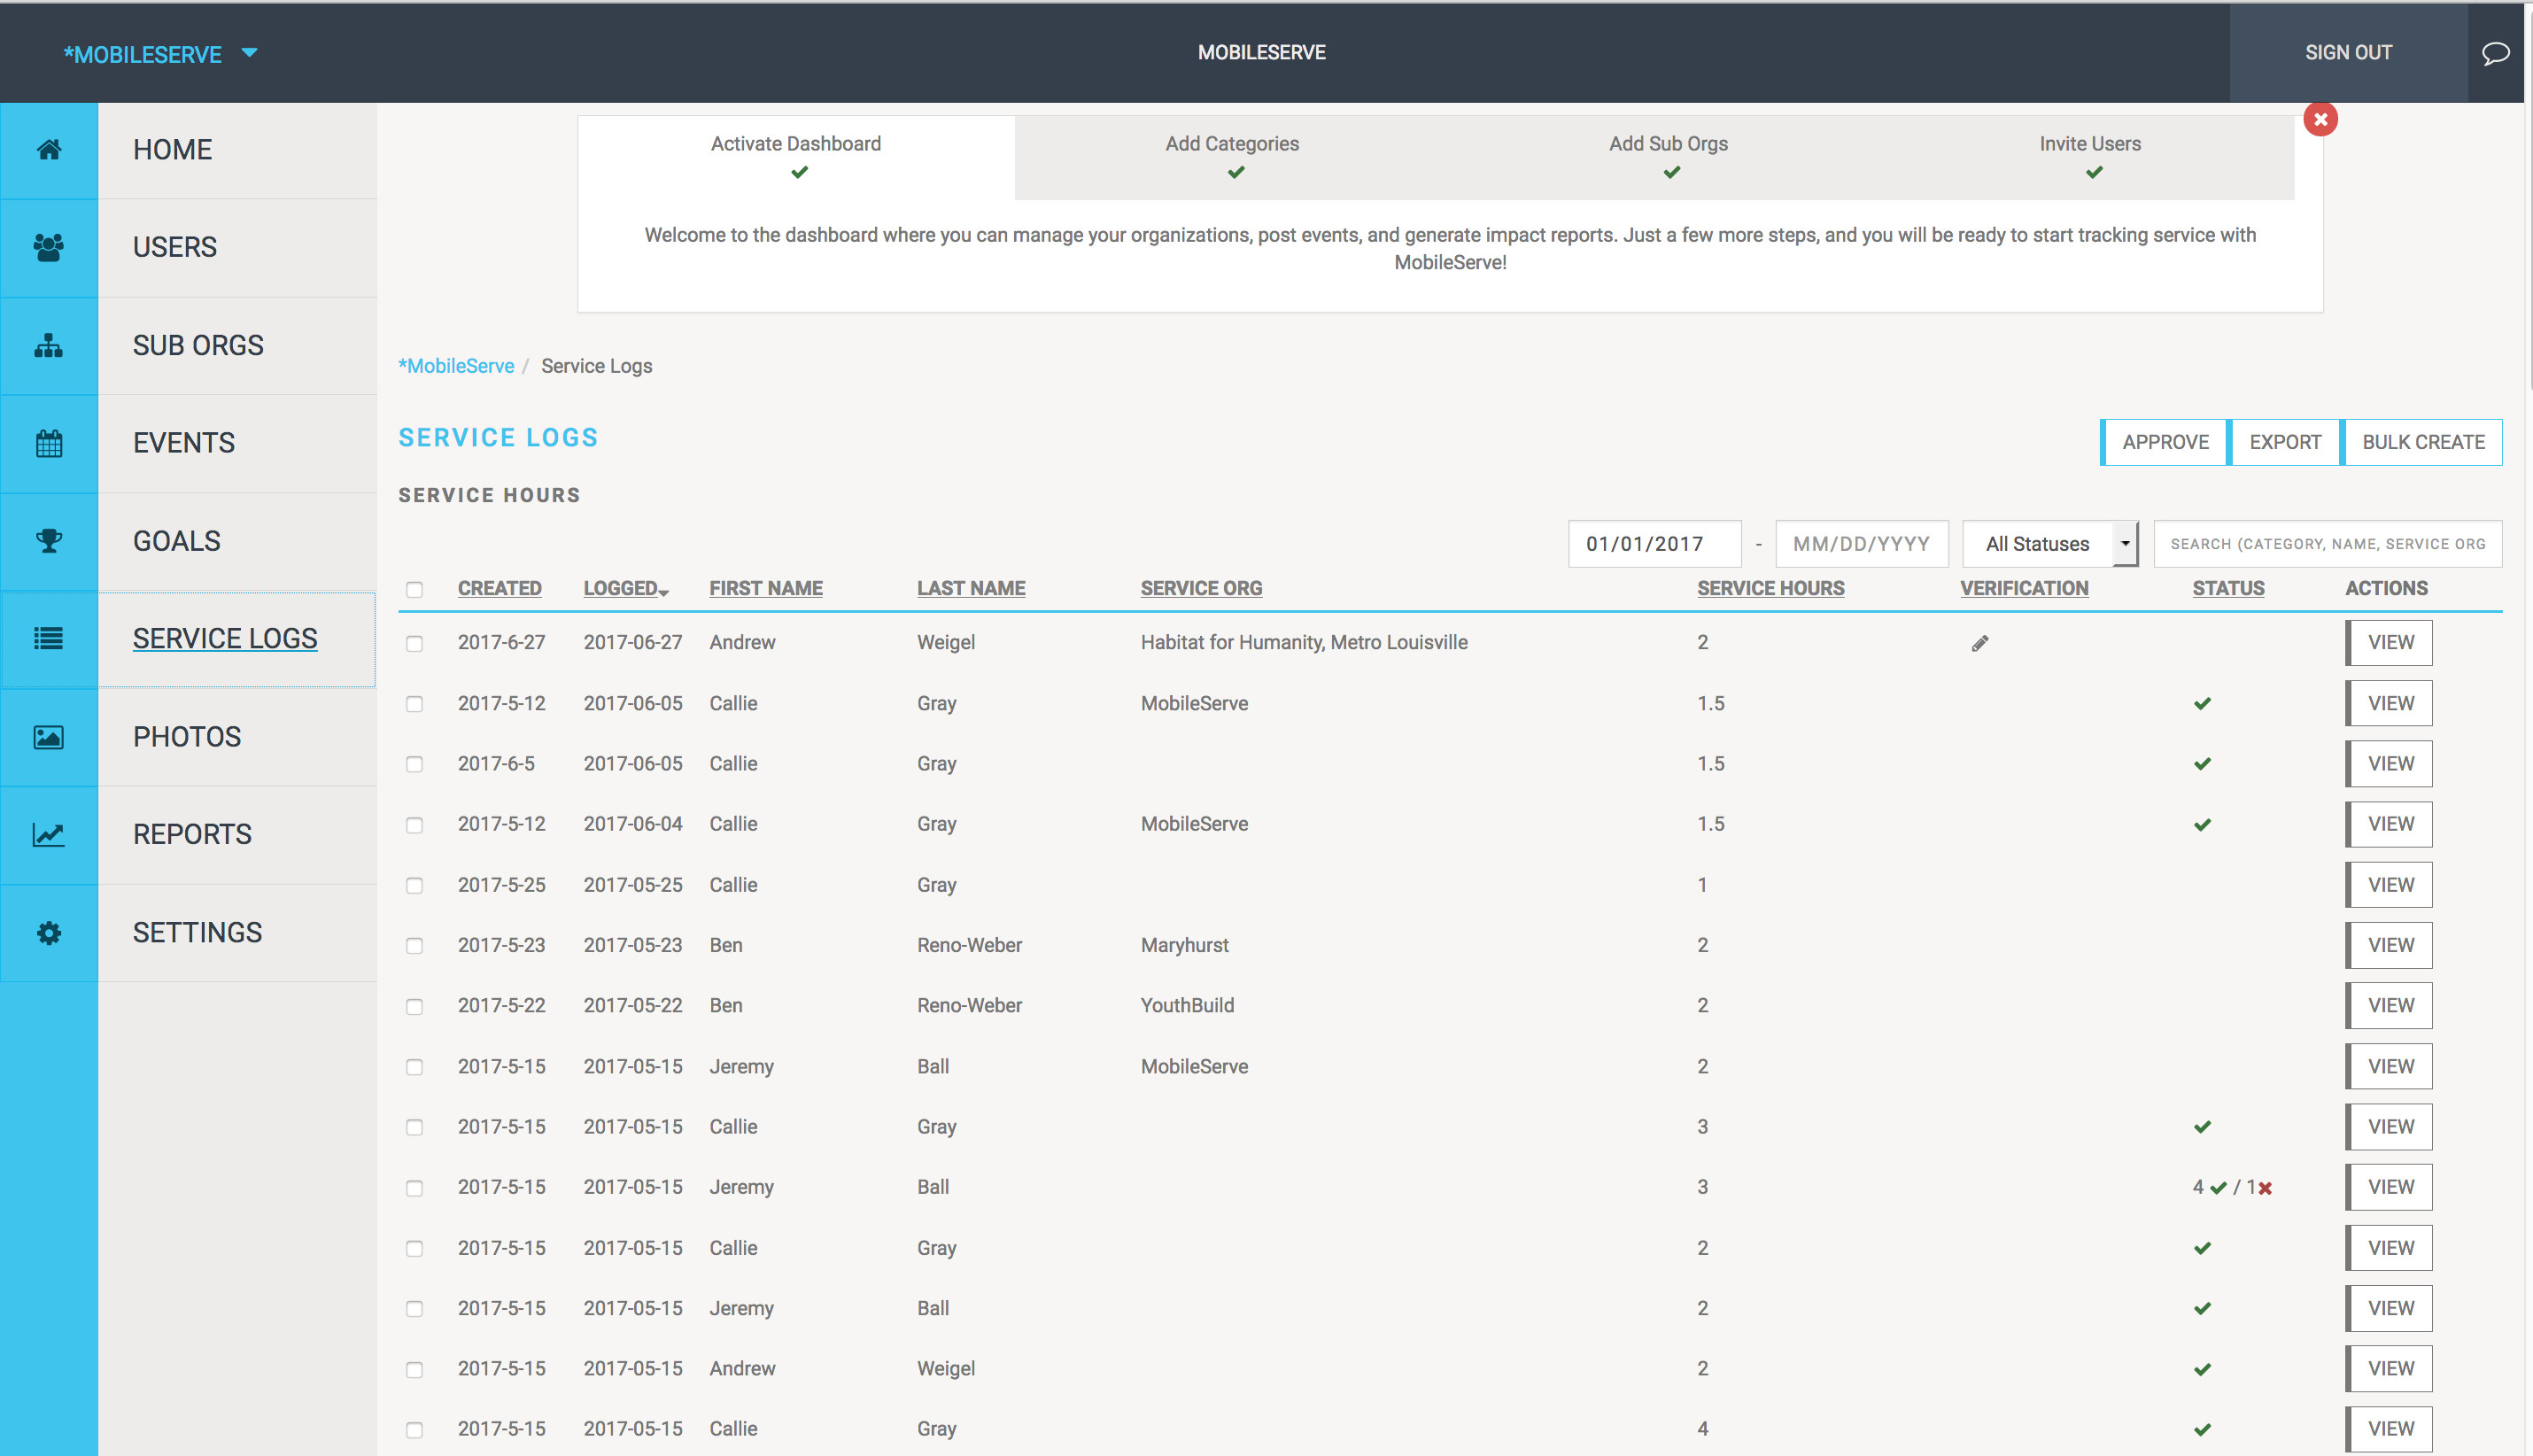 Service Log Example
Approving or Rejecting Service Logs
To review and manage service log approvals within your mobile serve app:
- Click on a log row to preview its details.
- Check the box next to the category you are reviewing.
- Click the “Actions” button.
- Select “Approve” or “Reject” from the dropdown menu.
- Approve: A checkmark indicates log approval.
- Reject: A text box appears to provide optional rejection feedback (an email with a link to the log and your explanation is sent to the user). Users can edit and resubmit rejected logs.
Adding Logs on Behalf of Members (Bulk Create)
Admins can efficiently add service logs for individuals, groups, or the entire organization using the Bulk Create feature in the mobile serve app. This is particularly useful for group events or when adding historical service hours.
Bulk Creating Service Logs:
- From the Service Logs page, click the “Bulk Create” button in the top right corner.
- Enter the service date, event duration, service category, service organization, and optional description and supervisor information.
- Select Recipients:
- Create for Everyone: Check the box to create the log for all organization members (confirmation message will appear).
- Select Specific Users or Sub-Orgs: Leave the box unchecked and use the search bar to add individual users or sub-organizations. Remove selected recipients by clicking the “X” on their name box.
- Click the “Bulk Create” button (confirmation message will appear).
Logs created via Bulk Create are automatically Admin Approved.
Exporting Service Logs
For data analysis and record-keeping, admins can export service log data to a CSV file via email.
Exporting Service Logs:
- Export Selected Logs: Check the boxes next to specific logs and click the “Export” button in the top right.
- Export All Logs: Select the top checkbox in the Service Log table to “Select All,” then click “Export” and confirm.
Photos: Visualizing Impact
The Photos section showcases all photos uploaded by your mobile serve app users when logging their volunteer time, regardless of whether they were shared on social media.
- Clicking on a photo takes you directly to the associated service log, allowing you to understand the story behind the image and the volunteer experience.
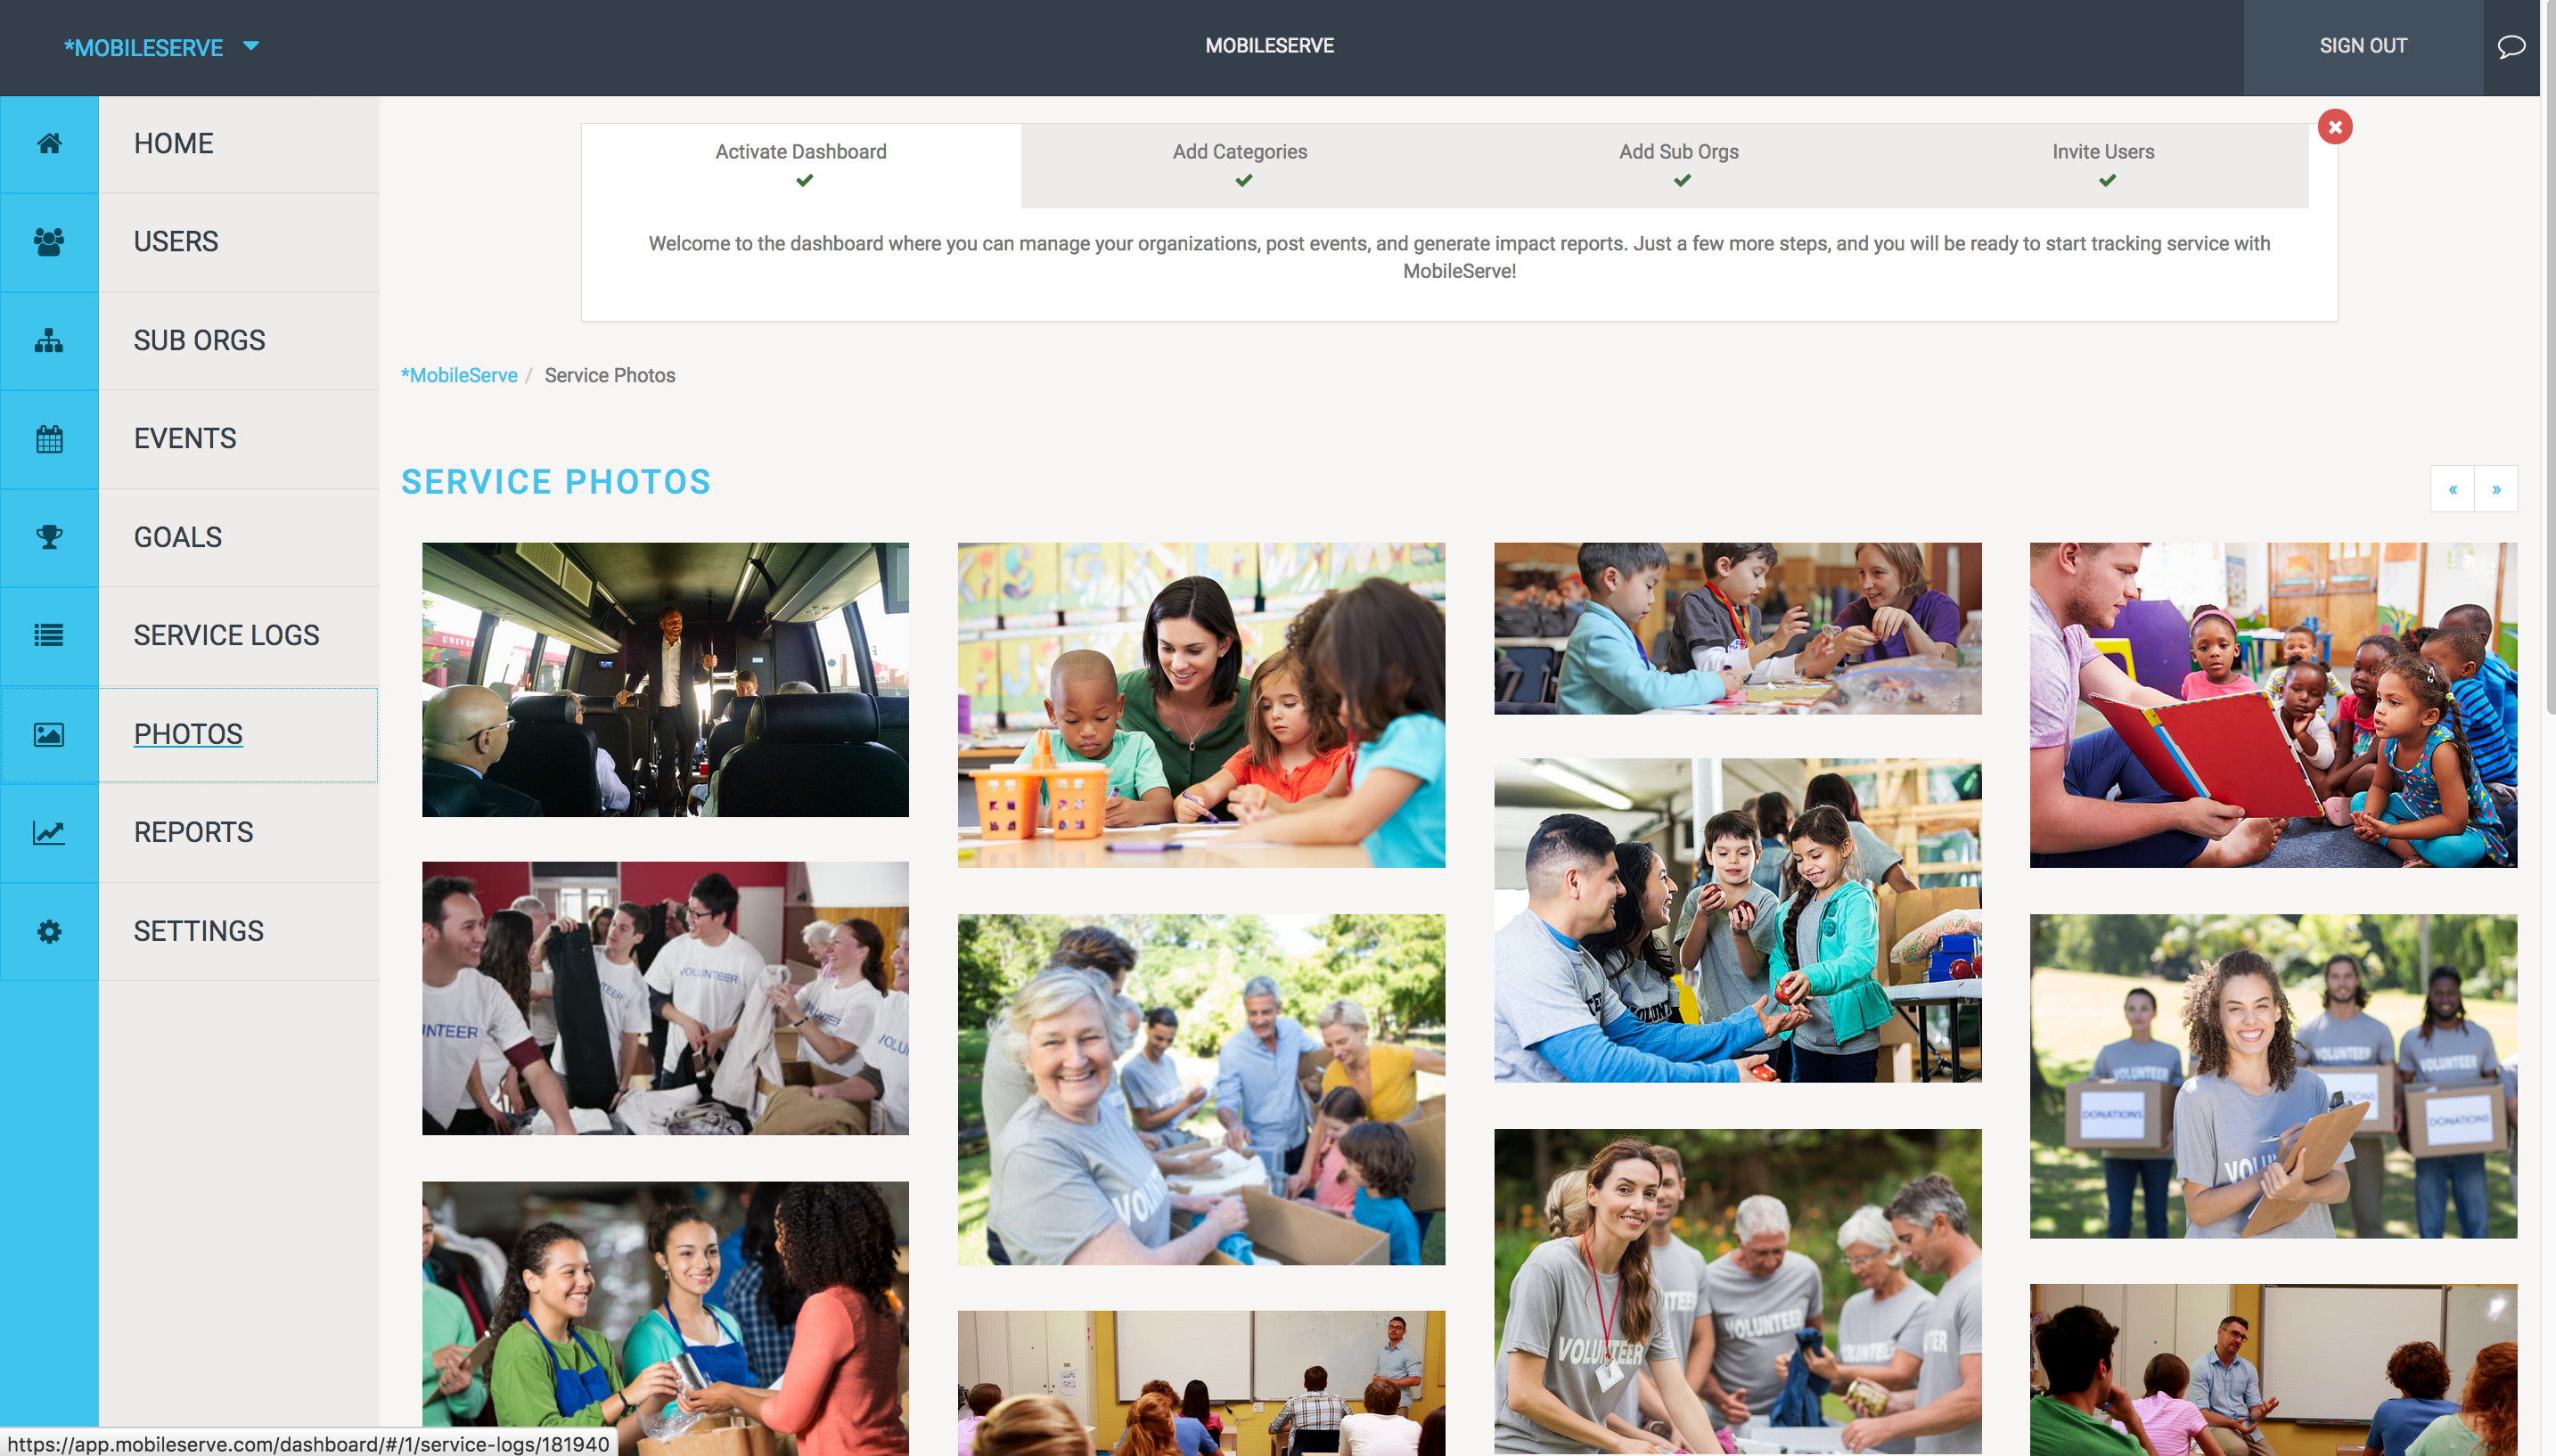 Photo Example
Reports: Data Visualization and Analysis
The Reports section of your mobile serve app dashboard provides downloadable infographics and data sets for visualizing and analyzing your organization’s service impact.
Downloading Reports:
- Individual Infographics/Data Sets: Under “Full Report,” click on the desired data point (e.g., “Total Hours,” “Service Categories”). Click “Download” and choose the file type (PNG for infographic, CSV for data). Click the header again to remove it from the selection.
- Multiple Infographics/Data Sets: Click all desired data points under “Full Report” to build a custom report preview. Click “Download” and select the file type to download the combined report.
For detailed raw data beyond visualizations, consider exporting data from the Users or Service Logs pages.
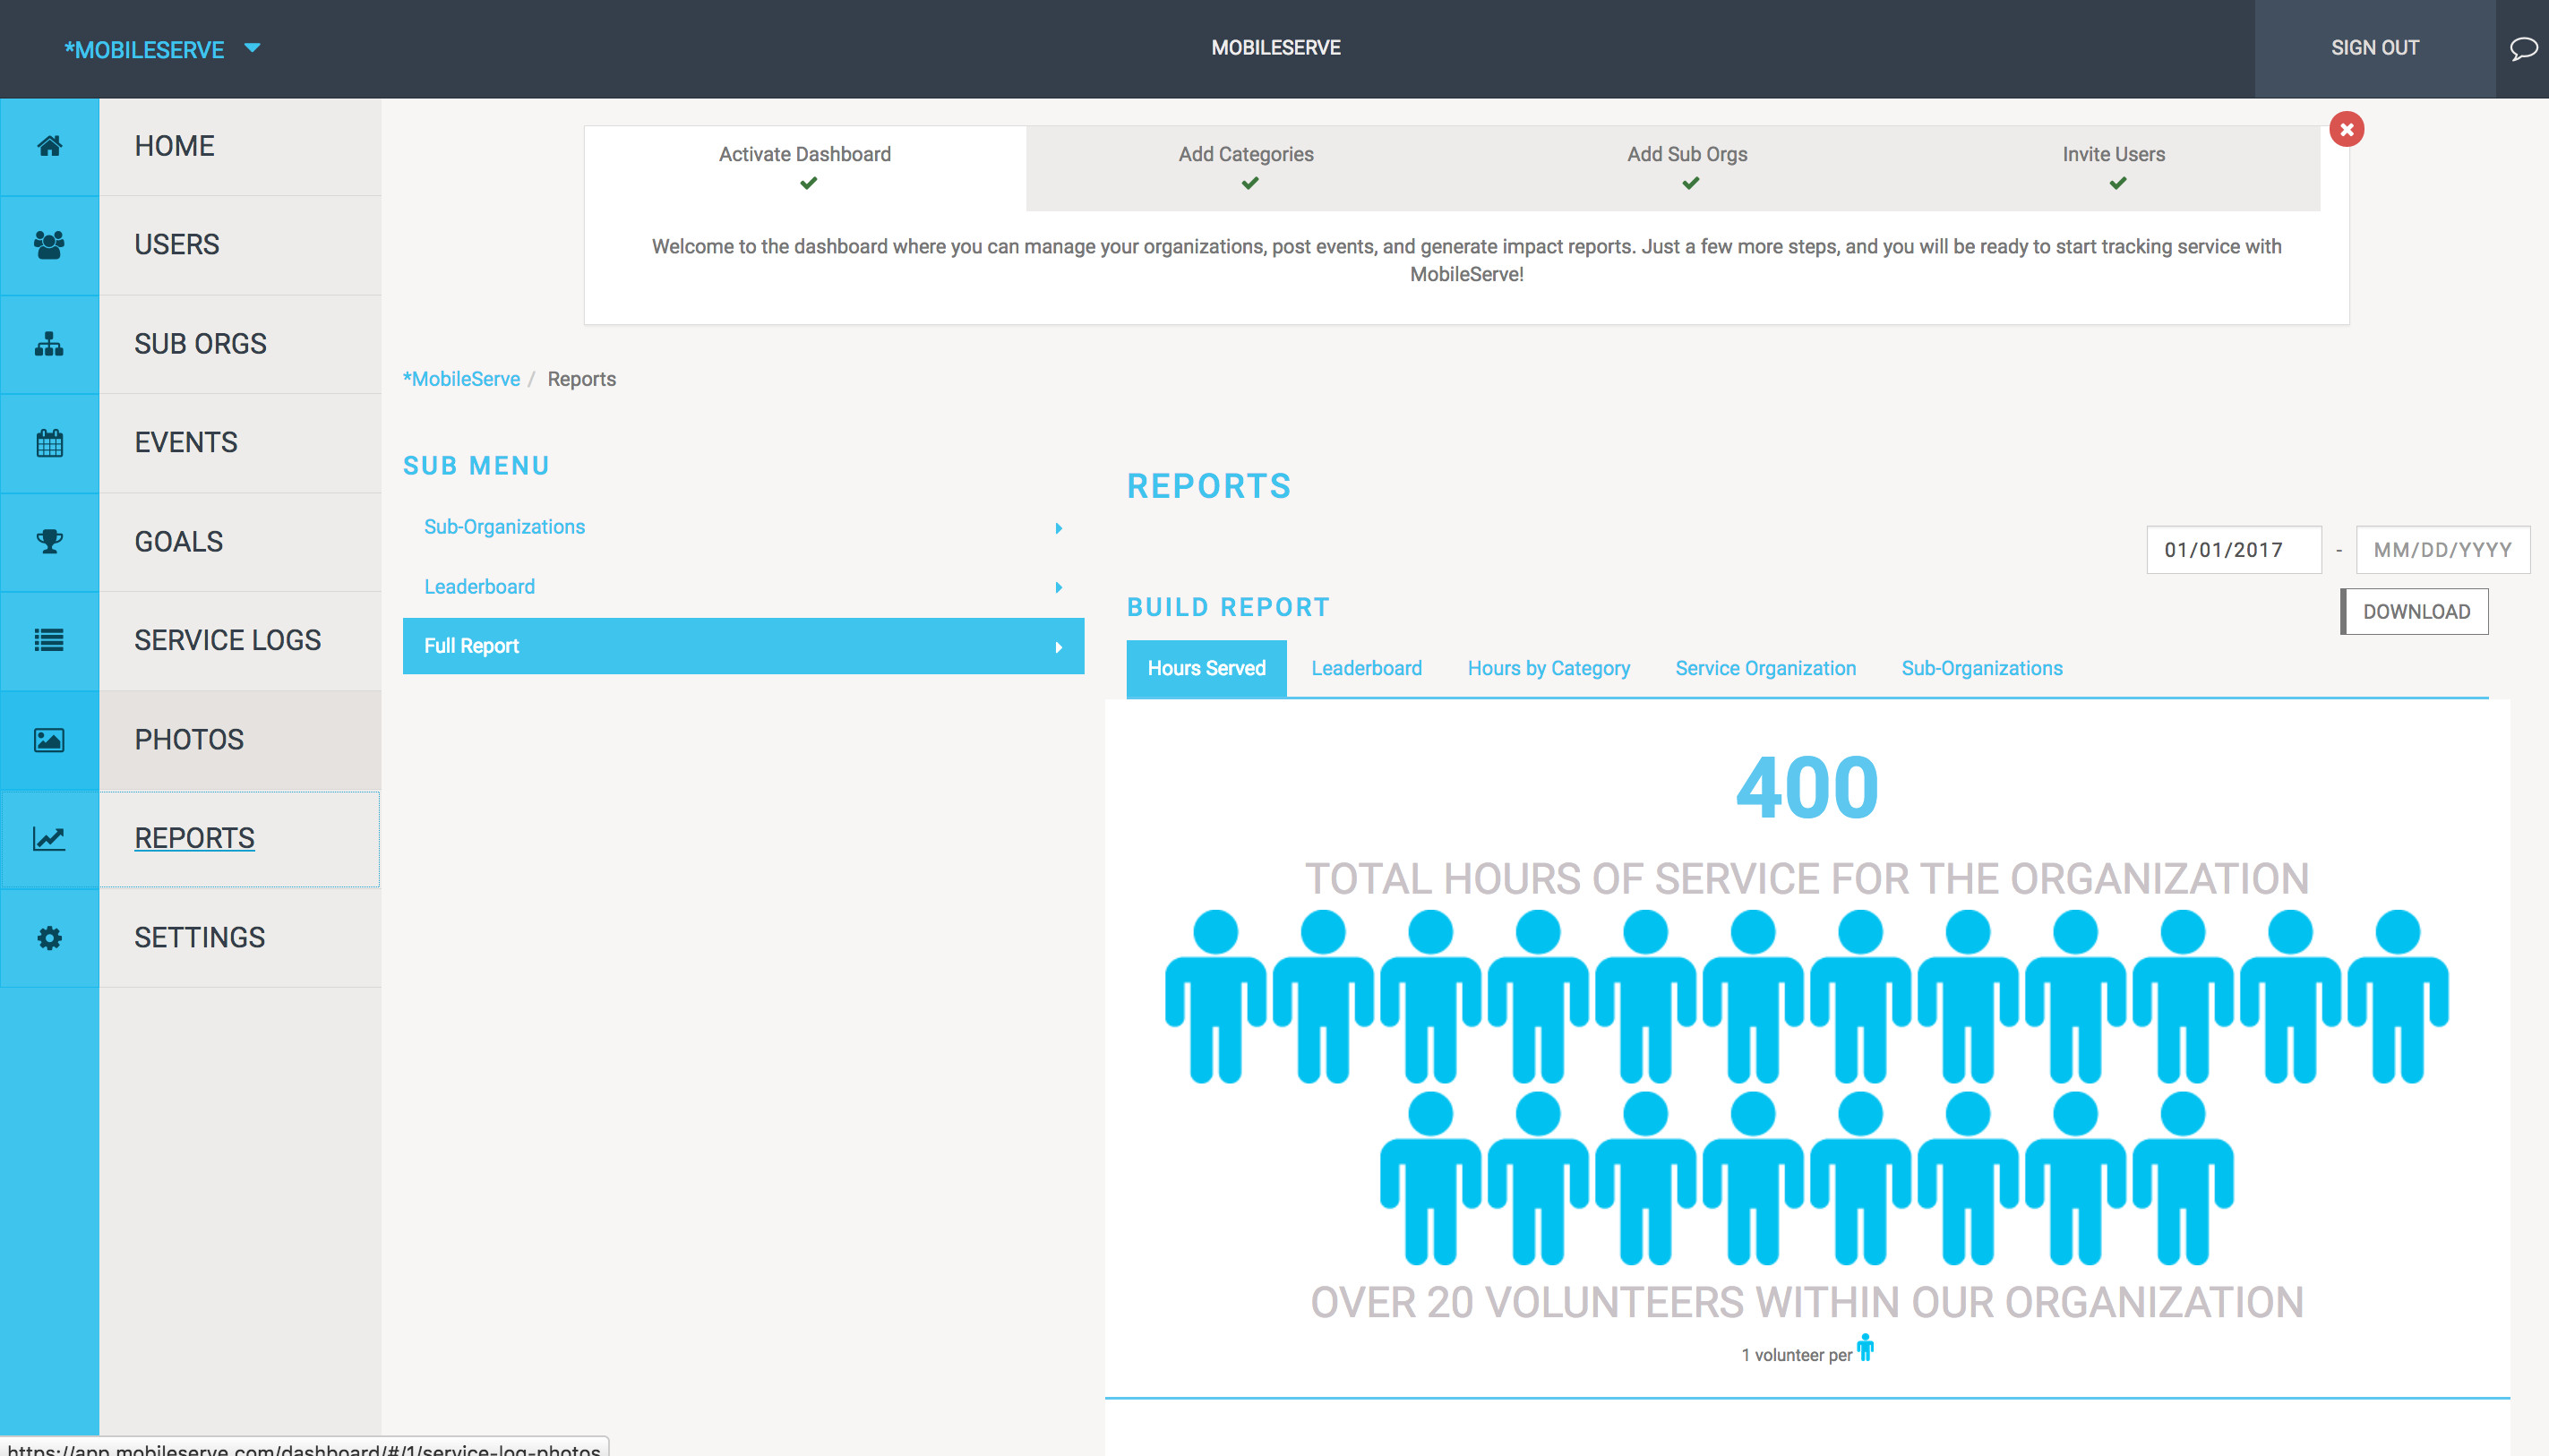 Build Report Example
Settings: Customizing Your Mobile Serve App Experience
The Settings page allows you to customize various aspects of your mobile serve app experience, including service log configurations, service categories, and user attributes.
Service Logs Settings
Customize the service log submission process for your users:
1. Set Field Visibility:
- Control the visibility of service log fields (Description, Supervisor, etc.) using Hidden, Visible, and Required settings.
- Hidden: Field is completely hidden from users.
- Visible (Default): Field is optional for users to complete.
- Required: Field must be completed for log submission. (Signature requirement is only enforced on mobile devices).
2. Set up a Prompt:
- Replace the default “Description” field label with a custom prompt or question to guide user log entries. Hide the “Description” field if using a custom prompt to avoid confusion.
3. Auto Approval:
- Configure automatic service log approval based on verification methods.
- Never (Default): Manual admin approval required for all logs.
- Immediately: All logs are automatically approved upon submission.
- Any: Logs are auto-approved if any selected verification method is present.
- All: Logs are auto-approved only if all selected verification methods are present.
Add / Modify Service Categories
Manage your organization’s service categories:
- Add Category: Enter a new category name in the blank box and click the “+” icon.
- Modify Category Name: Click the pencil icon next to a category, enter the new name, and press Enter.
- Change Visibility: Check/uncheck the “Visible” box to control category visibility for users (invisible categories cannot be used for new logs but remain in historical reports).
- Delete Category: Click the trash icon. Reassign hours from deleted categories to another category when prompted. Deleted categories will not appear in reports.
User Attributes
Manage user data fields beyond the default information. MobileServe provides 5 global attributes and allows adding custom attributes specific to your organization.
Attribute Settings:
- Visible: Users can view the attribute and their response on their profile settings page.
- Editable: Users can edit the attribute value after initial setup.
- Required: Users must provide a value for this attribute when joining your organization via Org Code.
- Searchable: Adds the attribute as a column on the Users page and makes values searchable.
Edit attribute settings at any time. Deleting an attribute removes all associated data. Bulk import user attribute values via “Bulk Import User Attributes” under settings.