
The virtual server function, often referred to as port forwarding, is a powerful feature that allows you to make services running on your local network accessible from the internet. Specifically for users of the Huawei EG8145V5 router, understanding how to configure this setting is key to hosting web servers, game servers, or accessing devices remotely. This guide will walk you through the process of setting up a virtual server on your EG8145V5, ensuring external network access to your internal devices.
Before you begin, it’s important to note a few prerequisites for successful port mapping:
- Public WAN IP Address: Your router needs to have a public IP address assigned by your internet service provider (ISP). A private WAN IP will prevent external access. If you’re unsure, contact your ISP to confirm whether you have a public IP.
- Maximum Virtual Servers: The Huawei EG8145V5 supports the configuration of up to 32 virtual servers, giving you ample flexibility for multiple services.
- Interface Variations: Keep in mind that the user interface may vary slightly depending on your specific EG8145V5 model and firmware version. Always refer to the actual interface you see for the most accurate steps.
Now, let’s dive into the step-by-step configuration process:
-
Accessing Your Router’s Management Page
First, ensure your computer is connected to your Huawei EG8145V5 router. You can connect via Wi-Fi or through an Ethernet cable plugged into one of the router’s LAN ports.
Open a web browser on your computer and in the address bar, type 192.168.8.1. This is the default IP address for accessing the management page of your Huawei router. Press Enter, and you will be prompted to enter your login password. Enter your password to access the router’s configuration interface.
This image shows the initial step of accessing the Huawei EG8145V5 router management page by entering the router’s IP address in a web browser.
-
Navigating to Virtual Server Settings
Once logged in, navigate to the virtual server configuration section. Typically, this is found under the Advanced settings. Look for a Security or similar category, and within that, you should find Virtual Server. Click on Virtual Server to proceed.
On the Virtual Server page, you will likely see a list of existing virtual server configurations (if any) and an option to add a new one. Click the + icon (or a button that indicates adding a new virtual server) to access the virtual server configuration page.
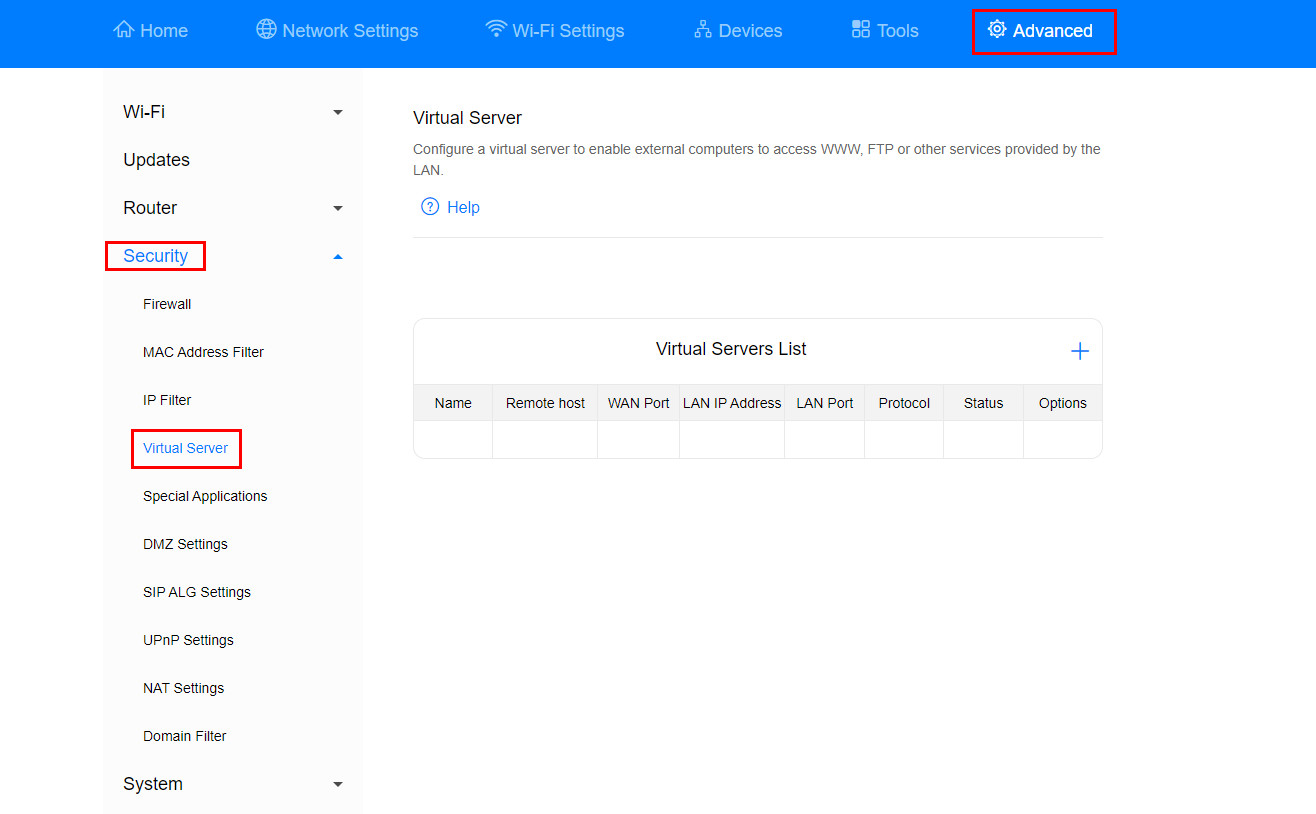 Virtual Server Configuration Page Access on Huawei EG8145V5
This image illustrates how to navigate through the Huawei EG8145V5 router’s interface to find and access the virtual server configuration settings under the Advanced and Security menus.
-
Configuring Virtual Server Parameters
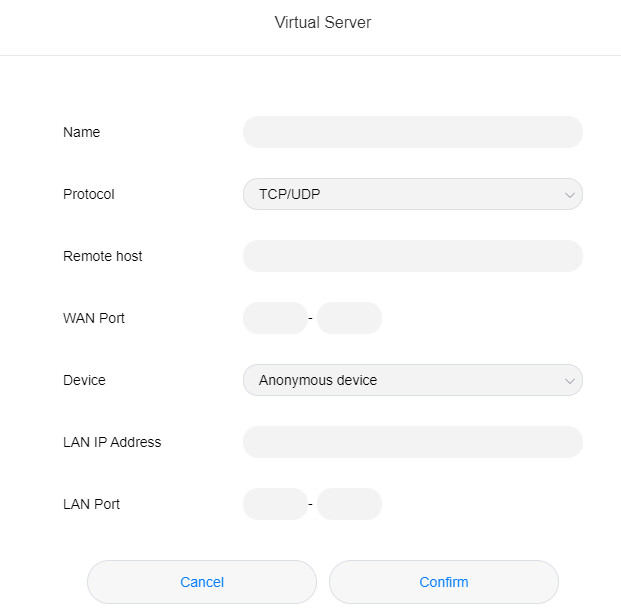
Now you’re on the virtual server configuration page. Here, you need to input specific details to set up the port mapping correctly. Let’s break down each field:
- Name: Enter a descriptive name for this virtual server rule. This is for your reference and helps you identify the service later. For example, “Web Server” or “Game Server”.
- Protocol: Select the protocol type used by the service you want to expose. Common options are TCP, UDP, or TCP/UDP. If you are unsure, and the service can use either, select TCP/UDP for broader compatibility. Consult the service’s documentation if you are unsure of the protocol.
- Remote host: This field is optional. If you want to restrict access to a specific remote IP address, enter that IP address here. Leaving it blank allows access from any remote host on the internet. For most general use cases, you can leave this empty to allow anyone on the internet to access the service through the configured port.
- WAN Port: This is the port number that external users will use to access your service from the internet. Choose an unused port number. For standard services like web servers (HTTP), the default port is 80. For HTTPS, it’s 443. If you’re using a custom port, make sure external users know this port number to include it in the address when accessing your service (e.g.,
http://your_wan_ip:your_wan_port). Consult your network administrator or service documentation for the appropriate WAN port. - Device: Select the specific device on your local network that will be providing the service. This is usually selected from a dropdown list of devices currently connected to your router.
- LAN IP Address: Once you select a device, the LAN IP address of that device should automatically populate. This is the internal IP address of the computer or server on your local network. Verify this IP address is correct.
- LAN Port: Enter the port number that the service is using on the internal device (LAN). This is often the same as the WAN Port, but it can be different if needed. For example, a web server typically uses port 80. Consult your network administrator or service documentation for the appropriate LAN port.
After filling in all the necessary fields, click Confirm or Apply to save your virtual server configuration.
This image highlights the various fields within the Huawei EG8145V5 virtual server configuration interface that users need to fill in, including Name, Protocol, WAN Port, Device, and LAN Port details for proper port mapping setup.
Note on Remote Host: Leaving the “Remote host” field blank means the service will be accessible from any IP address on the internet. If you fill in a specific IP address, only traffic originating from that IP will be forwarded to your internal device.
 Remote Host Configuration on Virtual Server Setup
This image clarifies the function of the “Remote host” field in the virtual server settings, explaining that leaving it empty allows global access while specifying an IP restricts access to only that source.
Example: Configuring a Web Server
Let’s illustrate with an example of setting up a virtual server for a web server running on a client computer with the local IP address 192.168.8.101. We want external users to access this web server.
-
Virtual Server Configuration:
Name Protocol Remote host WAN Port Device LAN IP Address LAN Port Web Server TCP 21.1.1.1180 Client that provides web services 192.168.8.10180 In this example, we’ve named the service “Web Server”, selected TCP protocol, and specified WAN port 80 (standard HTTP port). The LAN IP address is set to
192.168.8.101(the web server’s computer), and the LAN port is also 80. We’ve also specified aRemote hostIP21.1.1.11, meaning only traffic from this specific IP will be forwarded. To allow access from anywhere, leaveRemote hostblank. -
Obtaining Your Router’s WAN IP Address:
To allow external users to access your web server, they need your router’s public WAN IP address. Find this information in your router’s management interface, typically under Advanced or System settings, then Device Information or WAN Information. Note down your WAN IP address. For this example, let’s assume the WAN IP address is
10.2.1.123. -
Accessing the Web Server from the External Network:
Now, an external user with the IP address
21.1.1.11can access the web server by enteringhttp://10.2.1.123in their browser. If you had changed the WAN port to, for example, 8021, they would need to enterhttp://10.2.1.123:8021.
Conclusion
Setting up a virtual server on your Huawei EG8145V5 router is a straightforward process that unlocks the ability to host services and access devices on your local network from the internet. By carefully following these steps and understanding the parameters involved, you can effectively configure port forwarding to meet your specific networking needs. Remember to always double-check your settings and consult your service’s documentation for port and protocol requirements to ensure a successful setup.