
Installing game content on a Linux Dedicated Server can sometimes feel like navigating a maze of conflicting tutorials. Many guides focus on scripting content updates, which can be overly specific and configuration-dependent, leaving users struggling with manual installations. If you prefer a hands-on approach and want to understand each step, this guide is for you. We’ll walk you through the process of manually installing game content on your linux dedicated server, ensuring a clear and reliable method.
While scripting can automate updates, manual installation offers a solid understanding of the underlying processes and can be more adaptable to various server setups. This tutorial will demonstrate how to install content manually. If you’re comfortable with scripting later on, you’ll have a much stronger foundation.
Let’s begin by setting up SteamCMD and installing your desired game content.
First, initiate a new PuTTY session and log in to your server using your designated gmod user account. Navigate to the Steam directory and launch SteamCMD. For organizational purposes, we’ll use /content/css to store game files, but you can adjust this directory structure as needed for different game content installations.
cd Steam
./steamcmd.sh +force_install_dir "/home/gmod/content/css"
Once you reach the Steam> prompt, log in anonymously to the Steam servers.
login anonymousNote: In some instances, especially when installing specific game content, anonymous login might result in a “No Subscription” error. If this occurs, log in using your Steam account credentials instead.
login your_usernameYou will be prompted to enter your password, and subsequently, you might be asked for a Steam Guard code, which will be sent to your associated email address. Input the Steam Guard code and press Enter. Be aware that this action will log you out of your Steam client.
After a brief pause, you should see a “Success!” message, and the prompt will return to Steam>. This indicates successful login to Steam on your linux dedicated server.
Now, you are prepared to install game content into the designated content folder.
For this tutorial, we will install Counter-Strike: Source content as an example. However, you can install content for other games by simply modifying the App ID to the corresponding game’s ID. You can find a comprehensive list of Steam Application IDs here.
Remember the css folder we created within the content directory at the beginning? You should create similar folders for any other games you plan to install, naming them according to your organizational preference.
Counter-Strike: Source uses the App ID 232330. Enter the following command to initiate the installation:
app_update 232330Similar to installing Garry’s Mod itself, SteamCMD will now download the necessary files for Counter-Strike: Source to your linux dedicated server. This process may take some time depending on your internet connection speed and server resources. Feel free to grab a beverage and return once the download is complete.
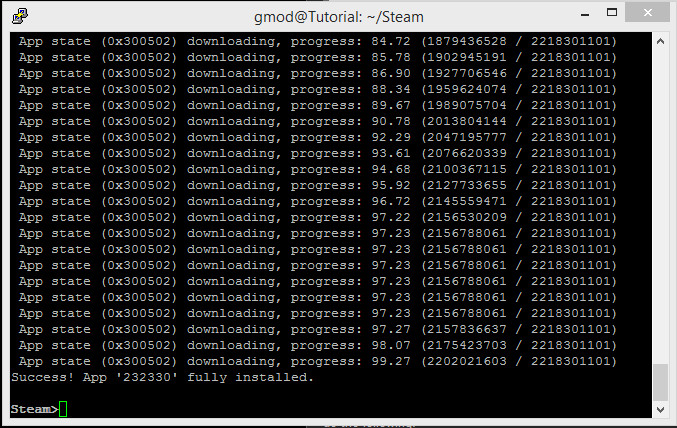 SteamCMD downloading Counter-Strike: Source content on a Linux dedicated server
Once the installation process is finished and you see confirmation that the game content is fully installed, type quit or press Ctrl+C to exit SteamCMD.
Let’s verify that the game files have been placed in the correct location. Navigate to the css directory within your content folder:
cd /home/gmod/content/css
ls
The output should display the Counter-Strike: Source game files, confirming successful installation on your linux dedicated server.
With the game content installed, we now need to instruct your Garry’s Mod server to recognize and utilize this content. This is achieved by modifying the mount.cfg file.
Open FileZilla and navigate to the /home/gmod/gmodds/garrysmod/cfg directory. Locate the mount.cfg file, right-click on it, and select “Edit”.
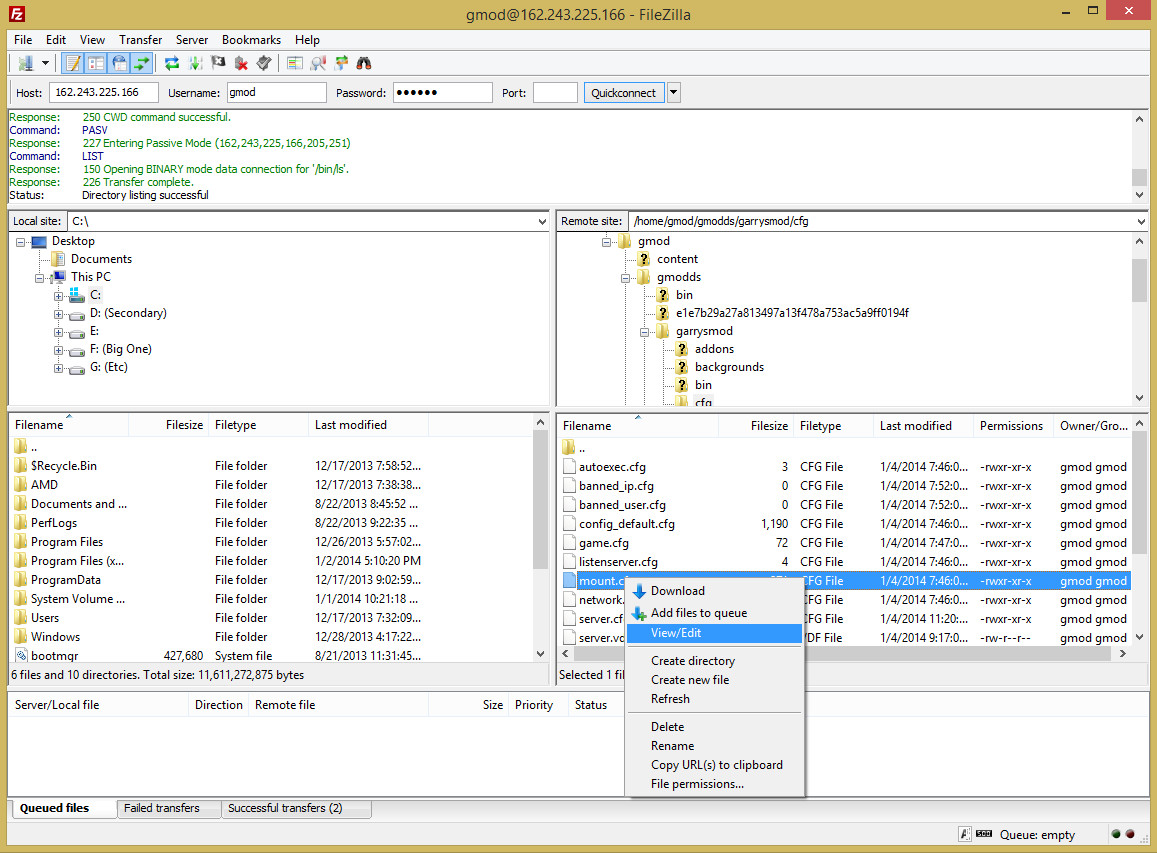 FileZilla interface showing mount.cfg file location on a Linux dedicated server
This action will download the mount.cfg file and open it in your default text editor (like Notepad). Inside, you’ll find examples of how to mount content. The default examples might be for Windows paths, so ensure you adjust them for your linux dedicated server environment. Below is an example of how to configure your mount.cfg file, assuming you followed this tutorial’s directory structure:
// Use this file to mount additional paths to the filesystem
// DO NOT add a slash to the end of the filename
"mountcfg"
{
    // "tf"     "/home/gmod/content/tf2/tf"
    // "ep2"        "/home/gmod/content/ep2/ep2"
    // "episodic"   "/home/gmod/content/ep2/episodic"
    "cstrike"   "/home/gmod/content/css/cstrike"
}
Modify the example entries or add new ones to reflect the paths to your installed game content. Ensure the paths accurately point to the game content directories on your linux dedicated server. Save the modified mount.cfg file and close your text editor. FileZilla will prompt you to upload the edited file back to your server; select “Yes”.
FileZilla is no longer needed for this tutorial, so you can close it.
To confirm that the content mounting is configured correctly, restart your Garry’s Mod server in PuTTY.
cd /home/gmod/gmodds
./srcds_run -console -game garrysmod +maxplayers 16 +map gm_construct
Wait until you see the message “VAC secure mode is activated.” This indicates that the server has started successfully. Now, launch Garry’s Mod and connect to your server. Once connected, press Tab to view the server information panel and verify your server name matches what you configured in config.cfg.
To confirm that the Counter-Strike: Source content is properly mounted, try spawning props from the game within Garry’s Mod.
 Garry's Mod showing Counter-Strike: Source props spawned on a Linux dedicated server
Congratulations! If everything works as expected on your first try, you’ve successfully installed game content on your linux dedicated server manually! This process can be repeated for any other game content you wish to add to your server. The most time-consuming part is usually the content download, but once that’s underway, the process is straightforward.
To stop your server, type quit or press Ctrl+C in the PuTTY session. In the next steps, we’ll explore how to install workshop content and utilize screen to keep your server running in the background.