
Maintaining accurate time synchronization is crucial within your vSphere environment, especially for vCenter Server. Correct time settings ensure proper logging, scheduled tasks, and overall system stability. While you typically configure NTP settings during the initial vCenter deployment, there might be situations where you need to adjust these settings post-deployment. Fortunately, updating your vCenter time server is now straightforward, offering user-friendly methods to keep your system clock in sync.
This guide will walk you through two primary methods for changing the Network Time Protocol (NTP) server settings on your vCenter 7, ensuring your environment remains accurately synchronized. You can choose between the graphical VAMI interface or the command-line interface (vCenter Shell), depending on your preference and access level.
Method 1: Updating Time Server Settings via the VAMI Interface
The vCenter Server Appliance Management Interface (VAMI) provides a web-based GUI for managing various vCenter settings, including time synchronization. This method is ideal for those who prefer a visual interface and easy navigation.
-
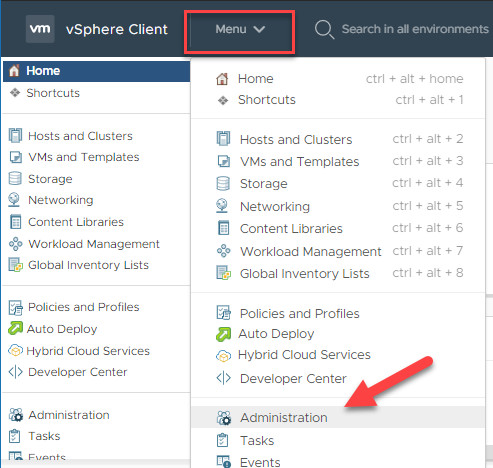
Access the VAMI: Open your web browser and navigate to the VAMI interface using the vCenter Server’s FQDN or IP address followed by port 5480 (e.g.,
https://your_vcenter_address:5480).Alternatively, you can access the VAMI indirectly through the vSphere Client. Log in to your vSphere Client, navigate to Menu, and select Administration.
 Accessing System Configuration in vSphere Client for VAMI
Accessing System Configuration in vSphere Client for VAMI
-
Navigate to System Configuration: In the Administration menu, locate Deployment and click on System Configuration. Select your vCenter node from the list to proceed.
-
VAMI Login: Clicking on your vCenter node will open a new browser tab directing you to the VAMI login page on port 5480. Log in using the
rootusername and your root password. vCenter VAMI Login Page
vCenter VAMI Login Page
-
Access Time Settings: Once logged in, navigate to Time in the left-hand pane. Click Edit under Time Synchronization to modify your time server settings.
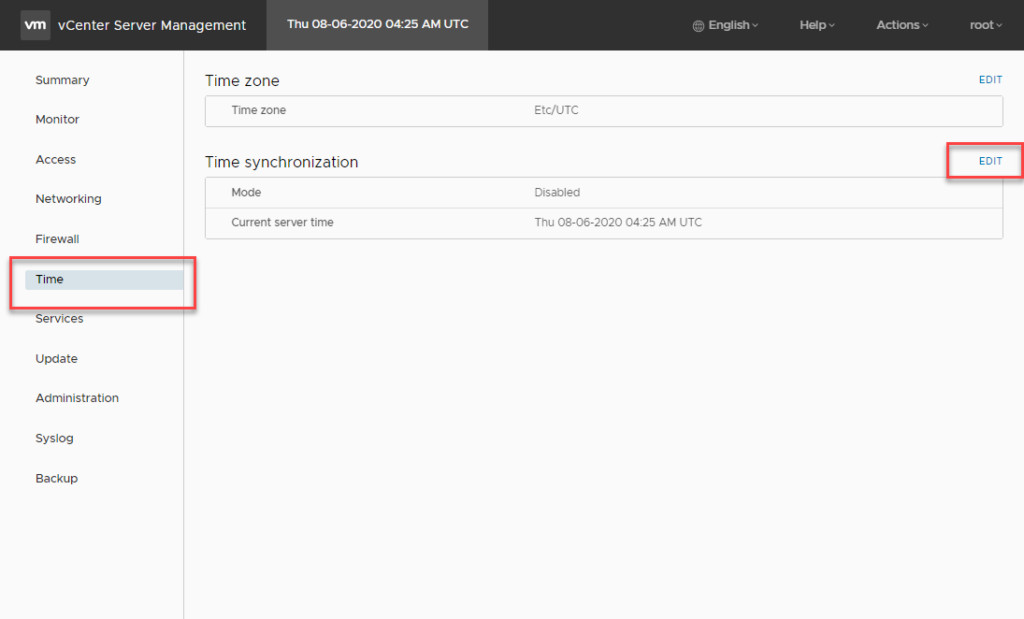 Accessing Time Synchronization Settings in VAMI
Accessing Time Synchronization Settings in VAMI
-
Configure Time Synchronization Mode: In the Edit Time Synchronization window, you can choose the Mode for time synchronization. You have two options:
- Host: Synchronizes vCenter time with the ESXi host it is running on.
- NTP: Allows you to specify one or more NTP servers. Select NTP to configure your vCenter time server.
-
Specify NTP Time Sources: With NTP mode selected, you can now enter your NTP time sources. It is best practice to configure at least three time sources for redundancy and accuracy. Separate each time source with a comma.
 Entering NTP Time Sources in VAMI
Entering NTP Time Sources in VAMI
-
Save and Verify: After entering your NTP servers, click SAVE. If the configuration is successful, each time source will display a green tick, indicating a healthy connection.
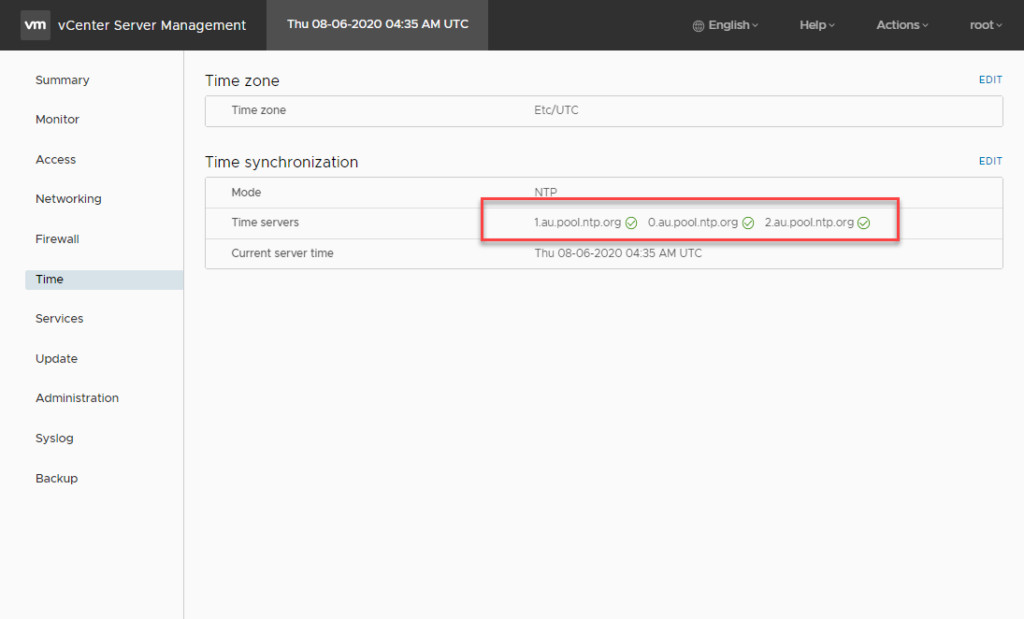 Successful NTP Time Source Configuration in VAMI
Successful NTP Time Source Configuration in VAMI
Method 2: Configuring vCenter Time Server via vCenter Shell (CLI)
For users comfortable with the command line, vCenter Shell offers a direct and efficient way to configure NTP settings. This method is particularly useful for automation and scripting.
-
Enable SSH or Access Console: To use vCenter Shell, you need to establish an SSH session to your vCenter Server or access the console directly. If SSH is disabled, you’ll need to enable it.
 vCenter Server Console Access
vCenter Server Console Access
-
Access the VMware Shell: By default, logging in via SSH or console will land you in the VMware Appliance Shell.
-
NTP Commands: Type
ntpand press the TAB key to list available NTP commands. You will see options likentp.get,ntp.set, and others. -
Check Current NTP Servers: Use the command
ntp.getto view currently configured NTP servers. If no servers are configured, the command will return an empty list.Command> ntp.get Command> -
Set NTP Servers: Use the
ntp.setcommand to define your NTP servers. Enter all desired NTP servers in a comma-separated list without spaces, using the--serversflag.Command> ntp.set --servers 0.pool.ntp.org,1.pool.ntp.org,2.pool.ntp.org -
Verify NTP Server Configuration: Run
ntp.getagain to confirm that your newly configured NTP servers are listed correctly.Command> ntp.get Servers: 1.pool.ntp.org 0.pool.ntp.org 2.pool.ntp.org -
Check and Set Time Synchronization Mode: Use
timesync.getto check the current time synchronization mode. To switch to NTP mode, use the commandtimesync.set --mode NTP. Verify the change withtimesync.getagain.Command> timesync.get Mode: Disabled Command> timesync.set --mode NTP Command> timesync.get Mode: NTP
Once you set the time synchronization mode to NTP and have correctly defined your time servers, vCenter Server should immediately begin synchronizing its time with the specified NTP sources.
By following either the VAMI or vCenter Shell method, you can easily manage your vCenter time server settings, ensuring accurate timekeeping across your virtual infrastructure. Consistent and correct time synchronization is vital for the smooth operation and management of your vSphere environment.