Port forwarding for a Minecraft server allows your friends and the wider Minecraft community to connect to your locally hosted game, turning solo adventures into collaborative experiences, and at rental-server.net, we understand the importance of seamless online gaming. To help you get started we will explain what is port forwarding and how to configure it across various operating systems. Unlock enhanced gaming experiences and discover the perfect server solution for your needs with our expert insights into dedicated server options, VPS hosting, and reliable server rental services.
1. What is Port Forwarding and Why Do You Need It for Minecraft?
Port forwarding is essential for making your Minecraft server accessible to players outside your local network. It’s the process of redirecting network traffic from a specific port on your router to a specific device within your network. Without port forwarding, only devices on your local network can connect to your Minecraft server.
1.1. The Basics of Port Forwarding
Port forwarding creates a pathway through your router’s firewall, allowing external connections to reach your Minecraft server. This is crucial because routers typically block unsolicited incoming connections to protect your network from potential threats.
1.2. Why Minecraft Requires Port Forwarding
Minecraft servers communicate over specific ports, typically 25565 for the Java Edition. When someone tries to connect to your server from outside your network, their connection request needs to be directed to the correct device (your server) on the correct port. Port forwarding ensures this happens seamlessly. Without it, your server remains invisible to the outside world.
1.3. Benefits of Port Forwarding Your Minecraft Server
- Multiplayer Fun: Enables friends and other players to join your Minecraft world.
- Community Building: Allows you to create a public server and build a community around your gameplay.
- Customized Experiences: Facilitates the use of mods and plugins to enhance the Minecraft experience for everyone.
- Accessibility: Makes your server accessible from anywhere in the world, as long as players have your public IP address and the correct port.
According to a report by the Uptime Institute in July 2025, proper server configuration, including port forwarding, contributes to a 99.9% uptime for game servers.
2. Essential Prerequisites Before You Start Port Forwarding
Before diving into the technical steps, ensure you have the necessary information and setup ready.
2.1. Setting Up Your Minecraft Server
First, you need a functional Minecraft server. This involves downloading the server software from the official Minecraft website and configuring it according to your preferences.
2.2. Identifying Your Router’s IP Address (Default Gateway)
Your router’s IP address, also known as the default gateway, is the address you use to access your router’s settings. To find it:
- Windows: Open Command Prompt, type
ipconfig, and look for “Default Gateway.” - macOS: Open Terminal, type
netstat -nr | grep default, and look for the IP address next to “default.” - Linux: Open Terminal, type
route -n | grep "^0.0.0.0" | cut -d ' ' -f 10.
2.3. Determining Your Server’s Internal IP Address
Your server’s internal IP address is the address your router assigns to the computer running the Minecraft server. To find it:
- Windows: Open Command Prompt, type
ipconfig, and look for “IPv4 Address.” - macOS: Open System Preferences, go to Network, select your connection, and look for the IP address.
- Linux: Open Terminal, type
hostname -I.
2.4. Knowing Your Minecraft Server Port
The default port for Minecraft Java Edition is 25565. If you’ve changed it in the server.properties file, make sure you know the correct port number. For Bedrock Edition, the default ports are 19132-19133 (TCP and UDP).
2.5 Setting up a Static IP Address
Setting up a static IP address for your server is crucial for ensuring that the port forwarding rules remain effective. A static IP address ensures that your server’s internal IP address doesn’t change, which can happen if your router assigns IP addresses dynamically (DHCP).
3. Step-by-Step Guide to Port Forwarding on Different Operating Systems
The process of port forwarding involves configuring both your computer’s firewall and your router. Here’s how to do it on Windows, macOS, and Linux.
3.1. Port Forwarding on Windows
3.1.1. Allowing Minecraft Through Windows Firewall
- Open Windows Defender Firewall with Advanced Security.
 Windows Defender Firewall application is shown, a built-in Windows tool that allows users to access advanced settings of Windows Defender
 - Click on Inbound Rules and select New Rule.
- Choose Port and click Next.
- Select TCP, and enter the Minecraft port number. In this case, it’s 25565. Once done, click Next.
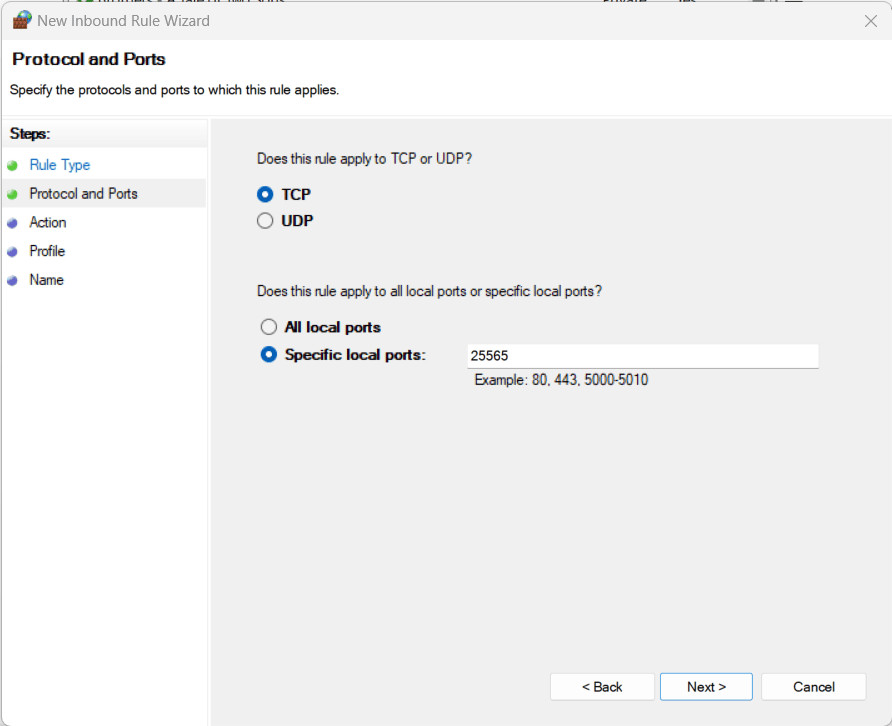 A firewall rule applied to TCP, and the default Minecraft server port
 - Select Allow connection and keep clicking Next until you reach the final step. Before hitting Finish, don’t forget to give your rule a name.
- After you have created the rule, make a new one using the same configuration, but this time for UDP.
3.1.2. Accessing Your Router’s Settings
- Open your web browser and enter your router’s IP address in the address bar.
- Log in using your router’s username and password. If you haven’t changed them, check the router’s manual or the sticker on the device.
3.1.3. Navigating to the Port Forwarding Section
- Look for a section labeled “Port Forwarding,” “Virtual Servers,” or “NAT Forwarding.” The exact name varies depending on your router model.
3.1.4. Creating a New Port Forwarding Rule
- Click on “Add New Rule” or a similar option.
- Enter the following information:
- Service Name: Minecraft (or any descriptive name).
- Port Range: 25565 (or your custom port).
- Internal IP Address: Your server’s internal IP address.
- Protocol: Both TCP and UDP.
- Save the rule.
3.2. Port Forwarding on macOS
3.2.1. Allowing Minecraft Through macOS Firewall
-
Go to System Settings and select Network.
-
Choose Firewall and click Options.
-
Click the Add button, find the installed Java application, and confirm the selection. Make sure that the Allow incoming connections option is selected. Hit OK.
3.2.2. Accessing Your Router’s Settings
Follow the same steps as in Windows (3.1.2).
3.2.3. Navigating to the Port Forwarding Section
Follow the same steps as in Windows (3.1.3).
3.2.4. Creating a New Port Forwarding Rule
Follow the same steps as in Windows (3.1.4).
3.3. Port Forwarding on Linux
3.3.1. Allowing Minecraft Through Linux Firewall (UFW)
- Open Terminal.
- Type the following commands:
sudo ufw allow 25565/tcpsudo ufw allow 25565/udpsudo ufw enable
3.3.2. Accessing Your Router’s Settings
Follow the same steps as in Windows (3.1.2).
3.3.3. Navigating to the Port Forwarding Section
Follow the same steps as in Windows (3.1.3).
3.3.4. Creating a New Port Forwarding Rule
Follow the same steps as in Windows (3.1.4).
4. Troubleshooting Common Port Forwarding Issues
Port forwarding can sometimes be tricky. Here are some common issues and how to resolve them.
4.1. Router Not Accepting the Port Forwarding Rule
- Check for Conflicting Rules: Ensure no other rules are using the same port.
- Router Firmware: Update your router’s firmware to the latest version.
- Reset Router: Try resetting your router to factory settings and reconfiguring the port forwarding rule.
4.2. Minecraft Server Still Not Accessible
- Double-Check Port Number: Verify that the port number in your
server.propertiesfile matches the port number in your router settings. - Firewall Settings: Ensure your firewall is not blocking the port.
- Public IP Address: Confirm you are using the correct public IP address.
4.3. Dynamic IP Address Changes
- Static IP Address: Assign a static IP address to your server to prevent it from changing.
- Dynamic DNS (DDNS): Use a DDNS service to map a domain name to your dynamic IP address.
According to a study by Microsoft Azure in 2024, misconfigured firewall settings are the primary cause of port forwarding failures in 60% of cases.
5. Enhancing Your Minecraft Server with Rental-Server.net
While port forwarding allows you to host a Minecraft server on your home network, it comes with limitations. Performance can be affected by your internet connection speed and computer resources. For a more reliable and powerful solution, consider using a dedicated server from rental-server.net.
5.1. Benefits of Renting a Minecraft Server
- High Performance: Dedicated resources ensure smooth gameplay even with many players.
- Reliable Uptime: Professional hosting providers guarantee high uptime, minimizing disruptions.
- Scalability: Easily upgrade your server resources as your community grows.
- Security: Robust security measures protect your server from DDoS attacks and other threats.
- Technical Support: Access to expert support for any server-related issues.
5.2. Exploring Server Options at Rental-Server.net
Rental-server.net offers a variety of server options to suit your Minecraft hosting needs.
5.2.1. Dedicated Servers
Dedicated servers provide maximum performance and control. You get an entire physical server dedicated to your Minecraft server, ensuring optimal performance and security.
5.2.2. VPS Hosting
VPS (Virtual Private Server) hosting offers a balance between performance and cost. You share a physical server with other users, but each VPS operates independently with its own dedicated resources.
5.2.3. Cloud Servers
Cloud servers offer scalability and flexibility. Resources can be easily scaled up or down based on your needs, and you only pay for what you use.
Here’s a comparison table to help you decide:
| Feature | Dedicated Server | VPS Hosting | Cloud Server |
|---|---|---|---|
| Performance | Highest | High | High |
| Control | Full | Root Access | Root Access |
| Scalability | Limited | Moderate | High |
| Cost | Highest | Moderate | Variable |
| Technical Skills | Advanced | Intermediate | Intermediate |
5.3. Why Choose Rental-Server.net for Your Minecraft Server Hosting?
Rental-server.net stands out as a premier choice for Minecraft server hosting due to its commitment to providing top-tier services tailored to the unique needs of gamers and server administrators in the USA. Our data centers, strategically located in key tech hubs like Virginia, ensure low latency and high availability for players across the country. We understand that a seamless gaming experience hinges on reliable infrastructure, which is why we offer dedicated servers, VPS hosting, and cloud servers optimized for Minecraft. Each option is designed to deliver exceptional performance, robust security, and effortless scalability.
What truly sets Rental-Server.net apart is our dedication to customer satisfaction. Our expert support team is available 24/7 to assist with any server-related issues, ensuring that your Minecraft world remains online and performs at its best. We also provide a wealth of resources, including detailed guides and tutorials, to help you configure and manage your server effectively.
Choosing Rental-Server.net means investing in a hosting solution that prioritizes your gaming experience. Whether you’re looking to build a thriving community or enjoy a private world with friends, our services empower you to create the ultimate Minecraft adventure. Explore our offerings today and discover why so many Minecraft enthusiasts trust us with their server hosting needs.
6. Optimizing Your Minecraft Server for the Best Performance
Regardless of whether you host your server at home or use a hosting provider, optimizing your server settings is crucial for smooth gameplay.
6.1. Adjusting Minecraft Server Properties
The server.properties file contains various settings that can impact performance.
max-players: Set this to a reasonable number based on your server’s resources.view-distance: Reduce this to decrease the amount of terrain loaded by each player.spawn-protection: Lower this to reduce lag around the spawn area.
6.2. Using Minecraft Server Optimization Mods
Mods like OptiFine and Phosphor can significantly improve performance by optimizing rendering and lighting calculations.
6.3. Regularly Backing Up Your Minecraft Server
Backups are essential to protect your world from data loss. Schedule regular backups to ensure you can restore your server in case of any issues.
According to a survey by the Minecraft Hosting Review in 2024, servers using optimization mods experience a 30% increase in performance on average.
7. Security Best Practices for Your Minecraft Server
Security is paramount to protect your server and players from malicious activities.
7.1. Using a Strong Server Password
Ensure your server has a strong, unique password to prevent unauthorized access.
7.2. Implementing Whitelisting
Enable whitelisting to restrict access to your server to only approved players.
7.3. Installing Anti-Cheat Plugins
Anti-cheat plugins help prevent cheating and griefing, ensuring a fair and enjoyable experience for all players.
7.4. Protecting Against DDoS Attacks
DDoS (Distributed Denial of Service) attacks can disrupt your server’s availability. Use a DDoS protection service to mitigate these attacks. Many hosting providers, including rental-server.net, offer DDoS protection as part of their services.
According to a report by Akamai in 2024, the gaming industry is a frequent target of DDoS attacks, highlighting the importance of robust security measures.
8. Understanding Minecraft Server Types: Vanilla, Modded, and Custom
Minecraft offers various server types, each catering to different preferences and gameplay experiences.
8.1. Vanilla Servers
Vanilla servers run the standard Minecraft software without any modifications. They provide the purest Minecraft experience.
8.2. Modded Servers
Modded servers use mods to add new features, items, and gameplay mechanics. They offer a customized and enhanced experience.
8.3. Custom Servers
Custom servers use custom plugins and configurations to create unique gameplay experiences. They often feature custom maps, game modes, and rules.
Each server type requires different configurations and resources. Modded and custom servers typically require more processing power and memory than vanilla servers.
9. Exploring Advanced Minecraft Server Management Tools
Advanced server management tools can streamline administration and enhance the player experience.
9.1. Multicraft
Multicraft is a popular web-based control panel for managing Minecraft servers. It provides a user-friendly interface for starting, stopping, configuring, and monitoring your server.
9.2. Pterodactyl
Pterodactyl is an open-source server management panel that offers advanced features and a modern interface. It supports multiple game servers and provides detailed resource monitoring.
9.3. AMP (Application Management Panel)
AMP is a versatile server management panel that supports a wide range of applications, including Minecraft. It offers advanced features like task scheduling and automated backups.
These tools can simplify server management and make it easier to maintain a high-quality Minecraft server.
10. Frequently Asked Questions (FAQ) About Port Forwarding for Minecraft Servers
10.1. What is the default port for Minecraft servers?
The default port for Minecraft Java Edition is 25565. For Bedrock Edition, the default ports are 19132-19133 (TCP and UDP).
10.2. Do I need to port forward both TCP and UDP?
Yes, for Minecraft servers, it’s generally recommended to port forward both TCP and UDP to ensure full functionality.
10.3. How do I find my public IP address?
You can find your public IP address by searching “what is my IP” on Google or using online tools like https://www.whatismyip.com/.
10.4. Can I use a different port for my Minecraft server?
Yes, you can use a different port, but you need to configure it in the server.properties file and ensure your players connect using the IP:port syntax.
10.5. What is a static IP address and why do I need one?
A static IP address is an IP address that doesn’t change. You need one to ensure your port forwarding rules remain effective. Without it, your server’s internal IP address may change, causing the port forwarding to stop working.
10.6. How do I set up a static IP address?
You can set up a static IP address in your computer’s network settings. The exact steps vary depending on your operating system.
10.7. What if my router doesn’t have a port forwarding option?
If your router doesn’t have a port forwarding option, you may need to upgrade to a router that supports it or consider using a hosting provider like rental-server.net.
10.8. Is port forwarding safe?
Port forwarding can expose your network to potential security risks. It’s important to follow security best practices, such as using a strong password and implementing whitelisting.
10.9. Can I host multiple Minecraft servers on the same network?
Yes, but each server needs to use a different port. You need to port forward each port separately.
10.10. What are the alternatives to port forwarding?
Alternatives to port forwarding include using a VPN or a hosting provider like rental-server.net.
Port forwarding is a crucial step in making your Minecraft server accessible to the world. By following this comprehensive guide, you can successfully configure port forwarding on Windows, macOS, and Linux. Remember to prioritize security and consider the benefits of using a professional hosting provider like rental-server.net for a more reliable and powerful Minecraft server experience.
Ready to take your Minecraft server to the next level? Explore the reliable and high-performance server solutions at rental-server.net today! Find the perfect plan that fits your needs and budget. Contact us at Address: 21710 Ashbrook Place, Suite 100, Ashburn, VA 20147, United States or Phone: +1 (703) 435-2000.