
Are you looking to create your own TeamSpeak server for seamless voice communication? Making a TeamSpeak server enables real-time voice communication for gaming, collaboration, and community engagement. At rental-server.net, we offer comprehensive solutions to help you set up and manage your own TeamSpeak server efficiently. Discover the best options for server hosting with high performance and reliable support.
1. What Is a TeamSpeak Server and Why Do You Need One?
A TeamSpeak server is a dedicated server running the TeamSpeak 3 (TS3) software, allowing multiple users to connect and communicate via voice over the internet. It’s favored for its low latency, high-quality audio, and robust security features, making it ideal for gamers, businesses, and organizations needing reliable voice communication.
TeamSpeak is a Voice over Internet Protocol (VoIP) application that allows users to communicate in real time. It is known for its reliability, lightweight design, and features such as AES-256 encryption and high audio quality.
1.1. Key Benefits of Running Your Own TeamSpeak Server
- Enhanced Privacy and Control: You have complete control over who joins your server and how it is managed.
- Customization: Tailor the server settings to meet your specific needs, including user permissions, channels, and codecs.
- Reliability: A dedicated server ensures consistent performance and minimal downtime.
- Cost-Effectiveness: For larger groups, running your own server can be more economical than using hosted services.
1.2. Use Cases for a TeamSpeak Server
- Gaming Communities: Coordinate strategies and communicate during gameplay.
- Business Communication: Facilitate team meetings, project discussions, and client interactions.
- Educational Institutions: Conduct virtual classes, study groups, and online tutorials.
- Organizations: Enable secure and reliable communication for remote teams and members.
2. Understanding the Essential Requirements for a TeamSpeak Server
Before diving into the setup process, it’s essential to understand the hardware and software requirements for running a TeamSpeak server. This ensures a smooth and efficient setup, tailored to your specific needs.
2.1. Hardware Requirements
The hardware requirements for a TeamSpeak server depend on the number of users you expect to support. Here’s a general guideline:
| Number of Users | CPU | RAM | Storage | Network |
|---|---|---|---|---|
| Up to 50 | 1 GHz | 512 MB | 10 GB | 10 Mbps |
| 50-100 | 2 GHz | 1 GB | 20 GB | 20 Mbps |
| 100+ | 3 GHz or higher | 2 GB or more | 40 GB or more | 50 Mbps or more |
- CPU: A faster CPU ensures better performance, especially with a higher number of users.
- RAM: Adequate RAM prevents lag and ensures smooth voice communication.
- Storage: Sufficient storage is needed for server files, logs, and backups.
- Network: A stable and fast internet connection is crucial for low-latency communication.
2.2. Software Requirements
- Operating System:
- Windows: Windows Server 2012 or later, Windows 10 or later
- Linux: Ubuntu, Debian, CentOS
- macOS: macOS 10.13 or later
- TeamSpeak Server Software: Available for download on the official TeamSpeak website.
- TeamSpeak Client Software: Required for users to connect to the server.
- Optional Tools: Text editor, SSH client (for Linux servers).
2.3. Choosing the Right Server Location
The location of your server is crucial for minimizing latency and ensuring a good user experience. Choose a server location that is geographically close to your primary user base.
- United States: Virginia is an excellent choice due to its large number of data centers and advanced technology infrastructure.
3. Step-by-Step Guide to Making a TeamSpeak Server on Linux (Ubuntu)
Setting up a TeamSpeak server on Linux, specifically Ubuntu, involves several steps, from creating a new user to configuring the server for startup. Follow these steps to get your TeamSpeak server up and running.
3.1. Prerequisites
- A Linux VPS (Virtual Private Server) running Ubuntu 22.04 or later.
- SSH client (e.g., PuTTY) to access your VPS.
- Basic knowledge of Linux commands.
3.2. Step 1: Access Your VPS via SSH
Use an SSH client to connect to your VPS. You’ll need the IP address and login credentials provided by your hosting provider.
ssh username@your_server_ip3.3. Step 2: Update Your System
Ensure your system is up-to-date by running the following commands:
sudo apt-get update && sudo apt-get upgrade Updating system packages using apt-get
3.4. Step 3: Create a New System User
Create a new user for the TeamSpeak server to enhance security:
sudo adduser --disabled-login teamspeakYou will be prompted to enter user details. You can leave these fields blank.
3.5. Step 4: Switch to the New User
Switch to the newly created user:
sudo su teamspeakNavigate to the user’s home directory:
cd /home/teamspeak3.6. Step 5: Download and Extract the TeamSpeak Server
Download the latest TeamSpeak server software from the official TeamSpeak website. Choose the 64-bit version for Linux. Use the wget command:
wget https://files.teamspeak-services.com/releases/server/3.13.7/teamspeak3-server_linux_amd64-3.13.7.tar.bz2Extract the downloaded file:
tar xvf teamspeak3-server_linux_amd64-3.13.7.tar.bz2Remove the archive file:
rm teamspeak3-server_linux_amd64-3.13.7.tar.bz2Note: Ensure you use the correct version number in the commands.
3.7. Step 6: Accept the TeamSpeak 3 License Agreement
Accept the license agreement by creating an empty file:
touch .ts3server_license_accepted3.8. Step 7: Start the TeamSpeak Server on Startup
Switch to the root user:
su -Create a new service file:
sudo nano /lib/systemd/system/teamspeak.serviceAdd the following content to the file:
[Unit]
Description=TeamSpeak 3 Server
After=network.target

[Service]
WorkingDirectory=/home/teamspeak/teamspeak3-server_linux_amd64
User=teamspeak
Group=teamspeak
Type=forking
ExecStart=/home/teamspeak/teamspeak3-server_linux_amd64/ts3server_startscript.sh start inifile=ts3server.ini
ExecStop=/home/teamspeak/teamspeak3-server_linux_amd64/ts3server_startscript.sh stop
PIDFile=/home/teamspeak/teamspeak3-server_linux_amd64/ts3server.pid
RestartSec=15
Restart=always

[Install]
WantedBy=multi-user.target
Save the file and enable the service:
systemctl enable teamspeak.service
systemctl start teamspeak.service
Check the status of the service:
systemctl status teamspeak.service Checking the status of the TeamSpeak service on Linux
3.9. Step 8: Retrieve the Privilege Key
Switch back to the teamspeak user:
sudo su teamspeakView the server logs to find the privilege key:
cat /home/teamspeak/teamspeak3-server_linux_amd64/logs/ts3server_*Copy the token from the ServerAdmin line:
ServerAdmin privilege key created, please use the line below
token=ZyQqAIGrZyQqAIGrZyQqAIGrZyQqAIGrZyQqAIGr
3.10. Step 9: Connect via the TeamSpeak Client
Open the TeamSpeak client and connect to your server using the VPS IP address. Enter the privilege key when prompted to gain admin rights.
4. Setting Up a TeamSpeak Server on Windows: A Simple Guide
Setting up a TeamSpeak server on Windows is straightforward, making it accessible for users who prefer a Windows environment. Here’s how to get started.
4.1. Step 1: Download and Extract the TeamSpeak Server
Download the TeamSpeak server files for Windows from the official TeamSpeak website. Extract the files to your desired location.
4.2. Step 2: Run the TeamSpeak Server Installer
Open the extracted folder and run the ts3server.exe file. Follow the prompts to accept the license agreement and configure the firewall settings.
The installer will provide you with the login name, server password, API key, and server admin token. Copy these values to a text file for later use.
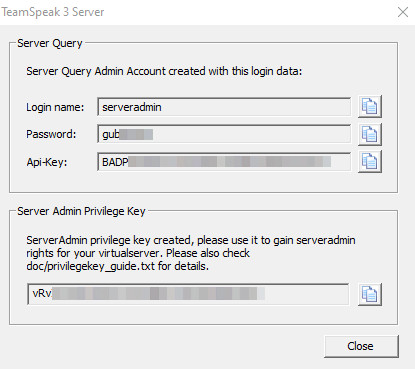 The setup process for the TeamSpeak server software on Windows
4.3. Step 3: Connect via the TeamSpeak Client
Download and install the TeamSpeak client from the official website. Open the client and go to Connections -> Connect. Enter your server’s IP address (you can find this by running ipconfig in the Command Prompt) and your server password.
Paste the privilege key when prompted to gain admin rights.
5. Creating a TeamSpeak Server on macOS: A Quick Tutorial
Setting up a TeamSpeak server on macOS is similar to the Linux setup, with a few macOS-specific steps.
5.1. Step 1: Download and Extract the TeamSpeak Server
Download the TeamSpeak server software for macOS from the official website. Double-click the downloaded file to extract it.
5.2. Step 2: Accept the TeamSpeak 3 License Agreement
Open the Terminal application and navigate to the extracted folder. Execute the following command:
touch .ts3server_license_accepted5.3. Step 3: Start the TeamSpeak Server and Retrieve Your Privilege Key
Start the server by running the following command:
./ts3serverIf you receive a warning about an unidentified developer, adjust your security settings in System Preferences -> Security & Privacy to allow the application to run.
Wait for the server to start, and you will see the privilege key in the terminal output.
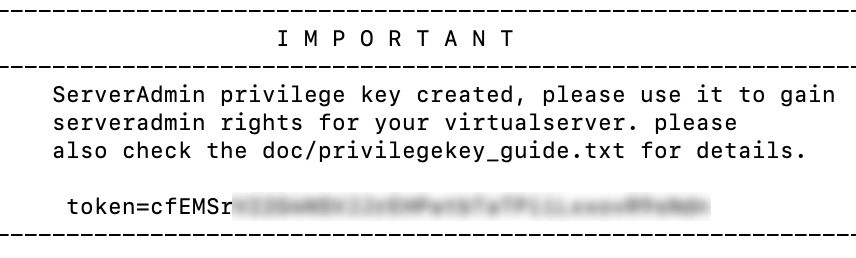 The server token in the terminal output for a TeamSpeak server
5.4. Step 4: Connect via the TeamSpeak Client
Open the TeamSpeak client and connect to your server using the IP address shown in System Preferences -> Network. Enter the privilege key when prompted to gain admin rights.
6. Optimizing Your TeamSpeak Server for Performance and Security
Once your TeamSpeak server is up and running, optimizing it for performance and security is essential for a smooth and secure user experience.
6.1. Performance Optimization
- Codec Configuration: Use efficient codecs like Opus for high-quality audio with minimal bandwidth usage.
- Server Groups: Create server groups with different permission levels to manage users effectively.
- Channel Management: Organize channels logically and set appropriate channel permissions.
- Regular Maintenance: Keep your server software up-to-date with the latest patches and updates.
6.2. Security Measures
- Password Protection: Set a strong server password to prevent unauthorized access.
- Anti-Flood Protection: Configure anti-flood settings to mitigate DDoS attacks.
- Ban Management: Regularly review and update your ban list to keep unwanted users off your server.
- Use a Firewall: Configure a firewall to protect your server from unauthorized access.
6.3. Recommended Codec Settings
| Codec | Quality | Description |
|---|---|---|
| Opus | 5-10 | High quality, low bandwidth consumption |
| Speex | 5-10 | Good quality, moderate bandwidth consumption |
| CELT | 5-10 | High quality, high bandwidth consumption |
7. How to Point a Domain to Your TeamSpeak Server
Pointing a domain to your TeamSpeak server makes it easier for users to connect using a memorable domain name instead of an IP address.
7.1. Step 1: Create a Subdomain with A Records
Log in to your domain registrar’s control panel (e.g., hPanel at Hostinger) and navigate to the DNS Zone Editor. Create a new A record with the following settings:
- Type: A
- Name: Specify a subdomain (e.g.,
ts3). - Points to: Enter the IP address of your TeamSpeak server.
- TTL: Leave the default value.
 Creating an A record for a TeamSpeak server subdomain
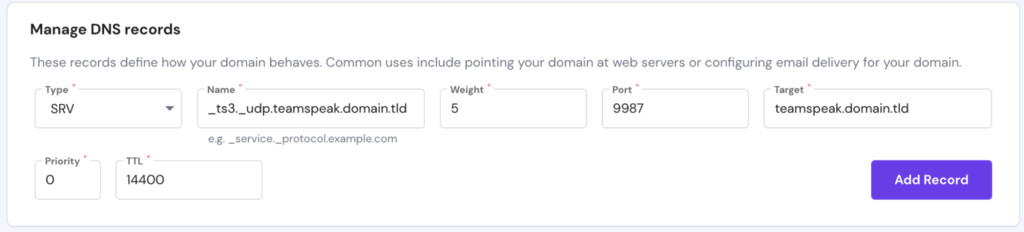
7.2. Step 2: Create an SRV Record
Create a new SRV record with the following settings:
- Type: SRV
- Name:
_ts3._udp.yourdomain.com(replaceyourdomain.comwith your actual domain). - Priority: 0
- Weight: 5
- Port: 9987 (default TeamSpeak port)
- Target: The subdomain you created in Step 1 (e.g.,
ts3.yourdomain.com). - TTL: Leave the default value.
7.3. Step 3: Verify DNS Propagation
It may take up to 24 hours for the new DNS records to propagate worldwide. You can use online tools to check the DNS propagation status.
8. Top TeamSpeak Server Hosting Providers in the USA
Choosing the right hosting provider is critical for ensuring the performance and reliability of your TeamSpeak server. Here are some of the top hosting providers in the USA:
8.1. rental-server.net
rental-server.net offers a range of dedicated server and VPS solutions optimized for TeamSpeak. With excellent uptime, robust security, and responsive customer support, they are a top choice for hosting your TeamSpeak server.
- Address: 21710 Ashbrook Place, Suite 100, Ashburn, VA 20147, United States
- Phone: +1 (703) 435-2000
- Website: rental-server.net
8.2. AWS (Amazon Web Services)
AWS provides scalable and reliable cloud hosting solutions. Their EC2 instances are suitable for hosting TeamSpeak servers, offering flexibility and control over your server environment.
8.3. Microsoft Azure
Azure offers a range of virtual machines that can be used to host TeamSpeak servers. With global data centers and robust security features, Azure is a reliable choice for businesses and organizations.
8.4. Google Cloud Platform (GCP)
GCP provides powerful virtual machines with high-performance networking, making it ideal for hosting TeamSpeak servers. Their global infrastructure ensures low latency and high availability.
8.5. Comparison of Hosting Providers
| Provider | Pricing | Uptime Guarantee | Key Features |
|---|---|---|---|
| rental-server.net | Competitive | 99.99% | Dedicated servers, VPS solutions, excellent support |
| AWS | Pay-as-you-go | 99.99% | Scalable EC2 instances, global data centers |
| Microsoft Azure | Pay-as-you-go | 99.99% | Virtual machines, robust security features |
| Google Cloud Platform | Pay-as-you-go | 99.99% | High-performance networking, global infrastructure |
9. Troubleshooting Common TeamSpeak Server Issues
Even with a well-configured server, you may encounter issues from time to time. Here are some common problems and how to troubleshoot them:
9.1. Server Not Starting
- Check Logs: Review the server logs for error messages that indicate the cause of the problem.
- License Agreement: Ensure you have accepted the TeamSpeak license agreement.
- Firewall: Verify that the firewall is not blocking TeamSpeak server traffic.
- Permissions: Make sure the TeamSpeak user has the necessary permissions to run the server.
9.2. Connection Issues
- Firewall: Check if the firewall is blocking TeamSpeak client traffic.
- Port Forwarding: Ensure that the necessary ports (default 9987 UDP) are forwarded in your router.
- Server IP: Verify that you are using the correct server IP address.
- DNS Issues: If using a domain name, ensure that the DNS records are correctly configured and propagated.
9.3. High Latency
- Server Location: Choose a server location that is geographically close to your user base.
- Network Congestion: Monitor network traffic and identify any bottlenecks.
- Codec Settings: Use efficient codecs like Opus to reduce bandwidth usage.
- Hardware Resources: Ensure your server has sufficient CPU, RAM, and network resources.
10. Frequently Asked Questions (FAQ) About TeamSpeak Servers
10.1. What are the main advantages of using a TeamSpeak server?
The main advantages include enhanced privacy and control, customization options, reliable performance, and cost-effectiveness for larger groups.
10.2. Can I run a TeamSpeak server on my home computer?
Yes, you can run a TeamSpeak server on your home computer, but it is recommended to use a dedicated server or VPS for better performance and reliability.
10.3. What is the default port for a TeamSpeak server?
The default port for a TeamSpeak server is 9987 UDP.
10.4. How do I get a privilege key for my TeamSpeak server?
The privilege key is generated when the server is first started. You can find it in the server logs.
10.5. How do I update my TeamSpeak server?
Download the latest server files from the official TeamSpeak website and follow the upgrade instructions provided in the documentation.
10.6. Is TeamSpeak free to use?
The TeamSpeak client is free to use. However, running a server may require a license, depending on the number of slots you need.
10.7. What is the best operating system for a TeamSpeak server?
Linux (e.g., Ubuntu, Debian) is often preferred for its stability, security, and performance. However, Windows and macOS can also be used.
10.8. How do I protect my TeamSpeak server from DDoS attacks?
Configure anti-flood settings, use a firewall, and consider using a DDoS protection service.
10.9. How do I create channels and set permissions on my TeamSpeak server?
Use the TeamSpeak client to create channels and configure permissions for different server groups and users.
10.10. Where can I find reliable TeamSpeak server hosting in the USA?
rental-server.net, AWS, Microsoft Azure, and Google Cloud Platform are reliable options for TeamSpeak server hosting in the USA.
Conclusion
Setting up a TeamSpeak server involves several steps, from choosing the right hardware and software to configuring the server for optimal performance and security. Whether you choose to host your server on Linux, Windows, or macOS, following the guidelines in this comprehensive guide will help you create a reliable and efficient communication platform.
For top-notch server solutions tailored to your needs, visit rental-server.net. We offer a wide range of dedicated servers and VPS options designed to deliver superior performance and reliability. Our expert team is ready to assist you in finding the perfect hosting solution for your TeamSpeak server.
Ready to experience seamless voice communication? Explore our hosting solutions at rental-server.net today and take your TeamSpeak server to the next level!