
Filezilla Server Settings are crucial for securely managing your file transfers, and rental-server.net is here to guide you through the process. Properly configured FileZilla server settings ensure optimal performance, robust security, and seamless file sharing, whether you’re a system administrator, web developer, or business owner. Let’s dive into the specifics and explore how you can make the most of FileZilla.
1. What Are FileZilla Server Settings and Why Are They Important?
FileZilla server settings refer to the configuration options available in the FileZilla Server software that allow administrators to customize the server’s behavior, security, and performance. They are important because they determine how the server handles connections, manages users, and protects data during file transfers.
- Security: Correct settings prevent unauthorized access and protect sensitive data.
- Performance: Optimized settings ensure efficient file transfers.
- Customization: Tailored settings meet specific needs, like user permissions.
1.1 Understanding the Significance of FileZilla Server Settings
FileZilla Server is a popular FTP (File Transfer Protocol) solution, enabling users to host and manage file-sharing services. Proper configuration is vital for security, performance, and reliability. Neglecting these settings can lead to vulnerabilities and inefficiencies.
As highlighted by cybersecurity experts, unsecure file transfer protocols are easy targets for cyberattacks. Configuring FileZilla correctly mitigates these risks, ensuring data integrity and confidentiality.
According to a report by the SANS Institute, misconfigured file servers are a common entry point for attackers. Understanding and implementing the right settings is critical for protecting your data.
1.2 Key Areas Covered in FileZilla Server Settings
When configuring FileZilla server settings, you’ll interact with several key areas:
- General Settings: Basic configurations like port number and server limits.
- Users and Groups: Managing user access and permissions.
- Security Settings: Implementing SSL/TLS encryption and IP filtering.
- Transfer Settings: Optimizing transfer speeds and connection limits.
- Logging: Enabling and configuring server logs for monitoring and troubleshooting.
2. What Are the Essential FileZilla Server General Settings?
Essential FileZilla server general settings include configuring the server’s listening port, setting connection limits, and managing IP bindings to ensure optimal performance and security. These settings define the basic operational parameters of your FileZilla server.
- Listening Port: The port on which the server listens for incoming connections.
- Connection Limits: The maximum number of simultaneous connections allowed.
- IP Bindings: Specifying which IP addresses the server should listen on.
2.1 Configuring the Listening Port for FileZilla Server
The listening port is the TCP port where FileZilla Server accepts new connections. The default port for FTP is 21, but for security reasons, it is often recommended to change it to a non-standard port.
To configure the listening port:
- Open FileZilla Server Interface.
- Navigate to Edit > Settings.
- In the General settings section, find the Listen on these ports field.
- Enter the desired port number (e.g., 2121).
 FileZilla Server listen on port setting
5. Click OK to save the changes.
According to the National Institute of Standards and Technology (NIST), using non-standard ports can help reduce the risk of automated attacks.
2.2 Setting Connection Limits in FileZilla Server
Setting connection limits helps prevent server overload and ensures fair access for all users. You can limit the total number of connections and the number of connections from a single IP address.
To set connection limits:
- Go to Edit > Settings.
- In the General settings section, locate the Maximum number of users and Maximum number of users per IP fields.
- Enter the desired values.
- Click OK to save the changes.
Limiting connections prevents denial-of-service (DoS) attacks and ensures a stable server environment, according to cybersecurity best practices recommended by OWASP.
2.3 Managing IP Bindings in FileZilla Server
IP bindings specify which IP addresses the FileZilla Server will listen on. This is useful for servers with multiple network interfaces or when you want to restrict access to specific networks.
To manage IP bindings:
- Navigate to Edit > Settings.
- In the General settings section, find the Listen on these IPs field.
- Enter the IP addresses you want the server to listen on, separated by commas.
- Click OK to apply the changes.
Binding the server to specific IP addresses enhances security by reducing the attack surface.
3. How to Configure FileZilla Server Users and Groups?
Configuring FileZilla Server users and groups involves creating user accounts, assigning them to groups, and setting appropriate permissions to manage file access effectively. This ensures that only authorized users can access specific directories and perform designated actions.
- User Creation: Adding new user accounts with unique usernames and passwords.
- Group Assignment: Organizing users into groups for easier permission management.
- Permissions Settings: Defining read, write, and delete permissions for users and groups.
3.1 Creating User Accounts in FileZilla Server
Creating user accounts is the first step in managing access to your FileZilla server. Each user account should have a unique username and a strong password.
To create a user account:
- Open FileZilla Server Interface.
- Navigate to Edit > Users.
- Click the Add button.
- Enter a username for the new user.
- Set a password for the user.
- Define shared folders and their permissions.
- Click OK to create the user account.
Implementing strong password policies is crucial. NIST recommends using passwords that are at least 12 characters long and include a mix of uppercase and lowercase letters, numbers, and symbols.
3.2 Assigning Users to Groups in FileZilla Server
Assigning users to groups simplifies permission management by allowing you to apply permissions to multiple users at once.
To assign users to a group:
- Go to Edit > Groups.
- Click the Add button to create a new group.
- Enter a name for the group.
- Define shared folders and permissions for the group.
- Go to Edit > Users.
- Select the user you want to add to the group.
- In the Group membership section, select the group.
- Click OK to save the changes.
Grouping users based on their roles and responsibilities streamlines access control and reduces the risk of misconfigured permissions.
3.3 Setting Permissions for Users and Groups in FileZilla Server
Setting permissions for users and groups determines what actions they can perform on the server, such as reading, writing, or deleting files.
To set permissions:
- Go to Edit > Users or Edit > Groups.
- Select the user or group you want to configure.
- In the Shared folders section, click Add to select a folder.
- Check the appropriate boxes to grant read, write, delete, or other permissions.
- Click OK to save the changes.
Properly configured permissions ensure that users only have access to the resources they need, following the principle of least privilege, which is a fundamental security practice.
4. What Are the Recommended FileZilla Server Security Settings?
Recommended FileZilla server security settings include enabling SSL/TLS encryption, configuring IP filtering, and setting up password policies to protect your server from unauthorized access and data breaches.
- SSL/TLS Encryption: Encrypting data during transmission to prevent eavesdropping.
- IP Filtering: Restricting access based on IP addresses to block malicious traffic.
- Password Policies: Enforcing strong password requirements for user accounts.
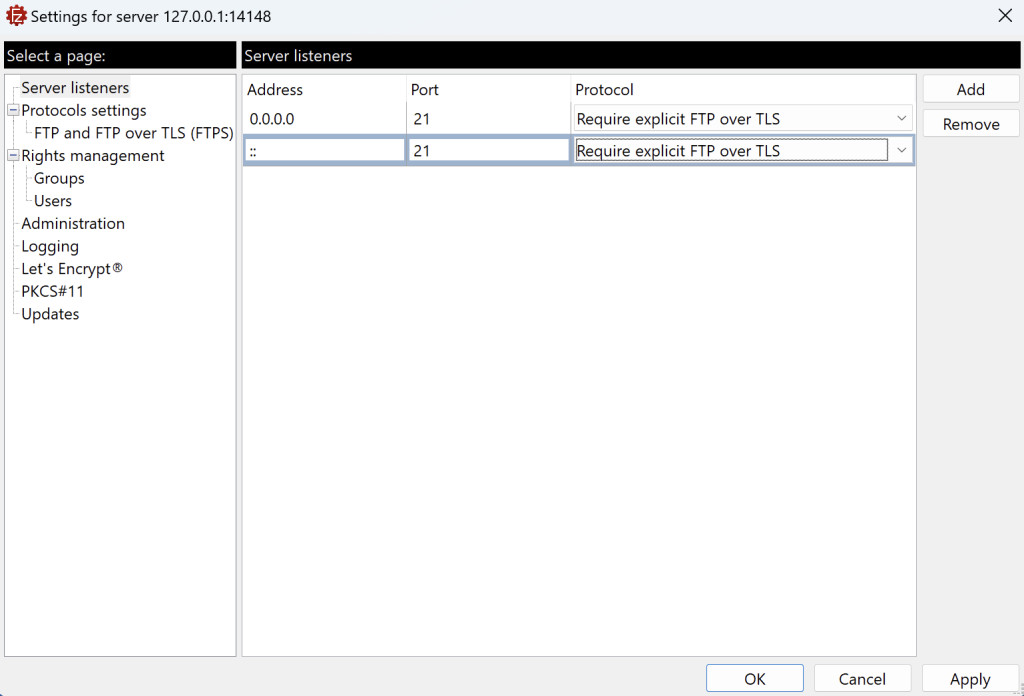
4.1 Enabling SSL/TLS Encryption in FileZilla Server
Enabling SSL/TLS encryption ensures that data transmitted between the client and server is encrypted, protecting it from eavesdropping.
To enable SSL/TLS encryption:
- Navigate to Edit > Settings.
- Go to FTP over TLS settings.
- Check the Enable FTP over TLS support (FTPS) box.
- Generate or import an SSL/TLS certificate.
- Specify the path to your certificate and private key files.
- Click OK to save the changes.
 FileZilla Server enable TLS settings
According to a study by the Ponemon Institute, encrypting data in transit significantly reduces the risk of data breaches.
4.2 Configuring IP Filtering in FileZilla Server
Configuring IP filtering allows you to restrict access to your server based on IP addresses, blocking malicious traffic and unauthorized access.
To configure IP filtering:
- Navigate to Edit > Settings.
- Go to IP filter.
- Add IP addresses or ranges to the Disallowed IP addresses list to block them.
- Add IP addresses or ranges to the Allowed IP addresses list to allow only specific IPs.
- Click OK to apply the changes.
IP filtering provides an additional layer of security by limiting access to trusted sources.
4.3 Implementing Strong Password Policies in FileZilla Server
Implementing strong password policies ensures that users create and use strong passwords, reducing the risk of password-based attacks.
To implement strong password policies:
- Navigate to Edit > Settings.
- Go to Security settings.
- Configure options such as minimum password length, password complexity requirements, and password expiration.
- Click OK to save the changes.
Enforcing strong password policies is a fundamental security practice recommended by cybersecurity experts.
5. How to Optimize FileZilla Server Transfer Settings?
Optimizing FileZilla server transfer settings involves configuring transfer modes, setting connection timeouts, and adjusting buffer sizes to achieve the best possible file transfer speeds and reliability.
- Transfer Modes: Choosing between active and passive transfer modes.
- Connection Timeouts: Setting appropriate timeouts to prevent stalled transfers.
- Buffer Sizes: Adjusting buffer sizes to optimize data transfer rates.
5.1 Choosing Between Active and Passive Transfer Modes in FileZilla Server
Active and passive transfer modes determine how the client and server establish data connections. Passive mode is generally preferred for clients behind firewalls or NAT devices.
To choose the transfer mode:
- In the FileZilla client, go to Edit > Settings > Connection > FTP > Passive mode.
- Select the appropriate passive mode setting (e.g., “Use the server’s external IP address”).
According to network configuration guides, passive mode is more reliable in complex network environments.
5.2 Setting Connection Timeouts in FileZilla Server
Setting connection timeouts ensures that stalled or inactive connections are automatically closed, freeing up server resources.
To set connection timeouts:
- Navigate to Edit > Settings.
- Go to Timeout settings.
- Adjust the Timeout for data connection and Timeout for control connection values as needed.
- Click OK to save the changes.
Appropriate timeout settings help maintain server performance and prevent resource exhaustion.
5.3 Adjusting Buffer Sizes in FileZilla Server
Adjusting buffer sizes can optimize data transfer rates by controlling the amount of data that is transferred at a time.
To adjust buffer sizes:
- Navigate to Edit > Settings.
- Go to Miscellaneous.
- Adjust the Socket buffer size values as needed.
- Click OK to apply the changes.
Optimal buffer sizes can improve transfer speeds, especially for large files.
6. Why Is Logging Important in FileZilla Server and How to Configure It?
Logging in FileZilla Server is crucial for monitoring server activity, troubleshooting issues, and ensuring security by recording detailed information about connections, file transfers, and errors.
- Monitoring Server Activity: Tracking user connections, file transfers, and server events.
- Troubleshooting Issues: Identifying and diagnosing problems by analyzing log data.
- Security Auditing: Reviewing logs to detect and investigate security incidents.
6.1 Enabling and Configuring Logging in FileZilla Server
Enabling and configuring logging ensures that FileZilla Server records the necessary information for monitoring and troubleshooting.
To enable logging:
- Navigate to Edit > Settings.
- Go to Logging.
- Check the Enable logging to file box.
- Specify the log file path and other logging options.
- Click OK to save the changes.
Properly configured logs provide valuable insights into server operations and security.
6.2 Analyzing FileZilla Server Logs
Analyzing FileZilla Server logs involves reviewing the log data to identify patterns, troubleshoot issues, and detect security incidents.
To analyze logs:
- Open the log file in a text editor or log analysis tool.
- Search for specific events, errors, or user activities.
- Use log analysis tools to visualize and summarize the log data.
Regular log analysis helps maintain server health and security.
6.3 Using Logs for Security Auditing in FileZilla Server
Using logs for security auditing involves reviewing the log data to detect and investigate security incidents, such as unauthorized access attempts or suspicious file transfers.
To use logs for security auditing:
- Regularly review the logs for suspicious activity.
- Set up alerts for critical events, such as failed login attempts.
- Use log analysis tools to identify potential security breaches.
Logs are an essential tool for maintaining a secure FileZilla Server environment.
7. What Are Some Advanced FileZilla Server Configuration Tips?
Advanced FileZilla server configuration tips include using virtual directories, setting up speed limits, and configuring auto-banning to further enhance server functionality and security.
- Virtual Directories: Mapping physical directories to virtual paths for easier user access.
- Speed Limits: Controlling transfer speeds to manage bandwidth usage.
- Auto-Banning: Automatically blocking IP addresses after multiple failed login attempts.
7.1 Using Virtual Directories in FileZilla Server
Using virtual directories allows you to map physical directories on your server to virtual paths, providing users with a more organized and user-friendly file structure.
To use virtual directories:
- Go to Edit > Users or Edit > Groups.
- Select the user or group you want to configure.
- In the Shared folders section, click Add to select a folder.
- Enter a virtual path for the folder.
- Click OK to save the changes.
Virtual directories simplify file access and improve the user experience.
7.2 Setting Up Speed Limits in FileZilla Server
Setting up speed limits allows you to control the transfer speeds for users, managing bandwidth usage and preventing any single user from monopolizing server resources.
To set up speed limits:
- Navigate to Edit > Settings.
- Go to Speed limits.
- Configure the speed limits for uploads and downloads.
- Click OK to apply the changes.
Speed limits ensure fair bandwidth allocation and prevent server overload.
7.3 Configuring Auto-Banning in FileZilla Server
Configuring auto-banning automatically blocks IP addresses after multiple failed login attempts, protecting your server from brute-force attacks.
To configure auto-banning:
- Navigate to Edit > Settings.
- Go to Auto-ban.
- Configure the number of failed login attempts and the ban duration.
- Click OK to save the changes.
Auto-banning provides an automated defense against malicious login attempts.
8. How Can rental-server.net Help with FileZilla Server Settings?
rental-server.net can assist with FileZilla server settings by providing comprehensive guides, expert advice, and tailored server solutions to optimize your file transfer capabilities.
- Comprehensive Guides: Step-by-step instructions for configuring FileZilla Server.
- Expert Advice: Professional guidance on optimizing server settings.
- Tailored Server Solutions: Customized server solutions to meet specific needs.
8.1 Exploring Comprehensive Guides on rental-server.net
rental-server.net offers a variety of comprehensive guides that cover every aspect of FileZilla Server configuration, from basic setup to advanced optimization. These guides are designed to help users of all skill levels get the most out of their FileZilla Server.
These guides cover:
- Installation: Detailed instructions for installing FileZilla Server on various operating systems.
- Configuration: Step-by-step guidance on configuring essential and advanced settings.
- Troubleshooting: Solutions to common issues and errors.
8.2 Seeking Expert Advice from rental-server.net
rental-server.net provides access to expert advice from experienced server administrators and cybersecurity professionals. Whether you need help with optimizing performance, enhancing security, or troubleshooting issues, our experts are here to assist you.
Our experts can help you:
- Optimize Server Settings: Tailor your FileZilla Server settings to meet your specific needs.
- Enhance Security: Implement best practices for securing your server.
- Troubleshoot Issues: Quickly identify and resolve any problems you may encounter.
8.3 Discovering Tailored Server Solutions on rental-server.net
rental-server.net offers a range of tailored server solutions designed to meet the unique needs of businesses and individuals. Whether you need a dedicated server, VPS, or cloud server, we have a solution that’s right for you.
Our server solutions include:
- Dedicated Servers: High-performance servers for demanding applications.
- VPS: Scalable and cost-effective virtual private servers.
- Cloud Servers: Flexible and reliable cloud-based server solutions.
We can help you choose the right server solution for your needs and provide expert assistance with FileZilla Server configuration.
9. What Are Common Mistakes to Avoid When Configuring FileZilla Server Settings?
Common mistakes to avoid when configuring FileZilla server settings include using default settings, neglecting security configurations, and failing to regularly monitor logs, all of which can compromise server performance and security.
- Using Default Settings: Not changing default settings, such as the listening port.
- Neglecting Security Configurations: Failing to enable SSL/TLS encryption or configure IP filtering.
- Failing to Regularly Monitor Logs: Not monitoring logs for suspicious activity or errors.
9.1 The Dangers of Using Default Settings in FileZilla Server
Using default settings can leave your server vulnerable to attacks, as attackers often target systems with well-known default configurations.
To avoid this:
- Change the default listening port.
- Set a strong administrator password.
- Disable unnecessary features.
9.2 Neglecting Security Configurations in FileZilla Server
Neglecting security configurations can expose your server to unauthorized access and data breaches.
To ensure security:
- Enable SSL/TLS encryption.
- Configure IP filtering.
- Implement strong password policies.
9.3 The Importance of Regularly Monitoring FileZilla Server Logs
Failing to regularly monitor logs can prevent you from detecting and responding to security incidents or performance issues in a timely manner.
To maintain server health:
- Enable logging.
- Regularly review the logs for suspicious activity.
- Set up alerts for critical events.
10. What Are the Latest Trends in File Transfer Security and How Do They Relate to FileZilla Server Settings?
The latest trends in file transfer security include enhanced encryption protocols, multi-factor authentication, and zero-trust security models, all of which can be implemented and supported through FileZilla server settings.
- Enhanced Encryption Protocols: Using the latest versions of SSL/TLS to ensure strong encryption.
- Multi-Factor Authentication: Requiring multiple forms of authentication to access the server.
- Zero-Trust Security Models: Verifying every user and device before granting access to server resources.
10.1 Implementing Enhanced Encryption Protocols in FileZilla Server
Implementing enhanced encryption protocols ensures that your file transfers are protected with the strongest possible encryption.
To implement enhanced encryption:
- Use the latest version of SSL/TLS.
- Configure FileZilla Server to use strong cipher suites.
- Regularly update your SSL/TLS certificates.
10.2 Using Multi-Factor Authentication with FileZilla Server
Using multi-factor authentication adds an extra layer of security by requiring users to provide multiple forms of authentication, such as a password and a verification code.
While FileZilla Server does not natively support multi-factor authentication, it can be integrated with external authentication providers that offer this feature.
10.3 Adopting Zero-Trust Security Models with FileZilla Server
Adopting zero-trust security models involves verifying every user and device before granting access to server resources, regardless of whether they are inside or outside the network perimeter.
To implement zero-trust security:
- Implement strong authentication and authorization policies.
- Continuously monitor and log all server activity.
- Use network segmentation to limit the impact of potential breaches.
By staying up-to-date with the latest trends in file transfer security and implementing appropriate FileZilla server settings, you can ensure that your data is protected from unauthorized access and data breaches.
Take Action with rental-server.net Today
Ready to optimize your FileZilla server settings for peak performance and robust security? Visit rental-server.net to explore our comprehensive guides, seek expert advice, and discover tailored server solutions. Don’t wait—secure your file transfers and streamline your server management today!
Address: 21710 Ashbrook Place, Suite 100, Ashburn, VA 20147, United States
Phone: +1 (703) 435-2000
Website: rental-server.net
FAQ: FileZilla Server Settings
1. What is FileZilla Server?
FileZilla Server is a free, open-source FTP server software that allows you to host and manage file transfers securely and efficiently.
2. Why is it important to configure FileZilla Server settings properly?
Properly configured FileZilla Server settings ensure optimal performance, robust security, and seamless file sharing, protecting your data from unauthorized access and breaches.
3. What are the essential FileZilla Server general settings?
Essential settings include configuring the listening port, setting connection limits, and managing IP bindings to define the server’s basic operational parameters.
4. How do I create a user account in FileZilla Server?
Navigate to Edit > Users, click Add, enter a username and password, define shared folders and permissions, and click OK.
5. What is SSL/TLS encryption, and how do I enable it in FileZilla Server?
SSL/TLS encryption ensures that data transmitted is encrypted, protecting it from eavesdropping. Enable it in FTP over TLS settings by checking “Enable FTP over TLS support (FTPS)” and specifying the certificate path.
6. How do I configure IP filtering in FileZilla Server?
Configure IP filtering in IP filter by adding IP addresses or ranges to the Disallowed IP addresses list to block them, or to the Allowed IP addresses list to permit only specific IPs.
7. What are transfer modes, and how do I choose between active and passive mode?
Transfer modes determine how the client and server establish data connections. Passive mode is generally preferred for clients behind firewalls or NAT devices.
8. Why is logging important in FileZilla Server, and how do I configure it?
Logging is crucial for monitoring server activity, troubleshooting issues, and ensuring security. Enable it in Logging by checking “Enable logging to file” and specifying the log file path.
9. What are virtual directories, and how do I use them in FileZilla Server?
Virtual directories map physical directories to virtual paths for easier user access. Configure them in Shared folders by adding a folder and entering a virtual path.
10. How does rental-server.net help with FileZilla Server settings?
rental-server.net provides comprehensive guides, expert advice, and tailored server solutions to optimize your file transfer capabilities.