
Are you looking to install a VNC server on your Ubuntu server to manage it with a graphical interface? This comprehensive guide, brought to you by rental-server.net, will walk you through setting up a secure and efficient VNC server on your Ubuntu server. This will enhance your server management experience and provide easy access to your server’s graphical applications. Let’s dive into the process of setting up your server with a graphical user interface, simplifying complex tasks, and ensuring seamless remote administration.
1. What is a VNC Server and Why Install It on Ubuntu Server?
A VNC (Virtual Network Computing) server allows you to remotely access the graphical desktop environment of a server. By installing a VNC server on your Ubuntu server, you can manage your server using a graphical interface, which is particularly useful for tasks that are easier to perform with a GUI than via the command line. This is especially helpful for users who may not be as comfortable with command-line interfaces.
1.1. What are the Key Benefits of Using VNC on Ubuntu Server?
- Remote Access: Access your server’s desktop from anywhere with an internet connection.
- User-Friendly Interface: Manage your server with a graphical interface, which is easier to use than the command line.
- Simplified Management: Easily manage files, software, and settings on your remote server.
- Efficient Administration: Perform complex tasks with ease, such as running graphical applications.
- Accessibility: Makes server management more accessible, especially for those less familiar with command-line interfaces.
1.2. Who Benefits Most from Installing a VNC Server?
- System Administrators: Simplifies server management and maintenance.
- Web Developers: Provides a graphical environment for developing and testing web applications.
- IT Managers: Offers a convenient way to monitor and manage servers remotely.
- Security Professionals: Allows for graphical analysis and management of server security settings.
- Solution Architects: Facilitates the design and implementation of server-based solutions.
2. What are the Search Intentions for Installing a VNC Server on Ubuntu Server?
- Informational: Users seeking guides on how to install and configure a VNC server.
- Navigational: Users looking for specific VNC server software and related tools.
- Comparative: Users comparing different VNC server options to determine the best fit for their needs.
- Transactional: Users looking for services or products that facilitate VNC server setup and maintenance.
- Investigative: Users troubleshooting issues related to VNC server installation and configuration.
3. Prerequisites for Installing VNC Server on Ubuntu Server
Before you begin installing a VNC server on your Ubuntu server, ensure you have the following prerequisites in place:
- Ubuntu Server: A running instance of Ubuntu Server (preferably 20.04 or later).
- SSH Access: Secure Shell (SSH) access to your server.
- User Account: A non-root user account with sudo privileges.
- Internet Connection: A stable internet connection for downloading packages.
- VNC Client: A VNC client installed on your local machine (e.g., TightVNC, RealVNC).
4. Step-by-Step Guide to Installing and Configuring VNC Server on Ubuntu Server
Follow these steps to install and configure a VNC server on your Ubuntu server.
4.1. Update Package Lists
First, update your package lists to ensure you have the latest versions of software packages:
sudo apt update
sudo apt upgrade
4.2. Install a Desktop Environment
Since Ubuntu Server doesn’t come with a default GUI, you need to install one. Xfce is a lightweight and efficient desktop environment that works well with VNC.
sudo apt install xfce4 xfce4-goodiesDuring the installation, you may be prompted to choose a default display manager. Either lightdm or gdm3 will work fine; select one and proceed.
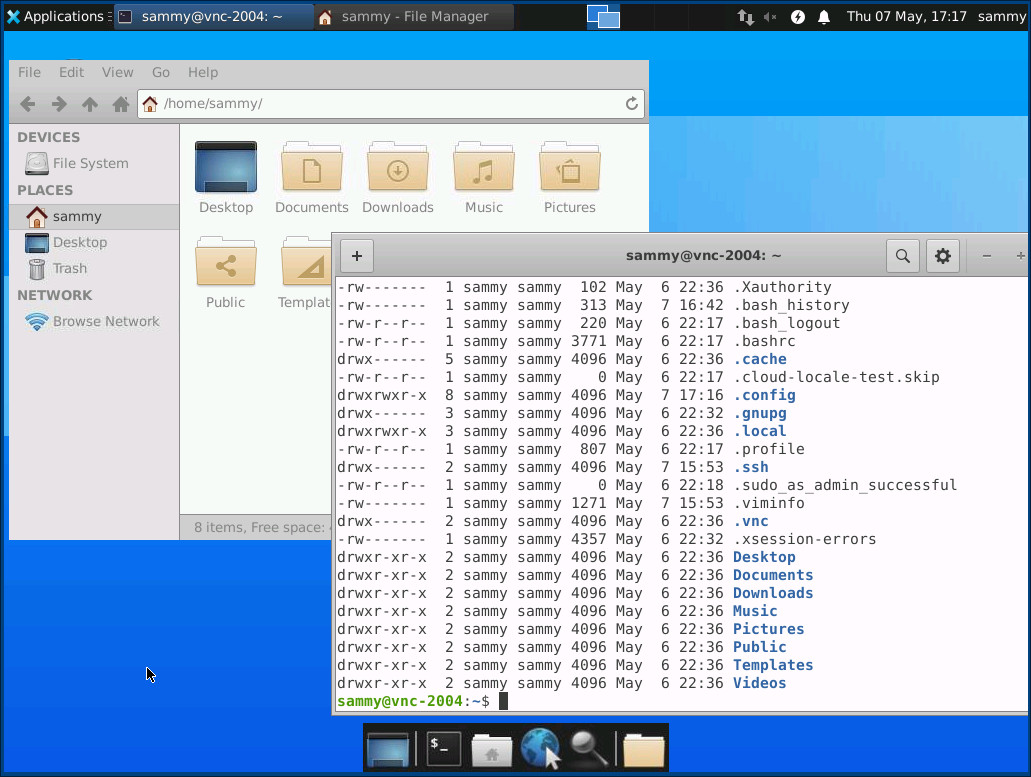 XFCE File Manager
The XFCE file manager provides an intuitive way to navigate and manage files on your server.
4.3. Install a VNC Server
There are several VNC servers available. TightVNC is a popular choice due to its lightweight nature and ease of configuration.
sudo apt install tightvncserver4.4. Configure the VNC Server
After installing the VNC server, you need to configure it. Start by running the vncserver command:
vncserverYou will be prompted to set a password to access your VNC server. The password must be between six and eight characters long.
You will require a password to access your desktops.

Password:
Verify:
You’ll also be asked if you want to create a view-only password. This is optional and can be skipped by pressing n.
4.5. Modify the xstartup File
The xstartup file contains the commands that the VNC server executes when it starts. You need to modify this file to start the Xfce desktop environment.
First, kill the current VNC server instance:
vncserver -kill :1Next, backup the original xstartup file:
mv ~/.vnc/xstartup ~/.vnc/xstartup.bakNow, create a new xstartup file:
nano ~/.vnc/xstartupAdd the following lines to the file:
#!/bin/bash
xrdb $HOME/.Xresources
startxfce4 &
Save and close the file. Make the xstartup file executable:
chmod +x ~/.vnc/xstartup4.6. Restart the VNC Server
Restart the VNC server for the changes to take effect:
vncserver -localhost :1The -localhost option ensures that the VNC server only accepts connections from the local machine, enhancing security.
4.7. Connect to the VNC Server via SSH Tunnel
VNC connections are not encrypted by default, so it’s important to create an SSH tunnel to secure the connection. On your local machine, use the following command:
ssh -L 59000:localhost:5901 -C -N -l your_username your_server_ipReplace your_username with your Ubuntu username and your_server_ip with your server’s IP address.
4.8. Use a VNC Client to Connect
Now, use a VNC client on your local machine to connect to localhost:59000. You will be prompted to enter the password you set earlier.
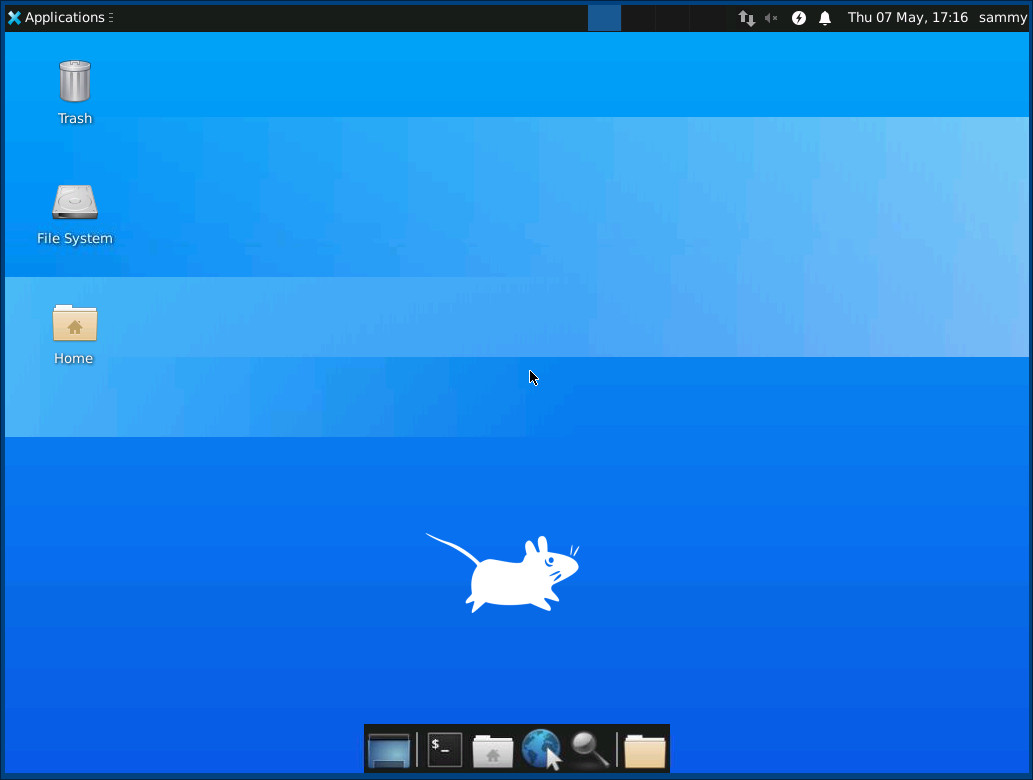 VNC Connection
A VNC connection to an Ubuntu server provides a full graphical desktop environment, enabling easy management and operation.
5. Setting Up VNC as a Systemd Service
To ensure the VNC server starts automatically on boot, set it up as a systemd service.
5.1. Create a Systemd Unit File
Create a new unit file for the VNC server:
sudo nano /etc/systemd/system/[email protected]Add the following lines to the file. Replace your_username with your Ubuntu username:
[Unit]
Description=Start TightVNC server at startup
After=syslog.target network.target

[Service]
Type=forking
User=your_username
Group=your_username
WorkingDirectory=/home/your_username
PIDFile=/home/your_username/.vnc/%H:%i.pid
ExecStartPre=-/usr/bin/vncserver -kill :%i > /dev/null 2>&1
ExecStart=/usr/bin/vncserver -depth 24 -geometry 1280x800 -localhost :%i
ExecStop=/usr/bin/vncserver -kill :%i

[Install]
WantedBy=multi-user.target
Save and close the file.
5.2. Enable and Start the VNC Service
Enable the systemd service:
sudo systemctl daemon-reload
sudo systemctl enable [email protected]
Start the VNC service:
sudo systemctl start [email protected]5.3. Verify the VNC Service Status
Check the status of the VNC service to ensure it’s running correctly:
sudo systemctl status [email protected]If the service is running, the output should indicate that it is active and running.
6. Optimizing VNC Server Performance
To ensure a smooth VNC experience, consider the following optimization tips:
- Use a Lightweight Desktop Environment: Xfce is a good choice for its low resource usage.
- Adjust Screen Resolution: Lower the screen resolution to reduce the amount of data transferred.
- Optimize VNC Settings: Adjust settings like color depth and compression to balance performance and quality.
- Use a Fast Network Connection: A stable and fast network connection is crucial for a responsive VNC session.
- Regularly Update Software: Keep your VNC server and client software updated for the latest performance improvements and security patches.
7. Enhancing VNC Server Security
Security is paramount when using VNC. Implement the following measures to protect your server:
- Use SSH Tunneling: Always connect to your VNC server via an SSH tunnel to encrypt the connection.
- Strong Passwords: Use strong, unique passwords for your VNC server and user accounts.
- Firewall Configuration: Configure your firewall to only allow SSH connections and block direct VNC connections.
- Regular Security Audits: Conduct regular security audits to identify and address potential vulnerabilities.
- Keep Software Updated: Ensure your VNC server and related software are up to date with the latest security patches.
8. Troubleshooting Common VNC Server Issues
Encountering issues while setting up or using your VNC server? Here are some common problems and their solutions:
- Problem: Unable to connect to the VNC server.
- Solution: Ensure the SSH tunnel is active and the VNC server is running. Check firewall settings and VNC server logs for errors.
- Problem: Black screen or blank desktop.
- Solution: Verify the
xstartupfile is correctly configured to start the desktop environment. Check the VNC server logs for any errors related to starting the desktop.
- Solution: Verify the
- Problem: Slow VNC performance.
- Solution: Reduce the screen resolution and color depth. Optimize VNC settings for better performance. Ensure a stable and fast network connection.
- Problem: Authentication issues.
- Solution: Double-check the VNC password. Ensure the correct user account is being used.
- Problem: VNC server fails to start on boot.
- Solution: Verify the systemd service is correctly configured and enabled. Check the system logs for any errors during startup.
9. Comparing Different VNC Server Options
Several VNC server options are available, each with its own strengths and weaknesses. Here’s a comparison of some popular choices:
| VNC Server | Pros | Cons |
|---|---|---|
| TightVNC | Lightweight, easy to configure, good performance | Limited features, basic security |
| RealVNC | Feature-rich, robust security, cross-platform compatibility | Can be resource-intensive, paid version required for full features |
| TigerVNC | Open-source, good performance, supports multiple platforms | Configuration can be complex |
| UltraVNC | Free, feature-rich, good for Windows environments | Primarily for Windows, less suitable for Linux |
Choosing the Right VNC Server
- TightVNC: Ideal for users seeking a lightweight and easy-to-configure VNC server with good performance.
- RealVNC: Best for users needing advanced features, robust security, and cross-platform compatibility.
- TigerVNC: Suitable for users looking for an open-source VNC server with good performance and support for multiple platforms.
- UltraVNC: Recommended for users primarily working in Windows environments and needing a feature-rich, free VNC server.
10. Enhancing Ubuntu Server Management with rental-server.net
rental-server.net offers a range of server solutions tailored to meet your specific needs. By choosing rental-server.net, you benefit from:
- Reliable Server Infrastructure: High-performance servers with guaranteed uptime.
- Scalable Solutions: Easily scale your server resources as your needs grow.
- Expert Support: Access to knowledgeable support staff ready to assist with any issues.
- Competitive Pricing: Cost-effective server solutions to fit your budget.
- Advanced Security: Robust security measures to protect your data and infrastructure.
Address: 21710 Ashbrook Place, Suite 100, Ashburn, VA 20147, United States.
Phone: +1 (703) 435-2000.
Website: rental-server.net.
10.1. How rental-server.net Can Help with VNC Server Setup
rental-server.net provides comprehensive guides and support to help you set up and manage your VNC server. Our resources include:
- Detailed Tutorials: Step-by-step guides for installing and configuring VNC servers.
- Expert Support: Assistance from experienced server administrators.
- Optimized Server Configurations: Pre-configured server setups for optimal VNC performance.
- Security Best Practices: Guidance on implementing robust security measures.
- Troubleshooting Assistance: Help with resolving common VNC server issues.
10.2. Explore Server Solutions with rental-server.net
Visit rental-server.net to explore our range of server solutions and find the perfect fit for your needs. Whether you need a dedicated server, VPS, or cloud server, we have the resources and expertise to support your success.
FAQ: Frequently Asked Questions About VNC Server on Ubuntu Server
1. What is the default port for VNC?
The default port for VNC is 5900 + display number. For example, display :1 uses port 5901.
2. How do I change the VNC password?
Run the vncpasswd command in the terminal.
3. Can I use VNC without a desktop environment?
While possible, it’s not recommended. A desktop environment provides a graphical interface, making server management easier.
4. Is VNC secure?
VNC connections are not encrypted by default, so it’s crucial to use an SSH tunnel to secure the connection.
5. How do I start the VNC server on boot?
Set up the VNC server as a systemd service to ensure it starts automatically on boot.
6. What is the best desktop environment for VNC?
Xfce is a lightweight and efficient desktop environment that works well with VNC.
7. How do I improve VNC performance?
Reduce the screen resolution and color depth. Optimize VNC settings for better performance. Ensure a stable and fast network connection.
8. Can I use VNC on multiple monitors?
Yes, but it requires additional configuration. You may need to adjust the VNC server settings to support multiple monitors.
9. How do I troubleshoot VNC connection issues?
Ensure the SSH tunnel is active and the VNC server is running. Check firewall settings and VNC server logs for errors.
10. What are the alternatives to VNC?
Alternatives to VNC include Remote Desktop Protocol (RDP), SSH with X forwarding, and web-based remote management tools.
By following this guide, you can successfully install and configure a VNC server on your Ubuntu server, enhancing your remote server management capabilities. Remember to prioritize security and optimize performance for a smooth and efficient VNC experience. And for reliable, scalable, and secure server solutions, visit rental-server.net today.
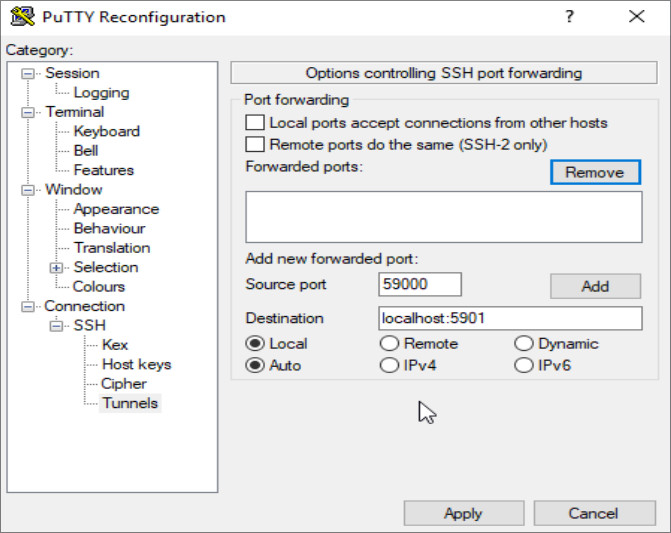 PuTTY SSH Tunnel Configuration
Configuring an SSH tunnel in PuTTY ensures a secure connection to your VNC server.