The Domain Name System (DNS) is a critical component of the internet, often described as the internet’s phonebook. It translates human-friendly domain names, like rental-server.net, into IP addresses that computers use to locate websites. By default, your computer uses the DNS servers provided by your Internet Service Provider (ISP). However, these aren’t always the fastest or most reliable. Changing your DNS server can lead to improved internet speed, enhanced security, and better access to websites and online services.
This guide will walk you through the simple steps to Change Dns Server settings on any Windows computer, empowering you to take control of your internet connection. Whether you’re aiming to resolve website access issues, speed up browsing, or simply explore alternative DNS options, this tutorial is for you.
Step-by-Step Guide to Change DNS Server on Windows
Follow these straightforward steps to modify your DNS settings on your Windows machine:
Step 1: Access the Control Panel
Begin by clicking on the Windows Start menu, typically located in the bottom-left corner of your screen. Type “control panel” into the search bar that appears. From the search results, select and open the “Control Panel” application.
Step 2: Navigate to Network and Sharing Center
Within the Control Panel, locate and click on the “Network and Internet” category.
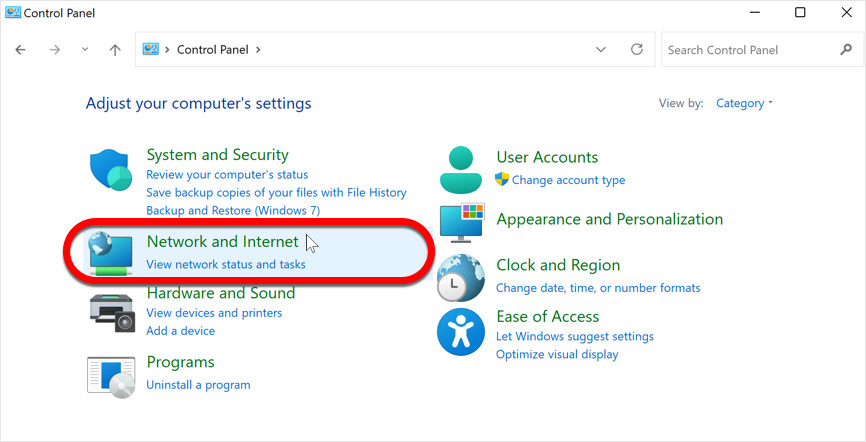 Network and Internet
Next, within the “Network and Internet” options, click on “Network and Sharing Center”. This section provides an overview of your network connections and settings.
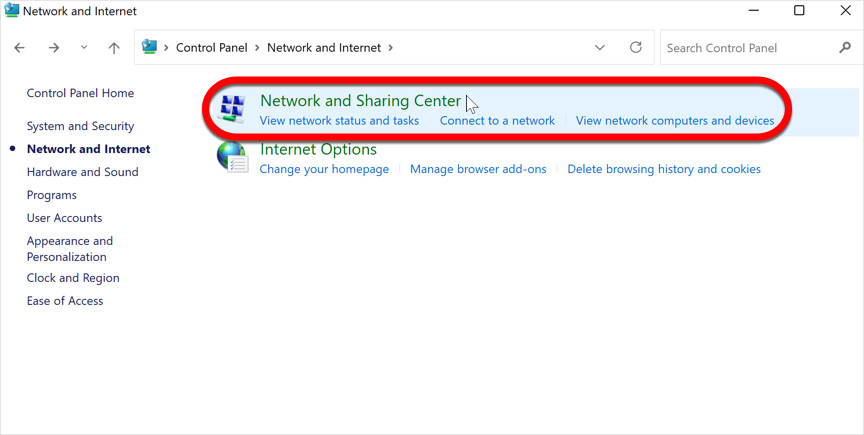 Network and Sharing Center
Step 3: Identify Your Active Connection
In the Network and Sharing Center window, you will see your active internet connection listed on the right side. It is usually labeled as either “Wi-Fi” (for wireless connections) or “Ethernet” (for wired connections). Click on the name of your active connection to proceed.
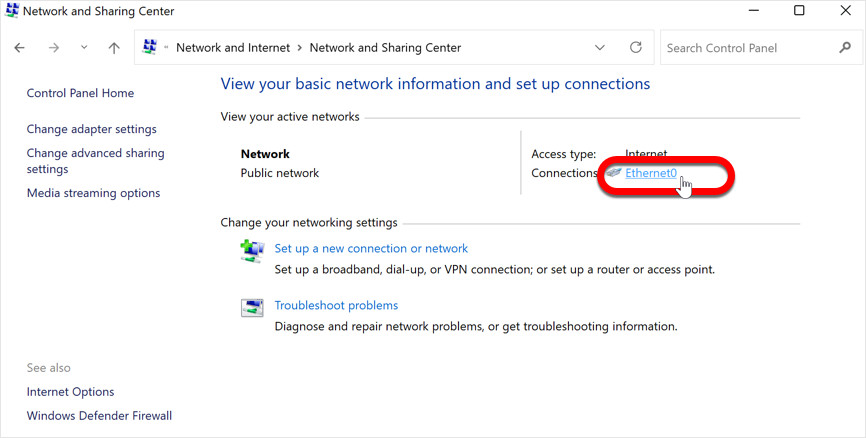 Connection (Ethernet / Wi-Fi)
Step 4: Open Connection Properties
A status window for your selected connection will pop up. In this window, click on the “Properties” button. This action will open a new window where you can adjust the properties of your network connection, including DNS settings.
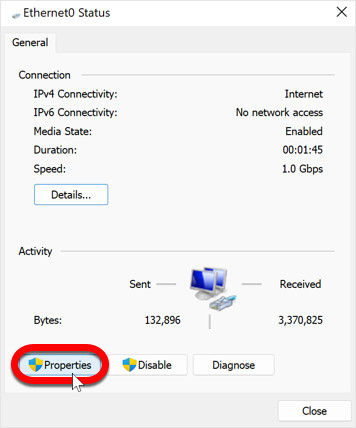 Properties – change DNS on Windows
Step 5: Select Internet Protocol Version 4 (TCP/IPv4)
In the connection properties window, you’ll see a list of items. Scroll down until you find “Internet Protocol Version 4 (TCP/IPv4)”. Click on it once to highlight it. It’s crucial to select IPv4 as it is the most widely used internet protocol.
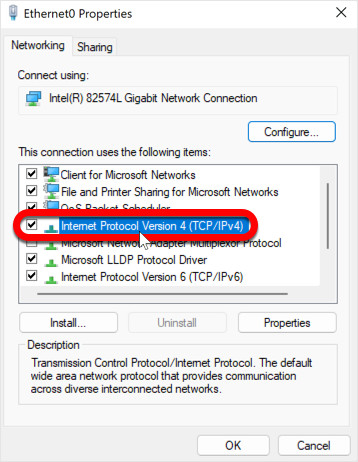 IPv4 – change DNS on Windows
Step 6: Access IPv4 Properties
With “Internet Protocol Version 4 (TCP/IPv4)” selected, click on the “Properties” button again. This will open a dedicated window for configuring the properties of IPv4, where you can finally change DNS server settings.
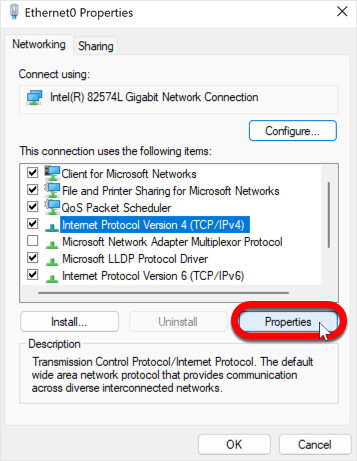 DNS properties
Step 7: Choose Custom DNS Server Addresses
Within the “Internet Protocol Version 4 (TCP/IPv4) Properties” window, locate the section labeled “Use the following DNS server addresses”. Click on the radio button next to this option to activate the fields for entering custom DNS server addresses. By selecting this, you are telling your computer to override the default DNS servers and use the ones you specify.
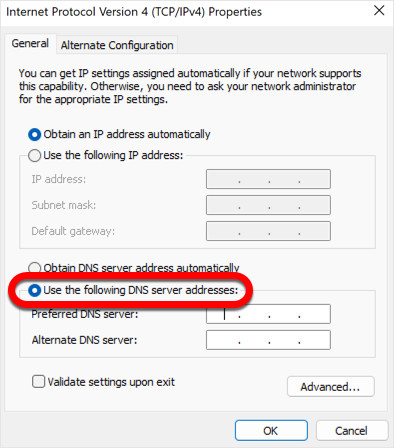 Use the following DNS server addresses
Step 8: Enter Your Preferred DNS Server Addresses
Now you can input your desired DNS server addresses. For this example, we will use Google Public DNS, a popular and reliable free DNS service.
- In the “Preferred DNS server” field, enter:
8.8.8.8 - In the “Alternate DNS server” field, enter:
8.8.4.4
These addresses are the IPv4 addresses for Google’s primary and secondary DNS servers. You can also use other public DNS servers like Cloudflare (1.1.1.1 and 1.0.0.1) or OpenDNS (208.67.222.222 and 208.67.220.220).
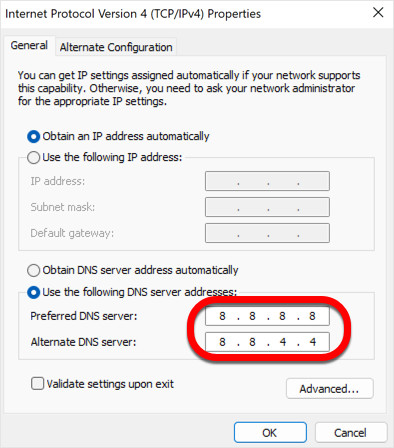 Custom DNS on Windows
Step 9: Save and Apply Changes
After entering your preferred and alternate DNS server addresses, click the “OK” button in the “Internet Protocol Version 4 (TCP/IPv4) Properties” window to save these settings. Then, click “OK” again in the connection properties window to close it.
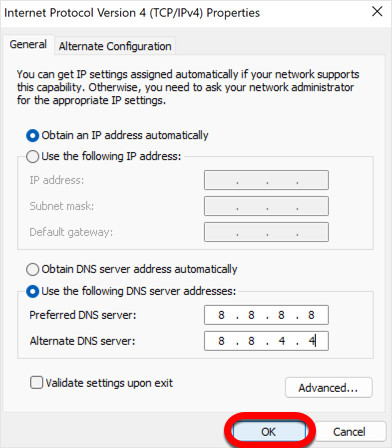 OK – change DNS on Windows
Step 10: Restart Your Computer
For the changes to take full effect immediately, it’s essential to restart your Windows computer. Click the Windows Start menu, then click the power button, and select “Restart”. This ensures that your system flushes the old DNS cache and starts using the new DNS servers you’ve configured.
Reverting to Default DNS Settings
If you wish to undo the changes and revert to your ISP’s default DNS servers, simply go back to Step 7 and select the “Obtain DNS server address automatically” radio button. This will instruct your computer to automatically receive DNS server addresses from your router, which are typically provided by your ISP.
Why Consider Changing Your DNS Server?
Changing your DNS server can offer several benefits:
- Improved Internet Speed: Public DNS servers like Google Public DNS or Cloudflare DNS are often faster and more efficient than ISP-provided DNS servers, leading to quicker website loading times.
- Increased Reliability: Reputable public DNS services have robust infrastructure and are less prone to outages, ensuring more reliable access to the internet.
- Enhanced Security: Some DNS servers offer built-in security features, such as protection against phishing and malware, adding an extra layer of security to your online activities.
- Circumventing Censorship: In some regions, ISPs might use DNS filtering to block access to certain websites. Using a public DNS server can sometimes bypass these restrictions.
By following these simple steps, you can easily change DNS server settings on your Windows computer and potentially experience a faster, more reliable, and secure internet browsing experience.
