
If you’re looking to connect your domain name to your web hosting service, understanding what a name server is becomes essential. You’ve likely encountered the term “nameserver” during this process. So, let’s break down: What Is A Name Server?
Nameservers are fundamental components of the Domain Name System (DNS), often referred to as the “phone book of the Internet.” They act as directories, translating user-friendly website addresses (URLs) into the numerical IP addresses of web servers. This translation is crucial for users to access websites effortlessly.
In this article, we will explore the concept of nameservers in detail. We’ll clarify their function, explain how they operate behind the scenes, and guide you on effectively utilizing them to manage your domain name and other aspects of your online presence.
Unpacking the Concept: What is a Name Server?
Imagine typing a web address, like “rental-server.net,” into your browser. For your computer to display the correct website, there needs to be a system that links this easy-to-remember address with the actual location of the website’s files – the web server. This is where nameservers come into play.
Consider the alternative: memorizing complex IP addresses for every website you visit. Remembering if a site is at 192.168.1.1 or 172.16.0.1 would be virtually impossible for humans. Nameservers simplify this by allowing us to use domain names, which are much more intuitive.
Nameservers themselves are identified by domain names, just like websites. Typically, you’ll find at least two nameservers associated with a website (and often more for redundancy). Here are examples of what nameservers look like:
ns1.example-nameserver.comns2.example-nameserver.net
However, instead of hosting a website, these nameservers serve as direction providers, guiding internet traffic to the correct web servers.
Let’s illustrate the process with a real-world example. When you want to visit the Kinsta homepage, the seemingly simple action of typing “kinsta.com” into your browser triggers a series of steps:
- You enter “kinsta.com” in your browser and press Enter.
- Your browser sends a request to the nameservers associated with “kinsta.com.”
- The nameservers respond with the IP address of the server hosting the Kinsta website.
- Your browser then requests the website content from that specific IP address.
- Finally, your browser receives the content and displays the Kinsta homepage.
This entire process happens in mere seconds, making browsing the internet seamless. If there is an issue with these decentralized naming systems, you might encounter errors like “DNS server not responding,” preventing your browser from translating the domain name into an IP address.
Nameservers in Relation to DNS Records
In the example above, we simplified the process for clarity. A crucial element we omitted is DNS records.
DNS records are the actual data entries that contain vital information, such as the IP address of your web server. Think of them as the detailed instructions for where to find different parts of your website and online services.
Nameservers are responsible for storing and organizing these individual DNS records.
To refine our earlier analogy of DNS being the internet’s phone book:
- Nameservers are the actual physical phone books – the directories themselves.
- DNS records are the individual listings within the phone book – each entry containing specific contact details (in this case, server addresses and instructions).
So, if you want to find someone’s phone number (or a website’s server address), you first consult the phone book (nameserver). Then, you search through the listings (DNS records) to find the precise information you need.
With this understanding, let’s revisit the website visit process with a more complete picture:
- You type “kinsta.com” into your browser and hit enter.
- Your browser uses DNS to locate the nameservers for the “kinsta.com” domain.
- Your browser queries the nameservers for the A record, which holds the web server’s IP address (a specific type of DNS record).
- The nameservers provide the IP address from the A record.
- Your browser requests the website content from that IP address.
- Your browser retrieves the content and renders the webpage.
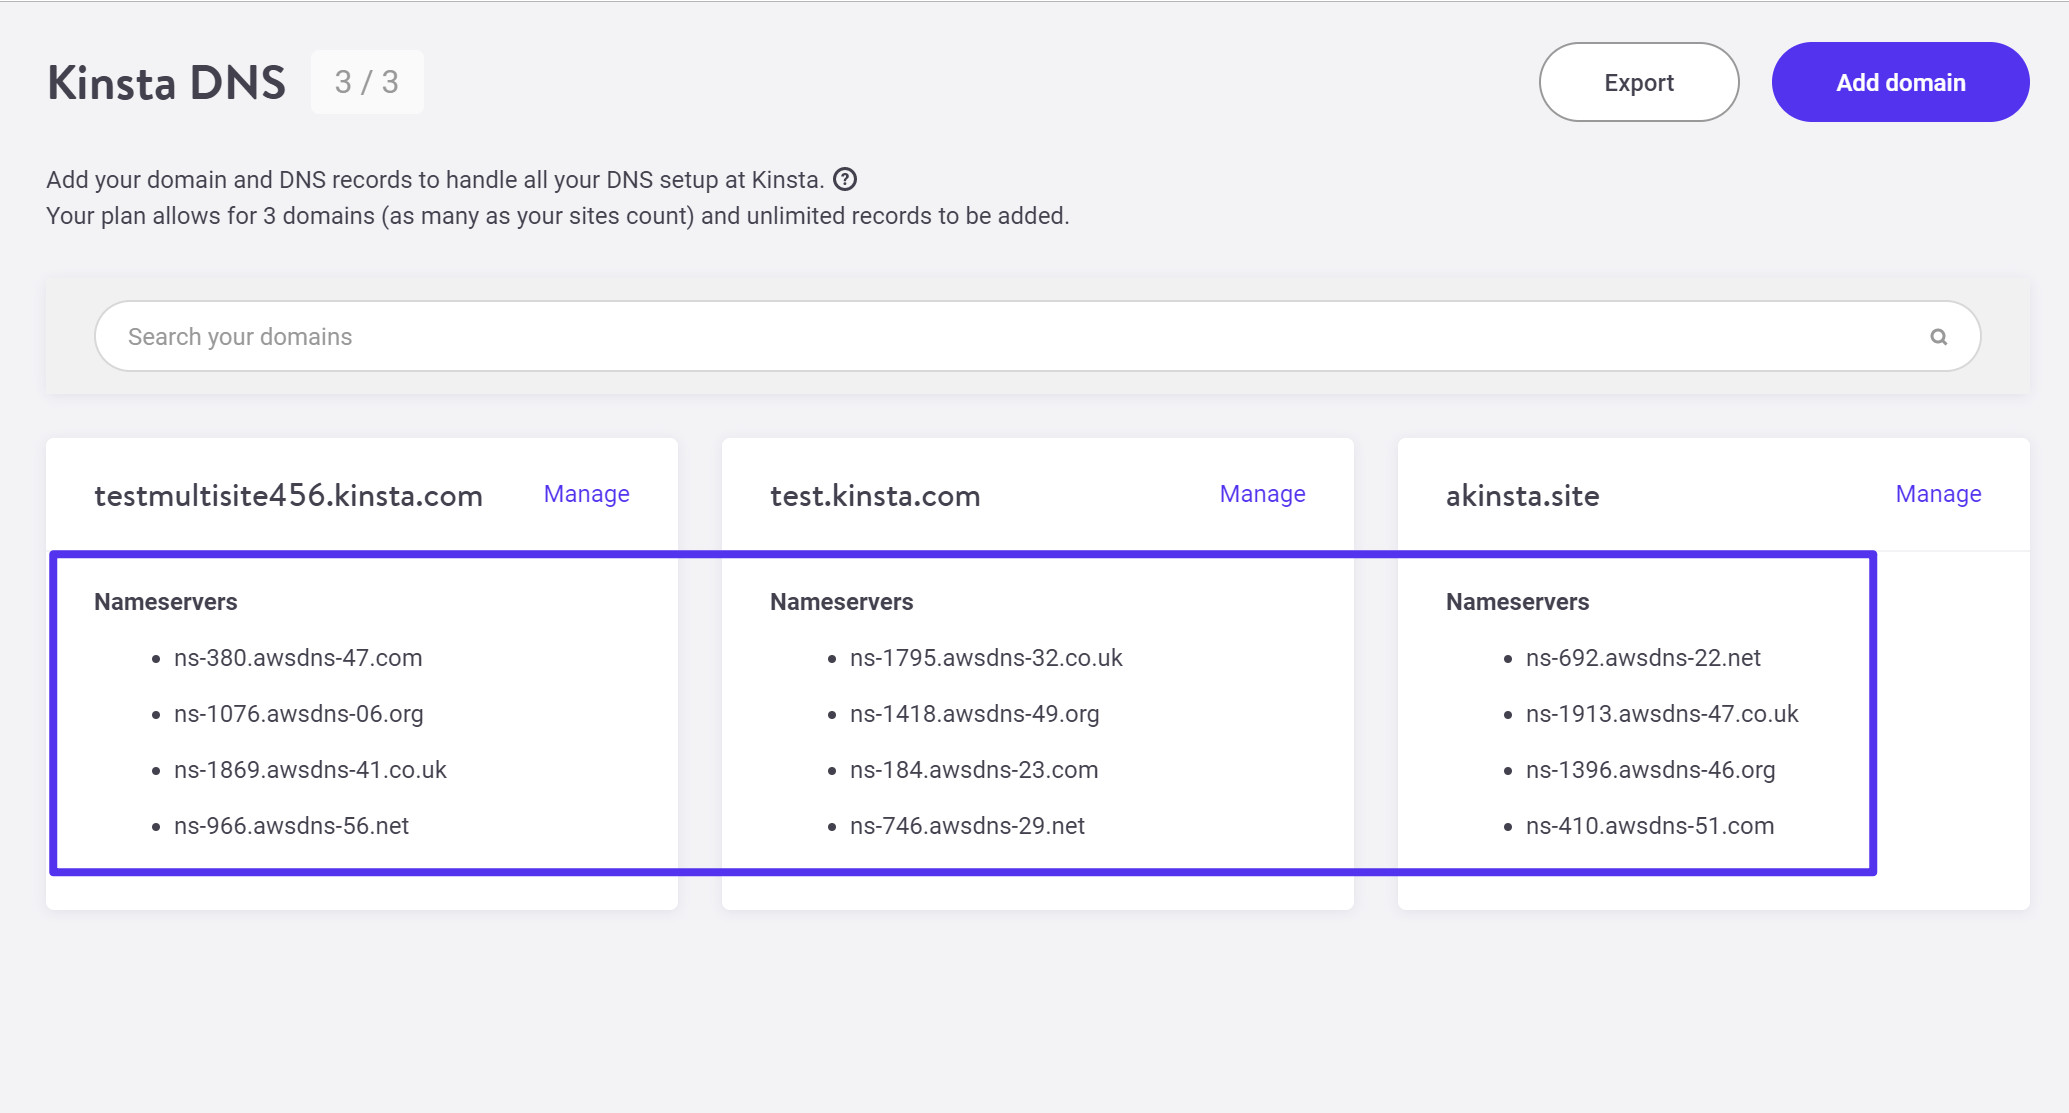 The nameservers in your Kinsta dashboard
Real-World Applications: How to Use Nameservers
In practical scenarios, you’ll primarily interact with nameservers and DNS records when you need to point your domain name to your web hosting provider. This connection ensures that when someone types your domain into their browser, they are directed to your website hosted on your server.
Beyond web hosting, DNS records managed through nameservers are used for various other functions, including:
- Setting up email accounts with MX records: Directing email traffic to your designated email servers.
- Verifying domain ownership with services like Google Search Console: Proving you control the domain for administrative purposes.
- Creating subdomains: Setting up different sections of your website (e.g., blog.yourdomain.com, shop.yourdomain.com) that may be hosted on different servers or services.
Locating Your Domain’s Nameservers
The location of your domain’s nameservers depends on where you initially registered your domain.
When you register a domain name through a domain registrar (like GoDaddy, Namecheap, Google Domains, etc.), it’s usually initially configured to use the registrar’s default nameservers. Your domain registrar’s control panel is also where you can modify your domain’s nameserver settings.
You have the option to keep your domain’s nameservers at your registrar and simply adjust the DNS records to point your domain to your web hosting. This is a viable approach, especially for simple setups.
However, many web hosting providers recommend or even require that you switch your domain’s nameservers to those provided by the hosting company. For instance, at Kinsta, we offer premium nameservers powered by Amazon Route 53 for enhanced reliability and performance. While using Kinsta’s nameservers is recommended for Kinsta users, it’s not mandatory.
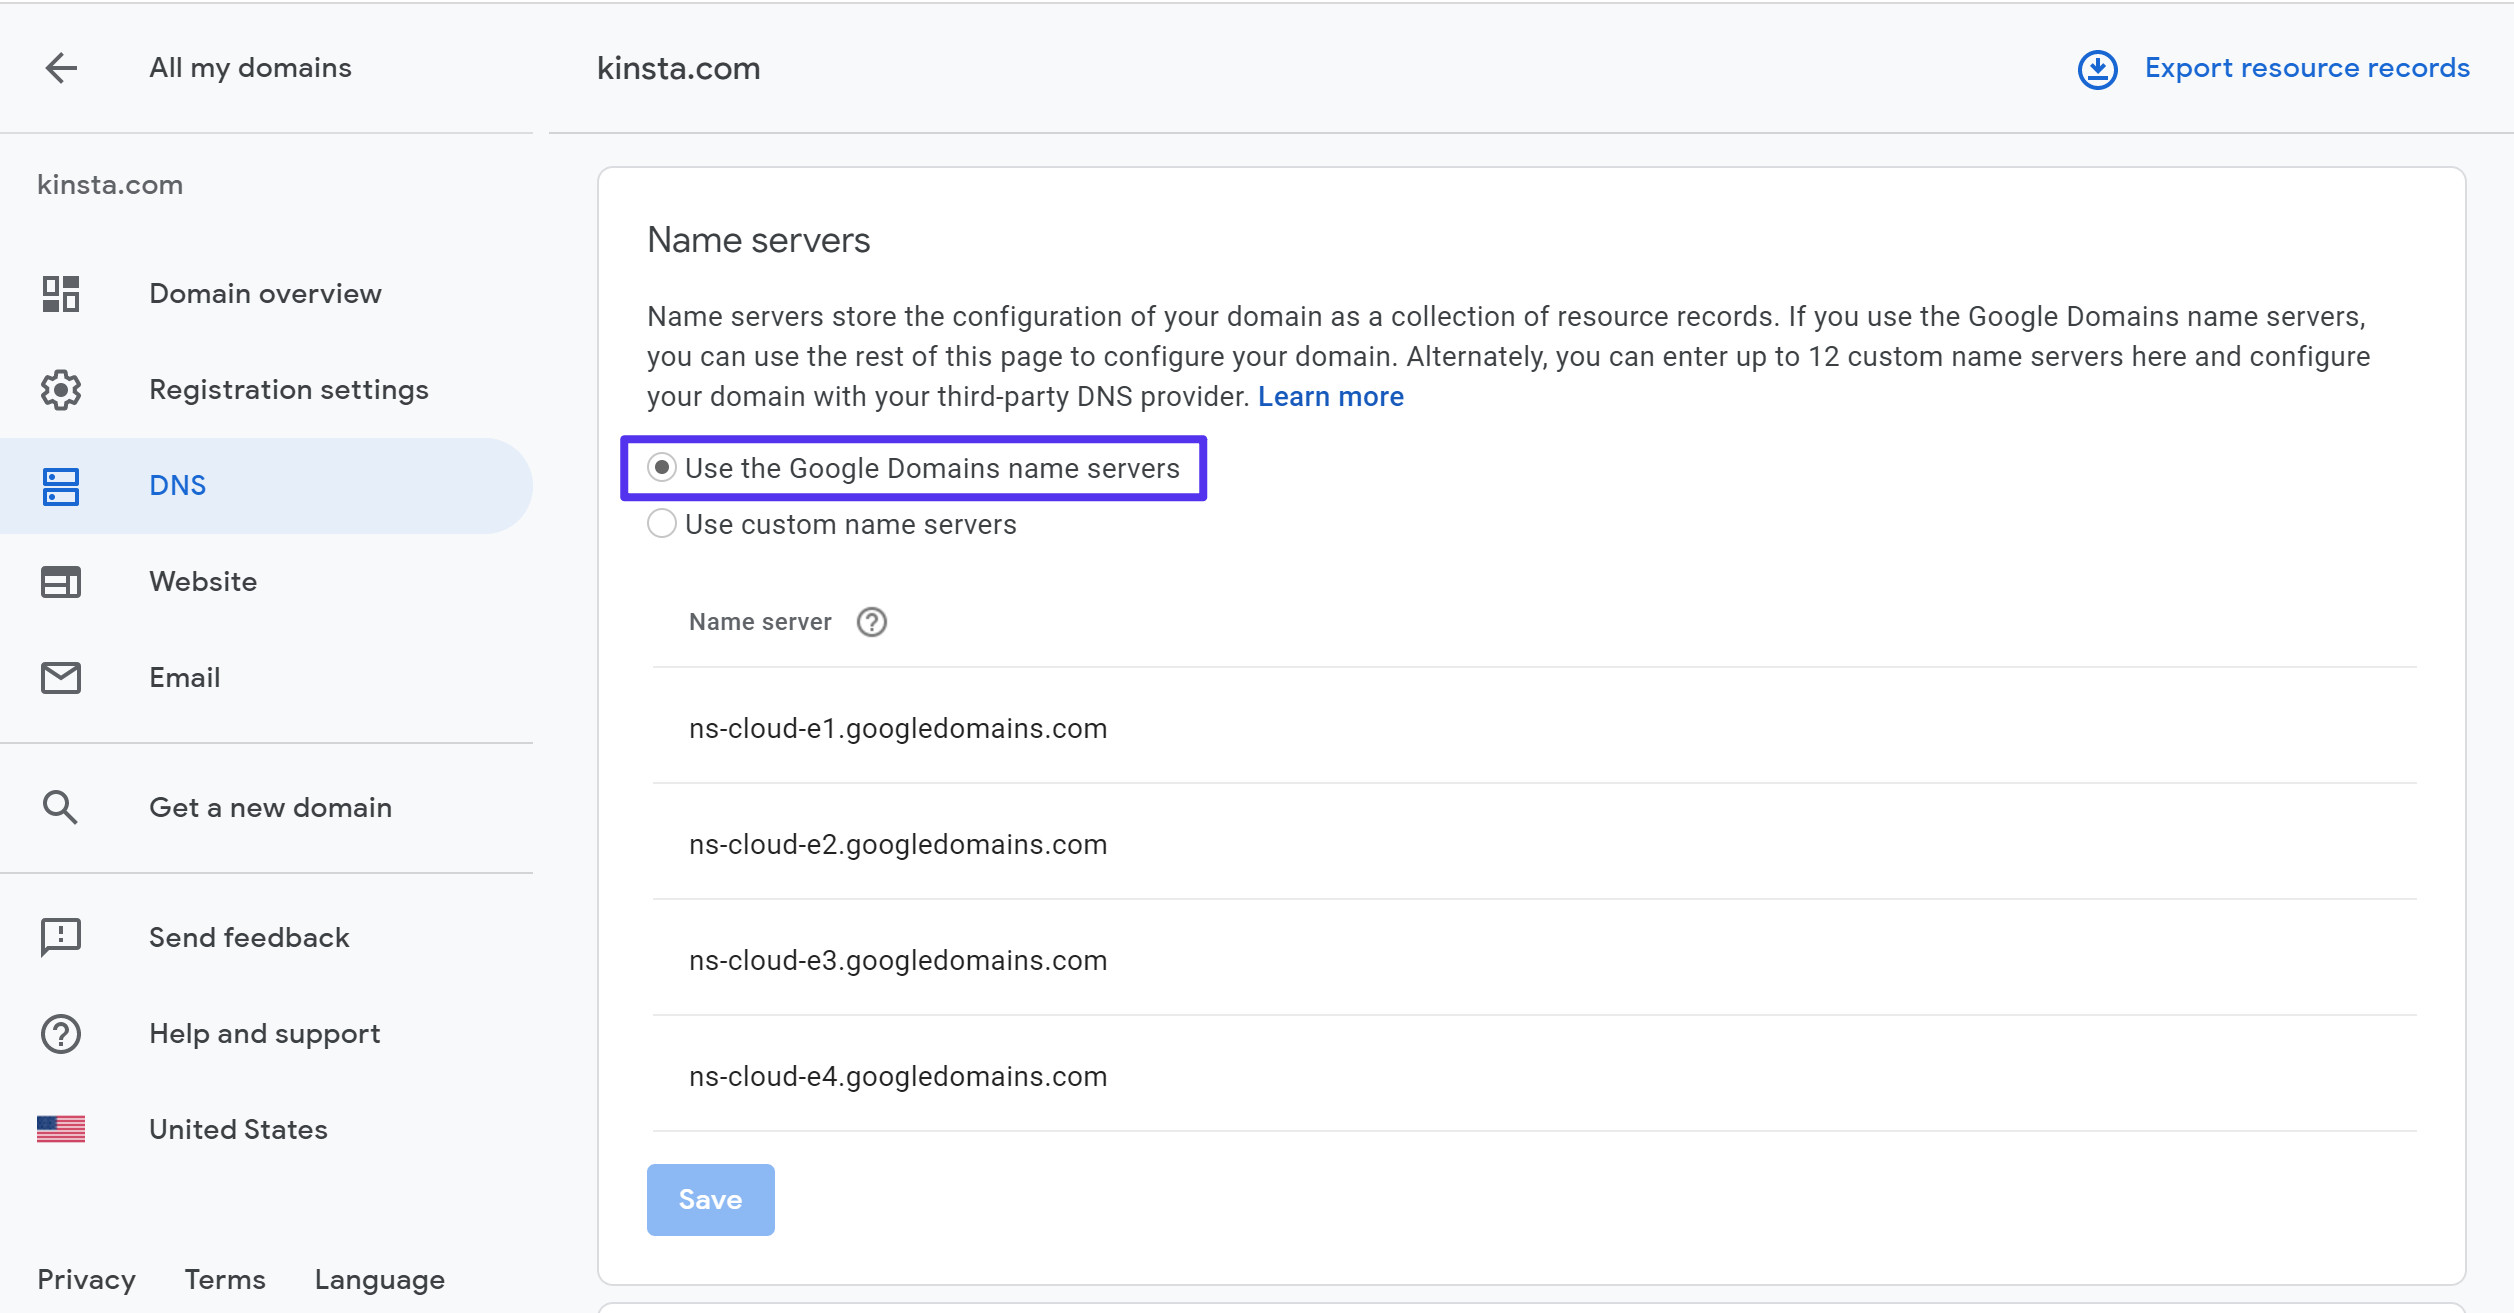 The default nameservers at Google Domains
To change your nameservers, you will need to access the domain management interface provided by your domain registrar.
For example, in Google Domains, you can easily switch from the default Google Domains nameservers to custom nameservers. By selecting the “Use custom name servers” option, you can input the nameservers provided by your hosting provider or a third-party DNS service.
Speaking of third-party options, Cloudflare is a popular example. When you utilize Cloudflare’s services for performance and security, you typically point your domain’s nameservers to Cloudflare’s nameservers instead of your web host or domain registrar.
Nameserver Providers Manage Your DNS Records
A critical point to remember is that when you change your domain’s nameservers away from the default registrar nameservers, you relinquish control of your DNS records to your nameserver provider.
For example, if you switch to Kinsta’s nameservers (powered by Amazon Route 53), you will then manage all your domain’s DNS records through the Kinsta dashboard, not your domain registrar’s control panel.
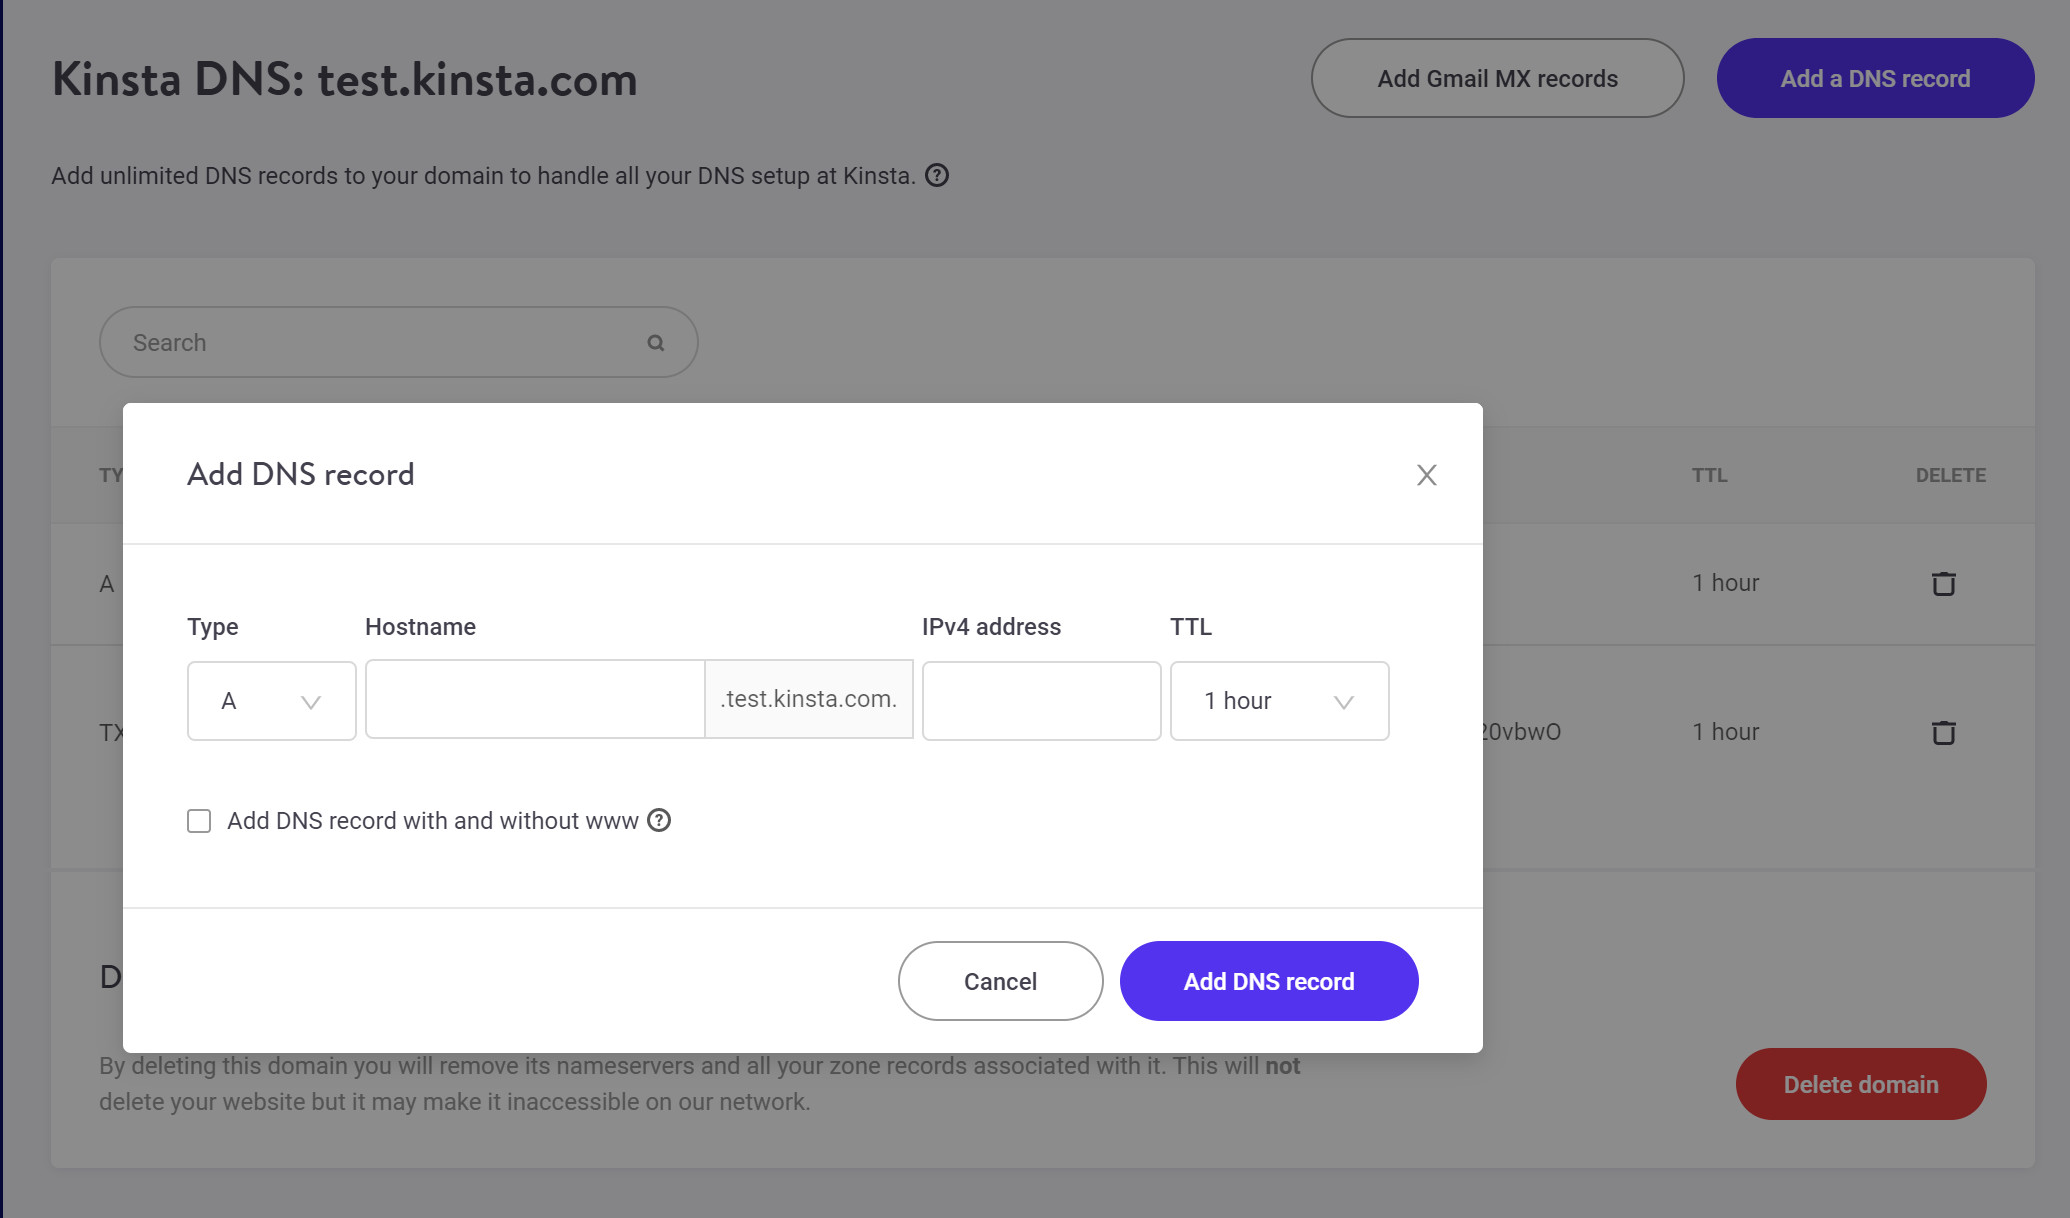 Editing an individual DNS record
Conversely, if you use Cloudflare’s nameservers, you will manage your DNS records through the Cloudflare interface, regardless of where your website is hosted. This centralized DNS management simplifies tasks like updating IP addresses, setting up subdomains, and configuring email routing.
Kinsta’s Nameservers: An Example
If you host your website with Kinsta, you can find your specific nameservers within the Kinsta DNS tab of your MyKinsta dashboard. Kinsta provides premium DNS service via Amazon Route 53, ensuring fast and reliable DNS resolution for your website.
It’s important to reiterate that using Kinsta’s nameservers is optional. You can still point your domain to Kinsta by configuring the A record at your domain registrar’s nameservers, Cloudflare, or any other DNS provider. Kinsta provides detailed tutorials on how to update nameservers and A records at various popular domain registrars to assist you in pointing your domain to Kinsta hosting.
How to Verify Your Website’s Current Nameservers
If you are unsure which nameservers are currently active for your domain, several online tools can help you check. WHOIS lookup tools are a common method. Websites like Whois.com allow you to enter your domain name and retrieve domain information, including the currently configured nameservers.
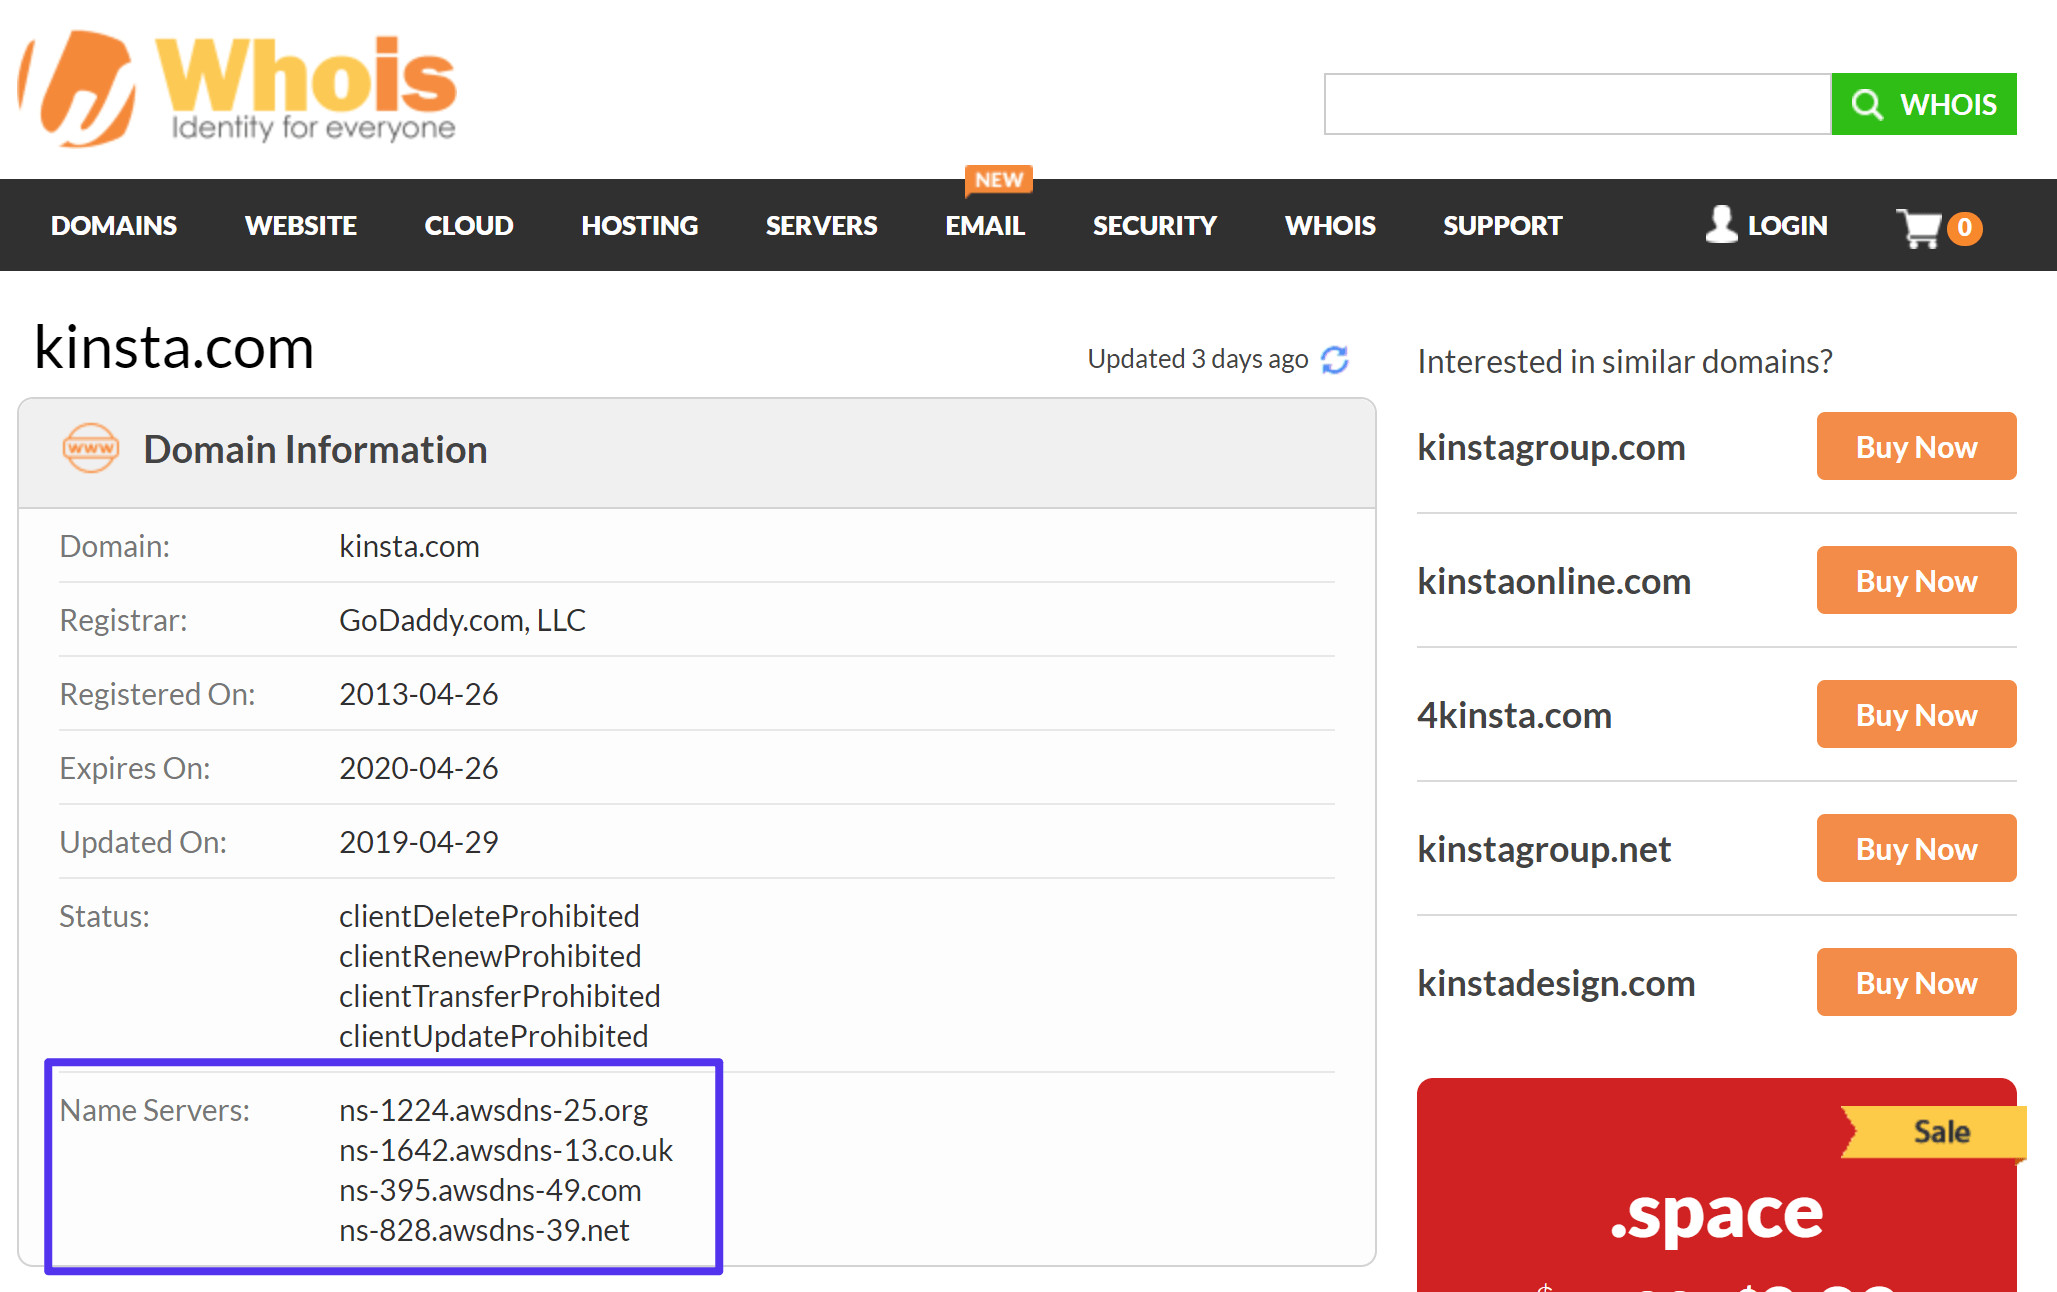 How to check what nameservers you
Alternatively, you can use command-line tools on your computer to check nameservers.
On Windows:
- Open PowerShell (search for “PowerShell” in the Start Menu).
- Type
nslookupand press Enter. - Type
set q=NSand press Enter. - Enter your domain name and press Enter again.
The results will display the nameservers for your domain.
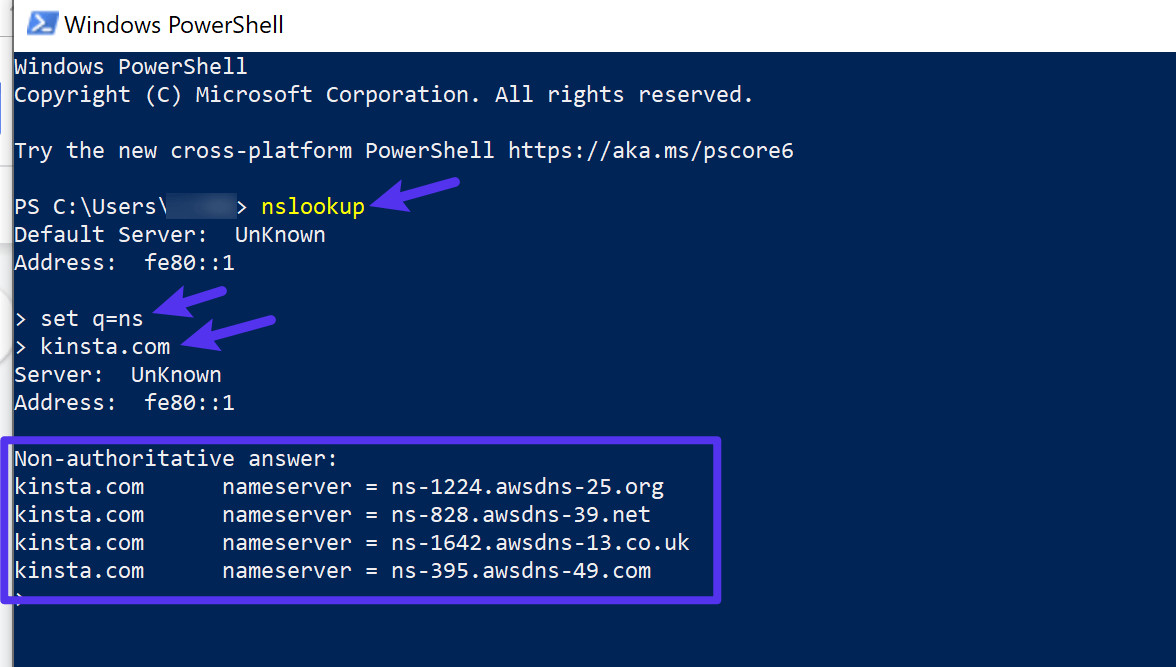 How to check nameservers using Windows PowerShell
On macOS or Linux:
- Open Terminal (search for “Terminal” in Spotlight on macOS).
- Run the command:
host -t NS yourdomain.com(replace “yourdomain.com” with your actual domain).
This command will also output the nameservers associated with your domain.
In Summary
Nameservers are indispensable for internet navigation. They bridge the gap between user-friendly domain names and the server IP addresses that host website content. By managing DNS records, nameservers ensure that web browsers and other online services can locate your website and related services efficiently.
You can manage your domain’s nameservers through your domain registrar. However, switching to nameservers provided by your hosting provider or a third-party DNS service like Cloudflare grants you DNS record management control at that respective provider’s interface.
If you intend to use Kinsta’s premium nameservers for your hosting with Kinsta, you can find detailed instructions in this helpful guide. Understanding and managing nameservers is a fundamental aspect of website ownership and online presence management.